Without reference to any specific post in this thread, I would caution that the terms ICC color profile and similar have sometimes been used ambiguously. This further confuses an already confusing topic. Metadata can contain an actual embedded ICC color profile and/or various color tags. They are not the same thing and will be interpreted (or ignored) differently by different programs. Elle Stone has provided a nice overview of the matter. The article is a bit old but never more relevant.
1 Like
Thanks for the info. It is very interesting. Color Management in for example the Windows-environment has developed with “structural growth” over many years and software companies have many times had to come up with their own proprietary solutions to cope with the the present state ofcthe Windows environment and it’s earlier lack of support we have today for color management.
The link test states that “every image editor has some settings…” but concerning Photolab that’s not really true. Photolab does a few things behind the curtain where you both don 't see at all what it is doing and it gives you no possibilities at all to change the settings like you can in my printerdriver in Windows with Windows Image Color Management (ICM) or in a viewer like XnView.
The effects of that when letting Photolab manage color management can be very confusing as I already have described above. In Photolab I couldn’t before todays reconfiguring of my monitor make the Print-function of the application print either a P3 or Prophoto image normally because I couldn’t set my monitor in P3 or Prophoto mode. Today I configured my Benq-monotor with a third calibration for P3 so now I think I at least print even P3 without letting the printerdriver manage color management through Windows ICM but for ProPhoto even that is imposdible without ICM.
In my own workflows with my own images I save my JPEG-files from Photolab and I have verified they are saved with Adobe RGB, sRGB and P3. The only colorspace that was slightly different in EXIF Tools was Prophoto and I wondered if that was because Photolab is working internally with a smaller gamut than ProPhoto. Wide Gamut covers sRGB, Adobe aRGB and P3 but not ProPhoto so I wonder what rwally gappens when ProPhoto is exported from Photolab.
In general, with printing you can
.
-
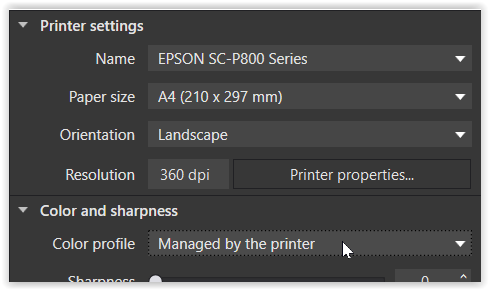
let the → printer (driver) do the colour management
-
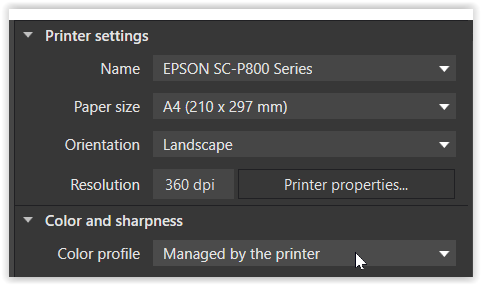
let the application (e.g. → Photolab) take care for the colour management
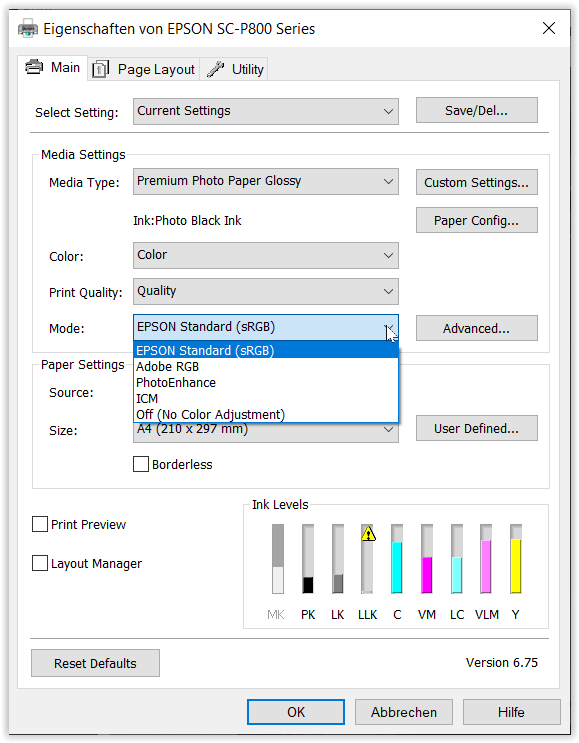
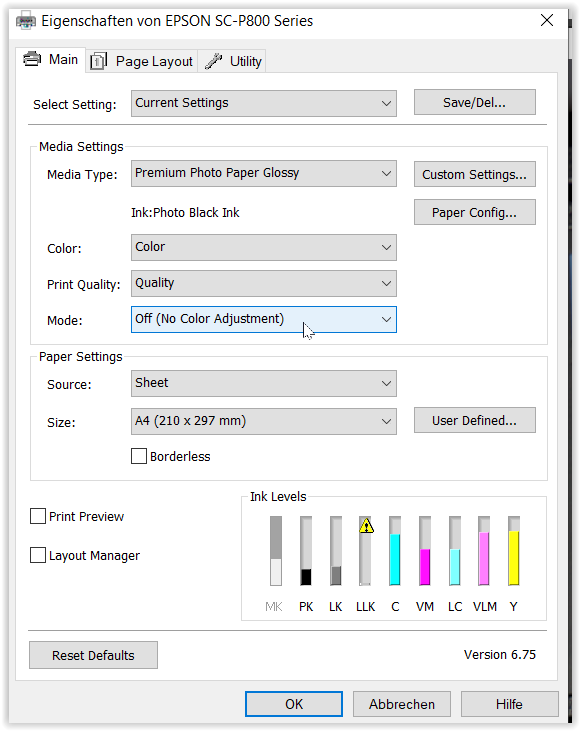
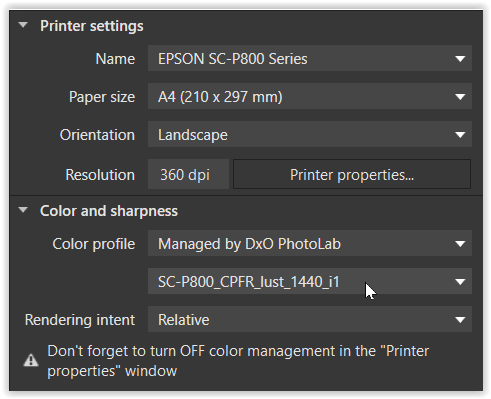
- This printer driver allows you to choose from
sRGB, AdobeRGB or → ICM
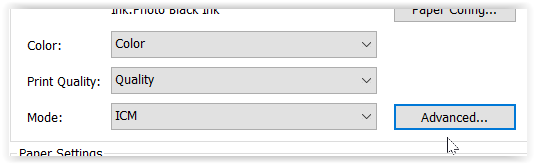
where you then have to choose
a) the pic’s “Input profile” … e.g. ProPhoto
b) the “Printer profile” … which is the Paper profile

much easier & far less error prone
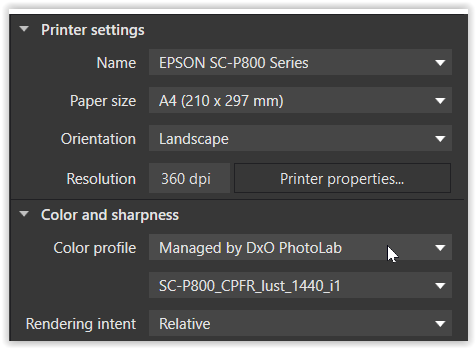
- The application takes care for the correct colour management,
– in other words –
Photolab recognizes the pic’s colour profile … e.g. ProPhoto
.
and all you do is to point the printer (driver) to use the appropriate Paper profile

shown here with a → custom paper profile
.
and as usual in the printer driver you choose the paper, print size etc.
some more notes
-
While usually I don’t print from Photolab (for other reasons),
in the other app I do the very same thing. -
Epson Print Layout (EPL) acts quite similar to PL’s print module, but
a) there is no softproof & the same as the printer driver → the “preview” appears as sRGB
a) EPL offers kind of softproof*), ‘mirroring’ the different (Epson)papers
b) EPL offers an ABW module -
as initially ‘demonstrated’ by the OP
.
viewers work/react differently
[ some can be set to correctly interpret the (embedded?) colour profile
AND
to recognize the monitor profile without requiring manual input ]
.
→ the viewer / app is responsible for the correct colour management
including the presentation on screen
Wolfgang
*) rechecked after updating to EPL 1.5.8
@All My apologies for no responses yesterday it was a busy day at my son’s new house in West Wickham and we didn’t get home until 00:30 this morning!
@stuck My “guess” would be that DxPL “Assigns” a colour profile during export given how easy it is for other software to revert to the appearance of the sRGB image.
My concern is that the “confusion” of the differing colours, which was determined by preference settings in other software does not appear in DxPL which simply seems to continue to use the sRGB profile of the original image even though it had assigned the colour profiles to the exports at my request!?
@Stenis I had done a similar test to yours, assigning a different colour profile to the same image, containing tulips in my case, i.e. shown in here in XnViewMP

So I believe (guess) that DxPL creates an embedded thumbnail using the assigned profile which is typically “seen” by all the software I have looked at, before being changed by the software generating a “replacement” for display where is considers it appropriate, i.e. based upon the settings I have identified, where such settings exist.
I can find no such settings in DxPL? So my display of the images in DxPL are
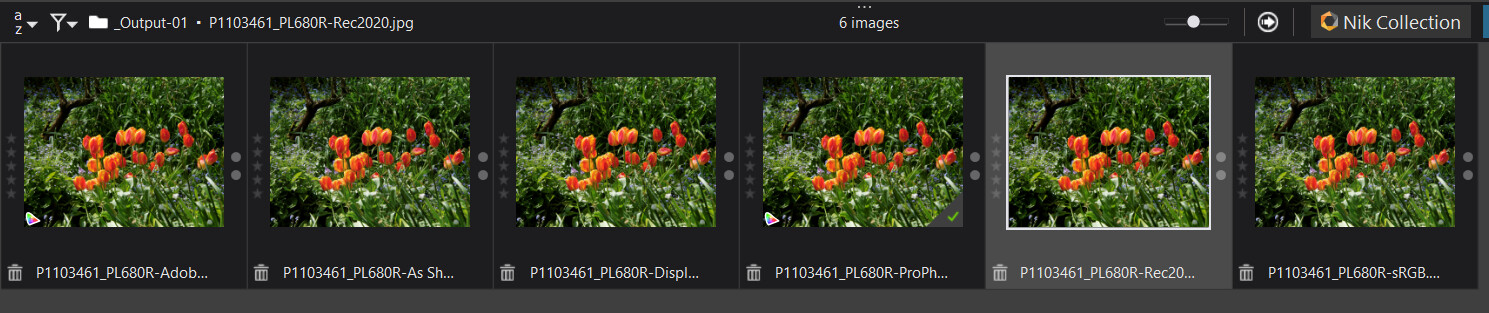
But as I indicated above DxPL does show the “assigned” profile here

but it doesn’t seem to do anything with it but will re-export it to another application
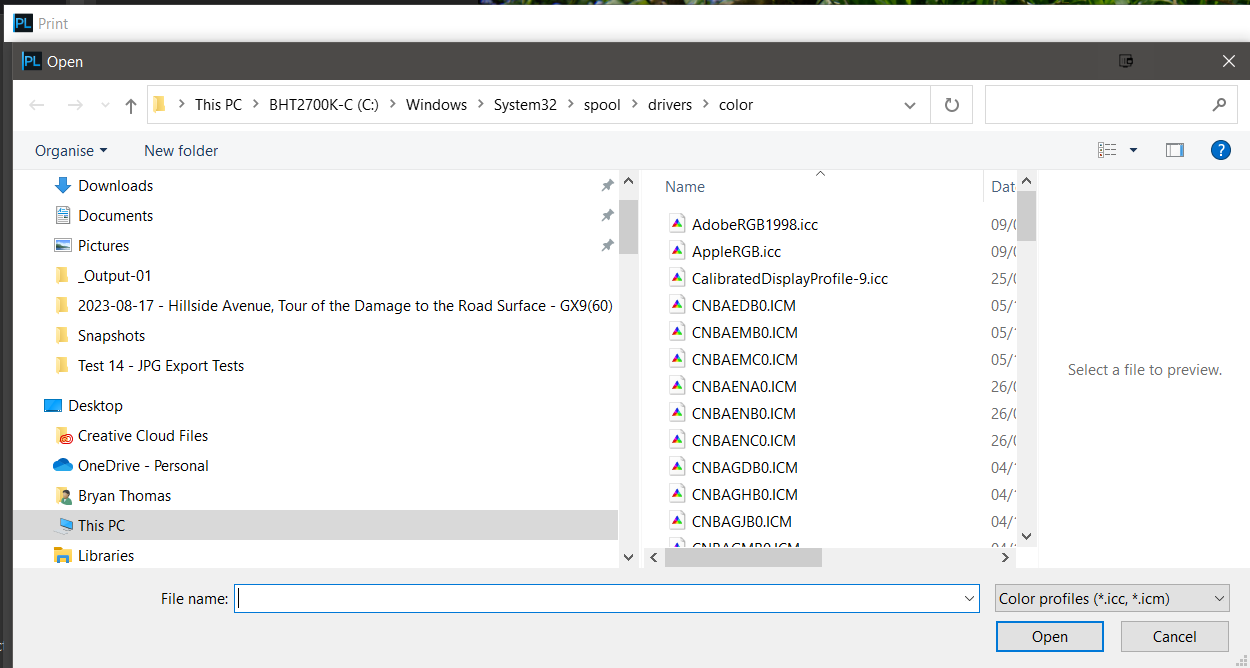
@Wolfgang on an image exported as ProPhoto in DxPL and recognised as such in the only way that DxPL does (shown in the snapshot above) when I select ‘Managed by DxO PhotoLab’ it immediately opens up this window from me to select a ‘Color profile’, I have never used the ‘Print’ facility in DxPL before!
i.e.

Once I had selected ProPhotoRGB then that option persisted and printing to pdf produced the same result as in XnviewMP except XnViewMP took the assigned colour profile and used that in the print command but without any intervention by me to select the printer colour profile.
So I also tried ‘Managed by the printer’ in DxPL and got the same result as from XnViewMP automatically!
No, PL will convert the image from its working colour space into that of the profile you specify at the point of export. Other applications then read the profile in the image and either display it ‘as is’ or convert it to whatever that application is using.
1 Like
@BHAYT
you either have not read or understood the difference between Assign and Convert
- to transfer a file’s colour profile into another – you convert
- to “label” a file without colour profile – you assign (guessing which is the right one) …
I can find no such settings in DxPL? So my display of the images in DxPL are
… because Photolab takes care of that – as explained in #2.
on an image exported as ProPhoto in DxPL and recognised as such in the only way that DxPL does (shown in the snapshot above) when I select ‘Managed by DxO PhotoLab’ it immediately opens up this window from me to select a ‘Color profile’, I have never used the ‘Print’ facility in DxPL before!
… which is why you have to → Import ICC profile …
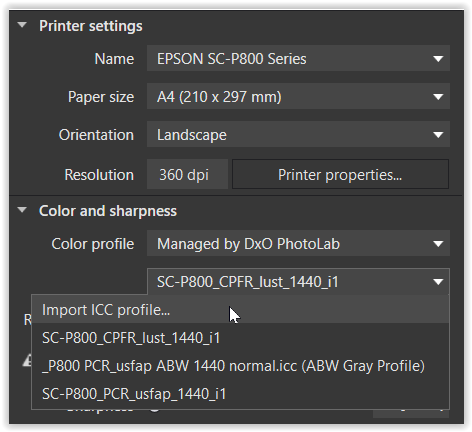
and as shown / explained in #2. you see a → custom paper profile,
.
a) choosing any profile does not act as softproof
b) the warning reminds you to put CMM off in the printer driver
→ to avoid colour nonsense by double profiling
Once I had selected ProPhotoRGB then that option persisted and printing to pdf produced the same result as in XnviewMP except XnViewMP took the assigned colour profile and used that in the print command but without any intervention by me to select the printer colour profile.
So I also tried ‘Managed by the printer’ in DxPL and got the same result as from XnViewMP automatically!
My explaination is about printing on paper, not print to pdf. – But I guess, you have to set up the PDF presenter similar to a photo viewer to avoid the pic to appear strange.
To help you further, read these three tutorials in this order:
https://www.cambridgeincolour.com/tutorials/color-management1.htm
https://www.cambridgeincolour.com/tutorials/color-spaces.htm
https://www.cambridgeincolour.com/tutorials/color-space-conversion.htm
1 Like
Wolfgang has responded with lots of great information that should prove useful to you. For various reasons, most forum members seem to avoid the current DxO PL print module altogether in favor of Qimage, Canon or Epson software, LRc, etc. Joanna has described an IOS printing workflow which seems both simple and effective. I’ve been using Epson Print Layout for my modest printing needs moving to LRc only if a special layout is required. I’ll switch to Qimage if my printing needs change.
I know you are keen to sort this out yourself. May I offer a suggestion for improving your testing? Use known printing test files such as those provided by Andrew Rodney (Digital Dog) and others.
http://www.digitaldog.net/index.html
These files contain actual embedded ICC color profiles for sRGB, aRGB, and ProPhoto. The TIFF files provided by Rodney do have some compression and before testing should be first exported from DxO PL as 16-bit full size TIFF files with no editing applied. Print the test files from DxO PL, again with no editing applied. Compare your prints to the images on your display (set to the appropriate color space). I think you will get accurate outputs from DxO PL with these test images, but if you can’t, time to look elsewhere.
If you will be routinely printing directly from DxO PL, I also suggest the extra step of first exporting 16-bit full size TIFF files with actual embedded ICC color profiles, not tags, and bringing those files back into DxO PL (e.g., export to original folder). Print those files directly from DxO PL. Delete the intermediary TIFFs after use to save space. In my workflow I will often use NIK Sharpener Pro which also uses a TIFF intermediate for print sharpening, thus killing two birds with one stone.
1 Like
Yes – always use proven test images to exclude mistakes one might have made oneself.
another good source
→ https://www.northlight-images.co.uk/photography-articles-and-reviews/printing-paper-reviews-articles/
→ https://www.northlight-images.co.uk/printer-test-images/
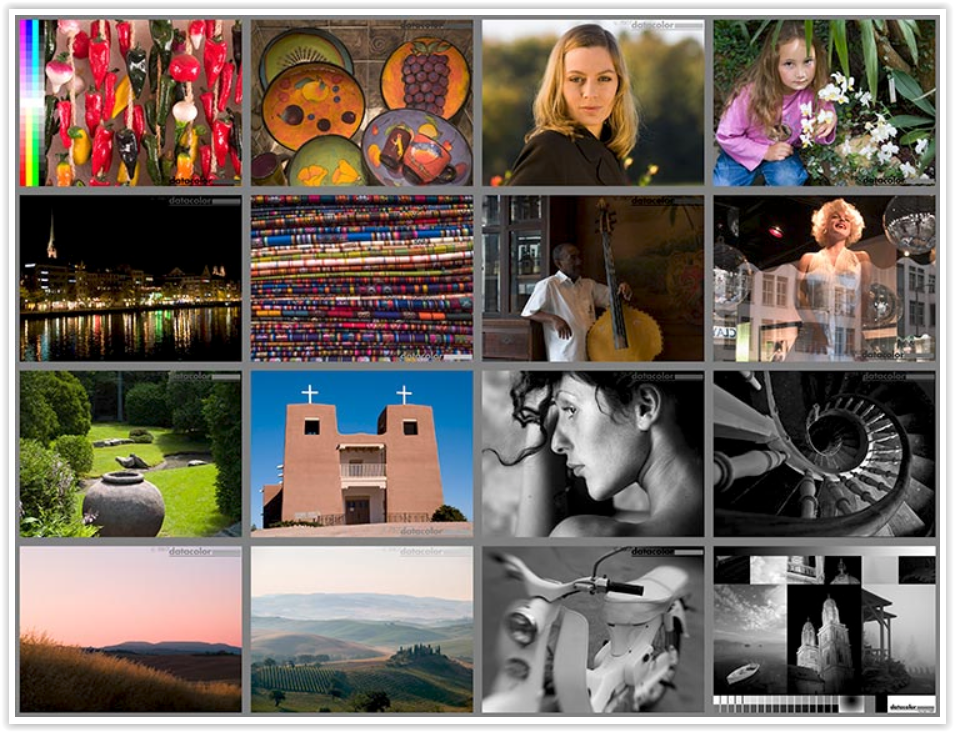
Ever since I’m using this Datacolor printer test image (AdobeRGB)
as it contains various scenes from real life plus you get detailed information what to look for.
→ https://www.northlight-images.co.uk/downloadable_2/matrixlarge_2.zip
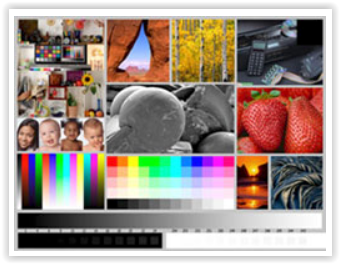
Outback print image (ProPhoto)
which also contains artificial colours
→ http://jirvana.outbackphoto.com/printer_tests/PrinterEvaluationImage_V002.zip
Riwo.dot Colortest I + II (ProPhoto)


→ http://www.riwodot.de/colormanagement_en.html
and for B&W
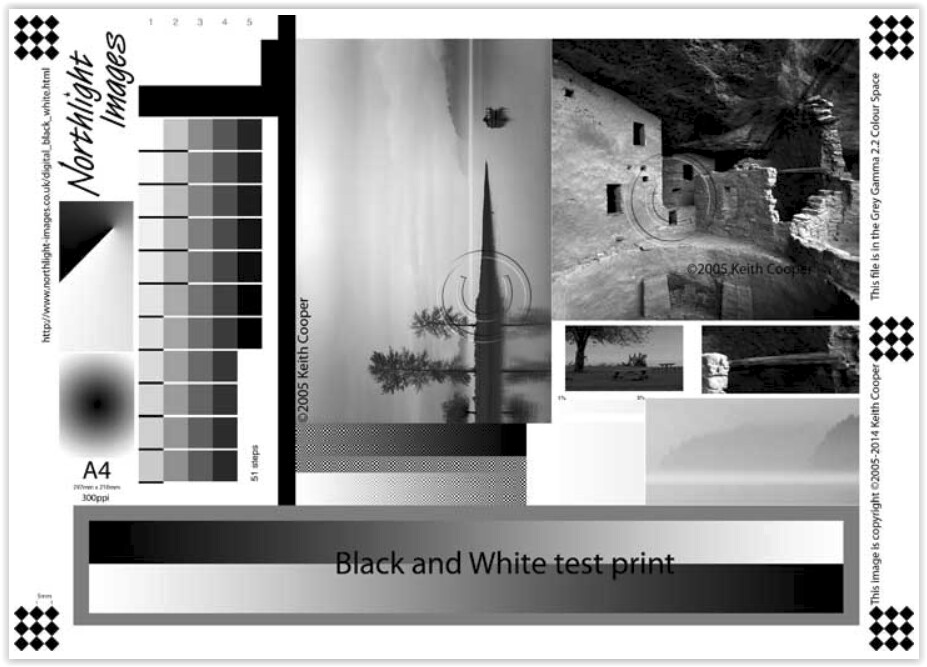
→ https://www.northlight-images.co.uk/test-image-for-black-and-white-printing/
I will do a few more tests and have special testimages too. The reason I used the ones I have used is because I saw what I saw when printing but besides that I think my Bogainville-images are very good indicators because the blue variations in the red makes the differences the ICC-profiles cause very easy to spot.
I don´t see the dialogs Wolfgang see in my Windows 11 where he gets a popup window where he can pick the settings he wants. In Windows and PL for Windows the application seem to print all my four testfiles with the gamut that happens been selected when I choose one of the three calibrations I now have tied to the three programmable buttons on the Benq monitors “Quick Button Puck”.
The only way for me to actually get prints reflecting the embedded ICC-profile is to turn off “Managed by DXO” in the printing Module and turn on ICM in the Epson P900-driver.
In my world Epson Print Layout IS NOT at all behaving like the Print-module in Photolab when Photolab manages the “Color Profile” in Photolab. It is “Managed by Printer” + ICM that gives a result that matches what i see both in XnView and EPL. If I print with “Managed by DXO Photolab” I get four images that looks identical to me and that was the reason I got so confused in the first place.
In fact I think my Bogainville-images are very good indicators because the blue variations in the red makes the differences very easy to spot.
Even in EPL you can choose between letting EPL automatically handle the profiles (Printer Manages Colorr) Here your options are “Auto Select” (which does what ICM does automatically with the profiles) or you can select Adobe RGB or sRGB. So there is no options for P3 or ProPhoto here so in that case you have to rely on “Auto Select”.
I also looked in Capture One with the same images and even there they look identical after import but varies as a change monitor settings and gamut between sRGB, Adobe RGB and P3. All images have the same look whatever I select despite the whole set get a slightly different tone depending on the selected gamut
If I select P3 as monitor setting and then open all the different images one by one in the Print-module of CO they will all be displayed in P3 regardless of which ICC it has embedded. I haven´t printed them but expect them all will come at in P3 as they would have done in Photolab too.
That might be perfectly fine as long as you really print P3-files if your monitor is set in P3 but as you might understand this system peculiarities both in CO and PL (and probably even in Lightroom) might fool us if we expect to get a ProPhoto-file printed when having the monitor set in sRGB, Adobe RGB or P3. I have no answer to why these Print-modules work as they do but it might be because we have lived so long with the fact that people until now have stuck to either sRGB or Adobe RGB when printing but that age might come to an end now and things might ger more complicated in the times to come.
That´s why it is important from now on to get smart and effective tools to check and control what ICC-profiles there are embedded in the files we print or abandon the standard Print-procedure where the applications control the color- and profile management. I will see where I land but I might start to use “Managed by Pfrinter” and ICM instead, because that seems really to solve this problem from what I have seen and Epson Photo Layout is also another way to go that seems to work and that appliacation also already have a smart way of checking the embedded profiles in the files - just a quick mouse over is all it takes.
I have now verified that the selected monitor setting overrules the embedded profile in the files.
If I for example have the monitor set to use P3 and then prints an sRGB-file and a P3-file they will both come out in P3.
I think I will continue to print in PL with the Print-module set to “Managed by DXO Photolab” but be very careful with what files I really print. I might also print in P3 instead of Adobe RGB but I have to do some more testing with Canson Etching Rag paper too and some proper test images too before I decide and when I do that I wont lokk back.
I have taken my own advice and printed out the three Andrew Rodney test files once using Epson Print Layout (EPL) and a second time directly from DxO PL6e (PL6e) using the Managed by DxO PhotoLab settings with no printer color adjustment applied (Epson ET-8550).
I verified that the sRGB, aRGB, and ProPhoto actual ICC color profiles were embedded in these files using ExifTool. The Rodney ProPhoto test file contains the old Kodak ProPhoto RGB profile. PL6e (but not EPL) balked at printing this file. I then saved this file to disk within DxO PL6e embedding the “ProPhoto” profile at export which reported as Adobe ROM RGB: ISO 22028-2: 2013 in ExifTool. My display was set to sRGB for the sRGB prints and aRGB for the aRGB and ProPhoto prints, both at 80 cd/m2.
The EPL prints matched the PL6e prints in every way. No discernable differences in color. I conclude that PL6e Managed by DXO PhotoLab module can indeed recognize embedded actual ICC color profiles and produce accurate prints.
2 Likes
@stuck The file sizes are certainly different and I should have checked that before making my “guess”

But my concern is why should the conversion back to sRGB, for example, be indistinguishable from the original sRGB (if it actually is!). In fact image comparisons seem to show that they are not pixel “identical” although they appear to look that way!
@Wolfgang I did read but was “concerned” by the fact that the various packages were converting back to sRGB so easily that no such conversion was actually taking place, i.e. valid (perhaps) observation but wrong conclusion!
My point was that DxPL provides no option to display the images with the profile that it has assigned, sorry converted, the images to! Other packages provide options to convert to sRGB or use the “new” profile but DxPL converts to sRGB automatically, as does FastRawViewer but at least you get to see the thumbnails “correctly” displayed with FSIV, and DxPL only provides the tiny reference to show what the profile actually is, and that is only visible in ‘Customize’ if the ‘Metadata’ Palette is active.
But I don’t, which was the point I was making, as you had shown in a previous post, so
- DxPL gives no options and no warnings that it is converting the images to sRGB
- The very first time I select to ‘Print’ I am now offered the option as to which profile to use, i.e. it has a profile assigned, it has converted to sRGB and now the decision is left to me to choose the profile to use for printing, useful but should it really be necessary!
- In fact it is not necessary which was the point that I was making and you had shown earlier
- As happened many years ago I discovered that each piece of software I used handled defaults and options in opposite ways.
- In this particular case if I want the embedded ICC profile to be used I need to do nothing.
and very useful that warning was because I checked and it gave me the clue that not going down that path might give me the results I “wanted”!
Printing to pdf should give the same results as printing to paper unless the pdf drivers suddenly start adding their own profiles. Printing to paper introduces the issue, in a topic like this, of showing the similarity or otherwise of the “finished” (printed) product to other topic participants!
I have been here before @Wolfgang many years ago but not with DxPL and amassed a collection of such images.

I am not sure that they really helped me setting up my cheap but reasonable printer (a Canon 4000 or 4500) with refillable cartridges and my own bottles of ink purchased from a reputable supplier at considerable expense!
But when that printer failed with a broken paper feed mechanism its replacement was simply nowhere near as good and printing is now restricted to documents and Birthday and Christmas cards.
I did buy the version of VueScan that can be used for calibrating printers and scanners but have actually not bothered to do that!
Indeed my current project is to start turning old physical photos into digitised images so that our sons and their families can complain about having all these images on disk instead of boxes and boxes of old “decaying” physical photos!
@Stenis They are but so are my Tulips (not actually mine they were at Highdown Gardens).
@eriepa thank you for confirming that.
I started down this path not because I want to print images but because I made an “accidental” setting and wanted to understand the outcome!
Trying to get images that looked in print the same as they did on screen was … but I was working with a £100 printer not one costing £1,000 +!
That’s how it should be.
A properly set up colour management (application & viewer included) recognizes the (embedded) input profile and shows all pics accordingly on the screen.
Printing out pics with different input profiles is also no problem, while the mentioned paper profiles take care to neutralize (some) differences between the different paper types so that the colour rendition appears about the same.
BTW
I’ve updated EPL now to version 1.5.8 and rechecked …
Choosing different (Epson) papers shows kind of, what to expect from the paper types.
.
In “Auto selection” the appropriate paper profile gets preselected for those branded papers.
Would you be kind enough to provide us access to the 4 files you have been using for your testing? Your workaround via display profiles is really quite clever, but surely not what DxO had in mind! None of our setups are exactly the same and sometimes that diversity can provide a clue to understanding. Thanks for considering.
As long the pic does not contain out-of-gamut colours, all 4 images should look the same, independently how they are saved. That is, the application (Photolab) recognizes the (embedded) pic’s profile and sends the pic to the printer.
Even in EPL you can choose between letting EPL automatically handle the profiles (Printer Manages Colorr) Here your options are “Auto Select” (which does what ICM does automatically with the profiles) or you can select Adobe RGB or sRGB. So there is no options for P3 or ProPhoto here so in that case you have to rely on “Auto Select”.
This “Auto Select” function in Epson Print Layout (EPL) is implemented for ease of use.

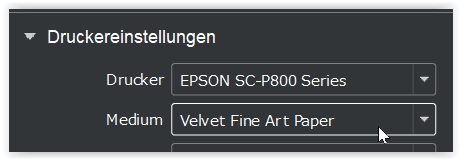
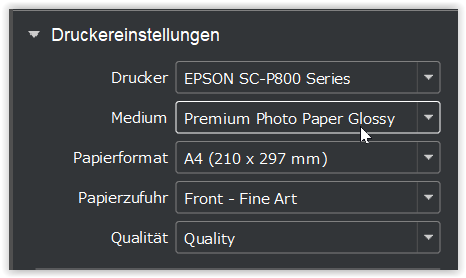
In EPL when you choose a certain Epson paper,
→ Premium Photo Glossy Paper
and you had chosen to let this application / EPL taking care for colour management (CM)
→ “ICC-Profil verwenden”
the generic paper profile for this branded paper gets automatically preselected
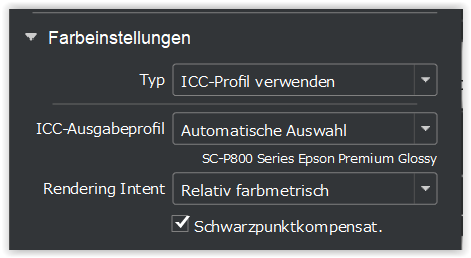
( the setting for “Rendering Intent” is sticky / kept from last time )
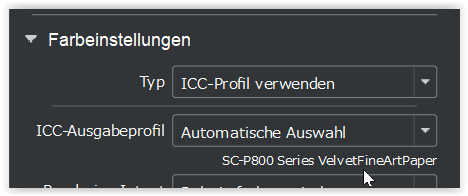
Using a third party paper (e.g. Tecco PCR 310)
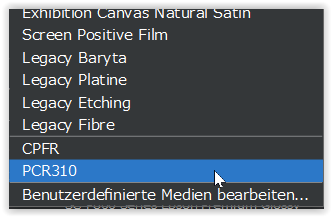
I chose the appropriate (my custom) paper profile from the list,
which I had saved …
to then appear as …

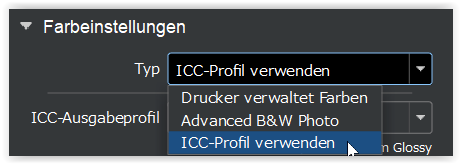
When you decide to let the printer take care for CM
→ “Drucker verwaltet Farben”
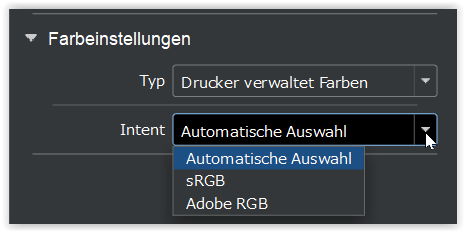
you continue to select the paper profile from within the printer driver.
please note
I don’t know, why EPL then shows “Intent Auto select” and also offering the choice of sRGB & ARGB.
.
Maybe it is connected to Epson’s Media Installer, which I think was introduced around the time of the P700/900 printers. When it is the same automatism as before to automatically choose the generic paper profile now in your printer driver, that would be great, but the choice of sRGB and ARGB does not make sense to me. … Also, I’m using Win 10 / Epson P800 and not Epson’s Media Installer.
Searching for better information … please look for
- your printer manual, which contains a chapter about EPL
- Printing with Epson Print Layout
- https://www.youtube.com/watch?v=js_sy9tXJ1k&t=1582s
( I have not watched that video in detail, but the presenter seems to explain so … )
Now, in Photolab’s print module … you either
let PL take care for the CM and you have to choose the appropriate paper profile
→ shown here w/ custom paper profile
OR
let the printer driver do the CM … and set up as explained
something general
It doesn’t matter, if you print a pic with a sRGB profile or one with a wider gamut (AdobeRGB, P3, Prophoto) on your P900.
IF the image contains colours beyond AdobeRGB, for example, and you have saved it as “Prophoto”, print it on good quality paper (e.g. glossy / baryta paper), regardless wether your monitor does or does not display the extended colour space due to a limitation (or calibration to sRGB, P3, Adobe RGB …).
→ The monitor property / profile determines what is visible, but it doesn’t “kinda” convert the image.
The “sacrifice” / hurdle for users with a monitor limitation …
Attempting to edit and export an image in a larger colour space than the monitor can display, can prove to be “flying blind” when a printer’s output (like from this Epson P900) is displaying those saturated colours. *)
Another “trap” …
When printing out-of-gamut colours with rendering intent perceptual, all colours get compressed / shifted to fit into the target colour space (determined by the printer’s ink + print paper) – and depending on the image that might not even be obvious.
There are just too many parameters to watch …
![]()
Apologies to everyone else for this expanded version about printing - but I hope to shed some light anyway.
Wolfgang
*) edited for clarity
Did some repeated tests with PL6 print modul and Epson Print Layout
( colour management by PL / EPL, same paper profile ).
Two different test files in TIFF-format / ProPhoto had been exported from PL6 (DxO Wide Gamut WCS)
as JPEGs to 1-ProPhoto, 2-AdobeRGB, 3-DCI-P3 and 4-sRGB, w/o any colour correction.
- monitor set to Native (= combined AdobeRGB + DCI-P3) / 6500K
- monitor set to sRGB / 5900K (as well to 6500K)
Both programs display the differences between the colour profiles for the respective out-of-gamut colours, that the colour profile cannot hold.
In the first case, differences are clearly visible, while on the “sRGB” setting they are less obvious.