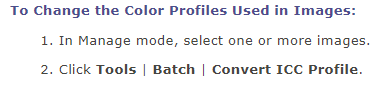
DxPL 6.8.0 (Win) exporting JPGs with different ICC Profiles versus other editing software

While testing a feature of DxPL(Win) version 6.8.0 for another topic I noticed that FastStone Image Viewer (FSIV) appeared to show thumbnails of exported JPGs with “muted” colours but then appeared to open the image “correctly”, i.e. as I expected the image to be!

FSIV Thumbnails of PL6.8.0 exported JPGs:-

Comparing these thumbnails against exports from PL5.13.0 showed that the “issue” only occurred with PL6.8.0!

But this was because the “issue” was caused by me setting the ICC export profile

image

image

in PL6.8.0 but not in PL5.13.0!

image

For compatibility I should have used ‘As shot’ as a “match” for ‘Original’ but had experimented with ‘ProPhoto RGB’ and left it set!

So in my “favourite” photo manager/viewer, FastStone Image Viewer (FSIV), I have different thumbnails but the images themselves are displayed identically in FSIV in the following comparison between PL6.8 and PL5.13 exports from JPG and RAW versions of the same image.

However, some software shows not only “different” thumbnails but also “different” images, i.e. FastRaw Viewer (FRV), XnViewMP, and IrfanView as shown in the following comparisons between PL6.8.0 and PL5.13.0 exports.

The clue to the problem became evident when I attempted to open a PL6.8 export in PaintShop Pro (PSP) when I encountered a “warning” message

image

So some software is displaying the image and/or the thumbnail according to the ICC profile embedded in the image by the DxPL export process and other software does not!

This raises the issue of reverting images back to sRGB in my case if I make the mistake again and what software attempts to use the ICC to render images for display and what does not?

I tested some software just out of interest and although I was able to remove the ICC profile in Adobe Elements and ACDSee I haven’t found any obvious free software to do the same thing?

DxPL shows the thumbnail and image as “normal” except that the thumbnail initially shows as the ICC rendered version before being changed.

The actual ICC profile is shown here in the ‘PhotoLibrary’

2023-08-18_111249_

Packages tested:-

Package Thumbnail Image
ACDSEE sRGB sRGB
DxPL sRGB sRGB
FastRaw Viewer Rendered Rendered
FastStone Image Viewer Rendered sRGB
Imagic 50 (Stoik) Rendered Rendered
IrfanView ? Rendered
Paintshop Pro sRGB sRGB Warning when opening image
Photo Director 11 Rendered Rendered
Photo Express Rendered Rendered
XnViewMP Rendered Rendered
Zoner sRGB sRGB

I propose you re-export the images with the intended profile and, considering what you wrote, to use sRGB instead.

@platypus I had worked out that re-exporting from the original RAW, minus the choice of ICC profile is the ideal way!

Re-exporting an exported image with the correct ICC profile works but risks a degradation in image quality when JPGs are chosen. I am not sure if either ACDSee or PhotoShop Elements actually “just” fix the ICC profile or also do a full re-export of the image (versus a simple copy).

The reason for my interest was to see if there is any software to add to my laptop which does not have PhotoLab installed in the event that I need to fix any wrongly exported images (which shouldn’t really happen again).

I checked but couldn’t find anything that looked like it could do a quick local “fix”!

GIMP is free and (apparently, I’ve never used it) can convert the ICC profile in an image:
https://docs.gimp.org/2.10/en/gimp-image-color-profile-convert.html

1 Like

@stuck I had seen references to GIMP in my searches and decided I had too much software installed already but relented and this is what I got

However, while writing this on one monitor the screen above “vanished” behind the file open screen that “spawned” it!

I always felt that Gimp was overloaded with options and my opinion has not changed!

But is spots the issue and options exist for saving the file with or without the original ICC profile or for opening it using the embedded ICC and then converting it within the program.

Have you tried ExifTool?

As far as metadata goes, ExifTool can probably do most things, but it takes some reading and learning, specially in the original CLI.

Searching for exiftool color profile produced a bunch of interesting articles.

Yes, as Platypus suggested and you determined, re-exporting from the original would be the way to go for sure.

I would suggest further that you consider embedding the sRGB profile at export. If your in-camera jpg setting is sRGB, the As Shot or sRGB IE61966-1 ICC settings do not embed a profile. You would need to import and select a custom sRGB ICC profile from the drop-down list for this purpose.

The hows and whys for this suggestion have been discussed many times in this forum without agreement. I remain of the opinion that embedding ICC profiles can eliminate, or at least reduce, the chances for the kinds of color management / ambiguity issues you describe.

2 Likes

…if the reading app manages colours at all.

According to standards/recommendations, an image should be assumed to be in sRGB, if there is no mention of a profile.

Excerpt from exiftool forum:

First, you need a valid ICC profile to write into the file. You can extract it from any other image containing a profile with a command like this:
Code: exiftool -icc_profile -b src.jpg > profile.icc
Then this command writes the profile to “dest.jpg”:
Code: exiftool “-icc_profile<=profile.icc” dest.jpg

1 Like

@platypus I also turned up references to ExifTool but I am not a great fan of command line interfaces and ExifToolGUI doesn’t seem to offer what I am looking for.

I started working with Python earlier in the year and then stopped but one area I will need for future development is a Python to ExifTool interface.

So it looks like I will need to “bite the bullet” and start using ExifTool as per your post, i.e.

@eriepa Worth thinking about but the problem occurred because I broke the habit of a lifetime and included an ICC profile in the export!?

@platypus, @stuck and @eriepa thanks for your responses.

I must return to my new “toy”, an FF-680W document scanner, to try to digitise L O T S and L … of old photos. The Epson software is doing a good job of “improving!” JPGs scanned at 600 dpi but any presets that can add further “improvements” to the scanned images would be appreciated!

@platypus Err, no, not a good idea.

@BHAYT If you were to use ExifTool to simply replace the name of the icc profile with a new name that would NOT convert the image from the old profile to the new one, it would simply assign a new profile.

Search ‘assign profile or convert to profile’ for more info, e.g.:
https://asktimgrey.com/2016/10/07/assign-or-convert/

Yes, I know, but that is what was asked for :wink: … and results could be even more confusing.
:grin:

Turned around, the solution to your problem came about when a program read the embedded profile and alerted you to the mismatch. Some of the other programs listed were probably doing their jobs as well, that is, just what you asked them to do. If an option, it’s very important to set the default preferences of these programs carefully on how to deal with ambiguous or mismatched color and display profiles. FRV, a program I use frequently, is exemplary in this regard. Cheers!

@eriepa Fast Raw Viewer (FRV) does have such an option and in my case it was left untouched and unset and setting it meant that FRV then worked as had FSIV and showed the thumbnails as “rendered” but the images as sRGB.

XnViewMP also has options that do the same

But because I have never been “silly” enough to set the DxPL export option I have never needed to investigate the options available or even to know that they exist in the other software I use!

With my normal basic image file management program FastStone Image Viewer, which showed the “rendered” thumbnails but not the “rendered” images I had this setting set

Resetting that option resulted in FSIV reverting to the behaviour of FRV and XnViewMP when their options were also not selected!

@platypus I will investigate ExifTool for other reasons and test the options suggested but my simplest strategy is to avoid what I don’t understand and use ACDSee to reset to sRGB, which appears to work, if needs be and set or not the options in other software I use now I know why I saw what I saw!

I am no expert in colour profiles as this topic shows, my camera is sRGB and my screens are considered “accurate” sRGB monitors and a recent eye test showed that in spite of my age I am still fortunate enough have no sign of cataracts.

However, it seems to me that the ICC profile is “just” a “label” that informs the software how to interpret the image for display, change the “label” and you change the interpretation? If that doesn’t provoke some comments I don’t know what will!

I do that too, but I limit the numbers of tools I use and often get straight into the innards (so to speak) with CLI tools and such.

Again, converting a large bunch of images to a different colour space is tedious imo, and simply assigning a different profile will often make things worse. I’d probably not try to convert the whole load, except if it was a task that could easily be automated and I was sure to be able to fall back, but go one by one as need arises.

@platypus Normally so do I but in this case I was trying to get a “handle” on what I was seeing and whether other software “agreed” or not!

My machine has software going back a long way and I am beginning to rediscover or review some of those old programs as part of my scanning exercise. In all cases looking for the ability to handle hundreds of images at a time!

Agreed and in all cases I will only ever attack one copy when all my backups have been brought up to date.

But in this case it only happened “by accident” to a small number of images and then I took one image and exported multiple times with each of the ICC profiles “on offer” in DxPL.

ACDSee also has Colour Management options so changing one option resulted in the thumbnails “reverting” to same “rendered” colours of FRV, FSIV etc…

and turning ‘Colour Management’ off entirely resulted in ACDSee presenting the images the same way as FRV etc. had during my initial tests.

ACDSee was not particularly speedy but the changed images were exported to another directory so I can compare them to the originals as and when!

It is found in
image

sorry that is a memo for me!

For ACDSee it seems to default to ‘Perceptual’ but elsewhere I have seen ‘Relative Colormetric’ used as the default. It has been a long time since I bothered to try to understand and to see the differences, apart from “whatever you like” are there any of the options on offer that are considered “better” than others?

“Better” always relates to something, e.g. your own expectations.

Read about rendering intent here, or simply convert the sources with all RI versions (except saturation) and then select the ones you like best.

Yes, and change it without understanding what you are doing and you might change the colours (probably for the worst) in your image. I urge you to follow the link /i posted above.

1 Like

@BHAYT and @OXiDant
I just intended to lift the same issue that Bryan just did, even at Fotosidan in Sweden without much success. I will try here since nobody in that forum seemed to have any knowledge about Photolab and to some extent of that reason were not able to understand what I tried to explain.

Bryan, I think what both you and I have discovered (you with the focus on how different application display files with different ICC-profiles and I also how Photolab actually prints files depending on if “Color Profile” in the “Print”-module is set to “Managed by DXO Photolab” or Managed by Printer.

The reason I started a testsession that ended with me printing about 20 testprints of two different motifs, was that I just bought a new Benq SW 271 Adobe RGB-compatible monitor and found some really strange things even when printing.

We are all very familiar with Photolab displaying all our JPEG-files as thereis no ICC-profiles in them at all, despite there really is in my testfiles and that might make sense since in one respect since it´s basically a RAW-converter handling RAW that lacks profiles. In that case even a JPEG is handled the same way. We really just need the basic JPEG-data when preparing even these files in Photolab BUT, it is an other thing with printing isn´t it.

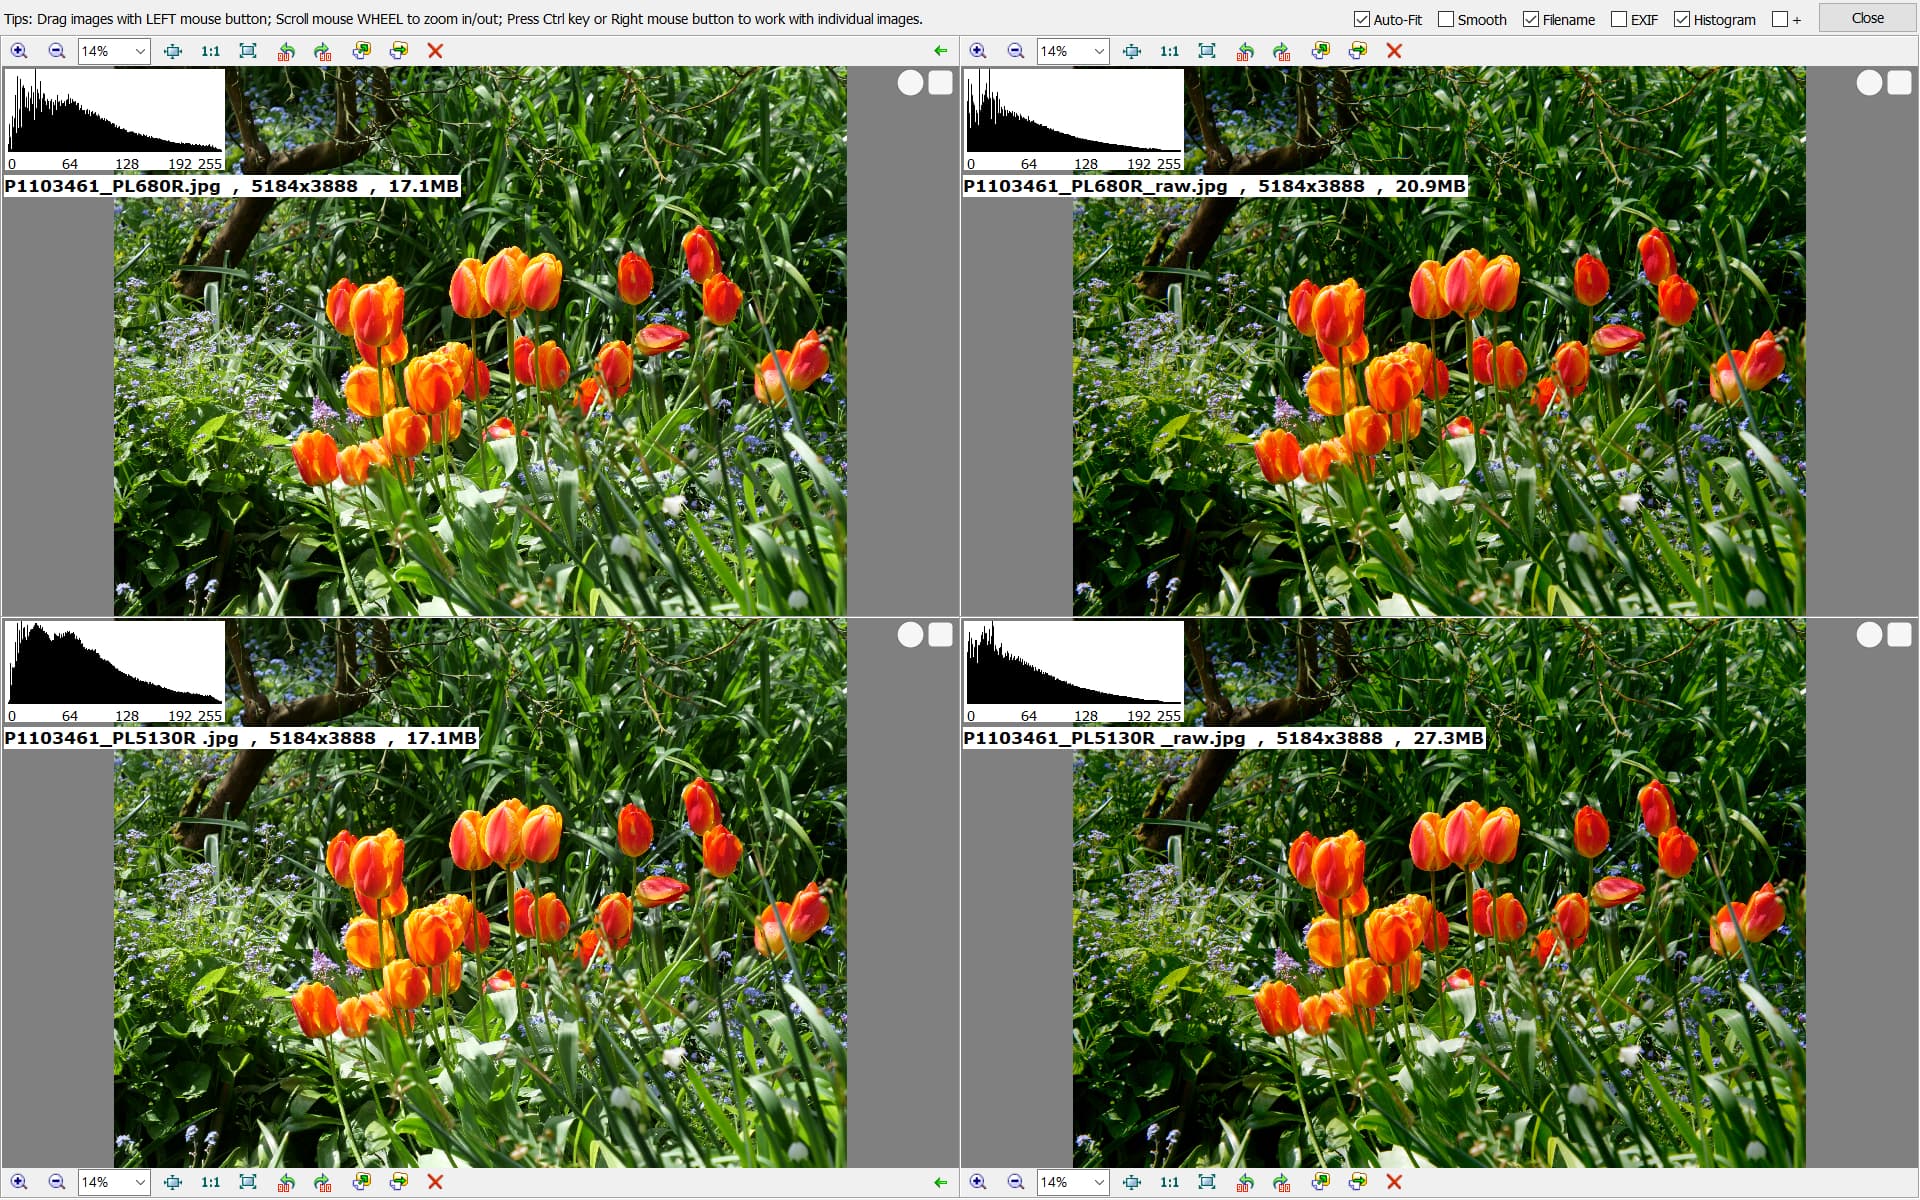
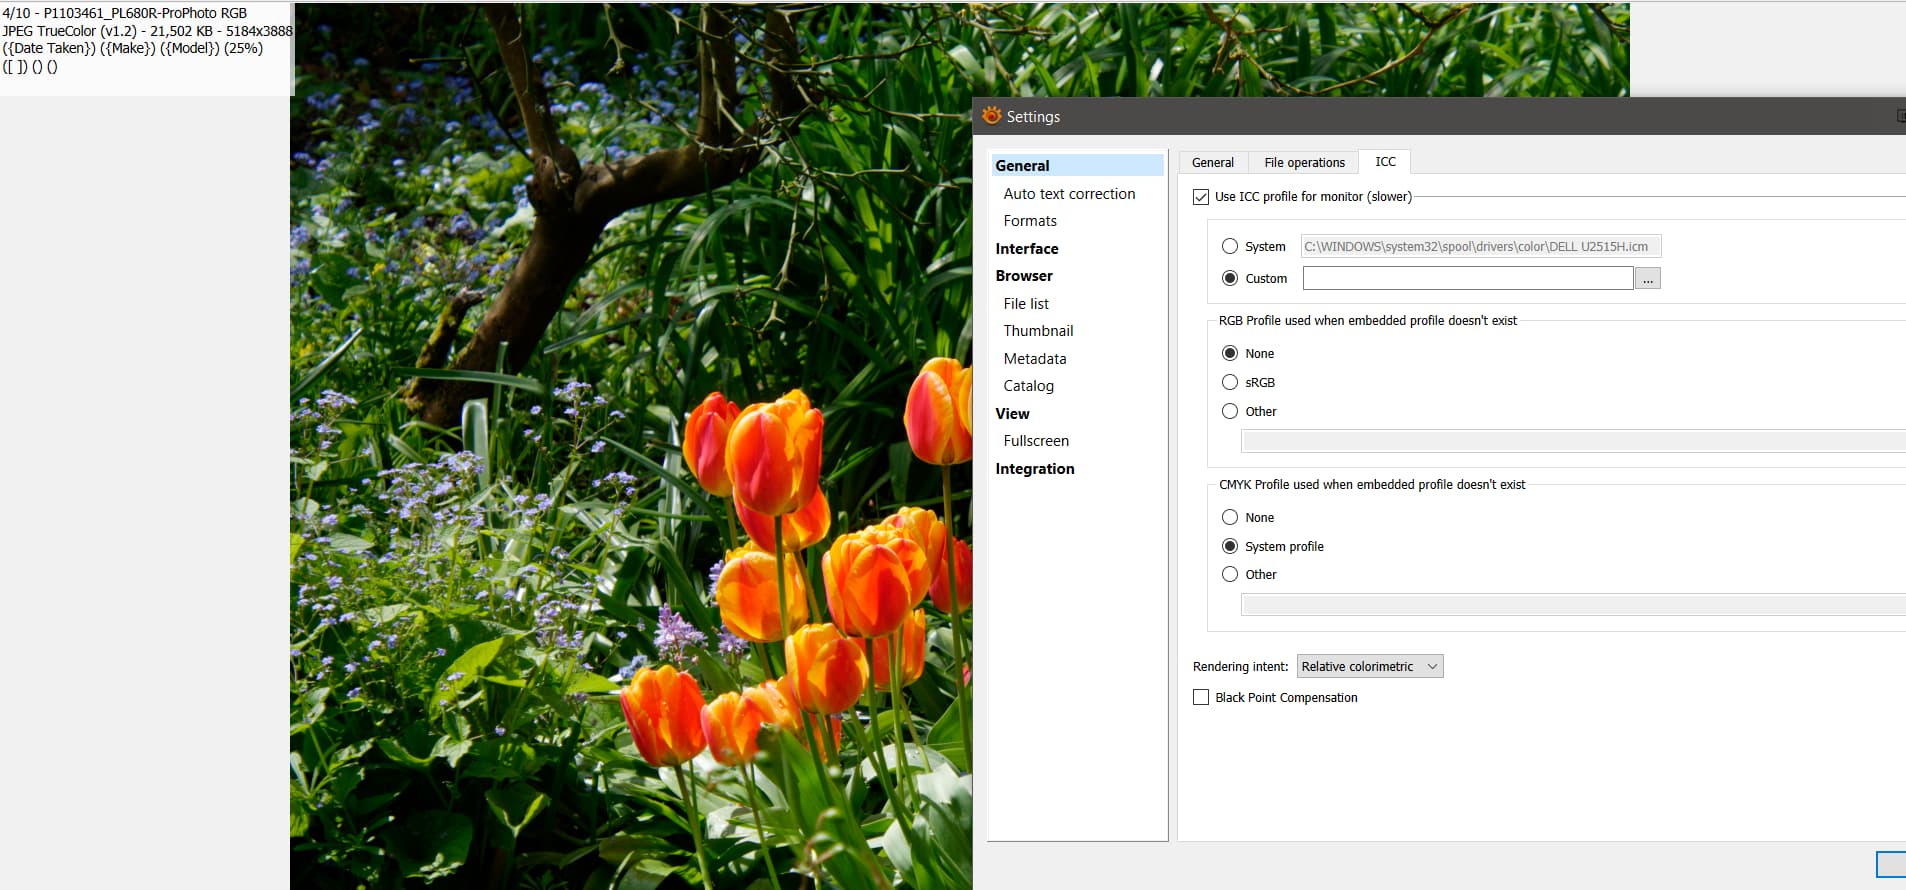
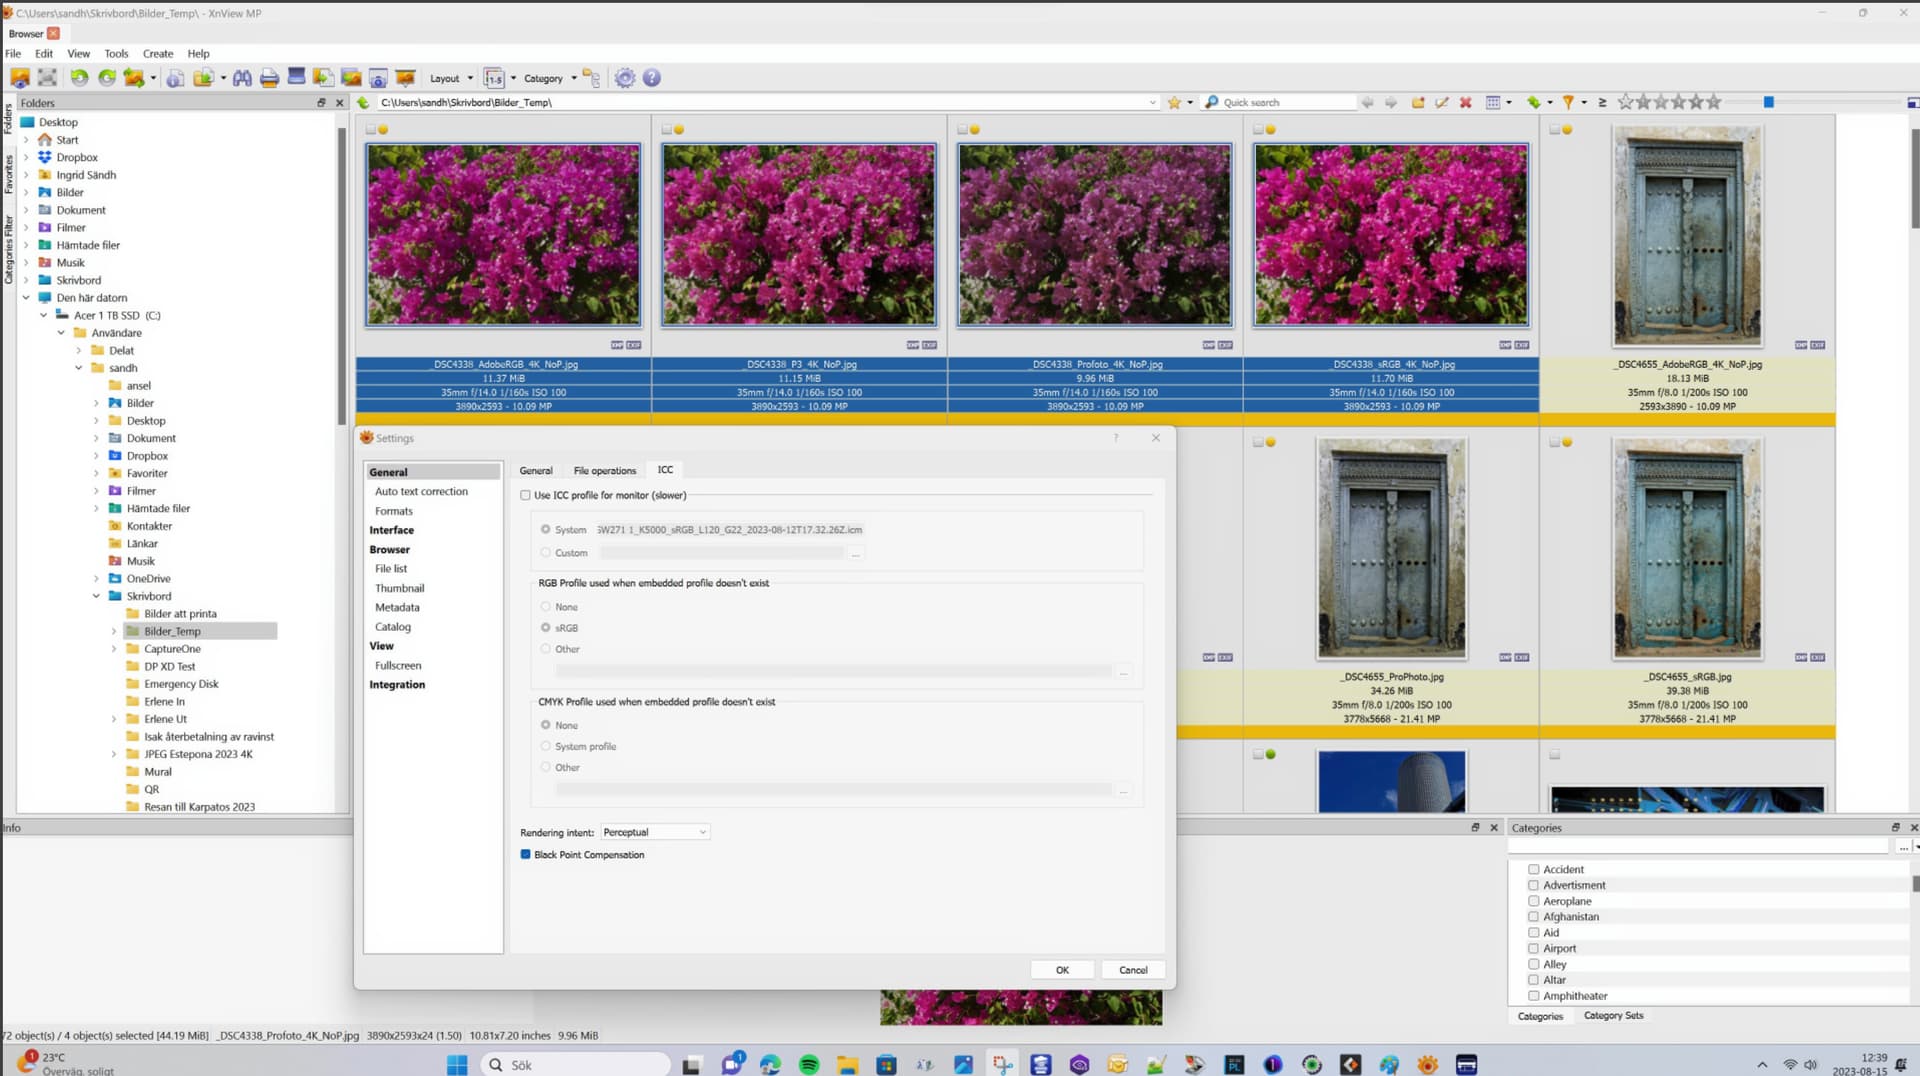
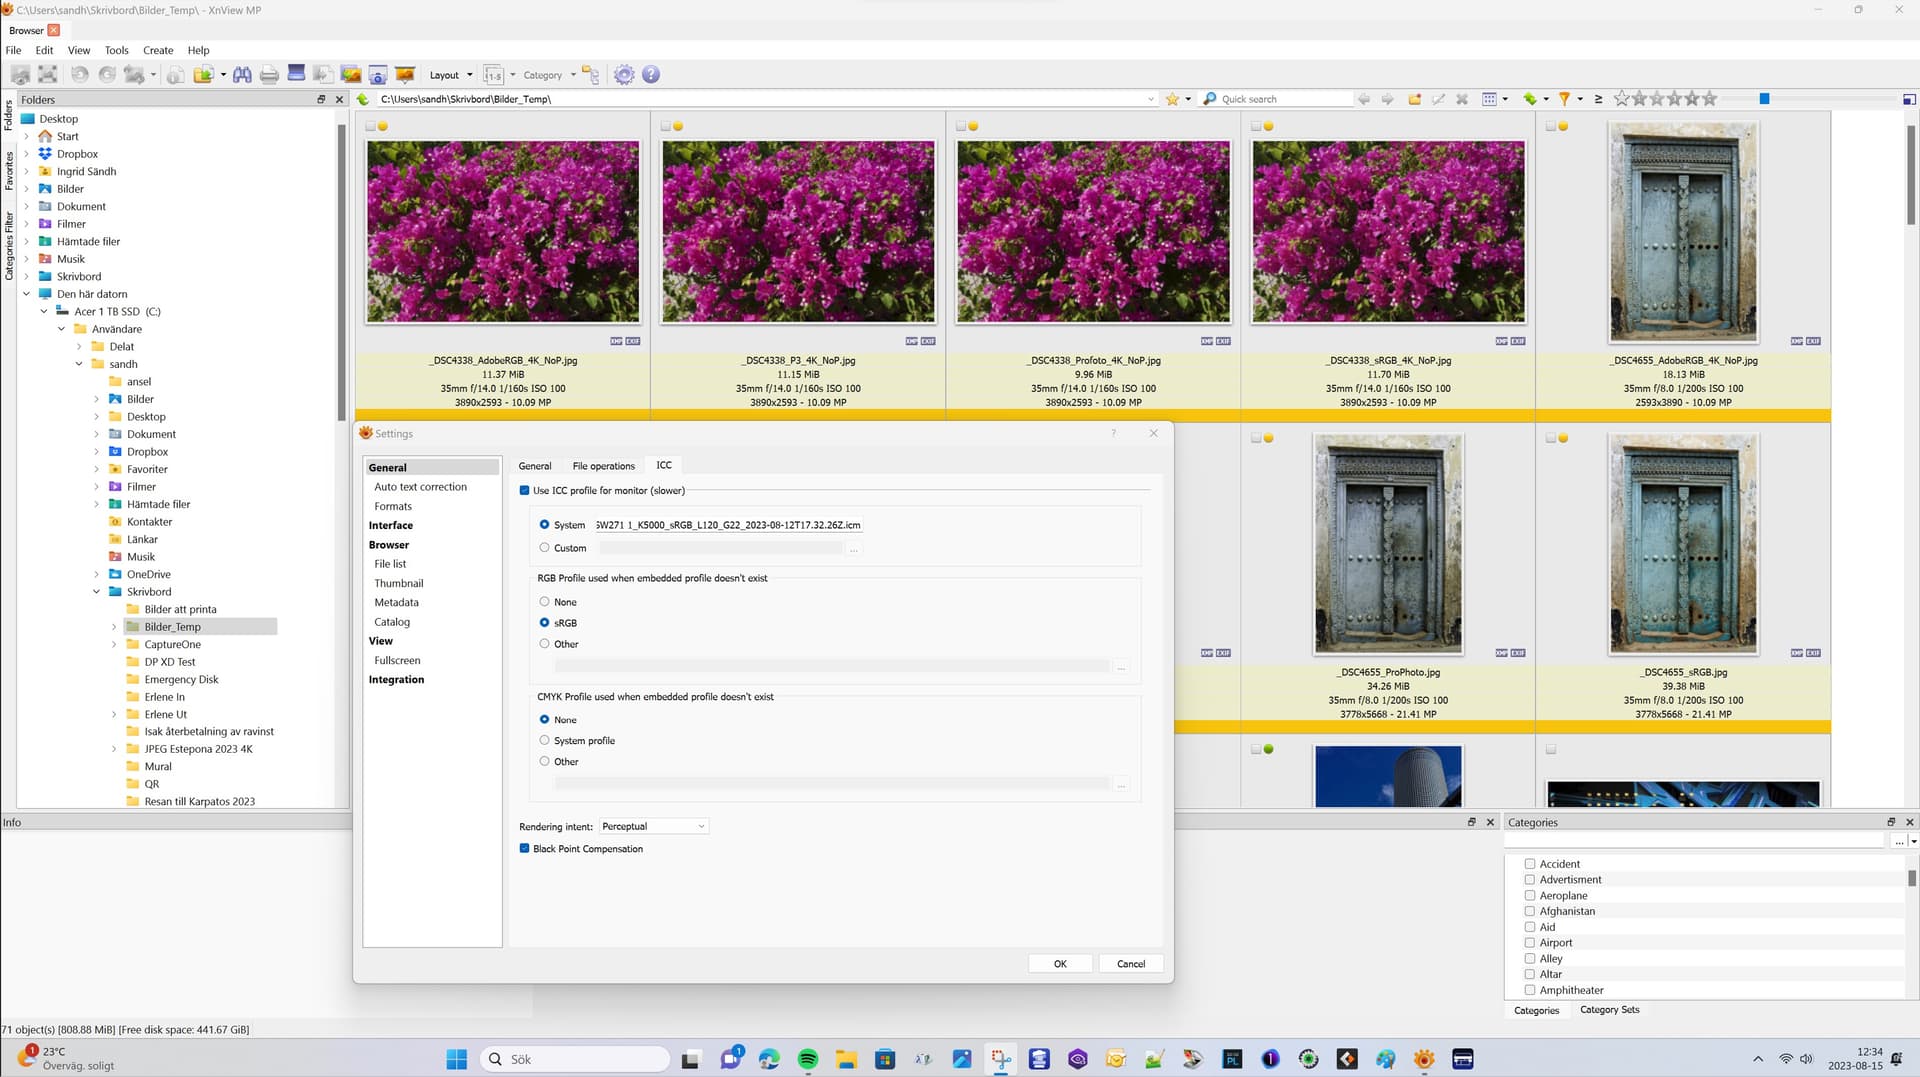
For me it really started when I began to use XnView because unlike both Photolab and Capture One XnView is by default actually using the ICC-profiles in the files when displaying the previews. In XnView there is also an option using the active Monitor-profile from Windows and if there isn´t any sRGB is used as default.

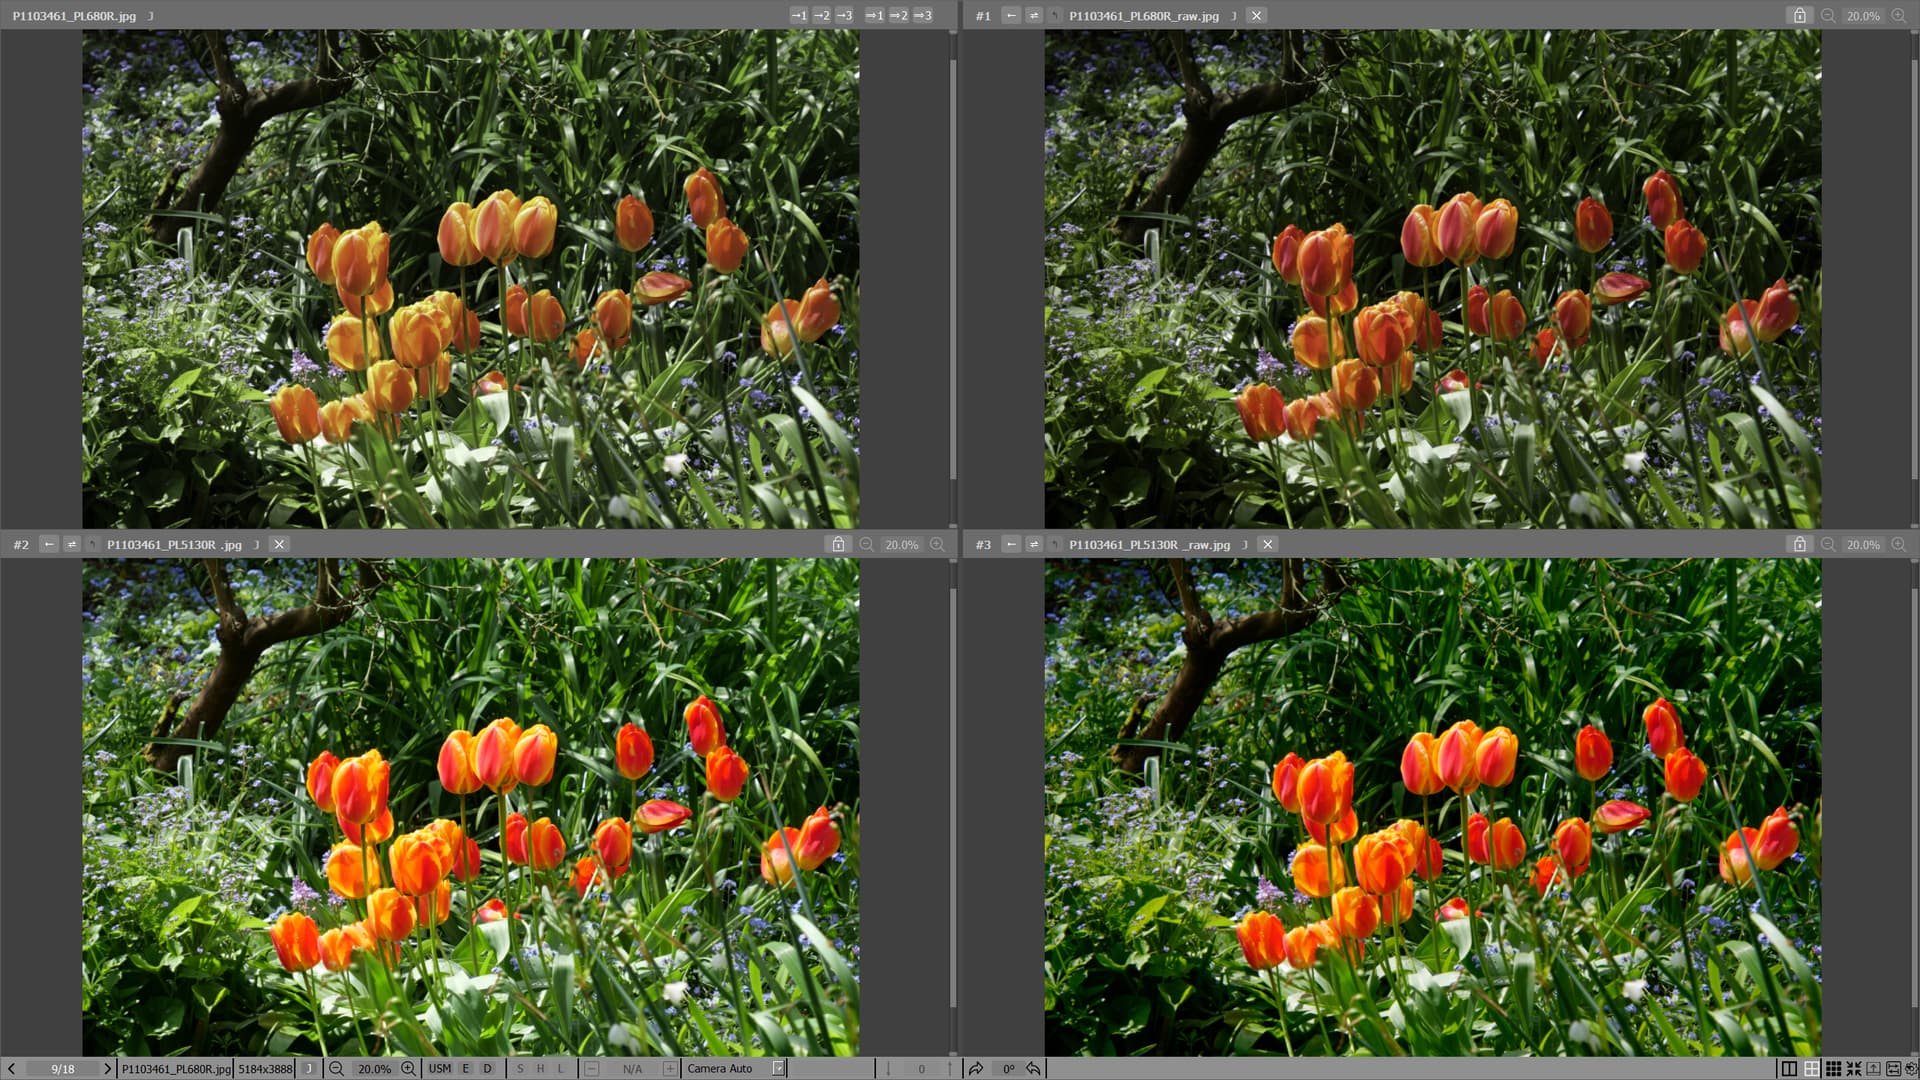
So the screen capture above is definitely showing an applikation using the embedded profiles of my testfiles to display how the JPEG in from left to right: Adobe RGB, P3, Prophoto and sRGB.

In this case XnView is set to use “the System Profile” instead and since I just have calibrated my monitor that supports hardware calibration, I know the name of that file from that occasion. It´s that name of the active .ICM for my monitor with sRGB active that has popped up in XnView too.

ICM (Image Color Management) is for those that might not having heard of that concept before, a 20 year old color management system that first was implemented in Windows Vista around the year 2000. Vista might have been the Windows-version of all times that presented more new tech than any other version have both before and after. ICM was an important part of that. Later it was improved in Windows 7 about 2009 and now lately in Windows 11. The .ICM-profiles nowadays are said to host the same kind of data as the ICC-profiles.

This display ICM, is as we shall see below, playing a very important role even when printing and it was this fact that really made med react.

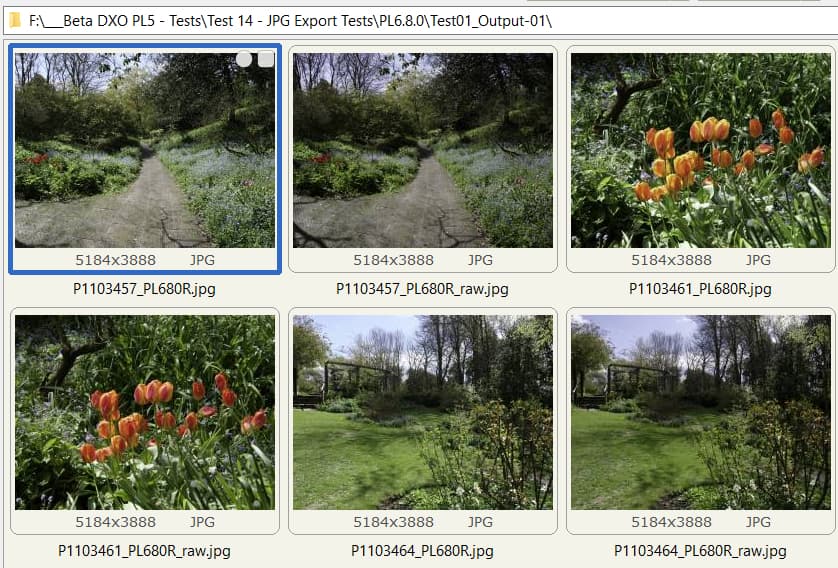
I first made a normal print using “Managed by Printer” of all of these “Bogainville” JPEG-files of mine you have seen above and guess what happened?? Well I guess you already have the answer since you already have looked at the screen captures above.

All four Bogainville images came out of the printer as if they were totally lacking a working ICC-profile at first sight. All of them was identical and first that really puzzled me. Well most well organized people with a good order in their files system especiallu when it comes to their JPEG-files, will never experience this since they will always print in sRGB or Adobe RGB with sRGB- or Adobe RGB-files but here I also had one file that really used to look different and that was Prophoto. ProPhoton use to give my images a tone of more blue and red that resulted in a more violet image.

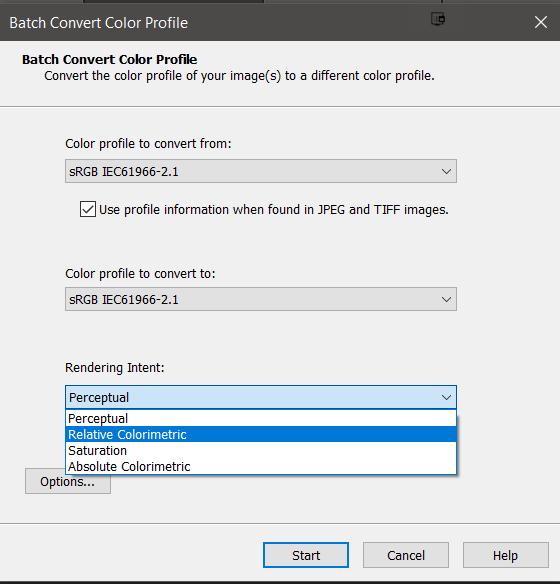
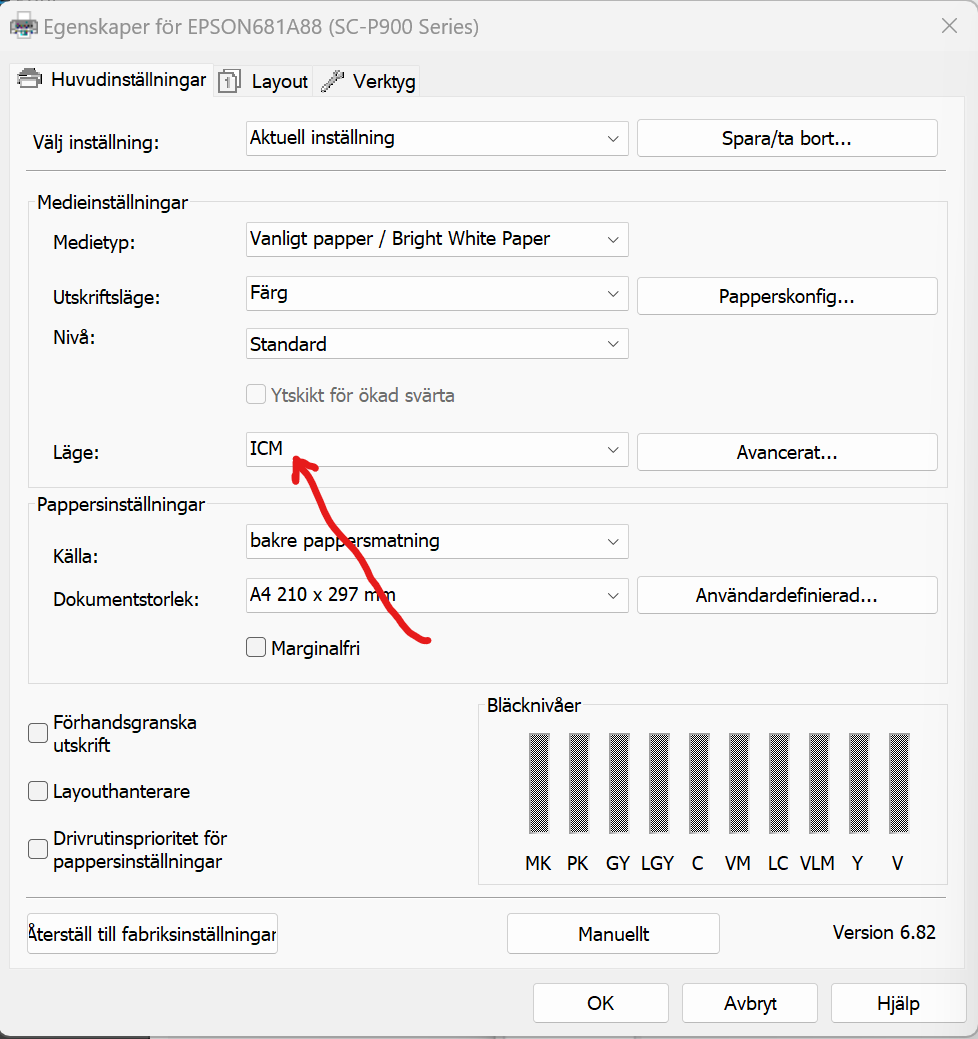
So then I decided to print the Prophoto JPEG. I then chose an image with a lot of white and cyan. At that time I had activated Adobe RGB as the monotor mode and gamut. I started with the standard setting of the Print module to “Managed by DXO Photolab” after setting the color management in the printer driver to “Off”. For the second print of the same ProPhoto-JPEG I turned the “Color profile” in the Photolab Print-module to “Managed by Printer” instead and then I opened the Printer driver dialog and set it to ICM instead.

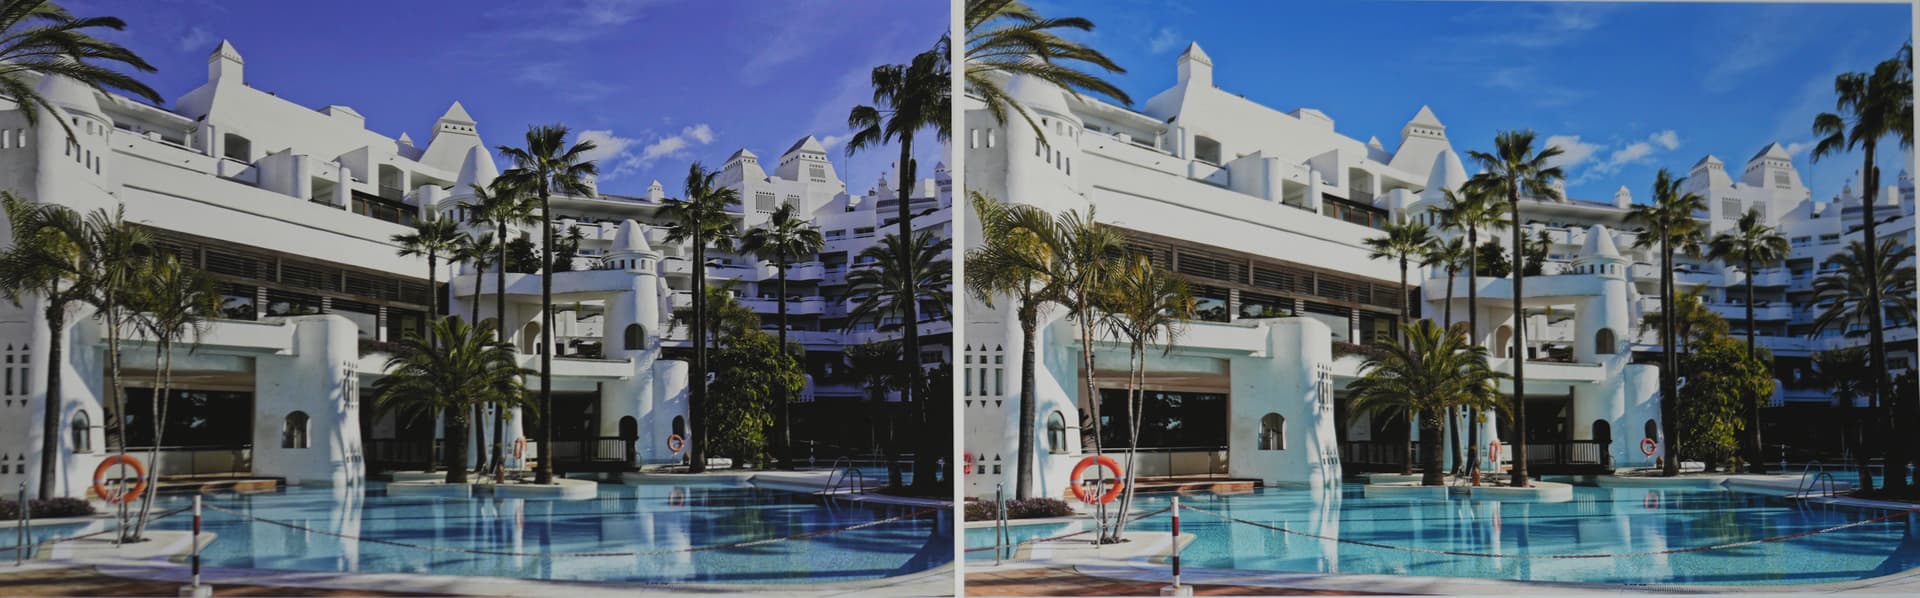
Below you can see a photo with these two A4-testprints side by side, The “Managed by printer” ICM-print to the left and the regular “Managed by Photolab” with the color management turned “Off” in the printer driver interface, to the right.

Click to zoom

As you can see, the left image is showing the image with the proper support of the embedded ICC-profile for ProPhoto. The right image was printed with the Adobe RGB-profile since that was now used as “System profile” of Photolab. If I had printed Adobe RGB, P3, Prophoto or sRGB too it would not have made any difference since they would all come out in the same fashion. In this case in Adobe RGB.

The left ProPhoto-print shows all characteristics of a sky with too much blue and red which makes the blue sky almost violet. The water in the pool is more blue than cyan as it ought to look and can be seen in the right print.

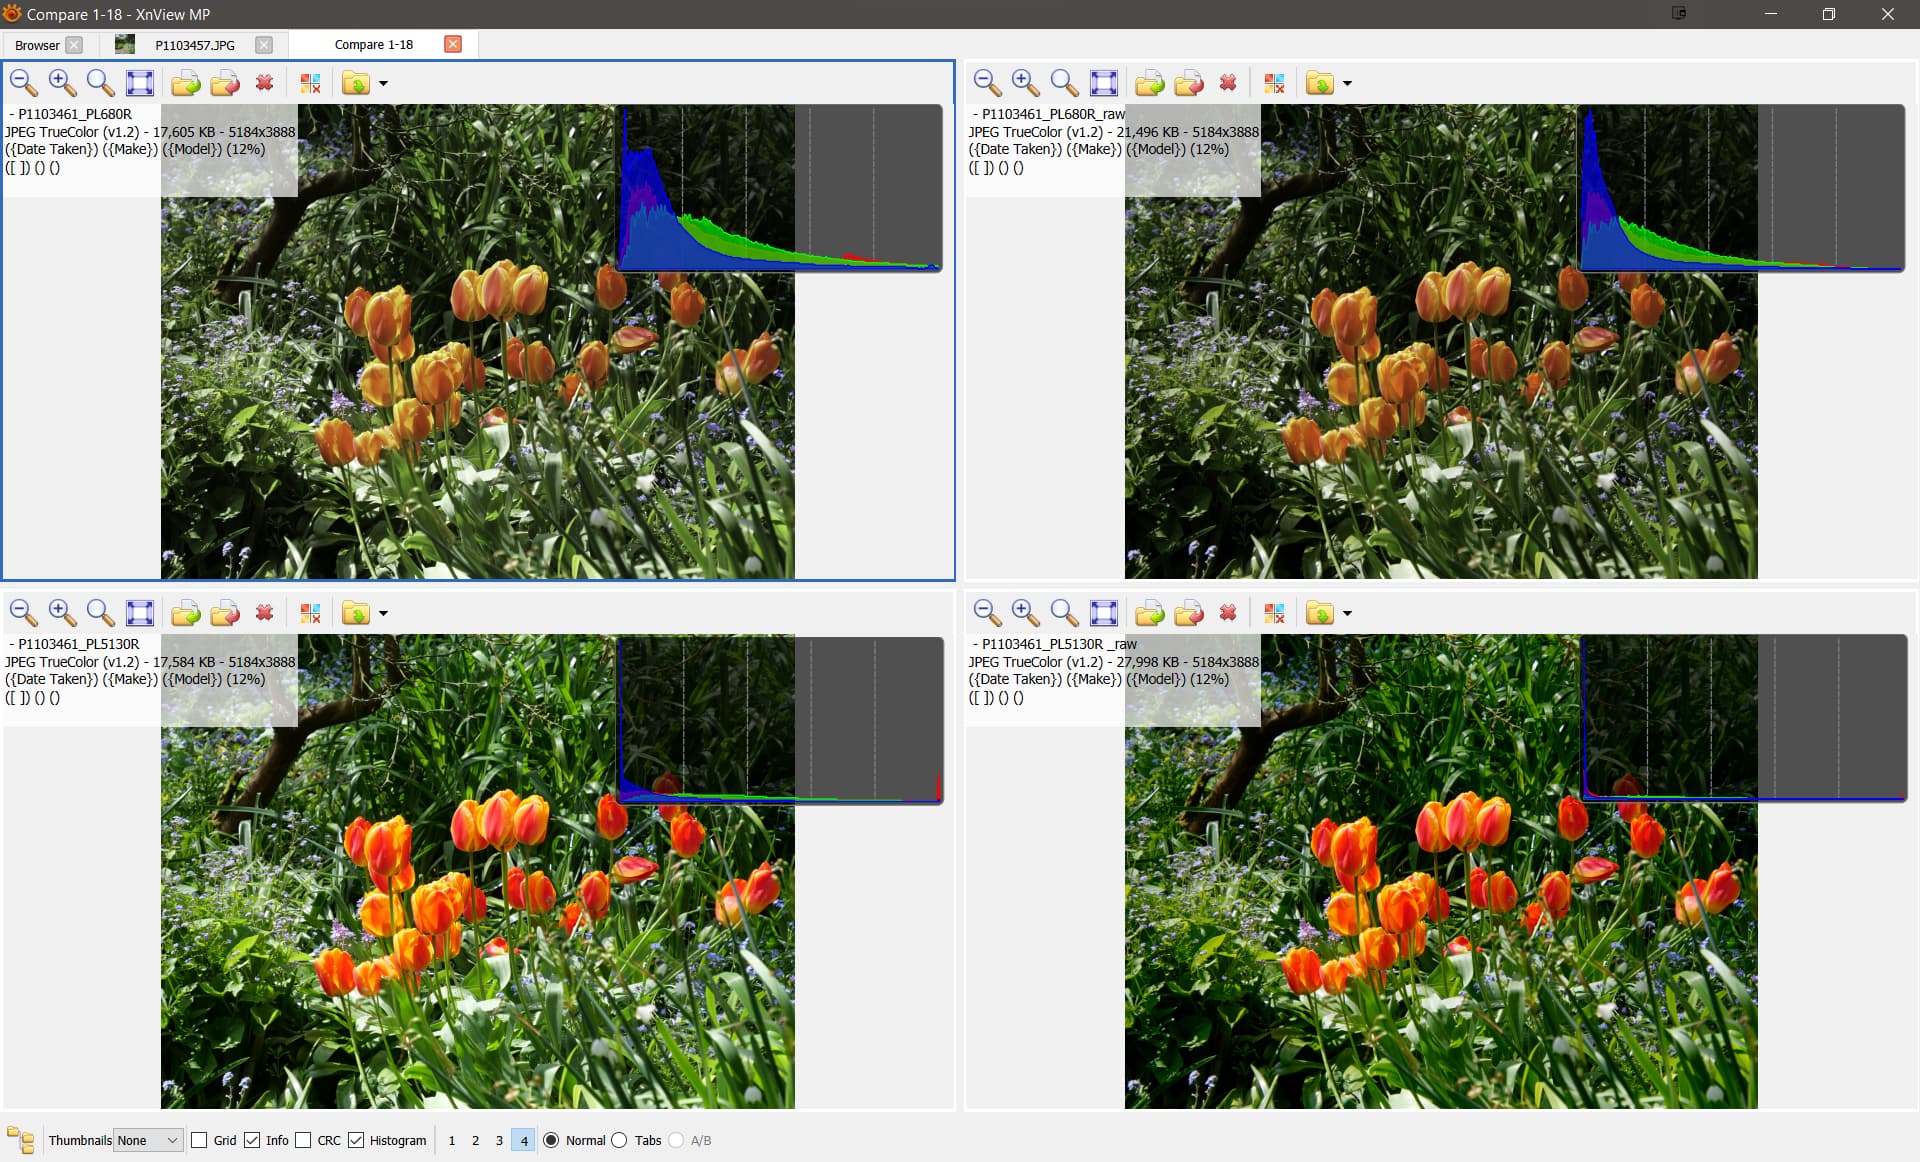
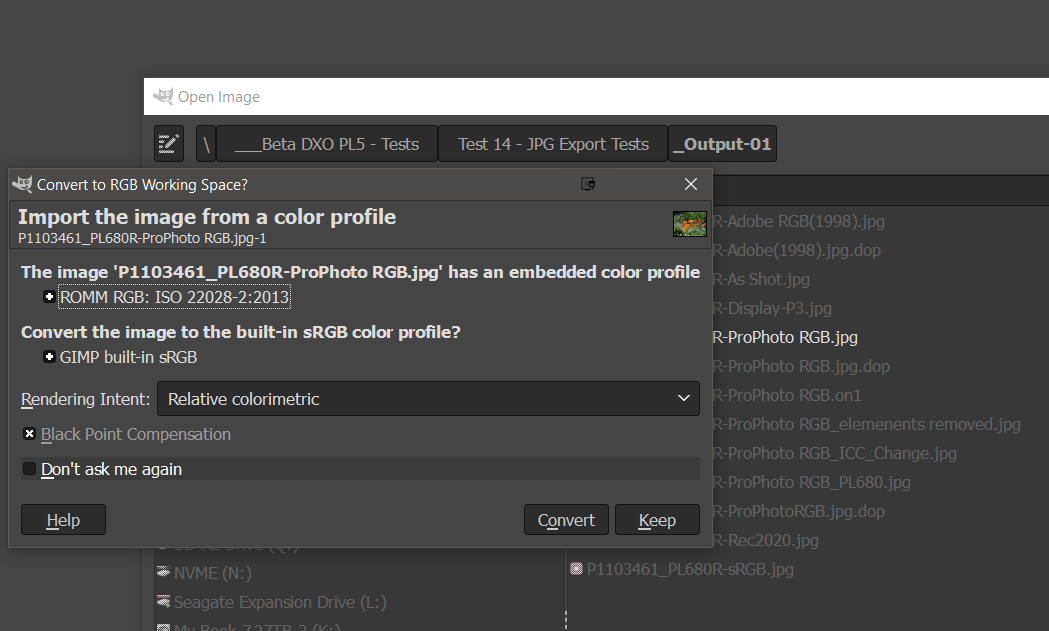
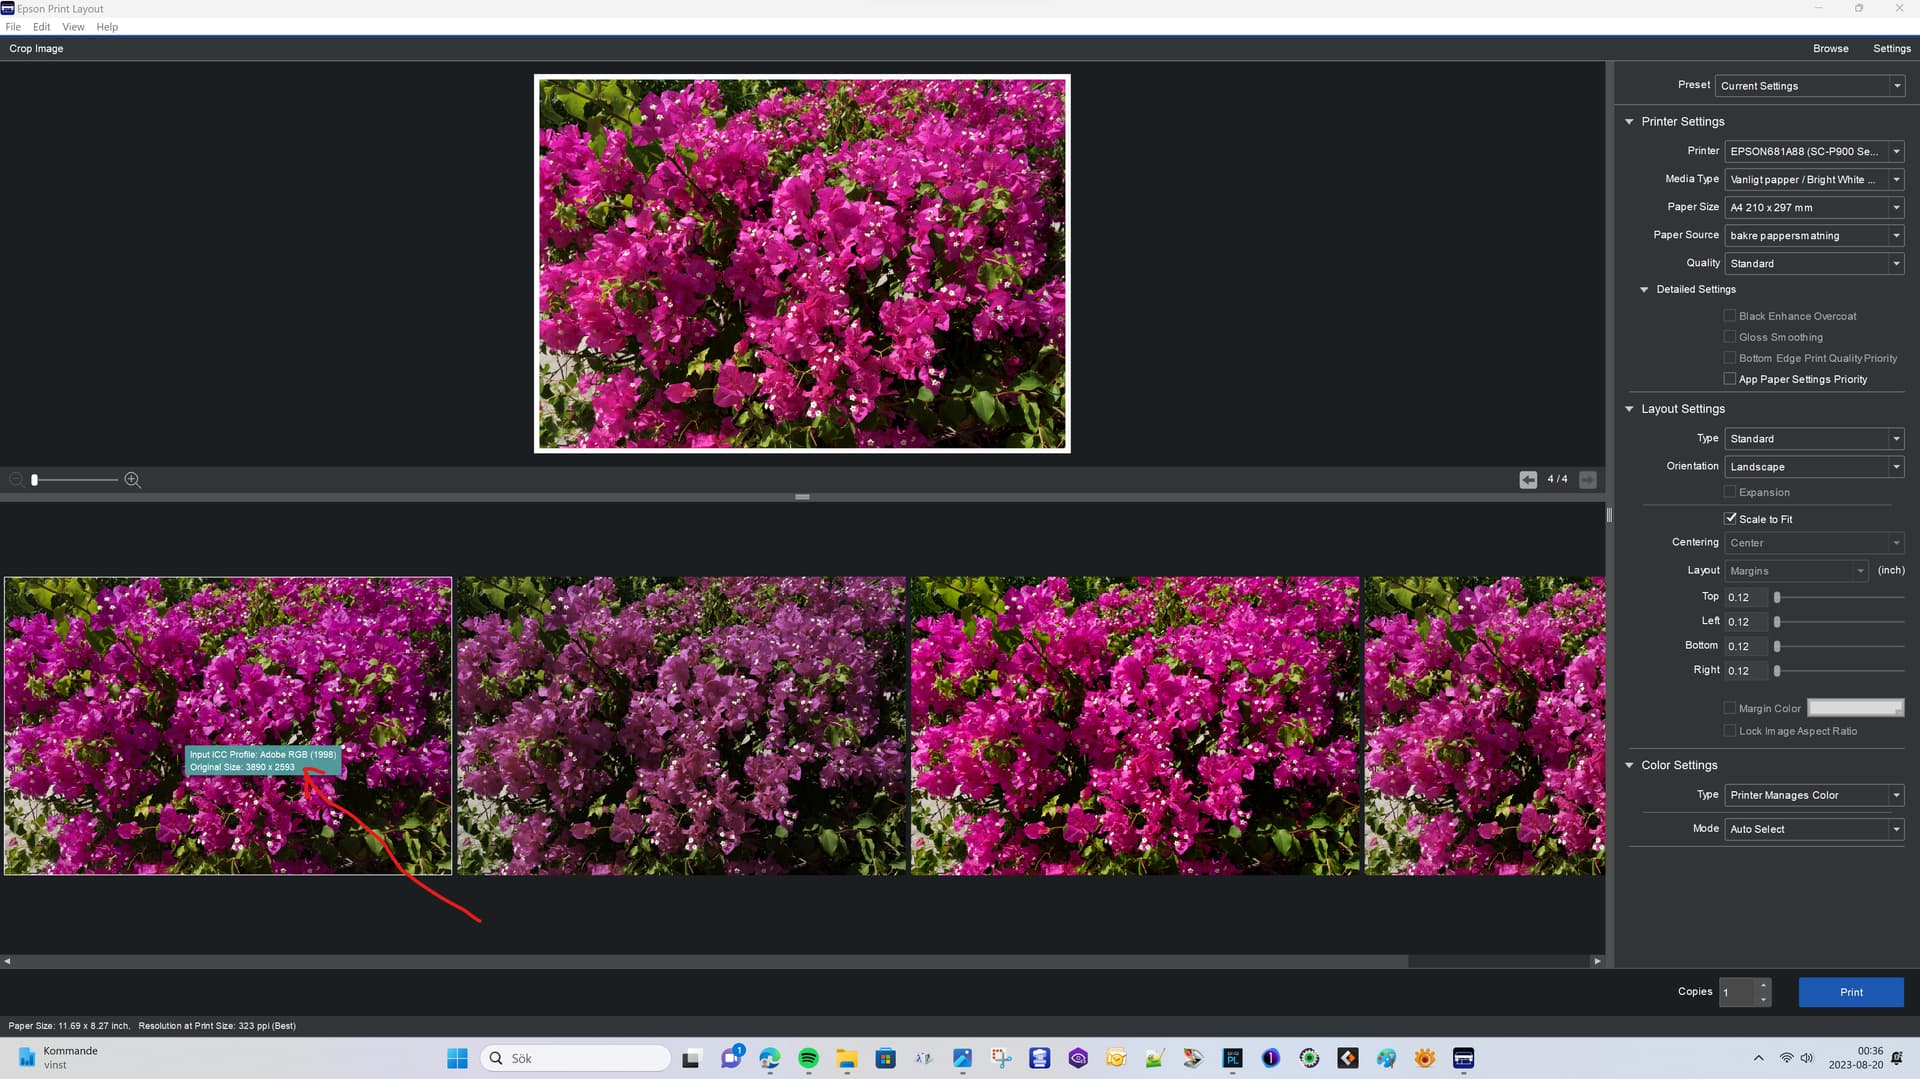
I can verify with Epson Photo Layout that it sees the images exactly as XnView is doing by default and as they would print using “Managed by printer” and ICM. If you print like that ICM will automatically use the embedded profile regardless of which type it is:

I think we are facing a slightly different profile handling world now than just some year ago. Since I until now always have printed in sRGB because i just had an sRGB-monitor before and preferred to have sync between my monitor and the prints before using the printers possibility to cover a wider gamut I now realizes that it´s far easier with a workflow based on one gamut than several others.

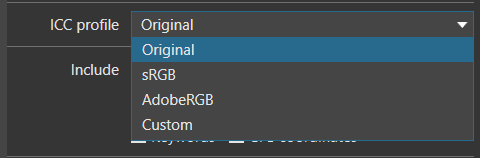
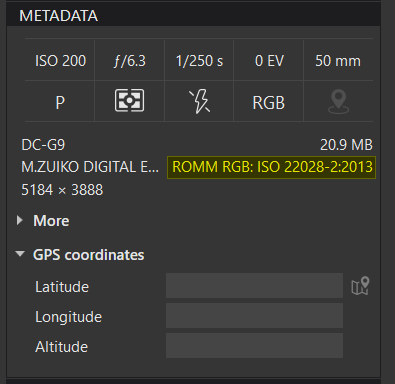
I realize that Adobe RGB and sRGB might not dominate as they have done before even in the future and maybe P3 will displace both sRGB and Adobe RGB in a future to come but until that happens, we definitely need better ways than the ones present today in DXO Photolab 6 to handle a more complex profile reality. Now we can´t get a clue which profile is embedded in a JPEG in Photolab even if we use Image Properties. We just get a general "RGB-Format as a “best guess” and that is definitely not good enough.

As you can see above EPL has a sufficient solution. In that application you just ned a “mouse over” to get the ICC-info displayed and I hope DXO can come up with something like that at least both for printing and profile info, because it´s just not sufficient as it is today.

Can we really go on with that poor Print-module that lets the active monitor-ICM override the ICC-profiles in the files without giving the user any hint of what´s going on “behind the curtain” in the application. I wonder what the design demands really looked like when DXO’s developers developed the Print-module’s logics in Photolab. Today it is perfectly possible that a JPEG P3-file will come out as a sRGB- or a Adobe RGB-print instead of a P3-print without, you have any idea that that is exactly what happens. Do we really think that’s good enough?.

image

Yes in this case it´s written in plain text in Paintshop Pro but in Photolab they just don´t tell us at all what they are doing with the profiles in both the images when displaying the previews or when printing and that is definitely a problem. If the system converts the profiles to sRGB or Adobe RGB or if it just picks the current system-ICM for the currently active monitor setting might not matter in practice but sure it confused me to a start but what all this boils down to for me, is that we really have to understand in detail what happens in the applications not to be fooled by them.

Especially in Windows we live among a lot of different applications where some of them originally was developed long before Windows had any support for a lot of the functions, we have learnt to take for granted. Originally there were no support for profiles or hardware-calibrated monitors and there were no Image Color Management either at all. So many applications has built in their own color management with profile handling and others lacks it completely. Some others use the active monitor ICM-file - like Photolab. It took more than 20 years before Windows got ICM and profile handling but still a lot of applications has not got updated to take advantage of that.

I see that Capture One handles the preview in the same way as Photolab and of that reason I wonder if they all are designed the way Lightroom is and maybe even the older Adobe-applications. Adobe has always owned the graphics application world and it would not surprised me at all if both DXO and Phase One looked at how Adobe had done it in their applications.