No. You don’t need Pure Raw. The Ad is pretty stupidly placed, because this is only a Plugin for software from other manufactures.
It dosen’t offer any additional function to PL.
Well done, that is an excellent start! Too many people arrive at this forum with problems stemming from not taking advantage of the 30 day trial.
Yes, PL is an end to end package but be aware, it’s only a complete package if you also buy FilmPack and ViewPoint. While you might not miss the ‘reshape’ feature in ViewPoint, do not dismiss FilmPack as just a bunch of film emulations. It’s more than that, it includes four additional sliders to control fine contrast as well as luminosity masking and maybe other stuff that I can’t remember as I type. There many topics here about DxO’s decision to package those extra features in this way but like it or not, it’s the way DxO sell these features. One more thing about FP and VP, you do not need to install the stand-alone versions, you just need to activate their features within PL. The standalone versions are for people who want to use them as plugins to other editors, like Photoshop.
You’re getting ads for PR because that what DxO do. You are correct, if you have PL, you do not need PR. PR is a pre-processor for other editors like Lightroom.
Yes, please do come back. There is no such thing as a stupid question. We all knew nothing about PL when we first began to use it. PL is not Lightroom or Photoshop, it has it’s own way of doing things.
It can’t remember for sure (can someone else here clarify?) but the 30 day trial of PL might automatically activate the features of FP and VP.
I do know for sure that the trial is of the Elite version of PL, don’t then buy the cheaper Standard version. Scroll to the bottom of this page to find a comparison of the features in PL Std vs Elite:
I don’t think the 30 day trial includes FP and VP.
There was (another) slightly irritating ad at the top of the PL screen wanting me to download FilmPack. It requires another activation key, which is no big deal. Downloading VP now.
You don’t need to run the FP (or VP) installer, you just need the activation code(s). Open PL and then on the main menu, click Help. You’ll see options for FilmPack and Viewpoint) and in there you can enter the activation codes.
Finally on the main menu again, click Palettes and check that the options for FP and VP are ticked.
The standalone versions of FP and VP that are installed if you, err, run the installer, are for people who want to use FP and VP as plugins to other editors, like Lightroom.
NB if you are on a Mac the menu locations might not exactly match I give above (I use Windows) but they should be enough to point you in the right direction.
Thank you again for your help and advice. It’s kind of you to take the time.
FP and VP didn’t appear when Help was selected. I tried the activation key for PL and was told (in no uncertain terms) that it wasn’t correct. So, I downloaded FP and VP as free trials with two new activation codes.
No big deal.
I’m now running the whole package and scratching my head (and when you have as little hair as I, you’ll realise that’s not a good thing) accordingly.
I should add that I have a new computer, a new camera, and now new software, and I don’t necessarily know what I’m doing!
The PhotoLibrary tab is just a file browser, i.e. what you see there is the folder structure on your disk.
The Customise tab is where you do the editing.
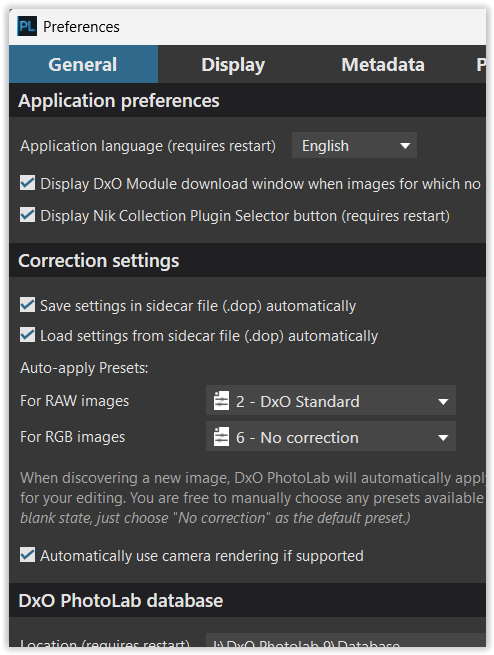
PL will automatically apply a preset to the image you choose to edit. That default preset is defined by the setting in Edit | Preferences | General tab.
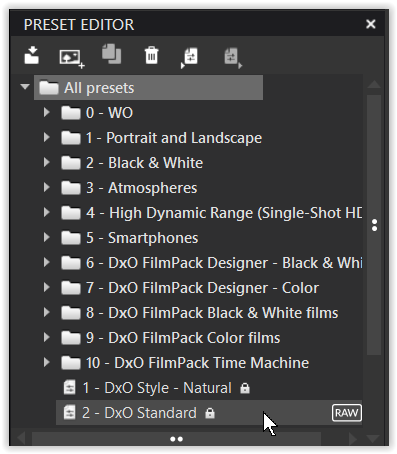
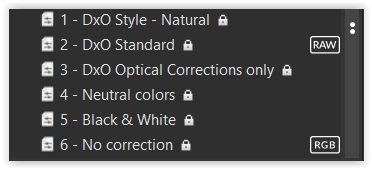
NB most people consider the preset called ‘DxO Style Natural’ to be far from natural.
You can create your own preset(s) and use that as your default.
Also in Edit | Preferences this time on the Display tab you will probably have to experiment with ticking / unticking the boxes under ‘Viewer Quality’, especially the one for DeepPRIME Rendering. On my desktop PC with its RTX 5070 12GB VRAM GPU I have both boxes ticked and have no problems. On my laptop with a RTX 4050 6GB VRAM GPU I only have the high quality previews one ticked.
Another often mentioned one is creative vignetting. PhotoLab will correct lens vignetting, but if you want to creatively add a vignette, that’s a function bestowed by a FilmPack license.
Seconded. There are some very long time users of PhotoLab (and its predecessor product) and I think it’s fair to say every one of us (I’ve been around since PL3) has been stuck on something.
For the editing side of things, you can largely just choose the Advanced Workspace (see the menus) and look at everything that’s there. If you can’t figure out what a part of it does, you can do worse than looking at the documentation online. There are also some good videos out there on YouTube, though nowhere near as many as for Lightroom (a plus in my book!)
Perhaps the harder aspects to ‘get a handle on’ in a 30 day trial are the “admin” bits. Managing the catalogue is where you might find things don’t work the way you expect or the way you want. Quite a few people here actually use other software to manage their photos. The good news on that front is if you point PhotoLab at a folder, it’ll just show you the images and it won’t care if another application put them there. Just be warned — do not try to manage your files from two different apps. It can really mess things up, especially for PhotoLab.
One thing I suspect everyone here will agree on, though… you’ve chosen to look at a product which can bring out the absolute best in your images. Try taking a photo with an ISO higher than you think is sensible and see what DeepPRIME 3 or XD3 can make of it. You may be surprised.
I’ve got to grips with the basics and admin side of PL. There are (mercifully few) YouTube videos to choose from, and most are to the point and informative.
I’m working my way through a RAW image previously tackled in Affinity. Things like dodge and burn, crop/image size and clone stamp clearly require a different approach – not necessarily a bad thing!
DeepPRIME XD3 is truly amazing. I now have an image with detail, not a random selection of coloured pixels.
Being new in these parts and having scoured the Forum, I became lost. So, I apologise if this is in the wrong place. Please point me to where I should have posted, and I’ll start again.
Two issues, both file-related, and I suspect the answers to both are obvious.
Working from Fuji RAW, I notice that the RAW file has been altered after processing. I’m assuming I should have created a copy before working on the original file. Is this the case?
Having processed the RAW file and exported to disc, it remains unprocessed. What am I doing wrong?
Are you sure? I’ve used PL since before it was called PL and it’s never, ever, altered any of my (Canon) RAW files. What it does do is write the edits to a sidecar file that has a .dop extension. For example, an edited RAW file called IMG_1234.CR3 will have an associated sidecar file called IMG_1234.CR3.dop
When exported to disk, PL combines the RAW data with the edits and writes out the finished file as whatever file type you selected. I only ever export to 16bit TIFFs, so using the same example file name as above, I also get a file called IMG_1234.tif
As @stuck already explained, PL itself doesn’t modify the original file because it works non-destructively. The changes you see (if you made any) are saved in the accompanying sidecar file. – When you export to JPEG or TIFF you should see exactly the same thing, whereas export to DNG is a special case.
Maybe you like to create a Virtual Copy to work on and to compare it to your original until you feel “safe”.
.
Note
By default, PL applies the “1 – DxO Style – Natural” preset to newly detected files, which many users find not truly natural. This preset merely provides a starting point with a few adjustments. I personally start my RAW files with “2 – DxO Standard,” while others begin with “3 – DxO Optical Corrections Only,” “4 – Neutral Colors,” or “6 – No Corrections.”
TIP
If you’ve adjusted some things and don’t like them, you don’t need to reset them all individually. Simply apply your preferred preset, and you’re done.
Are you on Windows? If so, have you not set File Explorer to show filename extensions? Perhaps not since, for reasons only Microsoft understand, the default is for file extensions to be hidden.
With file extensions hidden you’ll see your RAW files (think you mention Fuji RAF files) listed in Explorer as:
imageName1
imageName2
etc
Having edited these in PL, PL writes associated .dop files so now the file list becomes
imageName1
imageName1.raf
imageName2
imageName2.raf
Whereas with file extension visible the files will be listed as:
imageName1.raf
imageName1.raf.dop
imageName2.raf
imageName2.raf.dop
I agree with the others here. I think if you explain in more detail what you see, before and after, then we can begin to help you figure out what is, and isn’t, happening.
I’m not sure about PhotoLab, but Lightroom will update DNG RAW files. In any case, I don’t believe any Fuji cameras record native DNG.
No. All you are seeing is that, on reopening, PL is reading your edits from the sidecar file and reapplying those edits to your ‘in memory’ RAW file. The actual RAW file on your disk is untouched.
If you want a workflow where you always have a clean version of your RAW file available then I suggest you:
Set your default preset for RAW files to be ‘no correction’
Before you make any edits to a file, create a virtual copy of the file.
Edit the virtual copy as desired
Export your finalised image to your output format of choice, TIFF / JPEG / whatever
Now when you close and reopen PL you will see your original RAW file without any edits overlaid and your virtual copy with all your edits and your exported file.
Does this help?
EDITED TO ADD
When you get to 3) start your edits by applying your preset of choice, to ensure you don’t forget to apply the denoising and optical corrections, which are after all the main point of using PL as a RAW editor.
First, I suggest signing up for the trial. PureRaw is used to remove noise when using high ISO, and sharpening focus problems in a photo. It should be the first step in your photo processing regimen. It’s especially good for nature photography where poor lighting and focus problems caused by moving subjects. One caution is that you should use a robust GPU, such as ones used for gaming. A slow GPU operation will severely slow the sharpening and noise reduction processes, and might cause the computer to freeze-up. Testing first will let you know if you need to upgrade your GPU.