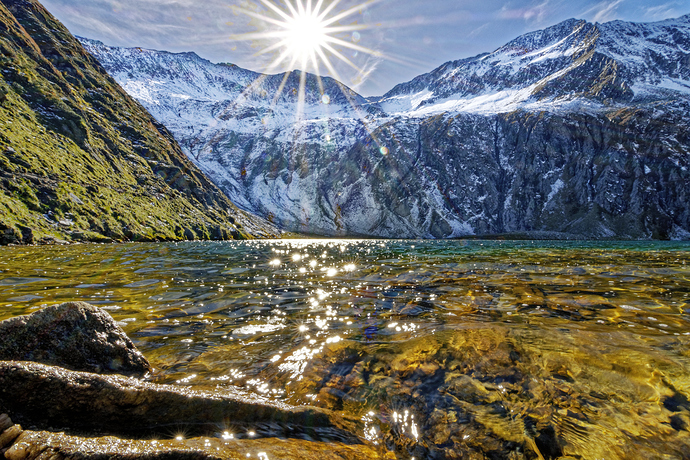
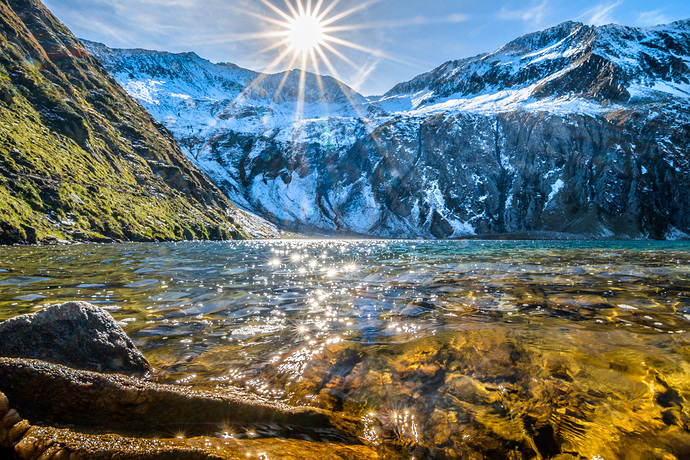
I have used Adobe Lightroom 6.14 so far and bought DXO Photolab 3 a while ago. Besides some handling quirks, I am really surprised that PL3 is by far not as capable as Lightroom 6.14 when it comes to highlight recovery. Also it looks like LR only recovers the highlights while Photolab seems to reduce also the overall brightness a bit. Is PL really not that capable when it comes to highlight recovery? Or am I doing something wrong, if I just use the sliders?
PhotoLab works differently than Lightroom for adjusting highlights and shadows, white and black, etc. Fortunately, the subject has been discussed here rather extensively. This might be a good starting point:
For simply recovering highlights, you might try making careful use of Smart Lighting (spot-weighted adjustment if the regular adjustment isn’t adequate), lowering exposure, or a combination of lowering Selective tone Highlights and raising Selective tone Midtones to compensate for the fact that the Highlights slider doesn’t just affect the brightest part of the image.
There is something that you must be aware of, before you even take the picture.
RAW files may support up to 10 stops of under-exposure but they will only support between 1⅔ and 2 stops of over-exposure. It is imperative that you do not exceed that over-exposure limit as there is simply no data to recover and no amount of “magic” in any software that can help.
When I teach, I suggest that people take a spot meter reading from the brightest part of the scene and then adjust the exposure to be between 1⅔ and 2 stops over exposed. Then, everything else will fall where it will and you won’t need to recover highlights in software.
Otherwise, Greg’s advice is worth following.
Thanks for your comments. I have edited the same raw file in Lightroom and in PL, see
https://www.flickr.com/photos/181720387@N07/albums/72157711853141608
Have a closer look to the sun stars on the water and the sun.
Edit: Attached the pictures.
FYI: It says I need to be signed in… I do not have an account… is there a way to sign in as a “guest”?
I can’t access that album. I do have a Flickr account
Thanks Greg for your comment. I now did follow the suggested order in the thread you have linked to. Indeed, if I first adjust the overall exposure to the highlights and afterwards pull up the shadows again, PL seems to be able to recover about the same range of highlights as LR.
Thank you very much 
Do you have a reference for this? I would have thought that depended somewhat on the sensor and camera software? Not saying I disbelieve you, it’s just my mental model doesn’t understand why.
Hi, Joanna,
This is an interesting observation and I am trying to make sense of it. In a very simplistic sense, sensors are basically photon counters and count up until they can’t count any higher. ISO affects this only in the sense that, since the photon count is multiplied, the dynamic range is reduced–the maximum possible photon count is reduced by half for each ISO step up.
Given this, the goal might be to ensure that the brightest spot in a scene does not exceed the maximum photon count supported by the sensor at a given ISO. It’s interesting to hear that this exposure could be calculated as between 1⅔ and 2 stops above the exposure selected by spot-metering the brightest spot.
I tried to derive this number. Let’s say I have a white, evenly lit surface, meter it and take a photo based on the reading. I then read the pixel value of the unadjusted image–what is the pixel’s luminance value? I see some web says saying that meters assume they meter an 18% gray surface and then provide an exposure so that the result is 18% gray. So, in an 8-bit image generated from the unadjusted RAW file of my white surface, I would expect to see an RGB value of around (46, 46, 46).
Raising this by 2 stops gives me about (184, 184, 184). It looks like one could go another 1/3 stop above this.
If a meter reproduces 18% gray as 18% gray and if my camera uses a 12-bit sensor, then 10 stops below 18% gray will yield 0, which is the end of the line. This would not be true for a 14-bit sensor, of course, as it could go 12 stops down. As another corollary, every ISO step reduces the dynamic range in half, which is the equivalent to dropping a bit. So, if base sensitivity is ISO 100 with a 12-bit sensor, then ISO 200 would support only 9 stops of underexposure, ISO 400 would support 8 and so on.
I never really spent much time thinking about what the meter is actually doing. Of course, if one has an EVF, one could just look at the histogram to avoid losing of highlights.
Let me know if I misunderstood or made incorrect assumptions.
Part of the reason I asked is because of ISO-invariance. Which my sensor has.
It’s interesting to think how one might take photos with a true ISO-invariant camera. Here’s how I might approach it:
- Set the camera to base ISO.
- Determine the slowest acceptable shutter speed.
- Determine the widest acceptable aperture.
- If the highlights aren’t blown (based on a histogram), take the shot.
- Otherwise, use a faster shutter for narrower aperture until the highlights aren’t blown, then take the shot.
If you don’t want to use the histogram method, you could try the spot meter method. The goal is to make sure the highlights aren’t blown.
Camera manufacturers are producing ISO invariant-cameras, but don’t quite seem to know what to do with them. They don’t advertise this as a selling point, for example.
In my ideal ISO-invariant camera, the ISO setting would merely be a piece of metadata. It would be used to control the image shown in an EVF or the preview JPG (or final JPG, if not shooting in RAW mode). Post software could also use it to set the EV +0 level. But all shots would be taken without any ISO gain.
Instead, ISO invariant cameras still include the ISO gain circuits (or perhaps they perform the gain in software before writing to the RAW file). And if you try to shoot everything at base ISO, many shots will look underexposed or even totally black. With an EVF, you might not be able to see what you’re shooting. And your preview images might be a long sequence of black shots. It’s a sad waste of a powerful tool—with an ISO-invariant camera, you should never have to sacrifice the total dynamic range of the sensor.
Regarding your original question, I have been able to recover detail in the highlights of one shot in PL that other tools were totally unable to recover. I don’t have the latest version of Lightroom, though (I do have Adobe Camera RAW CS6). I’m not sure why you had problems with your shot. I’d have to know what you did or have a chance to work with your original RAW file. You might try using control points on the sun to see if that helps.
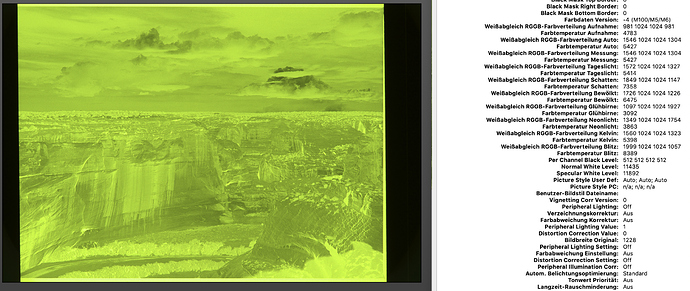
Hmm, be aware that the histogram (and blinkies) displayed by most cameras do NOT take their data from raw, but from the jpeg preview, which depends on the picture style, the WB and the colour space that you set in your camera. Over-exposure can happen in one or more of the r, g or b channels resulting in colours that can out of gamut or simply blown (usually in highlights)
The close to best way to make sure that your sensor’s photosites are not flooded is to use UniWB, a custom white balance setting that will provide outlandishly green jpgs and a histogram that translates raw data with preferably equal multipliers - check the wb multipliers (not quite perfect here) below.
Ways to get UniWB can be found here GUILLERMO LUIJK >> TUTORIALS >> UNIWB. MAKE CAMERA DISPLAY RELIABLE or wherever you find it yourself.
My technique for determining how much over-exposure is too much is based on my experience with the Zone System, as used with B&W negative film, but adapted to digital sensors.
You can go to DxOMark to find out the dynamic range of most cameras. Then you need to run tests to find where 18% gray is within that range.
To find the highest end of the range, you need to use manual mode and meter off something white with texture (I used white kitchen roll with dimples in it). Start by taking an average reading from the towel - this will give you the 18% reading and the image will look gray instead of white because of this. Then increase the exposure in ⅓ stop steps until you can no longer see detail in the image. Assessment should be done by bringing the RAW files into DxO and adjusting the image until it is as bright as can be without blowing the highlights.
One of the images (usually somewhere between 1⅓ and 2 stops) will be where you start to lose detail. Now you know how much you can over-expose a spot reading from the brightest part of a scene without losing detail.
You can do the same, but with a black textured towel, until you find where the lowest exposure falls before losing detail. Or you can work it out from the DxOMark measurements.
Of course, as @geno shows, the sun and other specular highlights can never be truly recovered; they are way beyond the range of any medium, film or digital, and you should never attempt to meter off the sun or specular highlights anyway.
What @geno is trying to do in recovering highlight detail in the sun is simply impossible and, even with a RAW file, processing in any software can only really dull it down to a gray of around 250ish instead of 255.
@Joanna - no, I did not try to do impossible things. I just tried to get the same dynamic range out of my Image with PL as in LR. This was my question and the topic of this thread, nothing else.
I’m sorry; I must have misinterpreted what you were saying.
Given the sample images you posted, exactly what was the difference you were seeing and which highlights were you trying to recover?
In my opinion, tthe main difference between the two images is, that the image from Lightroom has a warmer white balance. Therefore the sun appears more yellow, but the snow is not white and the mountains appear too blue-green.
I would try to put a U-Point on the sun and change the white balance for the U-Point so that the sun doesn’t appear so white/cold.
Regarding dynamic range I do not see any differance.
@Gerd: Notice the clouds / haze on the lower left of the sun. This area is completely burnt in the PL version. The WB had absolutely no effect on this. Believe me, I have spent whole evenings in this Image 
I will post crops later on, as well as crops from the current version following the process suggested in the thread @Egregius has linked to.
@geno, can you post your original raw somewhere accessible? I’d be interested in looking at the image with RawDigger and see what I can do in both Lr and PL.
Other than that, differences will always exist between different raw developers. Each app will deliver its own interpretation of the data provided, influenced by its camera profiles, colour management etc.
Try using ClearView Plus
… with a U-Point/Control-Point - - via Local Adjustments.
John M


