Highlight Recovery Current best practice

Yes, PL is not the best in this area, mostly due to it not having a White Point control and the Selective Tone controls being far too broad. This has been discussed many times before.

Now that we can save presets in the Tone Curve panel, my suggestion is a simple one-step solution that works very well in most cases and, I know that a lot of others use it. I did not invent it.

I do not understand why there is so much negativity to my suggestion from others on the forum.

Allan

Oh well, it seems difficult without a dedicated slider.

In the first and second example the histogram touches the right side and the value (bottom right) stays at 255.
As both images are overexposed (#1 in the red channel, #2 in all color channels) I could reduce the value (top left) to 253, where in (one of) your preset you apply that curve + limit at 245.

In the third example the histogram doesn’t reach the right side.

  • To better use the available tone values, I corrected the value (bottom right) for demonstration to 250, so that the activated Highlight clipping warning just started to show up.
    → I’ve set up the White point, here with a touch of clipping.
  • Instead I could have moved the triangle (bottom right) a bit to the left …
  • or moved the end of the “curve” (White point / top right) a bit to the left until the tonal values reach the right side
    … and to tackle clipping, move it vertically down.

Compare with different Tone curve settings by @stuck, @IanS and others.

.

→ When clipping you want to control the highlights, not to intensify them.

I do not understand this. None of my settings intensify the clipping and I never mentioned this.

Sorry if it wasn’t clear. You are dealing with highlights and clipping.

If you use your curve + limit at 245, you increase highlights (and midtones, even shadows) to some extent, while limiting the highlights at 245. – You might not notice in your “camel example”, but I could see the side effects as explained.

And please note that not every highlight needs to be “cured”. Sun, stars, lamps, candles, reflections, etc. create natural accents. If they are not a nuisance, leave them intact.
.

I do not understand why there is so much negativity to my suggestion from others on the forum.

What you call “negativity” are various suggestions, workflows … whatever you want to call them.

For example, while other users start with the neutral default setting, I use the “old” DxO standard.
I generally adjust overall brightness with exposure and use smart lighting to adjust image contrast and lighting. And/or use the tone curve.
Only then do I use Selective Tone, Finecontrast, ClearView etc.
To edit specific areas (e.g. highlight or tone down), I go to “Local Adjustments …”
OR I do something very different.

Use the way you are comfortable with. :slight_smile:
It’s the final result that counts.

Ok, I see what you are doing, however, your method of setting 253 results in the entire Tone Curve being adjusted, whereas, with my method it is not. This is because I have anchored the curve at 222 thus only the top end is adjusted.

This is the point that I have tried to make because It can be a factor depending on the image.

So, essentially, you are doing the same as I am other than the anchor point.

Before we go any further, I have to say that in my sunset example, 247 was required. I left it at 245 for the example.

I do have other images where 253 is sufficient. This number and the 222 are variables that I can adjust if the preset values do not work. The preset is a starting point. I also have a preset that starts at Hi -5 or 250. I find that for most of my photos that have clipping, the Hi -5 (250) is the one that I use.

Quite often if I have an image that has some clipping, after removing the clipping as described above, I return to the Tone Curve and adjust the mid tone, Gamma, portion of the curve. This adjust the tonal quality of the image yet still removes the clipping.

Example, something like this:

Actually, the camel images were Hi-5 (250). Anyway, I did both. I took a photo where 253 was the value and (A) I used my Hi-5 preset and adjusted to 253. (B) I used your method of setting 253. Both methods slightly adjusted the Histogram but differently. There was a very, very subtle difference in the resulting images.

Yes, I agree but it may make a difference when printing as you do not want “bare” paper.

Allan

Less then 1% at the high values, going down to 0% at the low values.

You anchor point is a rotating point. If you want a fixed point you need 2 anchor points next to each other. I just noticed.

George

2 Likes

If you like the scene-referred workflow of darktable but can’t stand the bloat, AP’s Ansel fork has become pretty stable and a pleasure to use in recent weeks. Everything comes with issues, but the transparent dynamic range management is what keeps me using it.

1 Like

Highlight recovery:

1 check if exposure of the blinkies area are max exposure +2ev. ( i use FRV) most of this can be recovered including details. Most pixels over the +2 is blown beond repair. Then is clone, repair a option if you need details on those places.

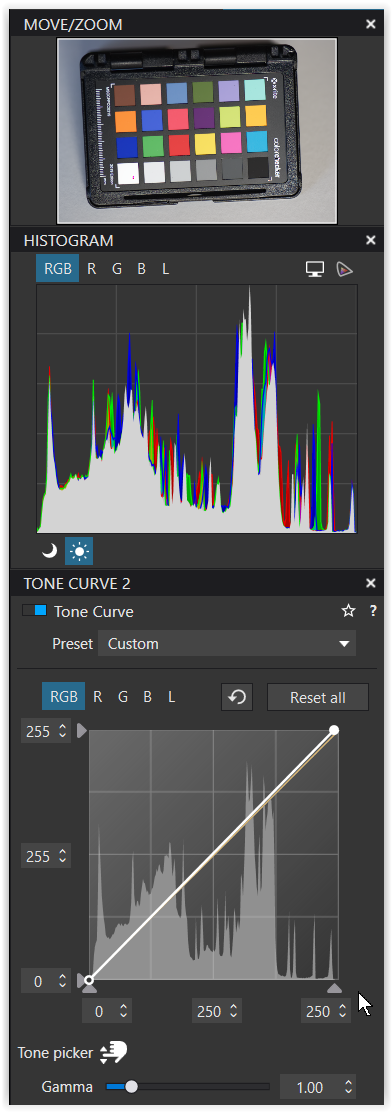
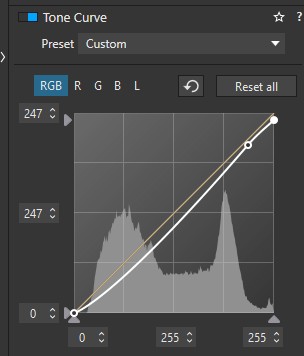
2 smartlighting is basicly a DR extention tool. It works a bit like idynamic. But then in post. By re-aranging tonecontrast it brings up blackisch shadows and bringsdown nearblown highlights. ( Yes with the cost of losing overal contrast) it looks a bit like the curvetone line push black to 5 and white 255 to 245 but a bit smarter.

Best way to use smartlighting is put (facialreqocnision) boxes on the places of interest. Hightlight, darkplaces, objects, people…. Use about 25% .

And then use exposure to brighten the image if it is too dark, because you boxed a brightest part of the image it tries to keep it inside the DR wile other parts get brightend. ( it compresses the upper part of the exposurehistogram.)

Then part two of the modes.

Selective tone and filmpack’s advanced contrastsliders.

Highlight bar of tone and contrast at -25 is much more effective then only selective tone at -50.

Why? Highlight contrast slider lowers(-) or enhance(+) pixel diversity in the 245-255plus area. So you lose some detail but well in blown white detail is already lost so why bother to try to keep this.

By enhancing midcontrast(+) a bit you get some details back in the highlighted areas of the pixels which arnt near blown. This give some detail back in those area’s. You can fiddle with -25 -25 and then -27 -23 until you find the sweetspot between supresion of brightnes and recovering detail.

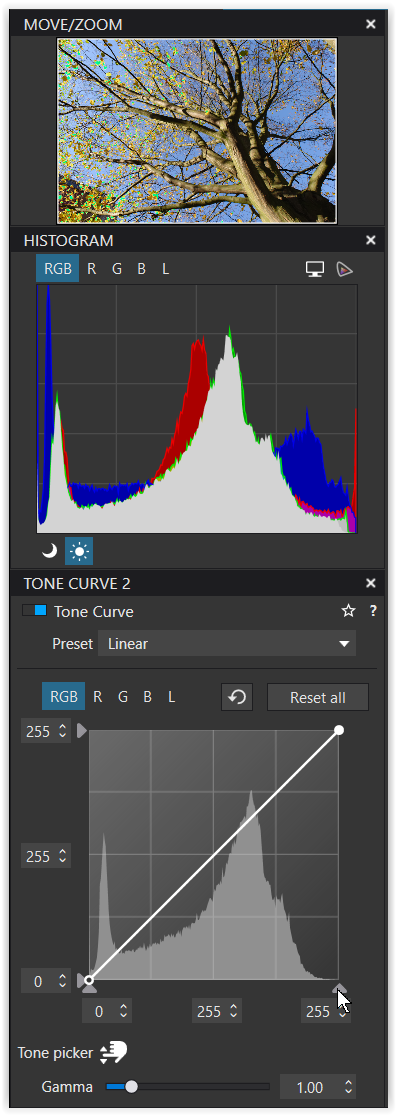
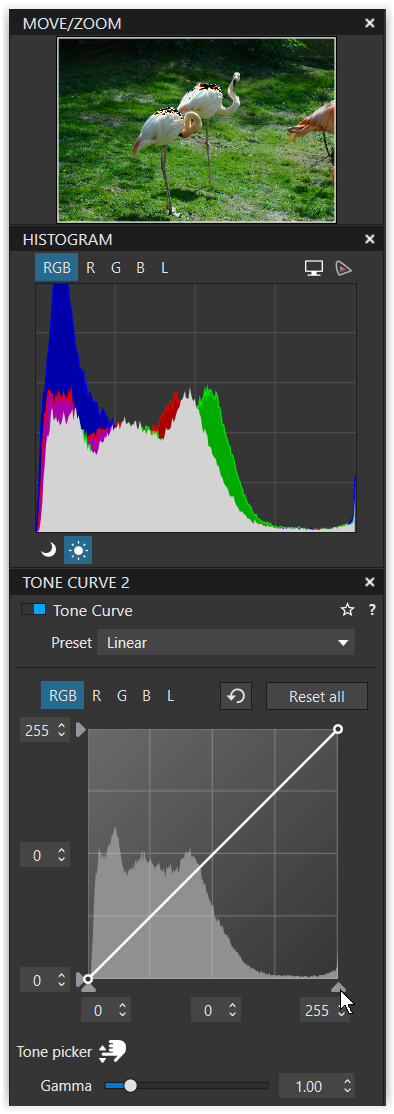
Sometimes the blinkies show complement colors like cyaan or magenta. This shows which channels are over brightend, blown. ( FRV shows this in the hystogram upperright of the screen. Sometimes you can maniplulate those channels seperate without ruin your WB and or colors. ( upoint filters are most useful in tackling this.

Using plain smartlighting to the max is often just compressing the tonality of a image and make it dull. Use it moderate and it helps you to re-aranging the tonecurve in a smart way. It give you a better starting point.

But be aware that it actively counter attacks your other adjustments IF they are in the dangerzones. So switch off and on smartlighting wile adjusting to see if you are poking in the wrong way.

Fine contrast and local adjustmenttools can help to bring a image back to life after a global recovery by smartlighting.

Remember you cant redo in post exposure. Blown is blown closed shadow is closed shadow. So those details are lost. What you can is re arange all other pixel brightnesvalues of rgb. Cloack or reveal areas of a image. ( i mean soften or harden a color to bring it upfront or push it back in the overal tonality( hiding the flaw.)

My old Epson SC-P800 is a pigment-ink printer, that always produces these “bare” spots on Semigloss / Luster type paper. But honestly, that’s the least of my problems, whether I use picture frames with or without glass !

That means, I never adjust the white point in the print version, which is a separate, soft-proofed file properly scaled and sharpened with a custom layout, then to be printed from old PS.
Matte paper solves this “problem” on its own. – If you are printing in B&W, don’t reduce the white point to maintain the contrast.

And when using a dye-ink printer and glossy paper, there shouldn’t be a significant difference in gloss, at least I assume so.
:neutral_face:

My Canon Pro 1000 uses a clear “Chroma Optimiser” ink which “fills in” any blank paper

I had to look up that one.
It’s a kind of a transparent layer over the total print.

George

I vaguely recall that users used to complain about the gloss enhancer running out quickly, but not about the printer model itself. Apparently, Epson used to offer this feature on some older home printers, but not anymore.

Personally I have no experience with it – and in fact never liked high gloss paper. :slight_smile:

Neither do I. I mainly use Canson Baryta Photographique II, which, I suppose, could be described as “satin”, but it looks like Baryta “darkroom” paper, which is neither gloss nor matt. The Chroma Optimiser doesn’t seem to increase any gloss, just “fills in the gaps”.

This used to be a problem with my previous Epson SC-P600 but, fortunately, I got fed up with blocked jets and air leaks and moved to the Canon. Best move I ever made.

That where my thoughts too. It’s a 100% coverage.

George

Yes – it’s an excellent paper that good friends of mine used for B&W (also on a P800).

My favorite is Canson Platine Fibre Rag, for both colour and B&W. I need to find a replacement for Tecco PCR 310 (a beautiful, firm, matte paper), which is unfortunately no longer available.

I only know about the gloss optimizer thing by hearsay. None of my Epson printers had it.

I do very similar, but use spot mode (with the spot set as small as it will go).

It’s essentially using the Zone System for high-key, picking out a highlight that I want to retain some detail in (zone IX), dialing in between two and two and two thirds stops to the plus, reframing and taking the shot. I also have a D850 and yes, I can go three, but those appear to be overexposed in the RGB histogram. Raw gives me headroom beyond that, but without downloading to a PC and looking at the histogram with something like FastRawViewer I’m not able to verify that I got the shot without blowing those highlights out. I’ve gone through all sorts of gyrations to get the RGB histogram (essentially the JPEG embedded in the Raw) to better reflect the raw data, including UniWB which IMO is a PITA even with a monochrome PC to hide the color cast*.

So I’m underexposing albeit not by much - but both my D750 and 850 have enough DR for this to not matter a lot - especially with PL’s noise reduction for the deep blacks.

*PL doesn’t have ‘auto’ as one of the WB choices, unless I shoot in auto; then I can pick ‘as shot’ which sometimes gets me closer to how things actually looked (e.g. under heavy vegetation).

More cameras should have the implementation of the old Olympus film cameras. There you could spot meter for the highlights and shadows separately, or measure several spots of which it would take the average. It is basically the in-camera implementation of Photolabs Smart-Lighting.

How do you compare the blinkies between the jpg and raw?

George

I don’t think so. Camera metering is a completely different thing. Probably you had in mind some kind of tonal balancing but in very different context.

You pretty much don’t. With Nikon raw (NEF) files, both the blinkies and the RGB histogram come from the ‘medium’ JPEG produced when the raw file is saved*. Raw has more headroom on the highlights, but that’s not visible until you get the file off the camera and use an app to inspect. You just have to ‘know’ that you have that headrooom - or assume you don’t and give up a bit of dynamic range - or bracket.

*that JPEG is stored in a container; Nikon raw (probably the others) is a kind of TIFF, which in turn is a ‘container’ file.

If I understood correctly, you use small spot metering with EC=+2.xEV and that’s ok?
What type of photos are you referring to? For very variable stage lighting, I just use spot metering with EC=0 or -2/3EV, but I have no time to recompose (would loose the “moment”). With EC=+2EV most of my photos would be uselessly overexposed in important details. Btw, metering for highlights is also risky during concerts due to reflections from the metal parts of the equipment.
Currently using Z8, which is much more safe for overexposures than my previous D4.

Red River papers are quite nice, and very friendly to ‘alternate’ printer inks……