Highlight Recovery Current best practice

Is there a current best practice with recovering highlights in an image.

I’ve worked with PL in the past but moved back to Lr as, the recovering of highlights simply was too cumbersome.

With Highlight sliders creating problems with contrast and gamma.

I then tried the exposure and compensation with tonal curve and sliders to recover method. Which is where I find it too cumbersome.

Is there any other method that is used with the latest PL8, that is as seamless as Lr and it’s highlight sliders?

Try the Spot Weighted feature of Smart Lighting …

  • activate the Spot Weighted tool - and draw a rectangle over the area with most highlights
  • and then either add another rectangle (positioned over a different area) to balance out the lighting adjustment
  • and/or move the rectangle(s) around until you get a pleasing result.

This technique can be very effective (and simple to apply) - - I don’t believe there’s any such equivalent in LR (?)

3 Likes

Welcome here,

PL’s Selective Tone sliders work differently than those in LR.

For some explanation you might like to have a look e.g. for this video
DxO PhotoLab 8 - Transitioning from Lightroom to DxO PhotoLab

Also check DxO’s documentation
DxO PhotoLab – Help center
DxO PhotoLab 8 User Guide
manual download

and try the Smart Lighting feature as @John-M described.

No. Different products, different functionalities!

If there is still some structure in the highlights, you can bring down the white point of the tone curve just a little bit and apply some local correction to boost the structures - if this is what you want. You can also try any of the contrast increasing tools in combination with the tone curve.

Again, a kangaroo is not a human, even if the latter carries a bag.

Thank you. Have given Smart Lighting a go. Works much better than the Selective Tone Sliders.

1 Like

Thank you, I’ve watched Mark Galer’s video, which made me revisit DXO PL again.

Highlight Recovery was the original reason, I stopped using PL and was curious if there were simpler steps in the latest versions.

Using the PL8 demo, I run into the same issues as other versions. Longer workarounds and consistency, which got me wondering if there were newer / different methods that I wasn’t aware of.

In case you still have the PL8 demo available, you can play with this file
P1050189.RW2 (14,7 MB)
P1050189.RW2.dop (19,9 KB)


left: M = the finalized version
right: VC 1 = raw-file + DxO Standard preset + Highlight warning ON

.
To see how (where) I used in this example DxO’s Smart Lighting correction, hover the Master over those areas where the Virtual Copy shows the Highlight warning.

list of the applied lighting corrections,


followed by a few more … and a warmtone filter

.
It was a family outing on a cold, bright, and sunny day. I had my pocket camera with me to take a few snapshots and didn’t have time to waste on exposure or similar experiments … not a real photographer event.

The less-than-ideal bright light, while impressive, virtually eliminated the textures of those brightly lit areas, and there’s no way to restore them in post-production.

  • You can darken such areas (make them slightly grayish), play with the contrast, or do other things, but I left them as is (family photos, not for a competition or anything).
    Neither Exposure, Smart Lighting, nor Selective Tone turned off the Highlight warning, but reducing the Tone Curve/Luminance to 252 did it, before I exported the image. :slight_smile:

see → further down

Here is an export of my version…

… and here is your DOP with my version added as a VC…

P1050189.RW2.dop (74,3 Ko)

Basically, I added a luminosity mask for the brightest parts, darkened the masked area very slightly and then warmed up the colour temperature a tad.

Well…

I copied M to VC 3 and added a Luminosity Mask to break up (some of) the white tones and make them (very) slightly grayish. However, this doesn’t restore the texture.


VC 3 → P1050189.RW2.dop (136,3 KB)

.
I don’t like this excessive (fine)contrast and I miss the warm touch of the afternoon light.

:man_shrugging:

Unfortunately, there is no texture. Those areas are pure 255|255|255 and on the border of being blown.

A wild idea that has come to me is to clone a textured area over the white and then use a mask to change its tint, intensity and, possibly, transparency :thinking:

Please excuse the diversion…

How would you do this in PL?
I tried the repair/clone tool to copy similar areas with texture. To tone a washed out or pure gray area (say 200,200,200 or higher) I use the temperature slider to warm or cool the area in local adjustments. However, my results feel time consuming and blotchy. I know how to blend layers in a traditional pixel editor, but haven’t figured out how to use PL tools for something like this. Thanks!

Thank you, yes, have 3 weeks left on Trial. Thank you for the file. I’ll try a couple of the methods mentioned here.

1 Like

I think the other suggestions you’ve received are more nuanced, but I find the following approach to be better than simply dealing down the highlights slider. First, I darken the overall exposure via its slider, and then I dial up the sliders for shadows and midtones. Assuming there is detail to recover in the highlights, this may provide a quick fix.

1 Like

Thank you, everyone for all the input.

I do the same and get good results with this method. I think DxO does not include a White Point slider because this is how they expect you to work.

Here’s a good/interesting article on this very topic.

Author’s summary;

  1. I think it might be an error to treat blown highlights as a dynamic range problem when perhaps it’s actually an exposure problem

  2. Shadow recovery is perhaps the best way to judge dynamic range

  3. More dynamic range will always seem better, though the number of times you need 12EV rather than 10EV (for example) may be limited

  4. Lab tests will reveal weaknesses in performance but often with exposure adjustments you would never apply in real life

  5. Capturing a high dynamic range is one thing, converting it into an effective image is quite another

2 Likes

This is indeed a very good and interesting article. The author starts with the following statement…

I’m starting to think that if my highlights are blown, that’s maybe not a dynamic range issue, but an exposure error on my part.

The dynamic range of a camera’s sensor varies from model to model and, within any given model, it depends on the ISO that an image is taken at. Getting the exposure right is a matter of placing the 0EV reading at the right place within that range.

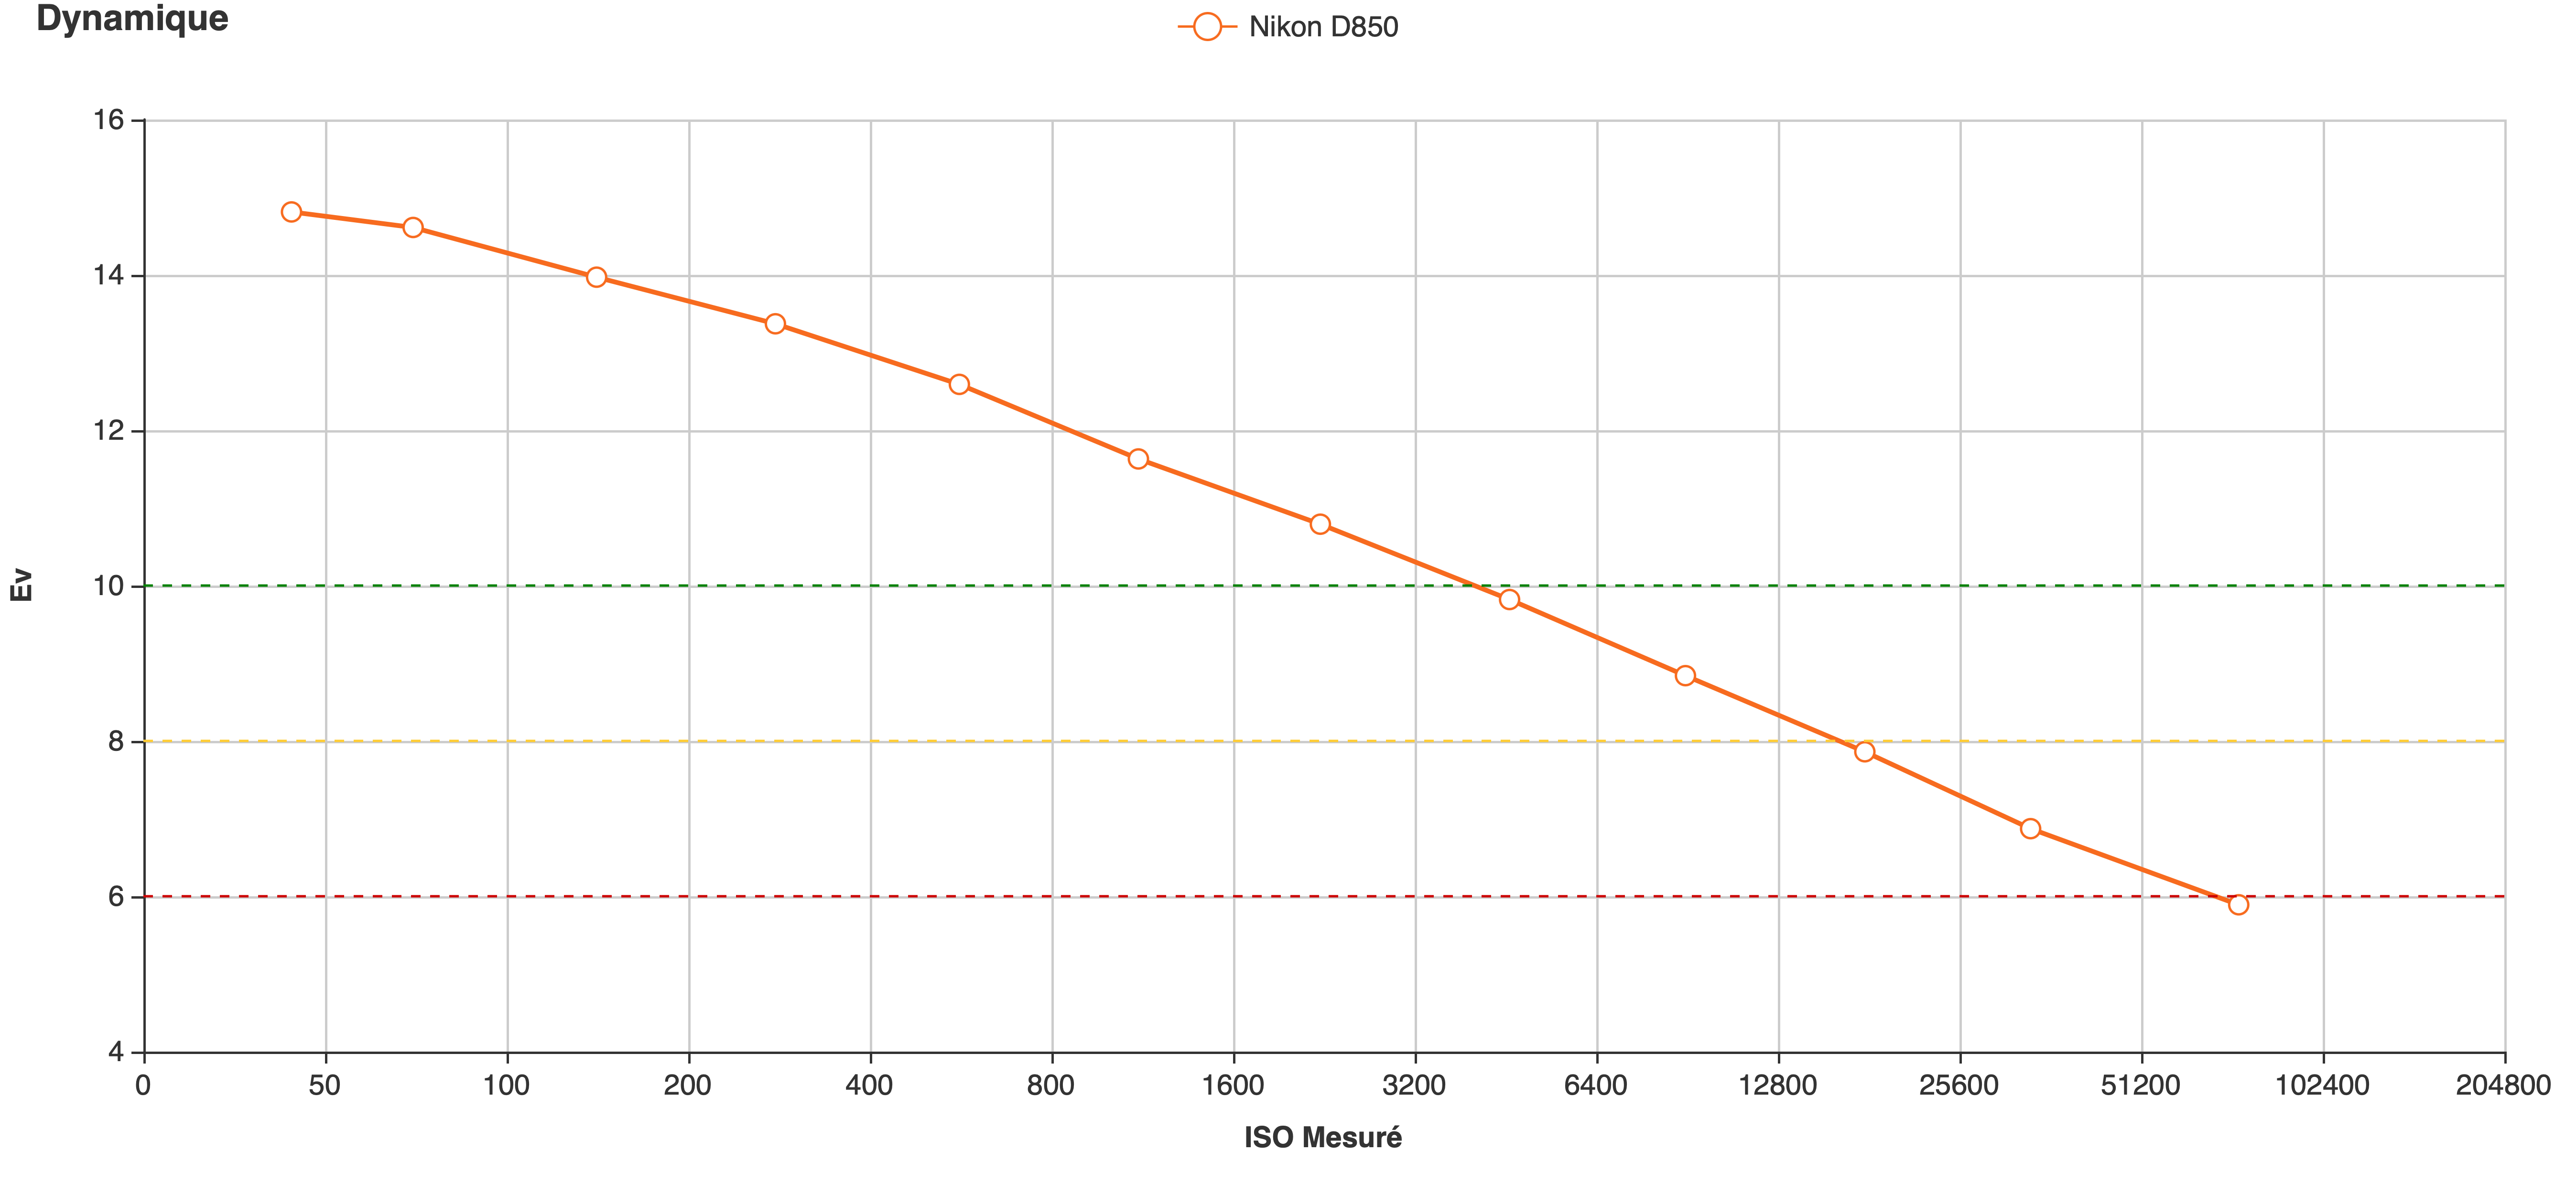
Hère is the DXOMARK dynamic range graph for my Nikon D850…

As you can see, at around 100 ISO, the DR is listed at 14.61 stops. But, at 6,400 ISO it is limited to 9.82 stops. The big question is - where, within a particular range, should we meter in order to maximise the tones available, without blowing out the highlights?

This can be determined with the aid of two pieces of material: one textured black and one textured white. Something like towels are useful for this exercise.

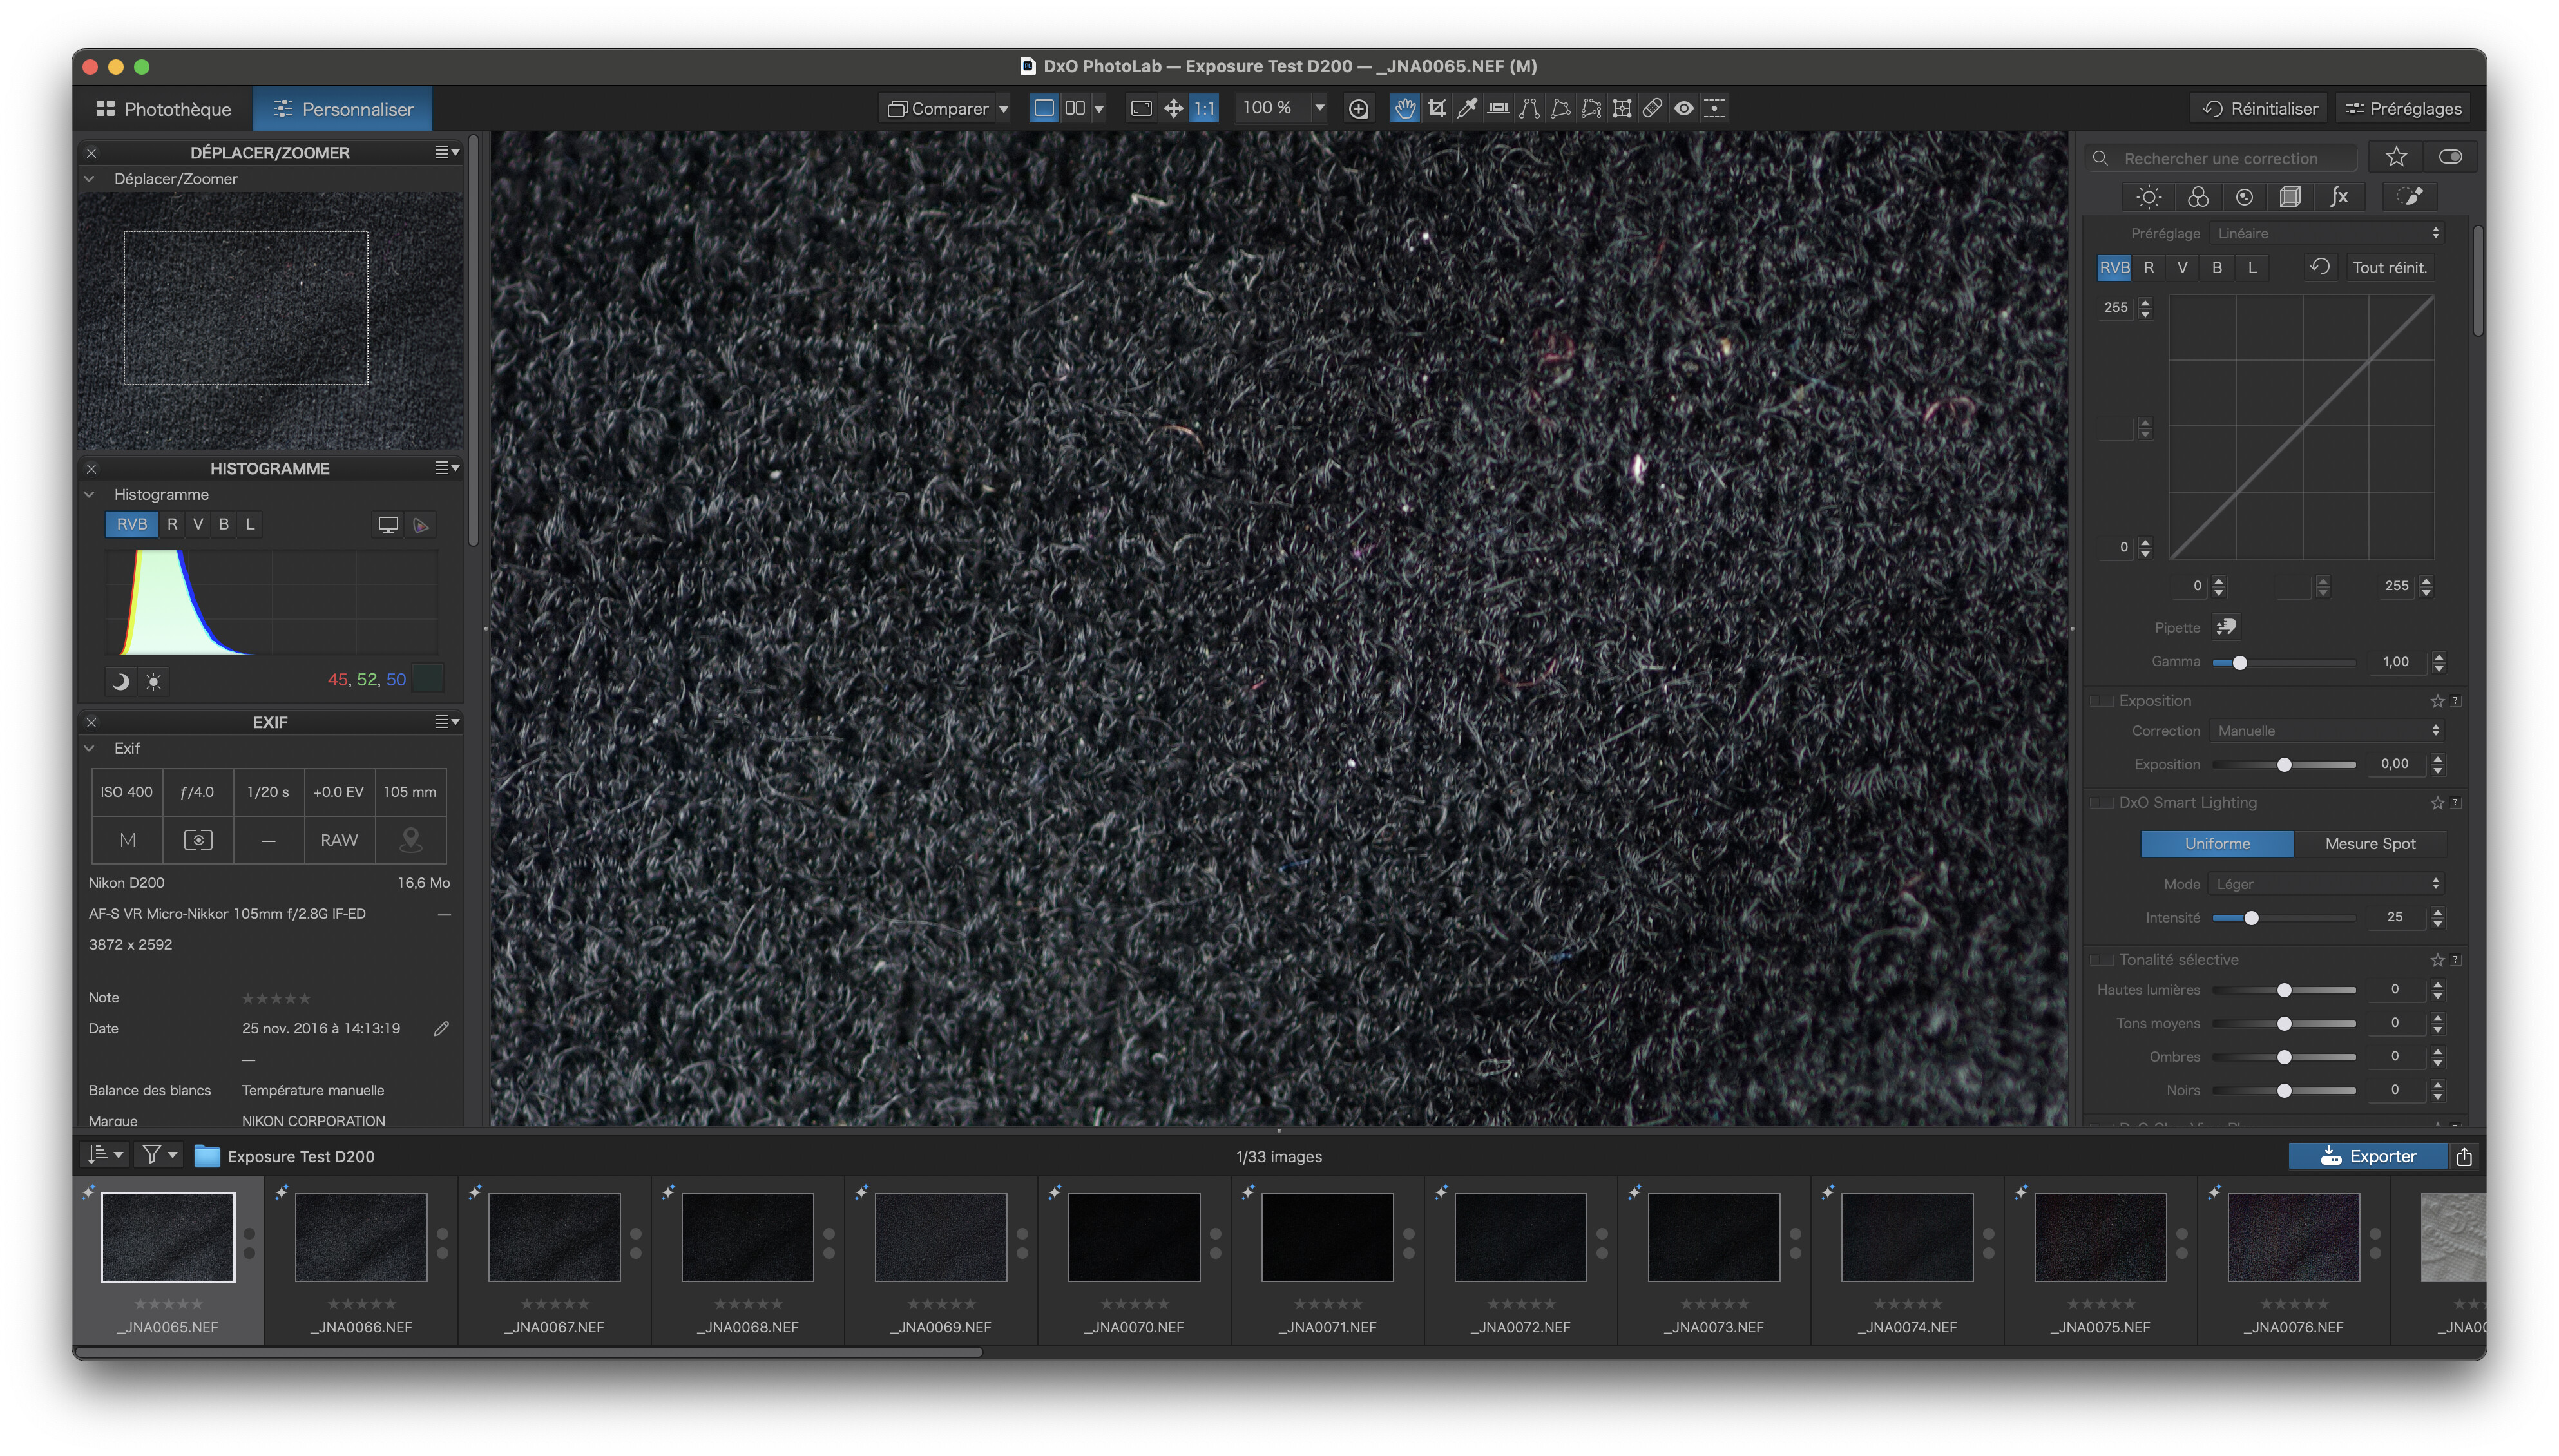
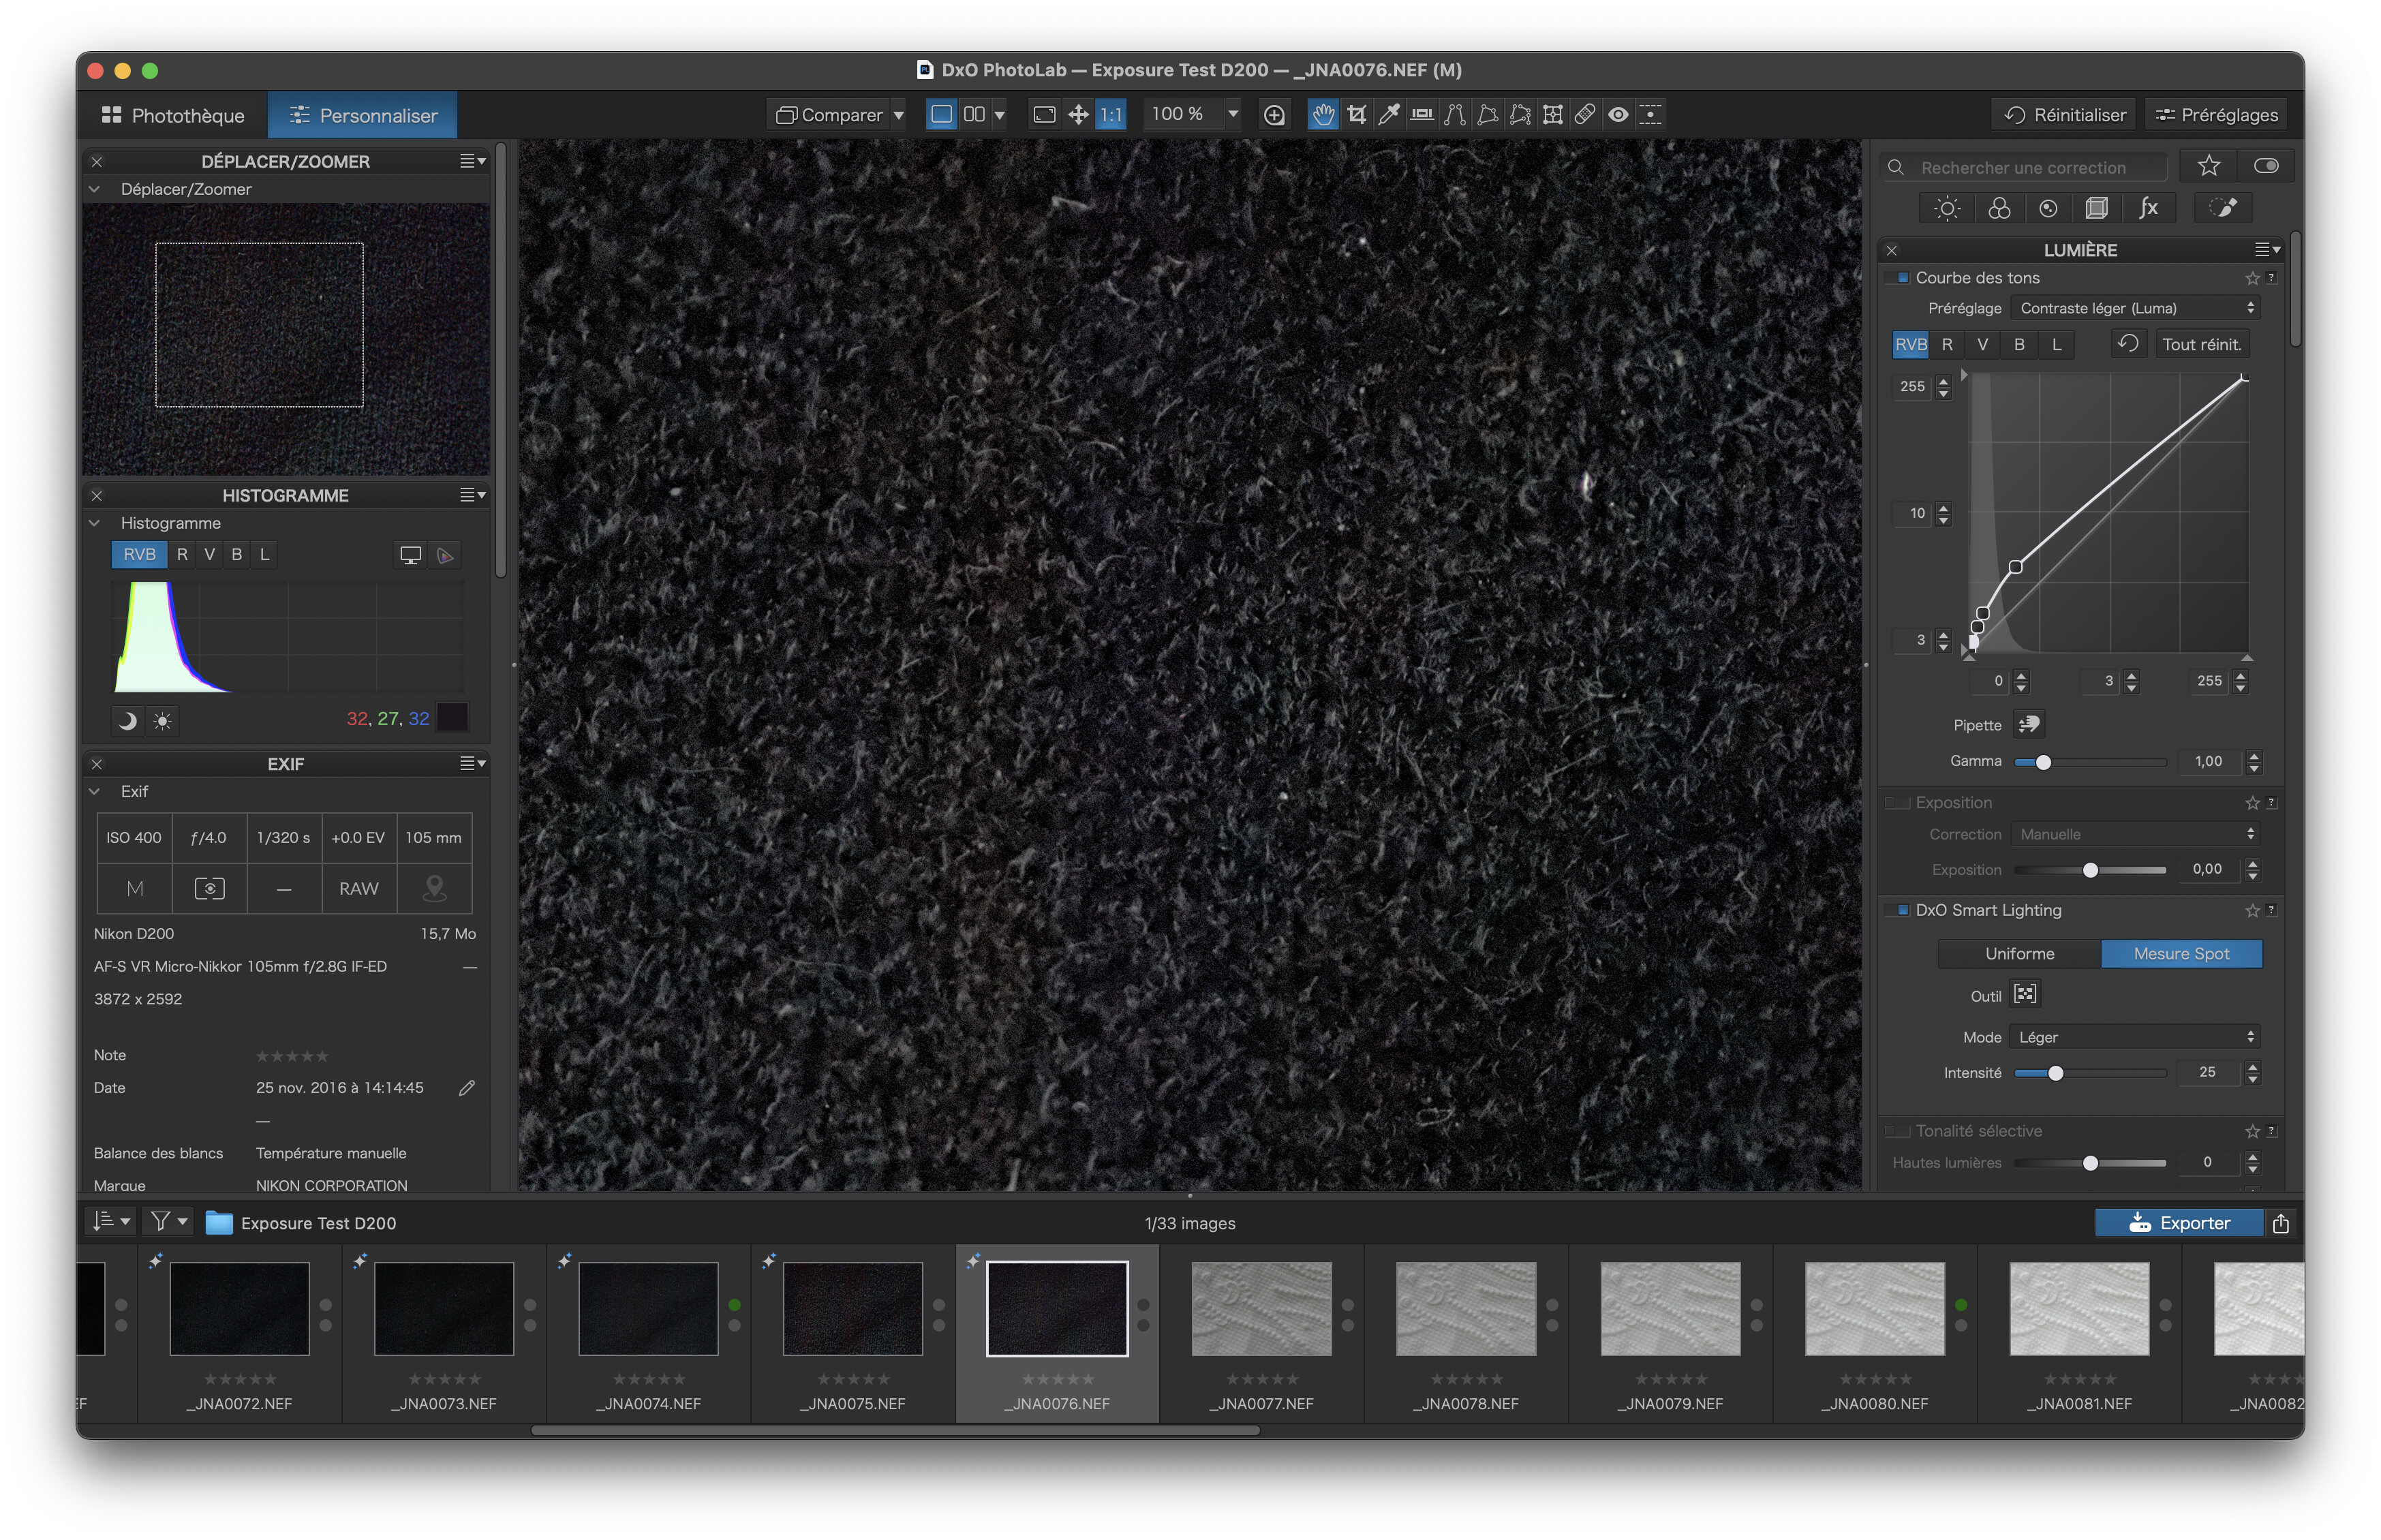
For the shadow detail limit, you will need to take quite a few shots as that part of the DR is quite large. Here are a couple of screenshots from an old test I did for an old Nikon D200…

First, with the correct exposure as determined by the light meter…

… then after reducing the exposure by ⅓ stop per frame, at -4EV

I could have gone further but, since it is much easier to recover shadow detail than highlight detail, I left it there.

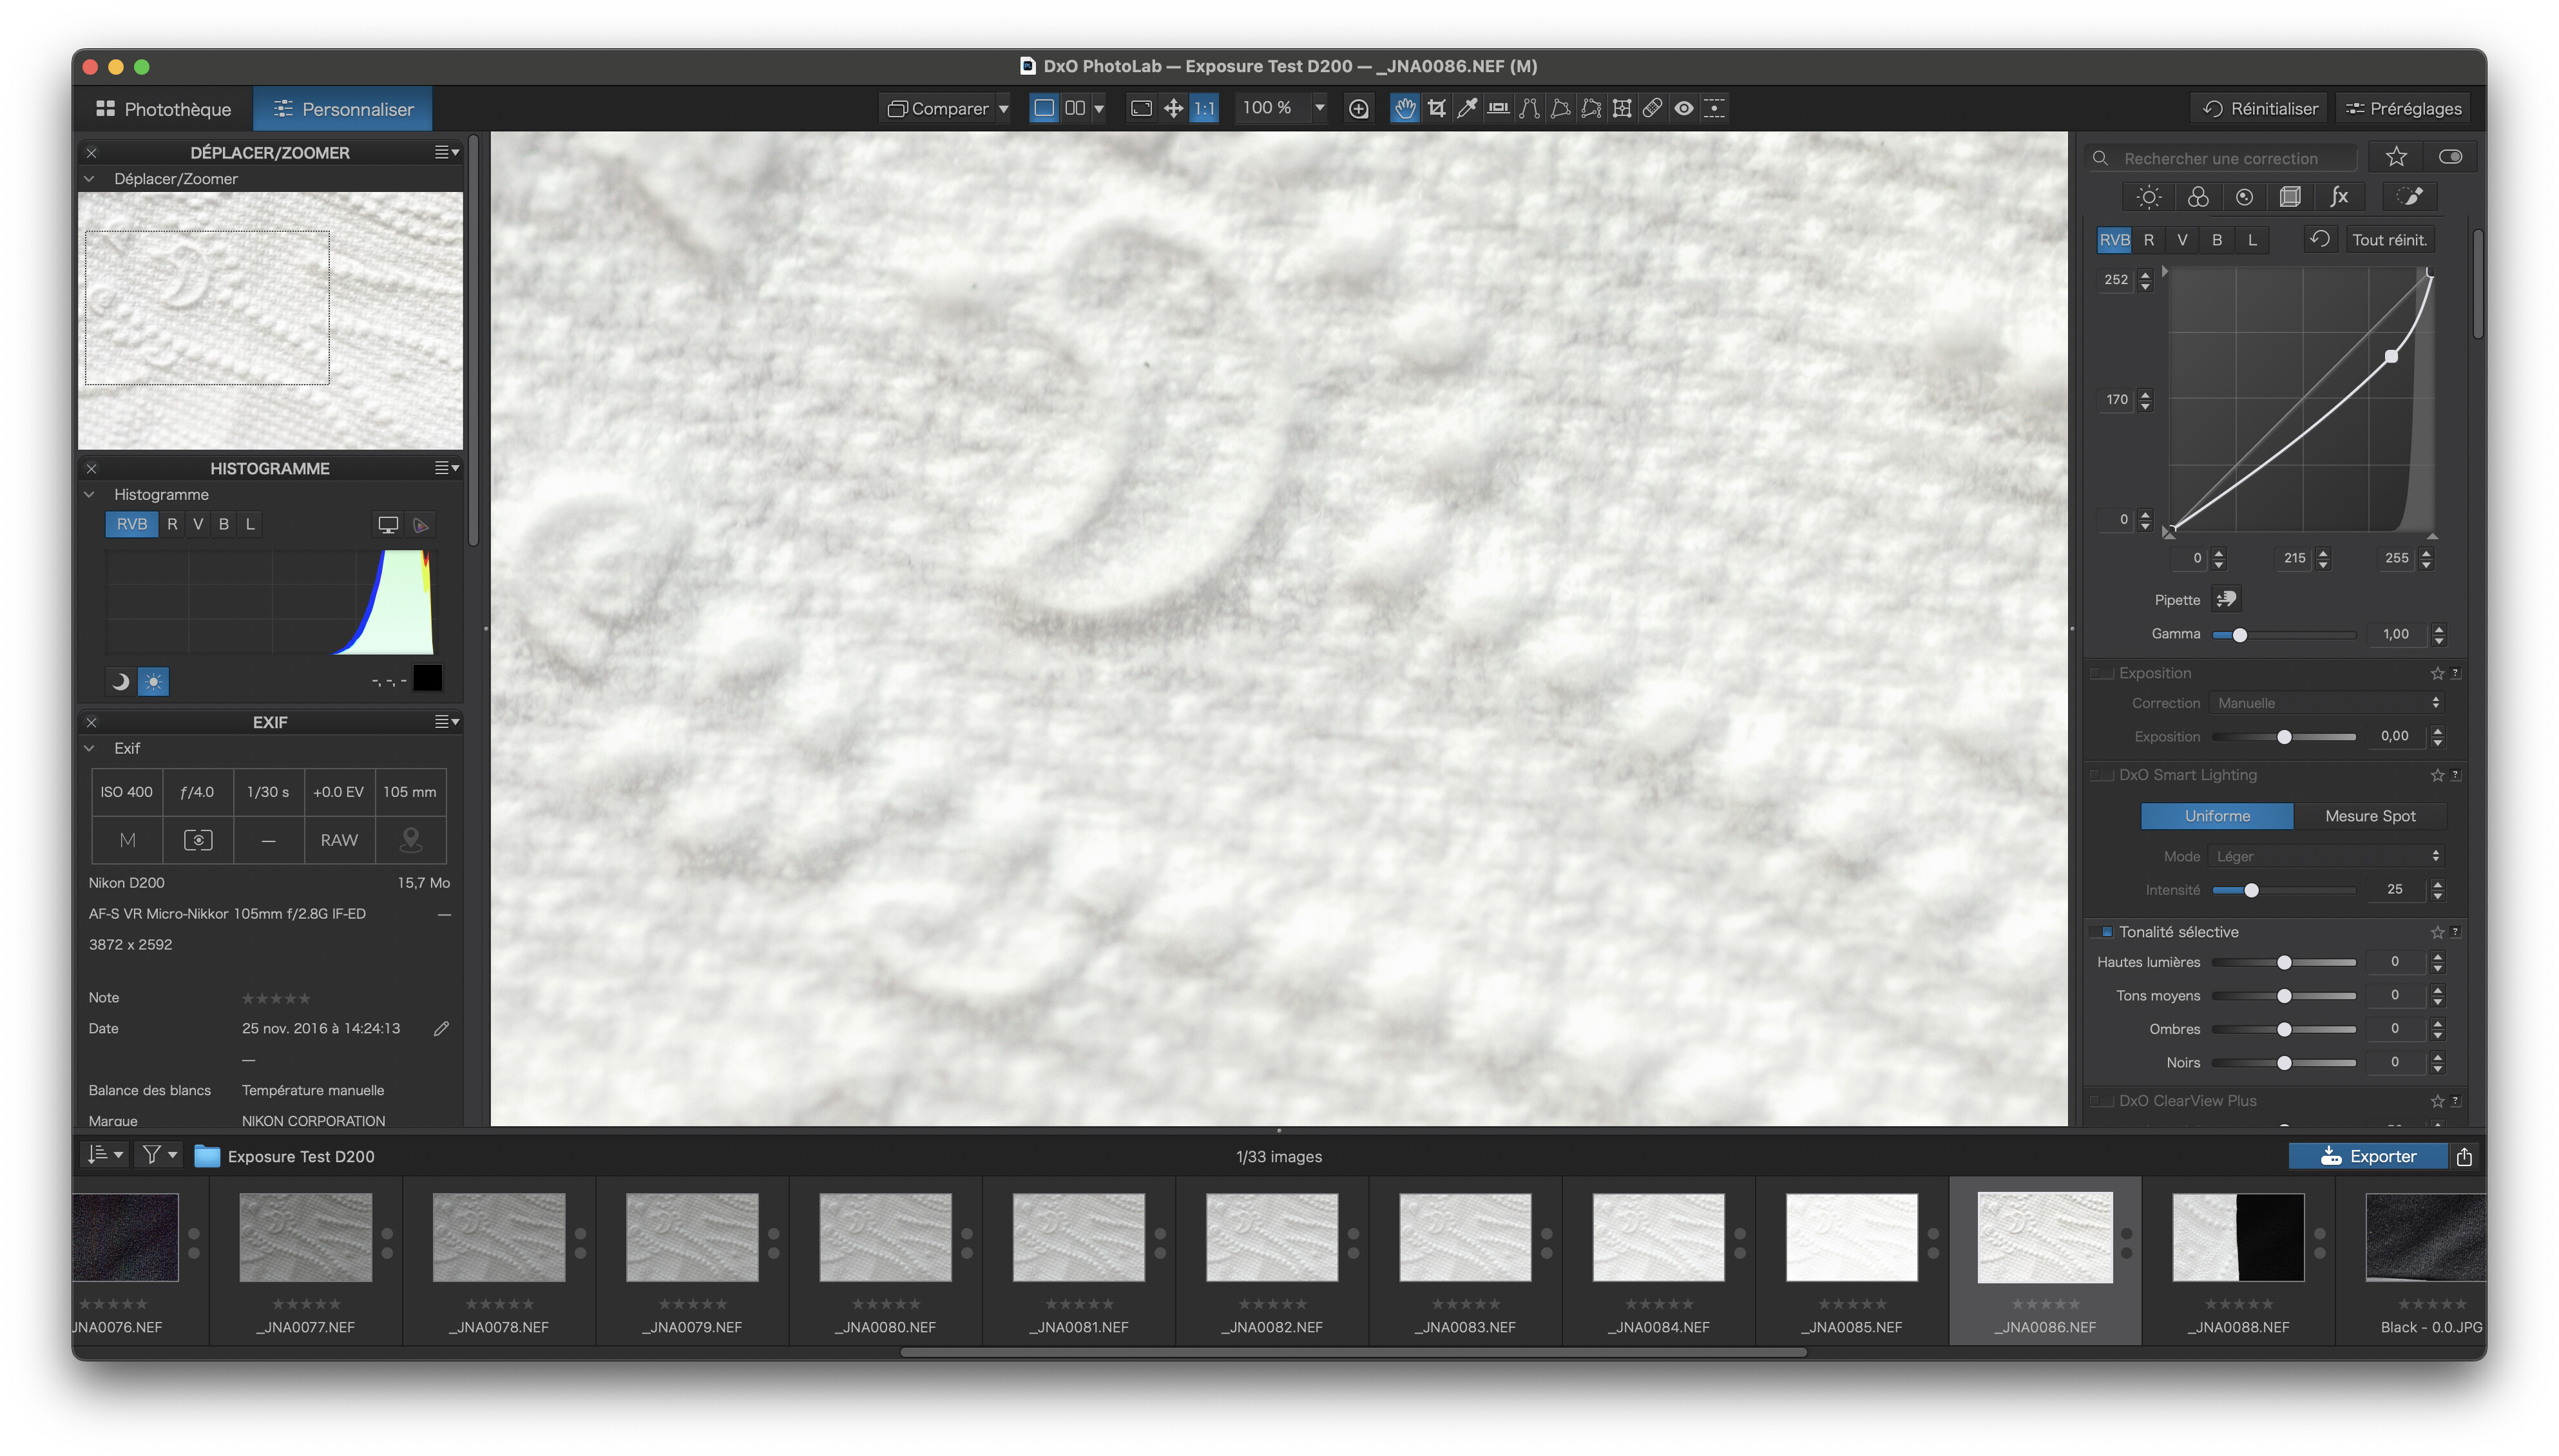
Next and much more importantly, I ran tests for the highlight limit…

The shot at 0EV is recorded, as expected, as 18% grey and is in the middle of the histogram.

Then I took another series at steadily increasing (⅓ stop at a time) exposures, until I reached a point where PL could no longer recover any more meaningful highlight detail…

This is the most important and crucial measurement. It shows me that +3EV is the absolute level at which detail is just retained.

Armed with this knowledge, I can now go forth into the world and take guaranteed perfectly exposed pictures, without blown highlights, every time.

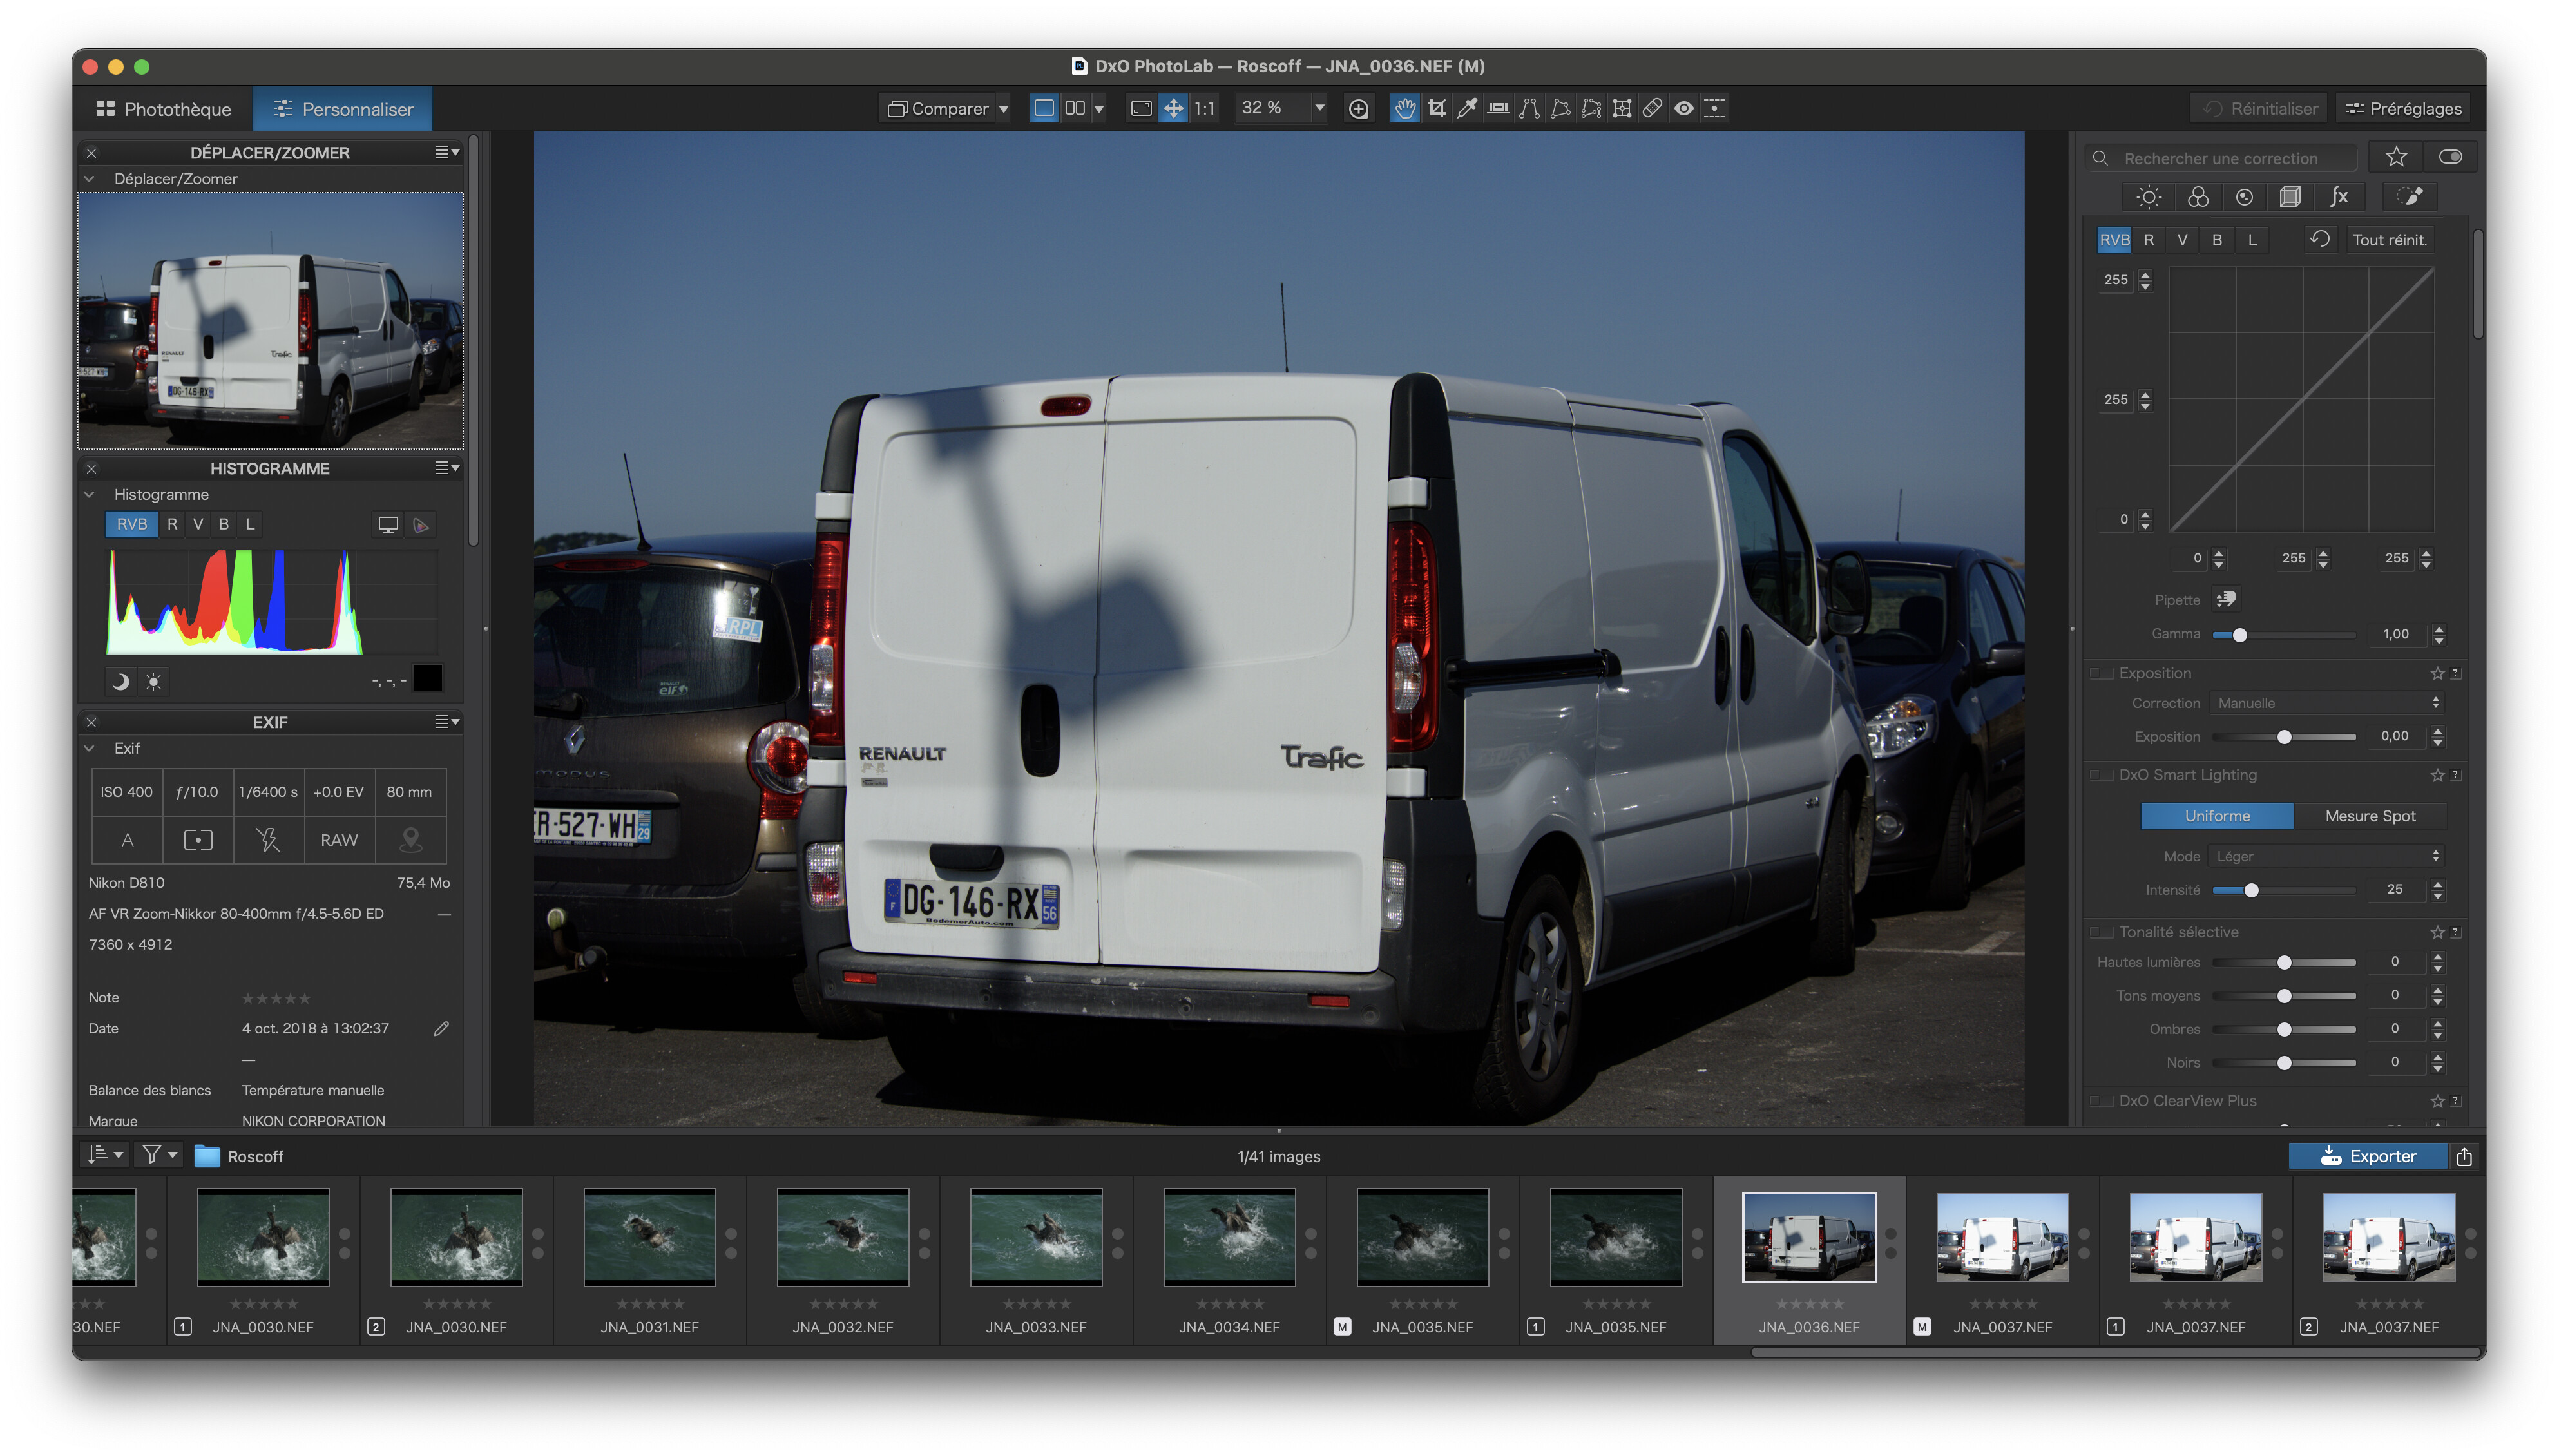
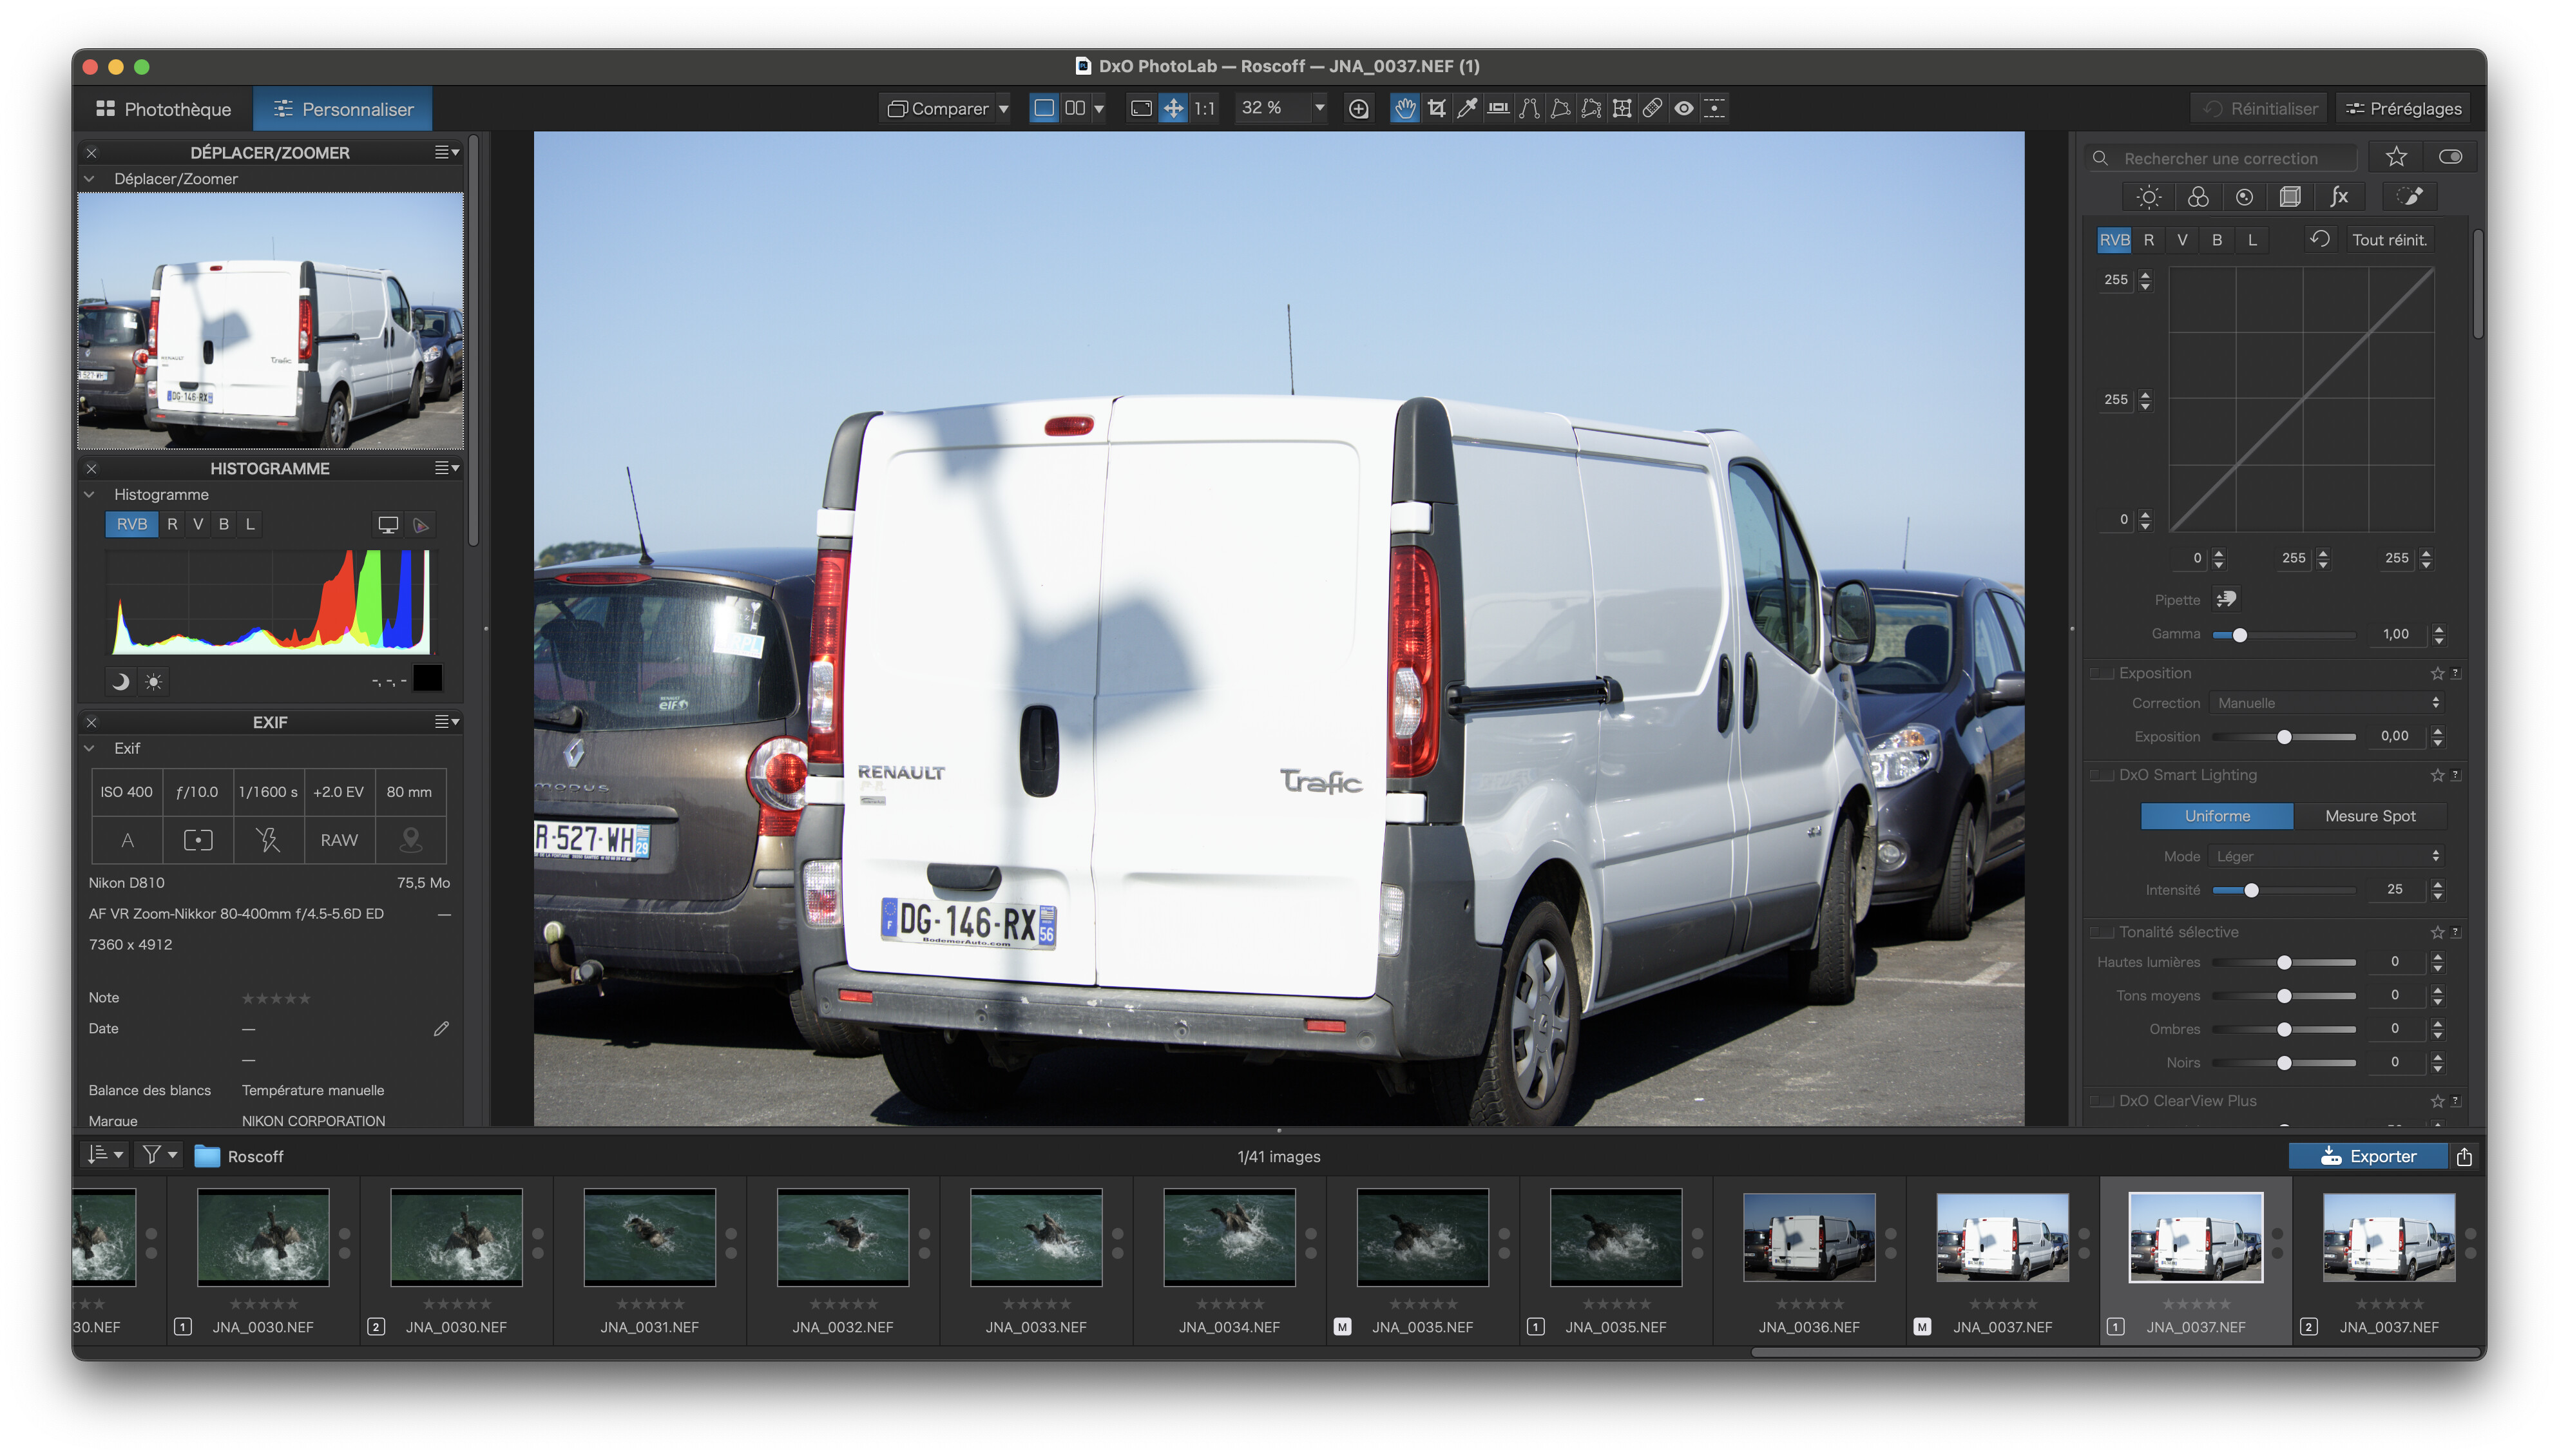
If I take a shot of a white van by metering at 0EV, I get a horrible 18% grey van and force the shadows into an even darker level…

However, armed with my knowledge that I can safely “over-expose” the white without losing detail, up to +3EV, I can increase the exposure by +2EV (to give more detail) and get a more accurate rendering of the white van…

… thus allowing me to recover even more shadow detail as well.

So, it is not just a matter of range versus exposure, it is far more accurate to state that it is a matter of knowing where to place the exposure with the available dynamic range.

With my D850 as an example, I absolutely know that, if I meter the brightest spot in a scene at +2EV, I will get highlight detail and, by deducting the highlight range of 3EV from the total range of the sensor of 14.6 EV, I have an available shadow range of 11.6 EV, which can be recovered in PL.

I never use the histogram because that is what I would call a “suck it and see” approach where you have to take a shot, check, alter it, check it again, etc.

For the sake of following this testing procedure, you will be able to guarantee never to get blown highlights and to maximise the available dynamic range.

The only exception is if you insist on having a full sun in the shot and risk burning the sensor.


By the way, all this is based on using manual exposure metering.

I’ve been thinking on the issue dynamic range many times.
My conclusion is that the extension of the dynamic range is on the dark side.
Clipping on the light side means that the sensels are filled to the maximum. Clipping on the dark side means that the distinction is lost. In this area you will profit from a higher dynamic range.
With my Z6ii I always use the histogram. I know some people don’t like this. But it’s the best way I think.

George

Dynamic range has always been an unbalanced distribution.

With B&W negative film, the Zone System states to expose for the deepest shadows with detail at zone 3 (two stops below 0EV) and let the highlights. So, you have a distribution of -2EV to +5EV. But this can be extended by over-exposing and over-developing.

As for the histogram, that is only showing the JPEG values, so you are missing out on what the RAW can give. The histogram might be the way you are content with but it certainly is not, and has never been, the “best way”. How do you think film photographers managed?

That sounds like an effective and simple process - thanks, Joanna.

How do you determine that you have the brightest part of the scene metered at +2EV ?