I would like to clarify the order for applying an ICC paper profile for sending to my Canon Pro 1000 printer.
I notice that I can export from PL8 with the printer profile embedded in the exported TIFF.
Or, I can export with the original profile from the file being edited and then apply the printer profile in Canon’s Professional Print & Layout software.
Others will chime in with their processes. Here’s mine:
I never export from PL8 with the printer profile embedded. I don’t want it ‘baked’ in to the tiff file, limiting my use of that file. I always export to file in ProPhoto RGB and choose the ICC profile when it’s time to print. For my use this allows me greater latitude of how the file is used after RAW processing.
I generally bring using Qimage One, choosing default output sharpening of 5. PPL performs equally well if output sharpening is applied to the tiff file.
Joanna, the paper profile is intended to “customize” your image output to your specific printer, ink set and paper. If you use a different paper, you need the appropriate paper profile.
You export your final image in your preferred color space (e.g. ProPhoto), but apply the paper profile during the printing process.
Soft proofing allows you to “preview” the likely outcome and make adjustments if necessary …
I don’t print myself. May I recapitulate in my words?
Embedding means that the pixel values are based on the target color space.
Embedding a ICC profile means that the pixel values are changed. The image can only be used for that purpose.
Soft proofing means that the ICC profile is added to the source file on the way to the monitor. The source file is unchanged.
Adding the ICC profile to the image on the way to the printer means that the original file is untouched. This can be done in the printer software or in a printer application.
Further testing reveals that it might be a good idea to export to TIFF, from the JPEG, using the wide gamut profile as that is what I am editing in on the screen.
Would you like to test editing a JPEG with the sRGB profile, in the wide gamut space, then exporting one TIFF with sRGB and another with wide gamut, to see if you find any difference when you soft proof those TIFFs?
Hi George,
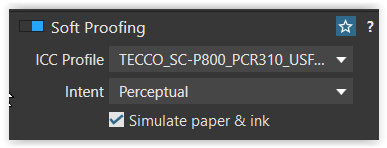
softproofing is meant to “preview” the image
( shown here with the profile for a matte paper )
… and allows the user to tweak the file accordingly
( then better work on a ‘print’ version ! ).
.
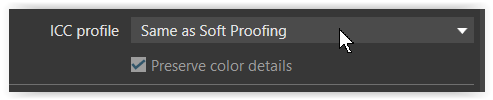
While the softproof itself does not change the image,
it would do this once you export with “Same as Softproof” ( this option is convenient when exporting e.g. to sRGB for online use )
As said before, it’s not recommended to export with the paper profile as you limit the color space to that of the paper. Then using the paper profile again in the printing process (where the paper profile normally is invoked) causes double profiling.
@Joanna, what is the profile of your original JPG file? Most likely sRGB.
Converting a file to a larger colour space than sRGB will NOT change anything as the sRGB colour space will fit into this colour space and NO colour data changes.
Soft proofing for printing will take your image and simulate on screen what it will look like on the printer and paper you select for printing which is most likely to be an even smaller colour space than sRGB.
In summary, converting to a larger gamut changes nothing. Converting to a smaller gamut MAY change data if the data does not all fit in the smaller gamut. There are many instances where the gamut of the photo is so small they will fit in the smallest colour space you use.
My suggestion is:
For RAW files:
Edit in wide gamut colour space
Soft proof for your printer
Edit your photo so you are happy with what it looks like in soft proofing.
Export as 16bit TIFF with the wide gamut colour space
Send to printer specifying the printer and paper profiles to use.
For JPG with sRGB profile:
a) Edit as for RAW files, or
b) Edit in sRGB colour space and export as TIFF or JPG (depending on the quality you prefer) with the sRGB profile, soft proof and edit to taste then send to printer.
Mmmm, giving it some more thought, you may want to export and embed the printer profile because PL has some sliders you can use to tweak the algorithm it uses when converting to a smaller colour space. This may give you a better result than relying on your printer driver to do the conversion for you.
I did some tests on the laptop with an image of my own. Just watching the clippings. No high clipping was added but low clipping was.
The original file had no clipping. The exported tiff file had some low clipping. Loading and exporting that file again as jpg did add more clipping. Loading the jpg and exporting as tif also did add more clipping. Any export, be it to jpg or tif did add clipping. I can’t say anything about the other colors in the image.
So it seems to me that when you don’t want to edit that original jpg, don’t load and save it again.
Your first reply describes my standard printing workflow, but this second just takes us back to Joanna’s first post, no? I take exported 16-bit TIFFs directly into Epson Print Layout, perhaps making a small test print. Then back to the RAW file in PL if corrections are needed. I know, why soft proof? Am very curious if specifying printer profiles earlier adds (or subtracts) anything but am skeptical. Thanks.
Surely a talented artisan printer would ask for a master image, with a standard sRGB or Adobe RGB profile. At that point, s/he would have high quality standardised routines to convert the image to his/her printer and the papers s/he uses.
Why are photographers pushed to waste time with poorly conceived soft-proofing tomfoolery?
@Joanna: Do you have some specific color range problems in mind?
I assume you are talking about color printing – all your recent photos in this forum were B&W What type of photos you have in mind?
Nature photographers, those who print themselves, may be the most reliable source, if you are at their color range.
Off-topic: In ancient times, when I was printing myself using Capture NX2 and a low-end Pixma-4500 plus certain Ilford papers (was it satin barite??), I stayed at sRGB and provided the specific paper profile to the printer driver as a last step. I didn’t have to rely too much on soft-proofing working that way (but I’m NOT very color picky most of the time). I’m not sure about your printer, but most have pretty limited gamut and mapping from very wide gamuts can produce unexpected results – it seems it’s safer to be as close to the target gamut as possible at the last step . Who knows what the particular version of driver may invent? Problems may happen with “basilica greens”, certain “poppy reds”, and some violets, e.g. certain early night landscape, which was my most awful printing miss. Put it shortly, spend a lot of ink/dye, paper, and your TIME to experiment and learn. Personally, I gave up printing myself because I don’t do it that often and the time, cost, printer cleaning, room space, is too much for me. Printing is handled much better by professionals, if you are lucky enough to find some passionate . Give them 16-bit sRGB TIFFs, or equivalent DNGs, and keep in mind that they get papers and dyes at lower prices, if you want to print hundreds. Publishers is yet another story… So, to be safe both for the Internet and the printers, stay at sRGB, until you see a proof to stay at ProPhotoRGB. Personally, I had too many misses with Adobe RGB…
EDIT: Sorry for being unclear. I think the main problem is that PL, or any other software, may map the colors between colorspaces in a different way than the printer driver and the printer itself. It’s best to consult your local printing expert, who knows the equipment and reviews hundreds of prints daily, assuming you can find one and make friends
1 Like
Stenis
(Sten-Åke Sändh (Sony, Win 11, PL 6, CO 16, PM Plus 6, XnView))
20