I think your problem might stem from using Gianpaulo’s (@Gianpaolo64) preset.
It has been constructed as a full preset and includes all sorts of stuff that will override existing settings.
Try using my version, which is a partial preset
I think your problem might stem from using Gianpaulo’s (@Gianpaolo64) preset.
It has been constructed as a full preset and includes all sorts of stuff that will override existing settings.
Try using my version, which is a partial preset
Thank you. In the referenced thread there was “yours” then “yours adapted for stuck”. I downloaded the latter first, and the cropping issue remained. Then when I did your first one, that’s fine. I’ll be interested to go back and compare the two - I see the stuck version is much larger, and regarding your notes later in the thread I understand what is happening. There were several engraved presets posted for a while that I saved several versions but didn’t quite know what was different in each. I have renamed these so I know which is your source and will remove the ones I don’t find to be of use.
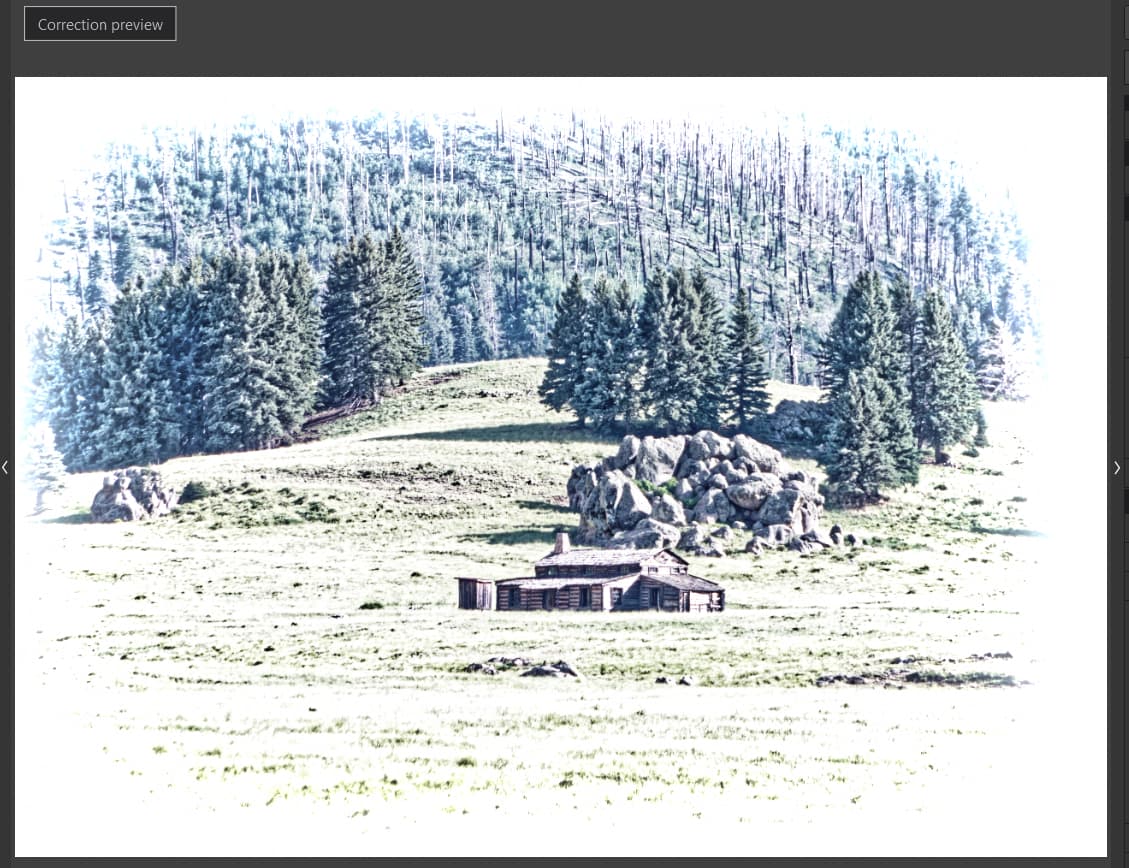
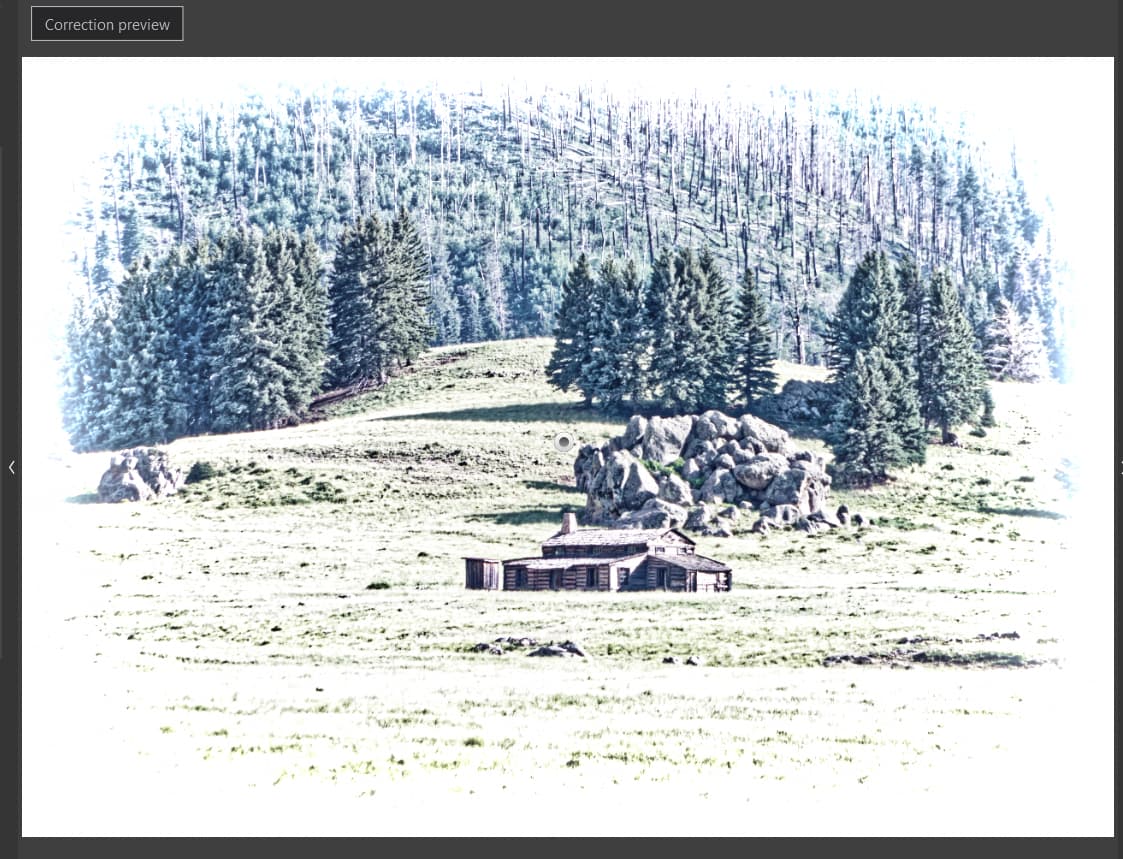
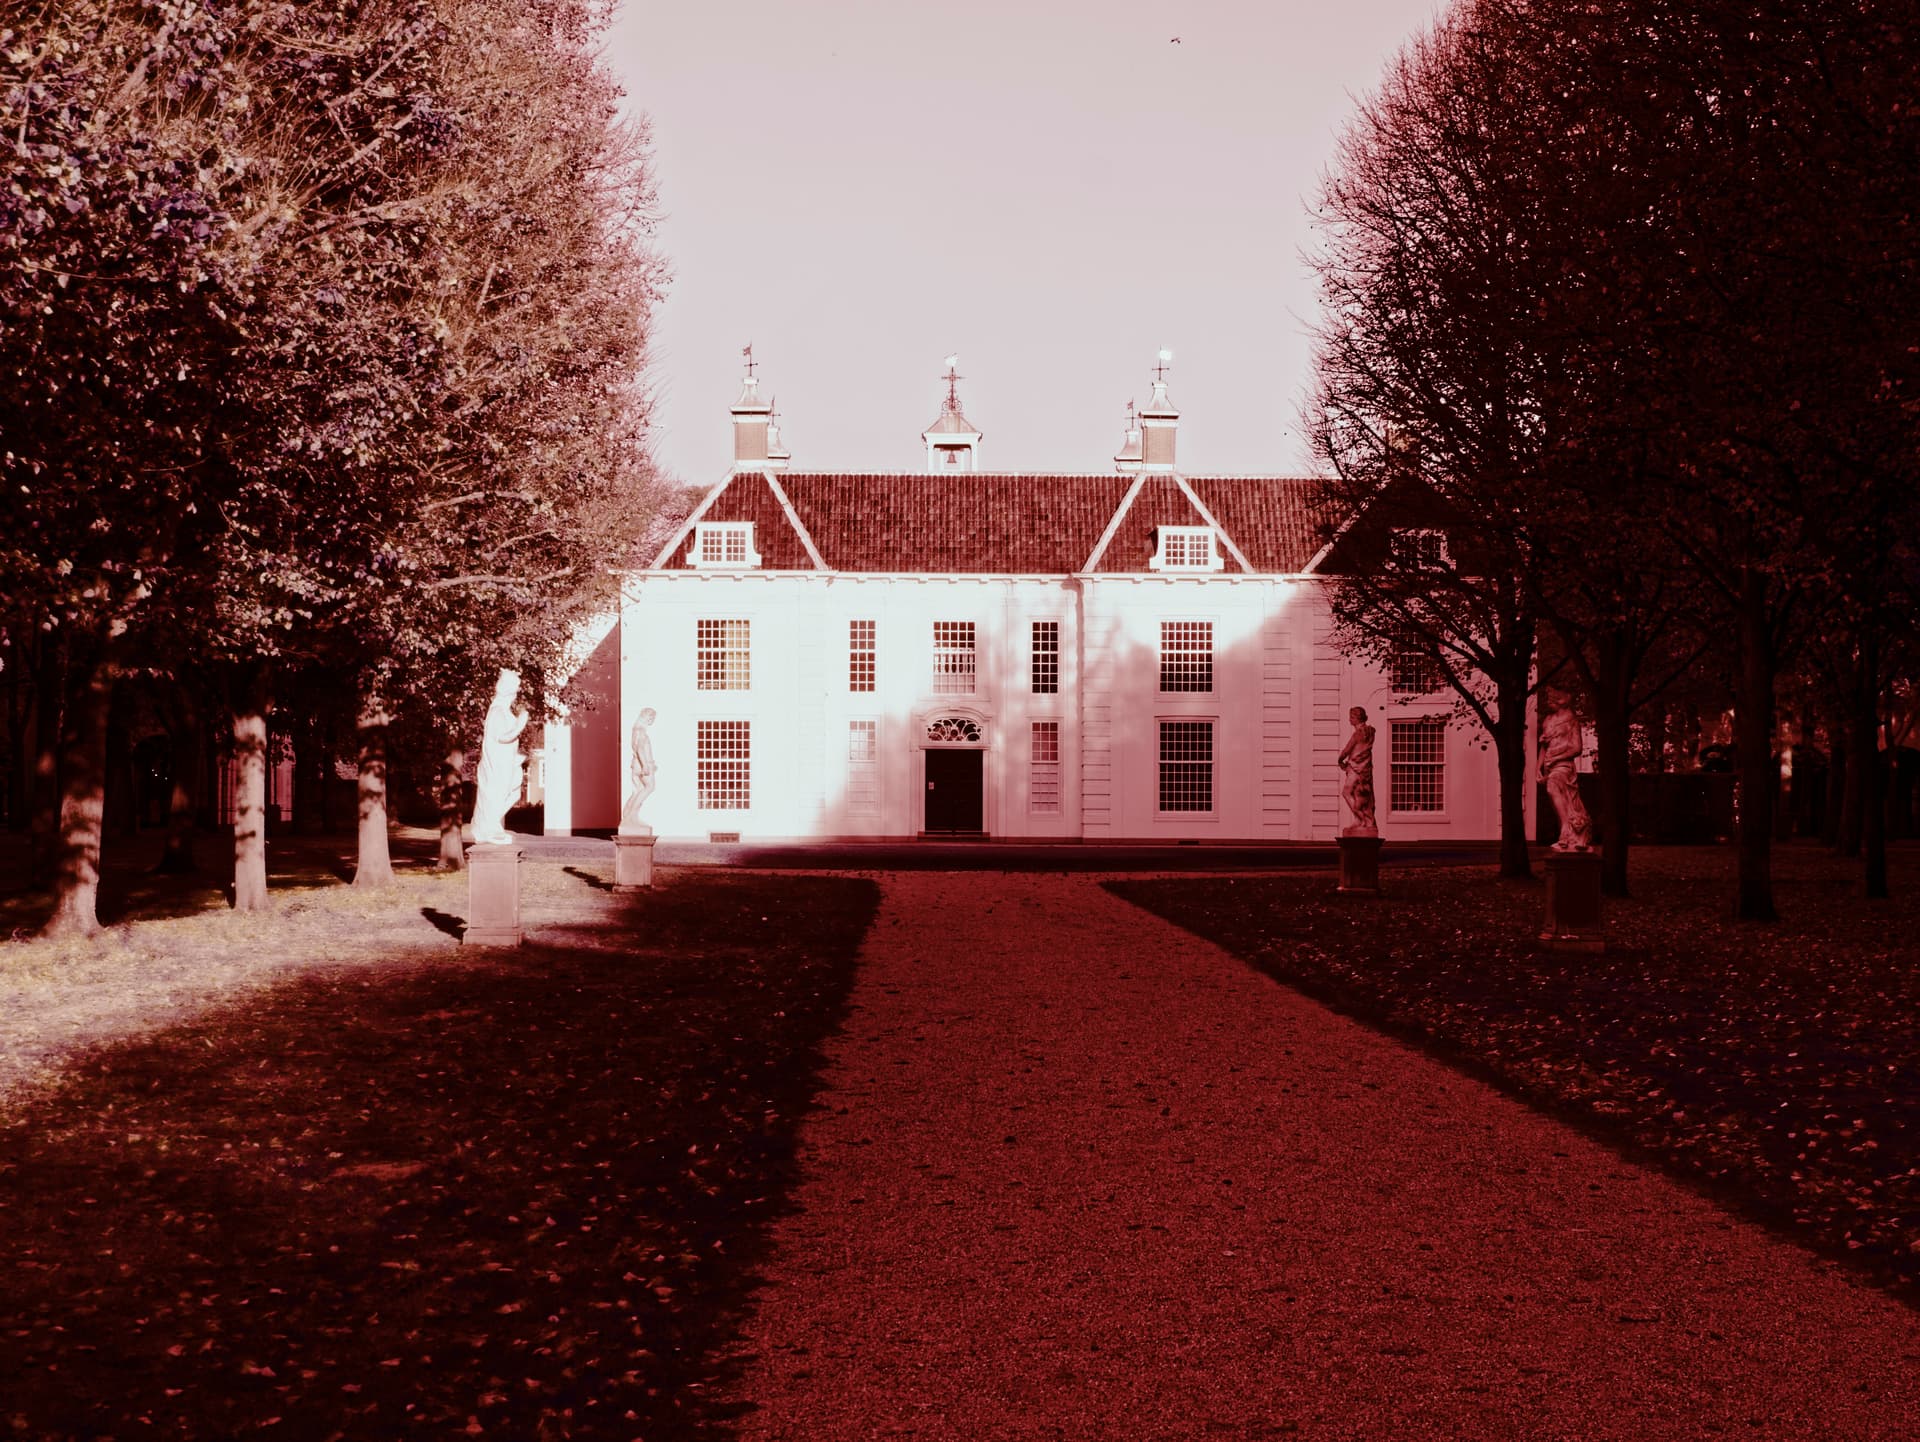
In working with the image file I uploaded, I notice that the vignetting does not seem very centered. That is true of all the versions of this, including yours. I’ve found that I can use the center tool and slide it a little to the right and then vignetting is more centered in the image. Otherwise, my right side border is very thick and the left side is very skimpy. Any ideas why? I can always use the center tool to tweak, and it helps me to look the image over more to make sure no other problems exist, but just seems … counterintuitive … that it wouldn’t center on the image.
This image was cropped to 7x5, then preset applied with default settings. Before centering ‘tweak’ and after.
It’s a slight difference:
When I first created the monochrome Engraved preset, I probably did not take care to center the vignette point. I’ll look into that. IIRC the color Engraved preset(s) were derived from the mono, so the same error probably perpetuated forward.
Thanks for pointing that out.
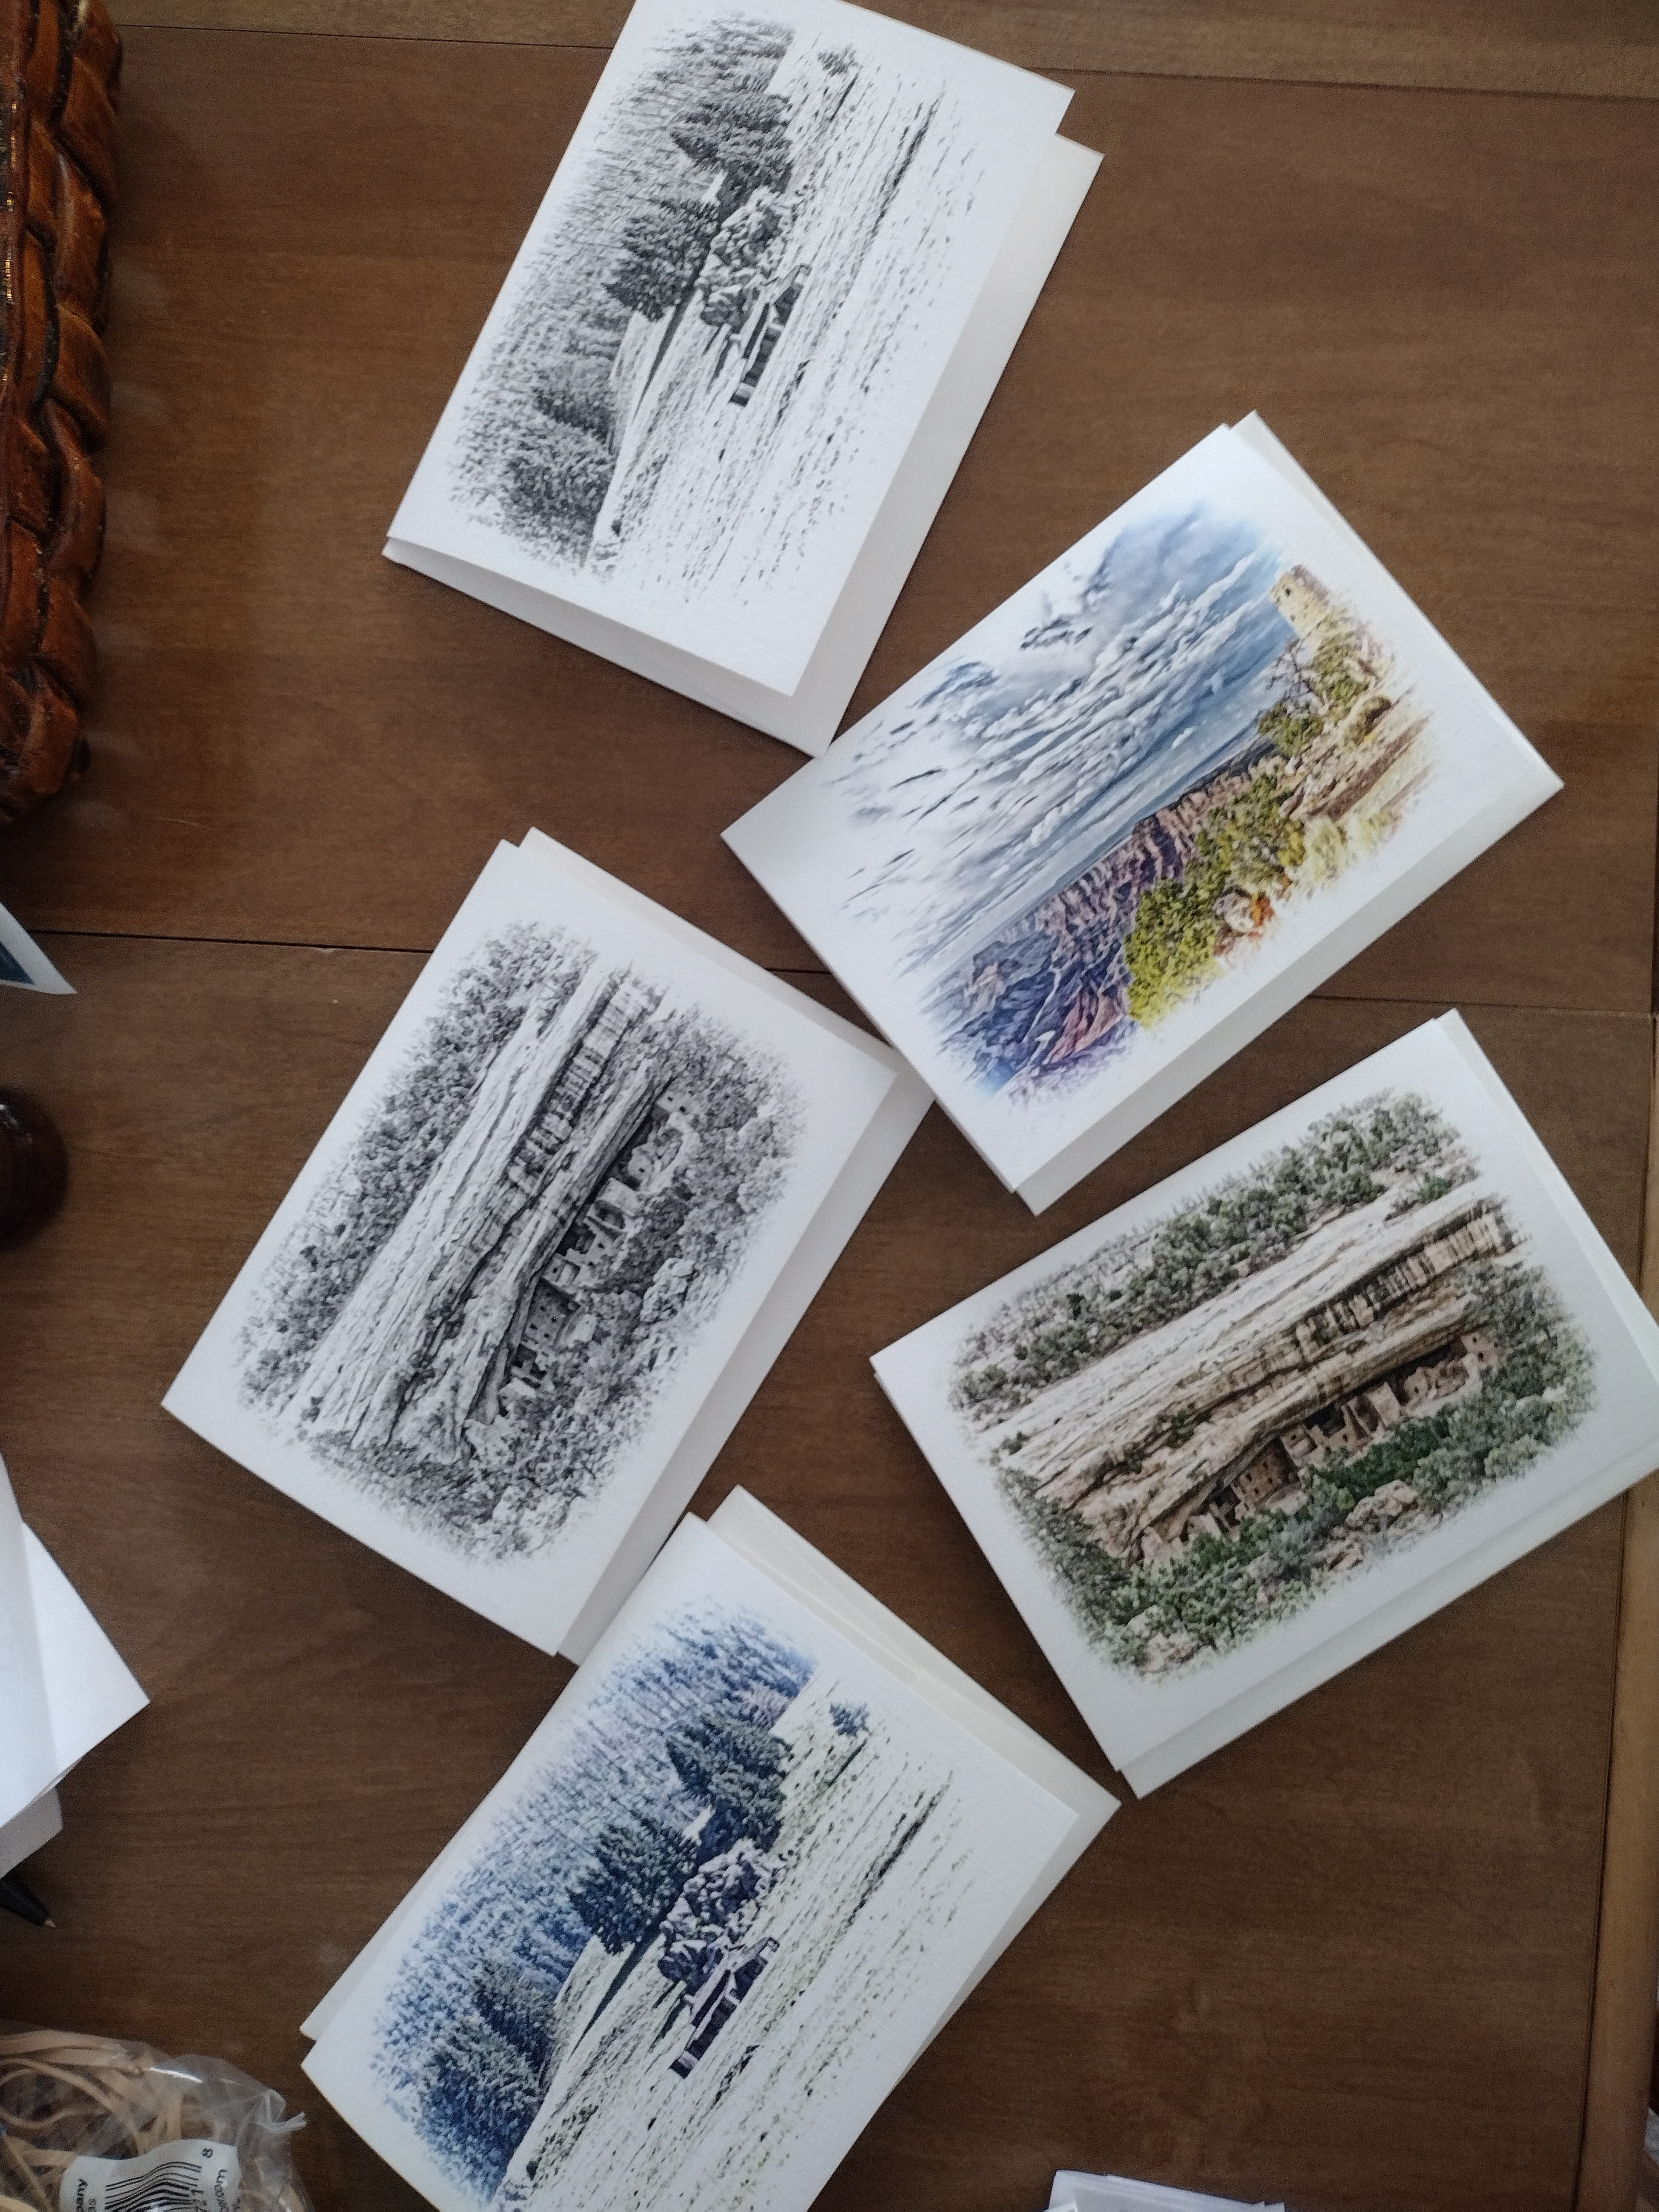
Awesome. My wife has opened a ceramics shop with a gallery space. I have a bit of Red River paper canvas greeting card stock and these effects give me some interesting subject matter for this particular paper type.
I’m learning that folks in this area like pretty pictures, but no one has disposable money. Something simple like a greeting card with its story are an easy seller, if done right. I’ve had this card stock for a couple years now but not sure how to get the most out of it. This helps!
Here is the new preset with adjusted center. For the record, it sets the following –
Exposure compensation +0.20
Selective tone +20/-30/+100/+100
Contrast +71
Microcontrast +50
Fine Contrast +100
ClearView Plus +50
Channel Mixer Red -23
Toning - Simple B&W +100
Creative Vignetting Intensity +100, Midpoint 58, Transition 24, Roundness 24
You might get some better effects by playing around with film types if you have the Film Pack plug-in. I also find that dropping the midtones and blacks can lead to some darker lines and occasionally better images.
Engraved.preset (5.9 KB)
Yikes, those are nice. That is precisely the effect I was looking for.
For many years I used freeware Paint.NET for all my editing. I like learning how to get a jpg out of my camera that looks like I want it to. I never pushed beyond that.
Then in 2019, I bought a PENTAX DSLR with astrotracer and in my one night under the stars of West Texas got some beautiful milky way photos. Then in 2020, I started waiting in a camp chair near the butterfly bush and after a few weeks managed to get some great (for me) hummingbird shots.
One thing in common with both sets of images. Noise. At end of 2020, I evaluated a lot of free trial software. I finally purchased Topaz suite and DXO PL elite. Topaz does some things I can use as needed while PL fits like a glove. I really appreciate the mostly intuitive nature of the software, with advanced options for processing without all the clutter of photoshop, light room, etc.
This past Black Friday I upgraded to PL5, and added other options including FilmPack Elite. The preset browser was an unexpected find when I stumbled across it. Adding Mark’s preset pack was good, then I found this thread. And now, here we are.
Thanks again for sharing! I am slowly getting the hang of things. But still a long ways away from expert in any one thing.
@Joanna ; Thanks to you for your suggestions regarding avoiding crop and other settings being discarded. And thanks to input from @RexBlock, I understand which setting affects centerpoint also. You can disregard this question. In your preset, as with the base, the centerpoint was defined something like this:
ArtisticVignettingCenterPoint = {
0.47593835,
0.503057718,
},
Modifying to this achieves the desired effect of having the vignetting centered properly on the image being edited.
		ArtisticVignettingCenterPoint = {
			0.50000000000000000,
			0.50000000000000000,
		},
hi welcome back! 
i downloaded your preset and compared it with the original, it’s now “only Elite” due the partial version.
let’s rename yours in “Engraved 2022 Elite partial”
2 - Engraved 2022 Elite partial.preset (5,2 KB)
and found an other film emulator you might like:
“cross Processed - Fuji Superia 200”
softer look: 3 - Engraved 2022 fuji superia partial.preset (4,0 KB)
then your old re-centered full apply. (for essential)
2 - Engraved 2022 full preset.preset (7,9 KB)
and the old color full preset recentered
4 - Engraved Color fullpreset.preset (8,1 KB)
And i think FPv6 EIR Kodak.
6 - Engraved IR kodak partial.preset (3,9 KB)
Al credits to you, i just modified them a bit.
Hope you like them.
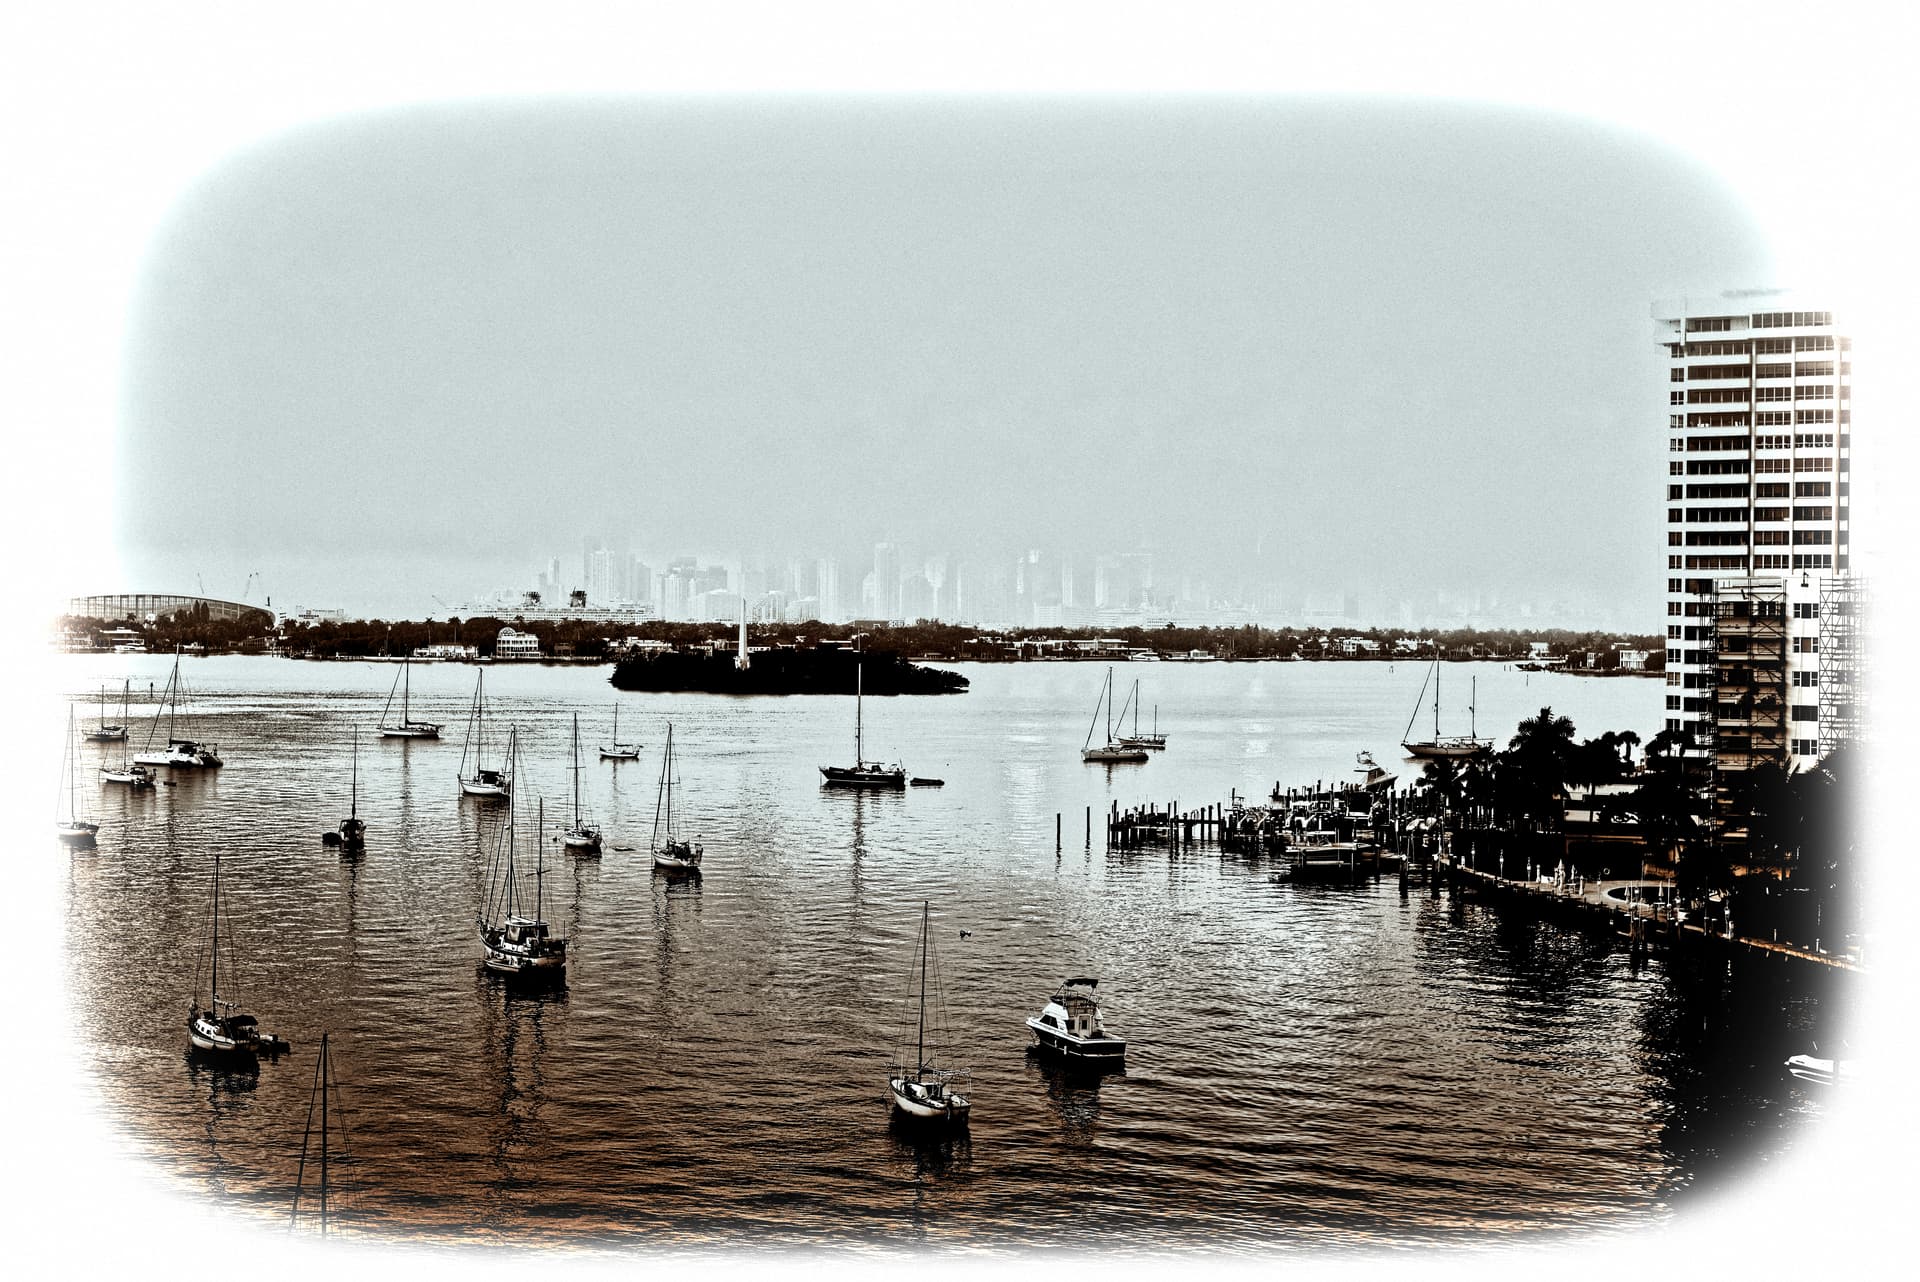
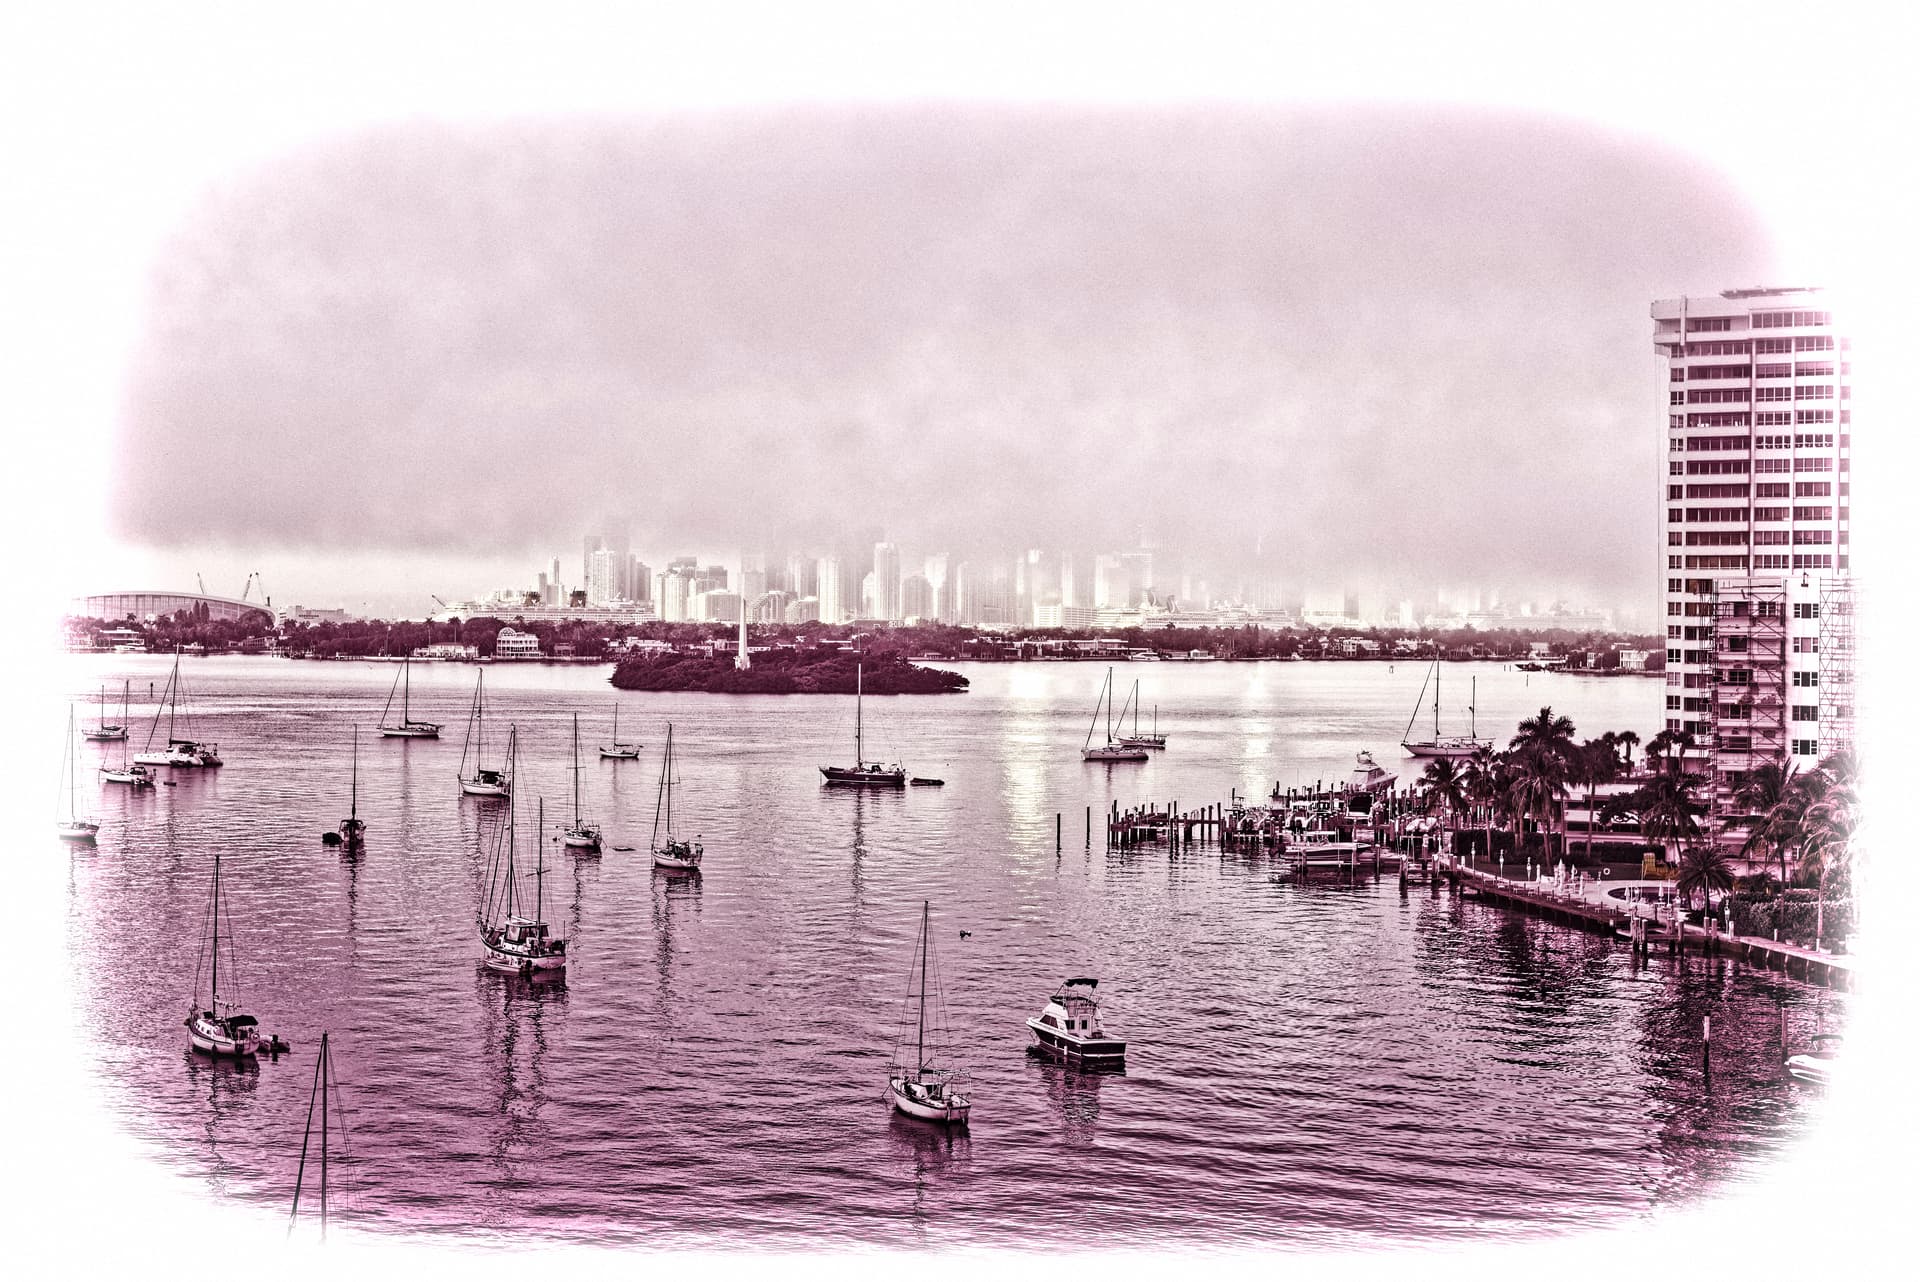
@mikemyers i borrowed one of your images to show:
minor tweak from applied preset:
intensity color rendering 200
blacks back to 50.
I haven’t been following this discussion, so this is somewhat of a surprise to me.
If I can download and install this Preset, and open one of my images with it, is it going to look like what you’ve posted here?
I feel like someone who walks into a movie already playing, with no idea what it’s about, and is trying to make sense of what I’m seeing.
Yes you can, IF you have FilmPack v6 .(i think it’s v6 only)
It’s a Infrared emulatie combined with @RexBlock 's engraved settings.
I made it just for fun.
The b&w version is completely a pencildrawing image wile the color more like a painting is.
Just download import by placing it in a presetfolder, test and play with it and modify if you find it nessacerry.
It’s sharing and thus use and give to use.
Most made presets are fun and artistic… Some are cinematic as in color detail enhancement in one click. Sort of HDR look.
Sometimes you clicked a image which is usable for artistic fun and over the top adjustments improves an image.
If you stumble on such an image and create certain setting which evolves in a preset the place to share is here. 
What is an “infrared emulate”??
Very cool versions of @RexBlock presets Peter. Thank you both.
I can only reply to try one of them on an image. The results are not always pleasing, but some results are very surprising.
This started as an attempt to produce something like the simple line portraits that are featured in the Wall Street Journal. They’re called stipple hedcuts (link). I didn’t quite get there but I got something else – a nice way to bring out lines and eliminate broad color fields, such as skies and other landscapes.
A filter preset that looks like simulation of infra red camera.
(As wrote earlier there are some problems in sharing presets.
1 elite vs essential => partail preset possible or not.
2 PL version, often not backwards compatible.
1 you can alter by creating a full version on request the other is simply try and error.
(i suppose as the preset has no “new features” active in the preset it can be read by older versions.)
Essential or older version?
Mike, I’m with you, I’m sure. I’ve been using PhotoLab for a bit over a year now. Quietly following many of your conversations and learning what I could. (You ask great questions and get even better answers).
Around Black Friday I upgraded to PL5 and added Viewpoint, Nik, and Filmpack licenses. This last one was interesting last year when I did the free trial, but I had opted to save the money. Now that I have it, I kept toggling back and forth between the standalone FilmPack app and PL, and made a comment here about how they are non-integrated. I could see a preset menu in PL, but saw no way to easily browse and compare different “film effects” (aka emulations). About the time @Joanna asked if I had made use of the “preset browser” I clicked on a button on top right that said “Apply Presets” and found a view where I could see some of the various film emulations and other creative effects included in FP.
This thread exists for folks to share their own customized presets, and here I found multiple versions of “engraved” and “engraved color” presets which I found to be very useful for a greeting card project I am working on.
Another useful thread with preset pack is here. Filmpack 6 Elite presets for use within PhotoLab are now available!
Hmmm…
I only got involved here because I thought I saw something about a “preset” for infrared, which to me is impossible. The tones and colors in infrared are not random, there is a lot of logic to them, and a camera sensitive to infrared only shows it’s reaction to what is already there, for real, being photographed. For example, green leaves do not turn to white leaves because of the color “green”.
I tiny part of that discussion can be found here:
infrared and James Webb Telescope
When I get a few free minutes, I am fascinated by what you are trying to do by using a Preset to convert an image into the “lines” that make up the resulting image. Before I say anything more, I think I need to go to the very beginning of this thread, and read the entire discussion to date. Maybe then I’ll be able to not only try to do what you are doing, but understand how and why it works.
So I installed these as you named. One jumped out at me as ‘off’. Comparing the internals the Color preset has two different vignetting centerpoints.
VignettedBlurCenterPoint = {
0.5,
0.5,
}
and
ArtisticVignettingCenterPoint = {
0.47593835,
0.503057718,
}
In my copy of 4 - Engraved Color fullpreset.preset , I modified the 2nd one to also use the 0.500000 format as the preview showed it still off center. Some of the other presets only had one of these fields…
Many thanks - I like your naming. When I have time I’ll redo my “Custom Presets” folder using this format.
hmm then i was pretty close by lose hand and eye. ![]()
if you upload the preset then i replace mine by the .50 .50
your welcome, i reorganised the preset list and renamed also the dxo preset folders

By adding folders and numbers i get my preferred line up and not organised by alphabet.
quicker finding and most used at the top.
Also easier to find in the right op preset button pulldown.