I have updated to PL7 elite for reasons that can be discussed under a separate thread. Note: if DxO decides to follow the rest of the lemmings and go to the rental (“subscription”) model, I shall be forced to look elsewhere. On a very useful help web site, I find: TuToDxO.com could not be updated for PhotoLab 7.
It will soon be completely redesigned.
You’ll find the new features here. End excerpt. Hence, I am posting here. I was imaging some birds in the late afternoon; a bird with a “white” chest had the chest appear “orange-brown” in the images due to the light. All of the images in the set were so affected. I corrected one using the Pick Color eyedropper under color and the chest went “white” and the sky “blue”; this did most of the work for me and bit more colour, contrast, exposure correction did the rest. How do I copy just these corrections to the rest of the images in the batch without establishing and then editing a preset? (If I repeatedly were to need this correction for future batches, I always could re-open the corrected image and establish a new preset.)
You can still use the tutorial on tutodxo. It works the same way in 6 and 7 - just copy paste the correction settings - either with your keyboard or right-click and use the context menu.
Thank you – indeed that set of operations worked and I now am submitting a few more images to a client. I have used TuToDxO.com as the examples often are more clear and to the point than I find in the DxO manual. However, once it was warned NOT to use this for PL7 – new site under complete redesign – I hesitated as I have found that “obsolete” instructions can do much damage (in this case, the original NEF files are saved such that all I must do is start over – but that can be very time consuming). On a related point, I wonder why DxO is recommending a tutorial on Fstoppers (part of the current incentive to license-for-fee right NOW, after the Black Friday pricing) by Mark Wallace. I searched for him on this Forum (all topics and posts) and he does not appear. I would expect him to be an EA Pro or the like if he is referenced.
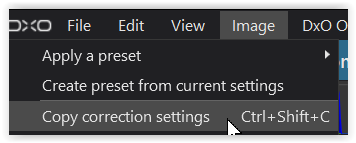
You don’t need to create a preset to copy paste corrections.
You can copy every correction from one image into clipboard and then paste all or a part of them into selected images.
This is not new in version 7.
Look into menu/image and you’ll find several functions to do that (and their shortcuts too).
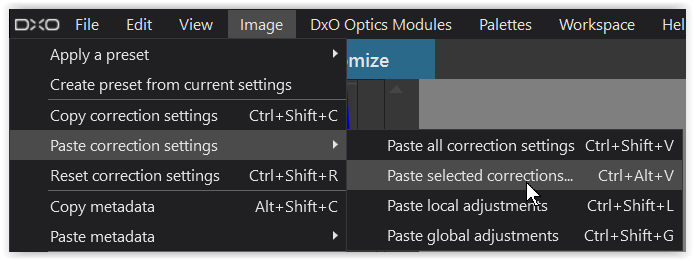
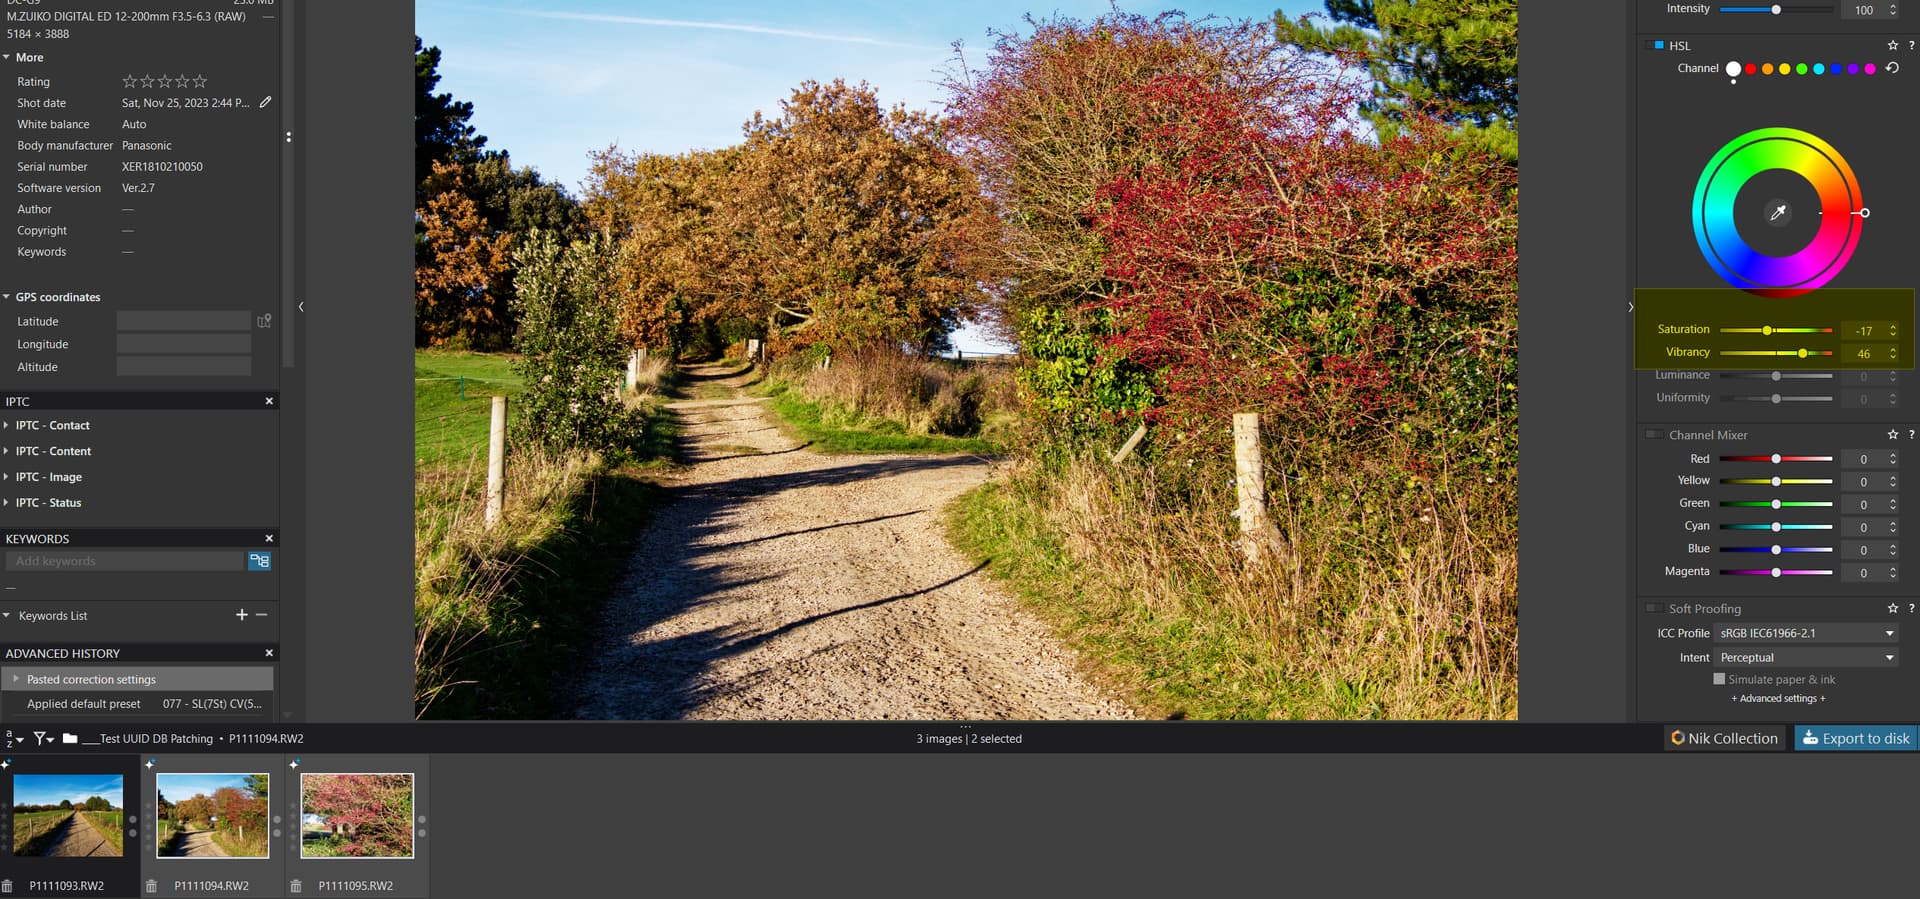
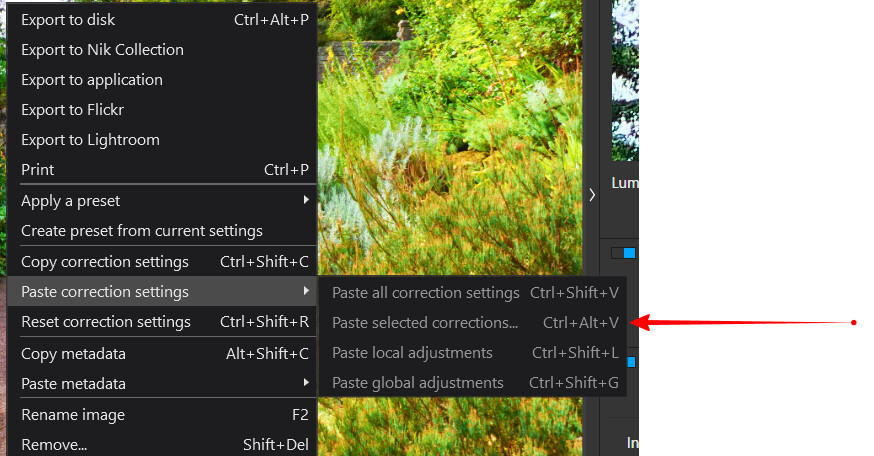
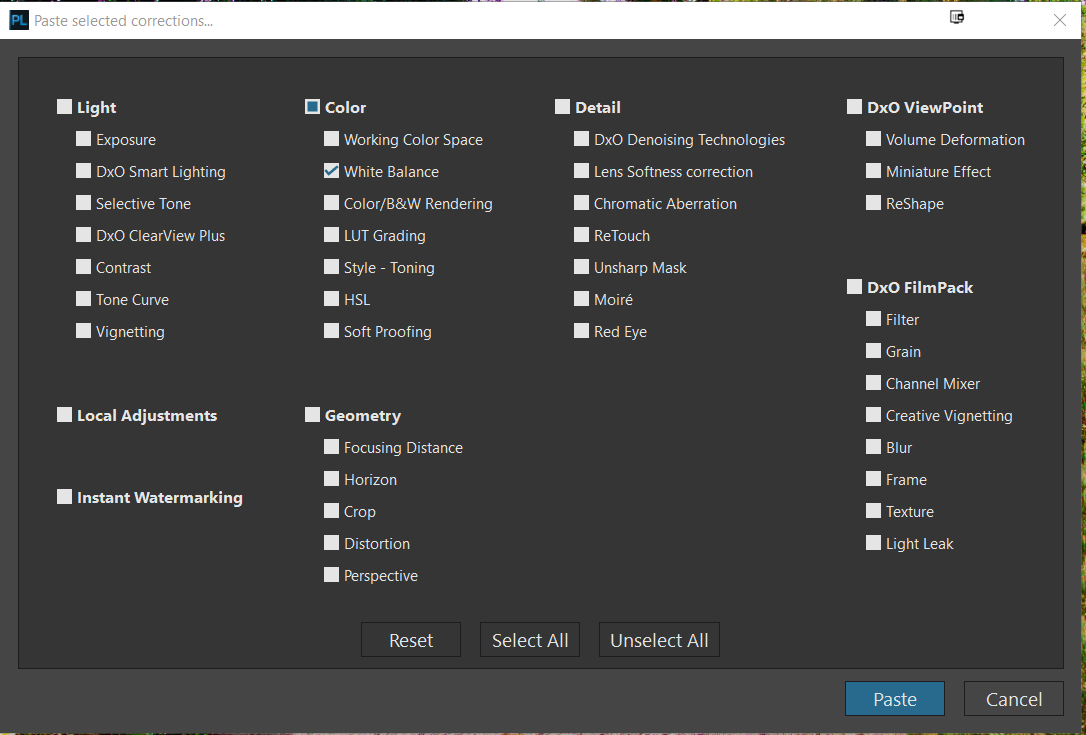
@wildlifephoto as @JoPoV and @Wolfgang stated you can copy the ‘Correction Settings’ from one image as I did here from the first image where I had changed the HSL setting and then ‘Paste selected corrections’
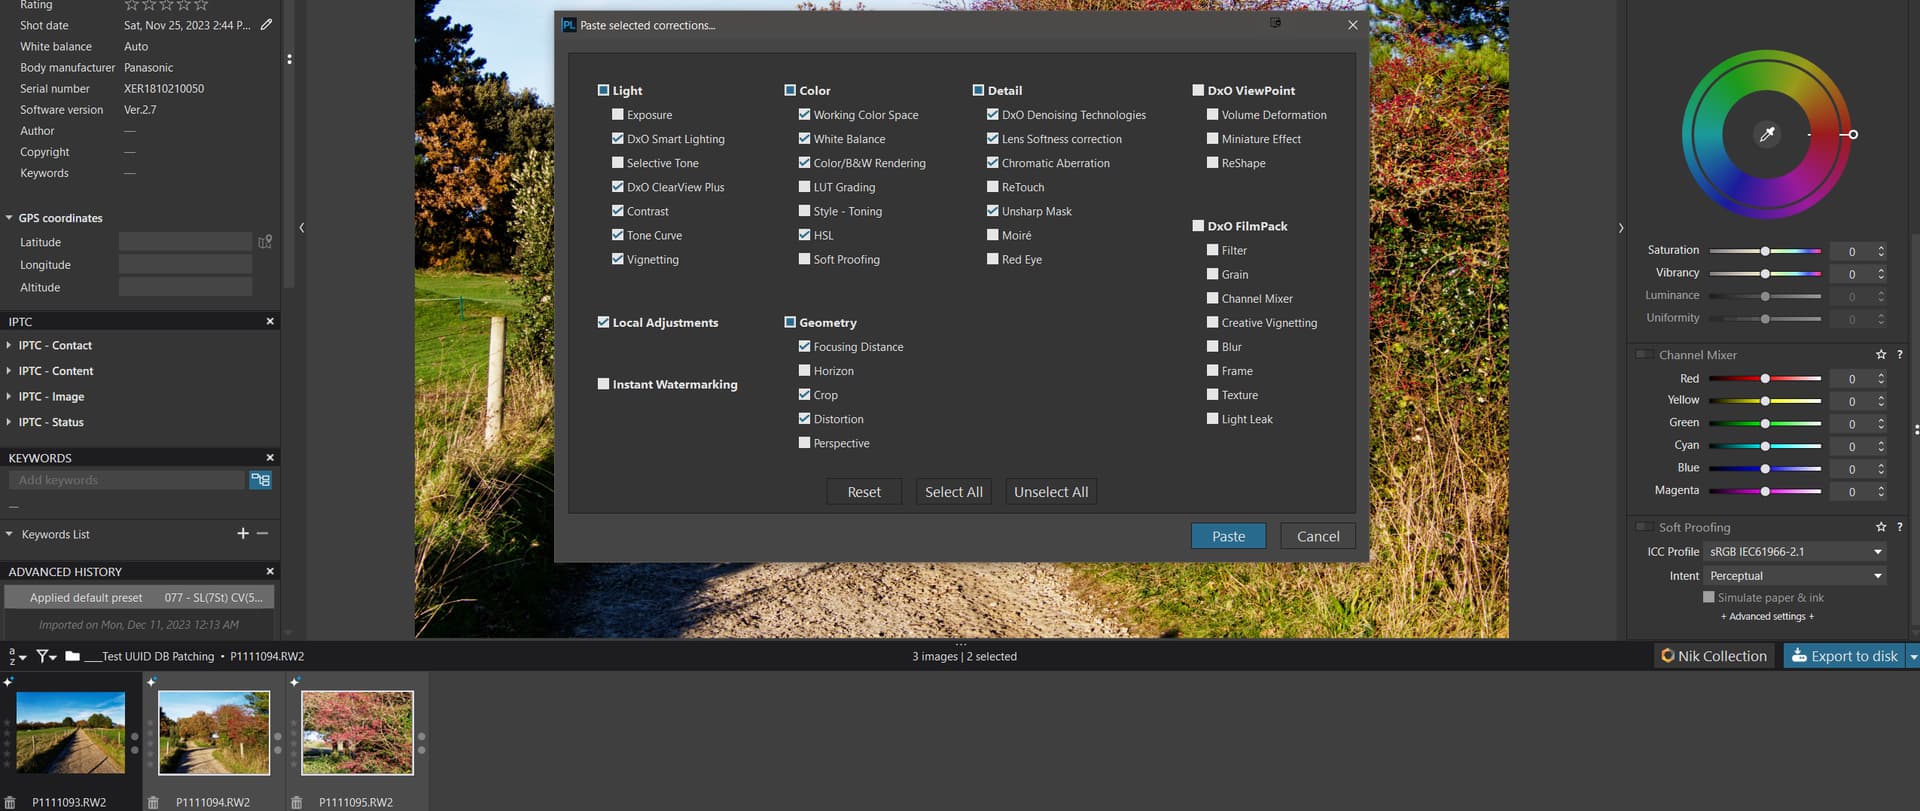
In this case it is easier to ‘Unset All’ and then mark HSL to be pasted into the two selected images
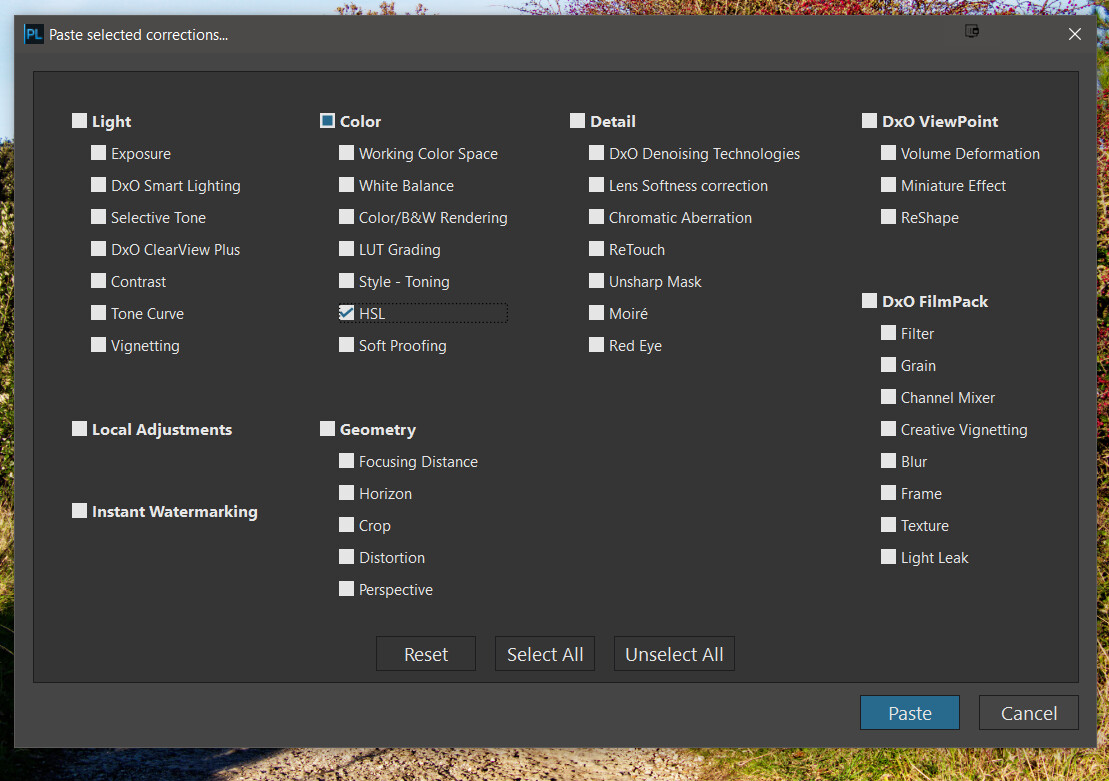
and the result is
If only it was that easy to create a ‘Partial Preset’!
… … …
There’s a shortage of training materials for DxO PhotoLab (and the other products). Unfortunate that they end up behind an expensive paywall.
If I find a single setting, such as white balance, that I want to apply some, but not all of the images, I do this:
Pick the best image where I can get a white balance setting, adjust the white balance to my liking.
Undo all of that, then control-click to select all of the images I want that WB adjusted.
Then redo the WB settings. IT will apply to all the selected images.
I do this so that I don’t copy and paste other settings I don’t want to all those images.
@Evildad if you use the process I demonstrated in post PL7 elite: how to copy a colour correction set from one image to the rest for only the batch under post - #6 by BHAYT, as mentioned by @JoPoV and @Wolfgang in their posts, you can copy all the settings but only post the one(s) you want.
In your case that would be the ‘White Balance’.
So
-
Pick the image that you decide is best for setting WB, make adjustments and copy the edit settings (no selective copy is available but selective paste is available).
-
Then select all the images to which you want to apply that WB setting using your current method of selection, sadly there is no image tagging capability in DxPL to make that easier (or add them to a ‘Project’ please see below)!
-
Select ‘Paste selected corrections’
-
Please Remember to ‘Unselect All’ as the first thing you do.
-
Select ‘While Balance’ to apply that to all the selected images
-
Paste to all images, including the one used for determining your “best” WB value if you wish
-
With that edit data still selected you are then free to “wander” the images and re-apply that WB (and/or any other settings) to any that missed the first cut, until you make another copy of the edits from another image.
Please note that with multiple images selected by whatever method you choose you can make edits or apply (Copy and Paste etc.) edits to all at the same time but I thought that from posts made in the past in the forum that you cannot undo except image by image (please see below for tests of that)?
Although your technique will work for a simple setting like WB, it would be a nightmare to use for something like ‘Tone Curve’ etc.
So for a test I
- Created VCs for 6 images to protect my original settings
- Adjusted the WB for first VC image of the group
- With all the VCs selected I used the above procedure and got this
Please note that you cannot undo the edits for the selection except one by one (if you can remember which ones you had selected and changed), please see below for the (lack of ) accuracy of this statement!?
That issue of (re-)locating images is not a consequence of of the copy and paste but rather the fact that you cannot tag images, unless you select the images and put them in a ‘Project’.
An image can belong to any number of ‘Projects’, e.g. ‘WB-Project’, ‘TC-Project’ etc. and then the ‘Projects’ can be deleted (or not) when the editing for a shoot is (largely) complete, e.g.

Applying just ‘WB’ from the edits copied earlier gives

But attempting a Ctrl Z with all still selected actually applies the Ctrl Z (undo) to all the selected images!

‘Load original images folder’ from the menu loads the original directory with all images selected in the ‘Project’ still selected in the original directory, reapplying the WB to all the selected the images yields
and Ctrl Z gives

Batch copy/paste for color corrections is such a huge time saver once you find the right workflow. I usually try to get one image looking perfect first, then sync only the color-related adjustments to the similar shots instead of the whole preset. For checking consistency between images, I’ve also used https://colorpickerimage.org/ a few times to compare tones and color values from exported shots. Makes it easier to spot small shifts across a batch.
I’ve found that works for me is to create one or two presets for a set (based on existing presets of course), and then copy and paste them forward as I go through the set. If light changes (and it usually does in my sets), the change gradually works its way into the set. I say one or two sets as I might be shooting into different directions or lighting conditions.
On my TourBox Neo (you can do it with a Contour Shuttle Pro or even a fancy Logitech mouse) I have reserved two buttons for 1. copy settings and 2. paste selected settings. It’s a single finger action rather than four or five fingers on two hands every time. It makes moving through a set much faster.
If you have a big set with almost identical lighting a mass paste is an excellent idea. Always with paste selected though so I can remove local adjustments and retouch (and often horizon, though I like to include crop to allow me to crop without geometric restrictions).