Yes – this!
And if I remember correctly, Mike’s monitor only provides sRGB, which I think he used alternately with an iMac (due to the lighting situation at his place) …
Yes – this!
And if I remember correctly, Mike’s monitor only provides sRGB, which I think he used alternately with an iMac (due to the lighting situation at his place) …
Indeed.
And, if I may just reinforce, when shooting RAW the camera colour space may not matter but when exporting, if you want to convey the image as you are seeing it on a screen with a larger colour space (like an Apple) you really need to think about the colour space you use in PhotoLab and use soft proofing to check your exports will look just as good.
Absolutely. I often see images projected at our photo club that are obviously prepared on an uncalibrated monitor and when the author is asked about the rendering, the reply is often “well it looked alright on my screen”
Actually Apple monitors are P3, so he may get problems just viewing on one screen and editing on the other.
… is part of PL’s export
And now you brought the out of gamut colors into the sRGB space. What is the difference with selecting sRGB from the beginning?
What you see on the monitor is in the monitor’s color space.
George
PL’s working space is either AdobeRGB (Classic) or their own Wide Gamut. It doesn’t work on images in sRGB. You have to decide on that when you export.
I’m referring to your soft proof example.
If you’re softproofing to a sRGB profile and you’re adjusting the out of gamut colors to that profile, then you’re restricting the colors to that gamut.
George
@mikemyers , let’s see, if the following helps to understand what’s going on.
RAW Workflow (left side of picture)
JPEG Workflow (right side of picture)
What about…?
Note: The above sounds fairly absolute at times while reality is more tolerant. Observing the above helps to retain your room for operations as wide as possible. Using smaller rooms of operation simply means that you might miss a few options, consequence of easier living.
Now, what should you do: Choose your options, live with the consequences and stop worrying. Why? Technical quality is one thing, but not everything. Cartier Bresson is not known because his photos are less grainy than others’…
That’s the whole idea, otherwise those looking at the exported file would see poorly rendered, possibly oversaturated, colours, lacking in detail in the out of gamut areas.
In today’s world, it seems to me that almost everything I read or see on TV is based on “opinions”, for better or worse.
The less I already understand what’s going on, I somewhat accept what I read, see, or hear.
However, the more I know about what’s going on, the more I find flaws or errors in what I read, see, or hear.
Comes down partly to how much I trust the information, and also how important I think the information is to me.
I think the more any of us understand the real situation, the better we get at separating “fact” from “opinion”. Ken Rockwell’s web information is a gold mine of good, useful information. For better or worse, it is “infested” by Ken’s opinion - which he thinks is useful to his readers.
The more I learn, the better I get at separating his facts and opinions, and I so much appreciate the “good stuff” regardless of how he feels about things.
Many people here (most?) understand photographic things better than I do, and I usually come away from this forum thinking I know more than I used to, but sometimes wondering about things people write, that I may or may not really accept - need more information. My attitude - be thankful for the good information, and disregard his opinion if I feel otherwise.
Example - raw. I bet the overall majority of Ken’s readers have no idea what “raw” means, or does, or is, or why they should go through all that effort, if “jpeg” already does everything they care about.
First, thank you for posting all those images, as it is the best explanation I have yet seen showing what this issue is all about.
I thought I solved it completely by setting my camera to sRGB. But from what you write, here’s my confusion:
“it certainly matters which colour space you use in PhotoLab”
How do I tell PhotoLab how to always use sRGB (unless I tell it otherwise)? Is there a setting I need to select?
I certainly understand a LOT more than a few days ago, but probably not enough - as in the question I just asked @Joanna. I never knew I needed to tell PhotoLab which color space I wanted. Or, I did it so long ago, I’ve long since forgotten.
Correct. I have a ASUS PB278Q LED LCD Monitor which I bought 10 years ago for $500. I also have a 2013 iMac which I added so I had more screen space. The ASUS is calibrated (but this was years ago, so maybe I should do it again). I don’t remember how the iMac was calibrated - I keep the brightness set to match what I see on my ASUS.
(I want to buy the Apple 27" display which @Joanna highly recommended, as soon as I can afford to.)
Yes, I didn’t know I had to select a color space in PhotoLab, or I did it so long ago, I’ve forgotten. I don’t yet know how to use “soft proofing”. I do look at my exported files from PhotoLab, and I haven’t noticed any serious issues…
Been there, done that, was amazed that my images were so awful - and @Joanna had me buy a monitor calibrator, and go through the calibration process. I thought my old image looked good, but that was on my screen. Nowadays I figure if the images look good on both of my displays, AND look good when I view them on my new MacBook Pro, they are probably OK, or close enough to OK that it doesn’t matter.
I obviously know where to find the exported images, but where do I find that chart? How do I see what you posted? I’ve never looked for it, because I never knew it existed…
I guess I need to look up the “color space” for all my displays. iMac 2013 21", iMac 2017 21", ASUS PB278Q, and my new MacBook Pro. Never thought about this before. Me bad.
Confused - all my images have been shot in sRGB, which you just wrote doesn’t work in PhotoLab’s choice of AdobeRGB or “Wide Gamut”. You say it doesn’t work on images in sRGB. So, how do I export in sRGB if PL can’t do that???
I already “knew” that, but your chart make it obvious what is going on. I suspect you need one more step towards the end, showing the possible variations in exporting an image for each color gamut (if I’m even saying that correctly). In your explanation, you suggest exporting in AdobeRGB, but as I currently understand, for digital use (like what I do) sRGB is preferable.
Do I need to figure out how to “soft proof” before exporting every image???
You can’t! As I wrote, PhotoLab only works in either AdobeRGB (its original colour space) now known as “Classic” or “Wide Gamut”, which is their new colour space that allows you to benefit from more colours and tones from RAW files.
You don’t have to. It defaults to Wide Gamut for all new images but you might find some older images were opened in “Classic” before the new colour space was available.
I don’t know how to emphasise this enough - you only need to select a colour space when you export for some purpose and, for that, you need to make a virtual copy and use the soft proofing tools just before exporting.
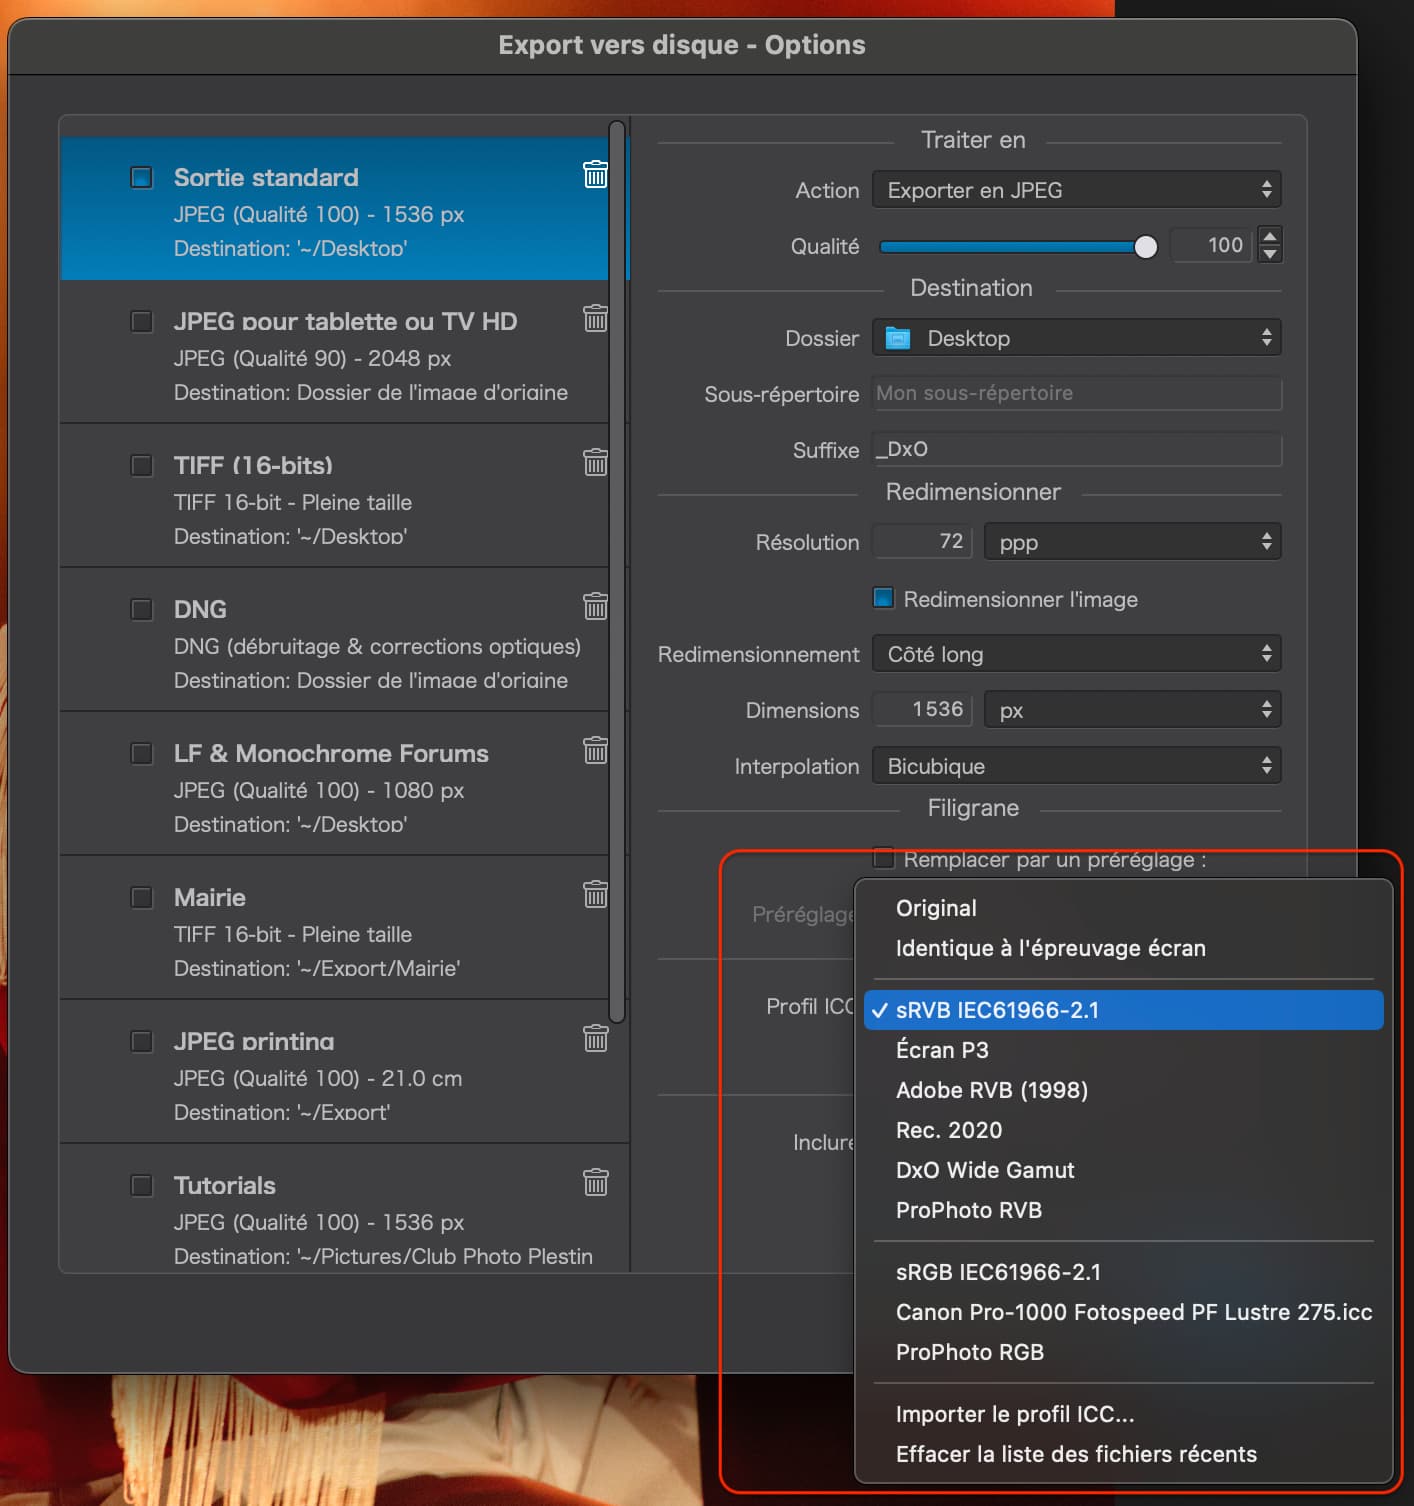
As @Wolfgang said, it’s on the export dialog…
Note my screenshot list shows sRVB because it is French (Rouge Vert Bleu)
You don’t so much need to look them up, just calibrate all of your screens, then the ICC profile(s) this will create and install will look after translating the image’s colour space to the appropriate one for each of your monitor(s)
When PhotoLab opens a RAW image it automatically translates it into the working colour space, which nowadays, should be Wide Gamut. This will give you the best possible rendering of colours and tones because it is a lot “larger” than either sRGB or AdobeRGB. As others have said, PL ignores the colour space from the camera on RAW images.
Having worked on the image in Wide Gamut, when you export, you select the appropriate colour space for your target (in your case sRGB) and PL will use the ICC profile that you have selected (in your case sRGB) as a “lookup table” to map the colours and tones from Wide Gamut to sRGB.
Some images, that don’t contain strongly saturated or dark colours will sometimes export without having to soft proof but it is always useful to do a quick check.
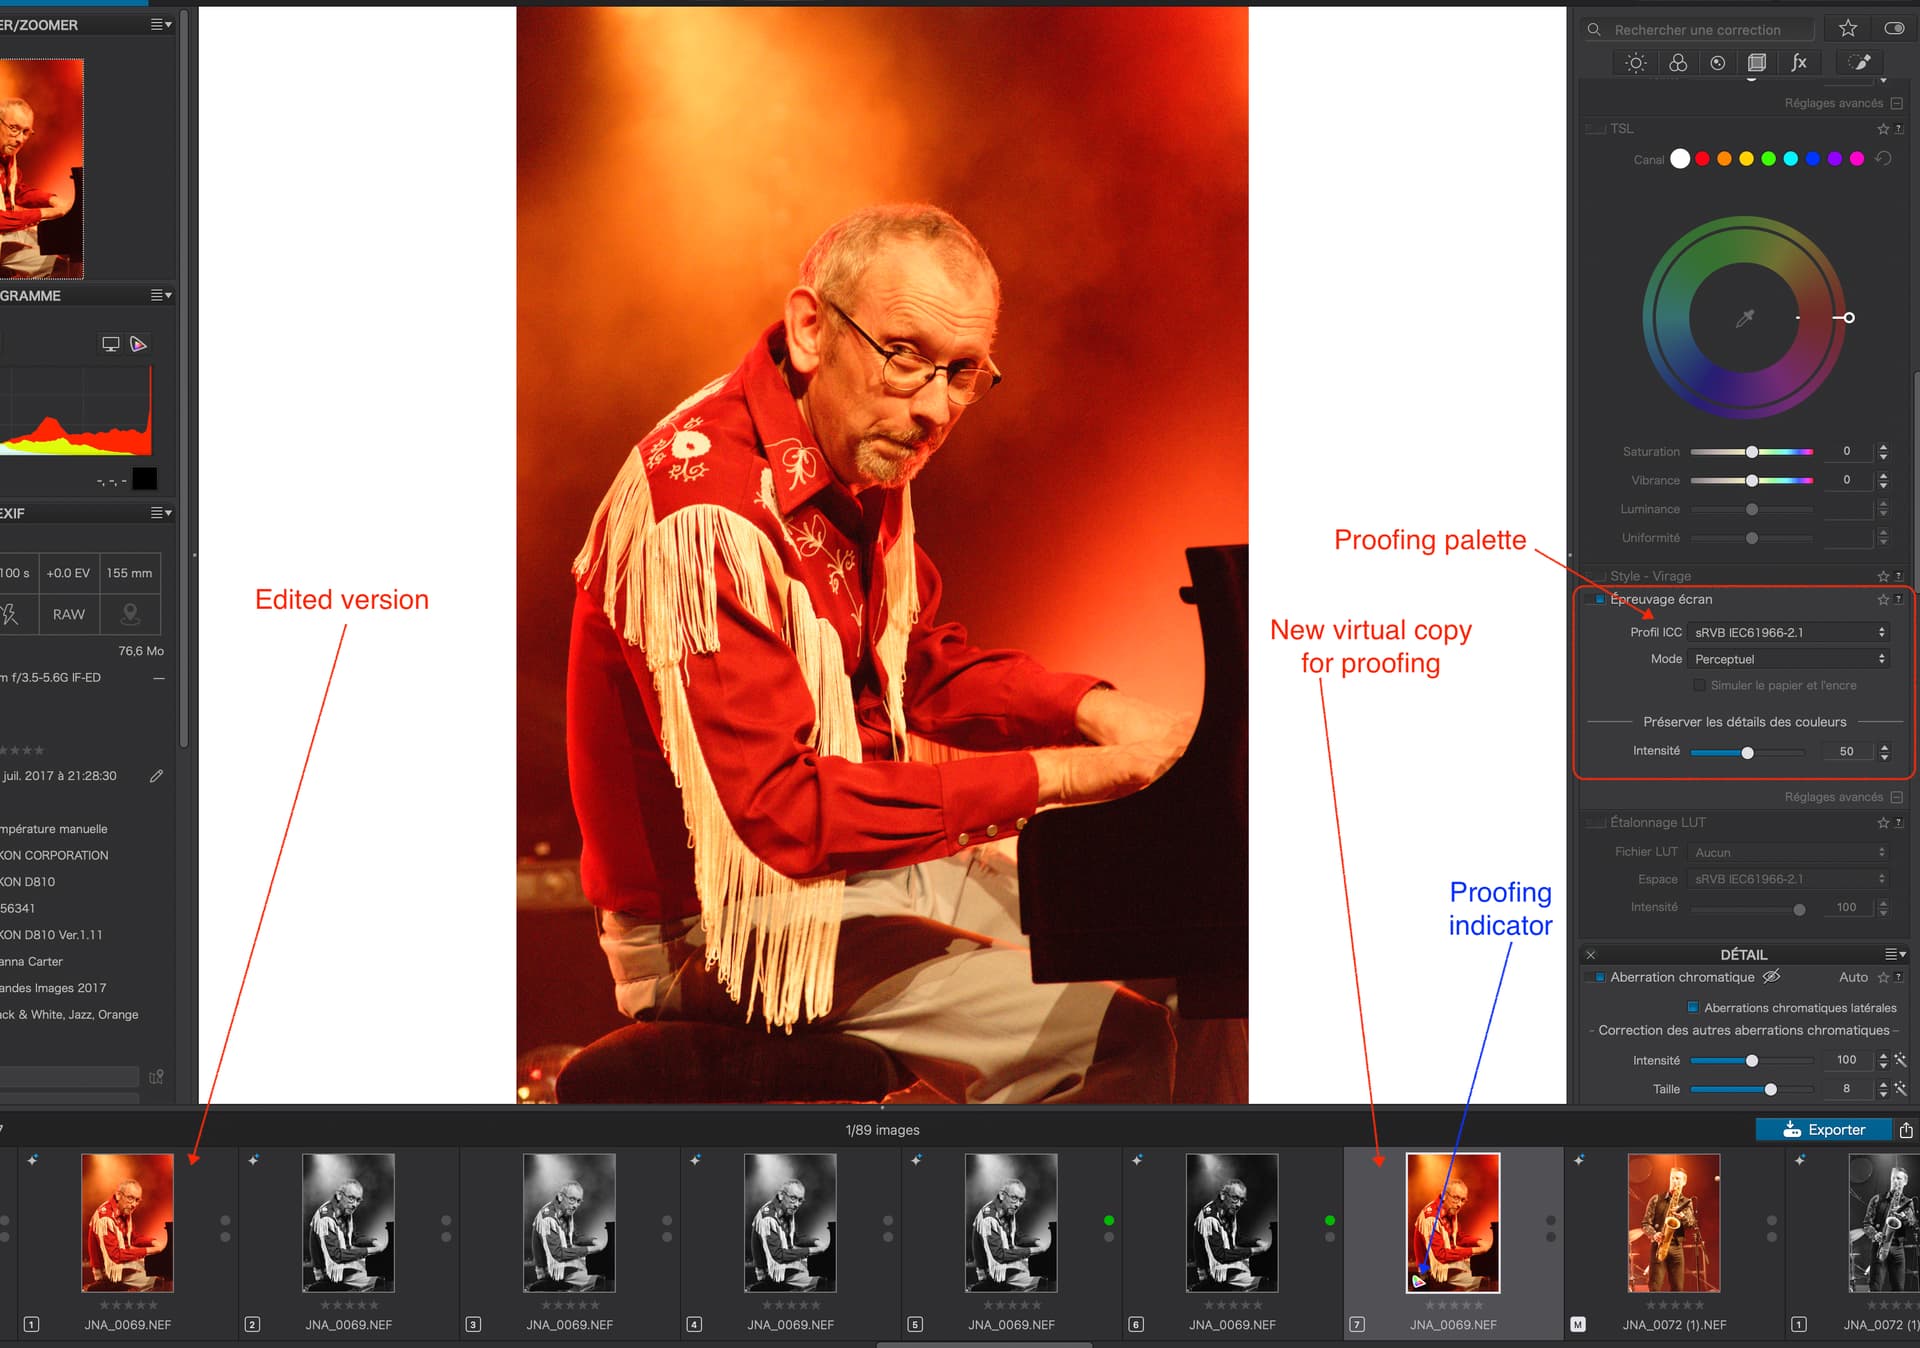
To check proofing, create a virtual copy and activate the Soft Proofing palette…
Note that the background changes to white and a little icon appears in the thumbnail to indicate you have selected proofing for this version.
Now activate the OOG warning. This does the same kind of job as the under/over-exposure indicators, but for colour gamut.
If you don’t get any indicators, then you can safely export the original image and delete the proofing virtual copy.
Try that much and see what you get. Then come back when you find an OOG image that you can post here and we can work on correcting.
I must be really dense, but your explanation above suddenly made everything clear in my mind. All the confusion evaporated.
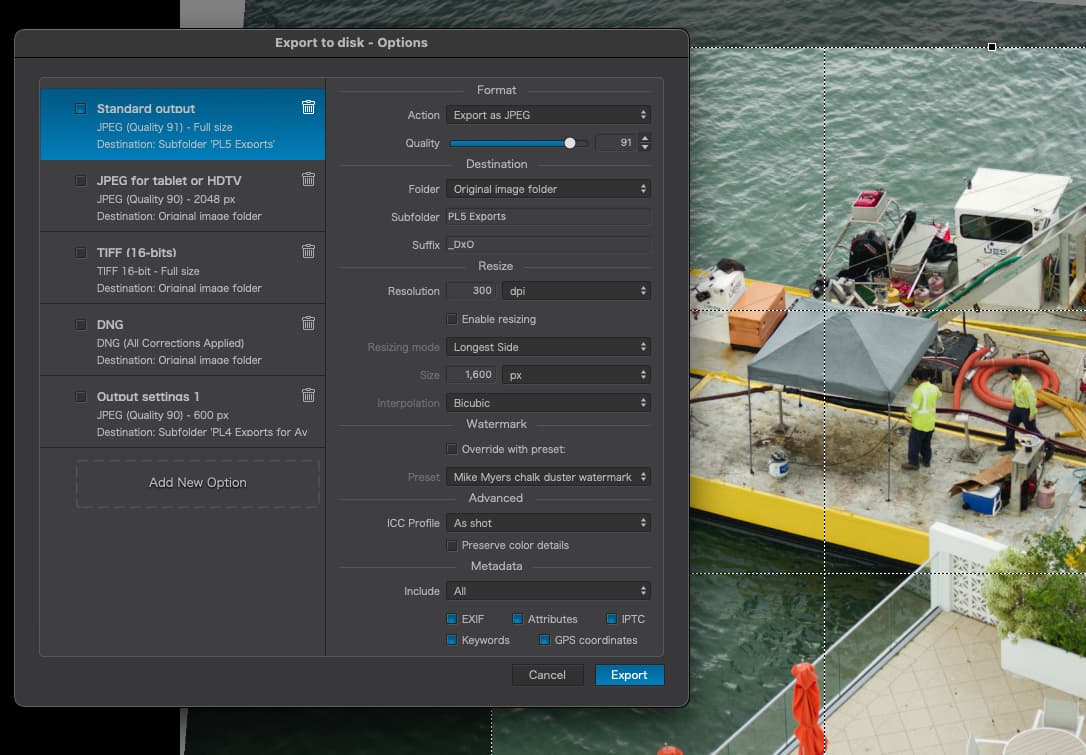
I’ve been using the export dialog for so long, but not really paying attention to it. It has already selected the “Standard output” as JPEG. The “ICC Profile” is set to “as shot”, so PhotoLab is set to sRGB which is what I set my camera to. Should I select “Preserve color details”?
I will let this sink in, and later this week I’ll look for OOG image to post (never really understood OOG until now).
I’m probably still confusabobbled somewhat, somewhere, but thanks to all of you, I finally think I understand what’s going on. At least all my questions are now answered in a way that makes sense to me.
In which case, now try reading these tutorials:
https://www.cambridgeincolour.com/color-management-printing.htm
They should help to further reinforce what you are learning here.
Pun with poker terminology: Looks like you got the nuts.
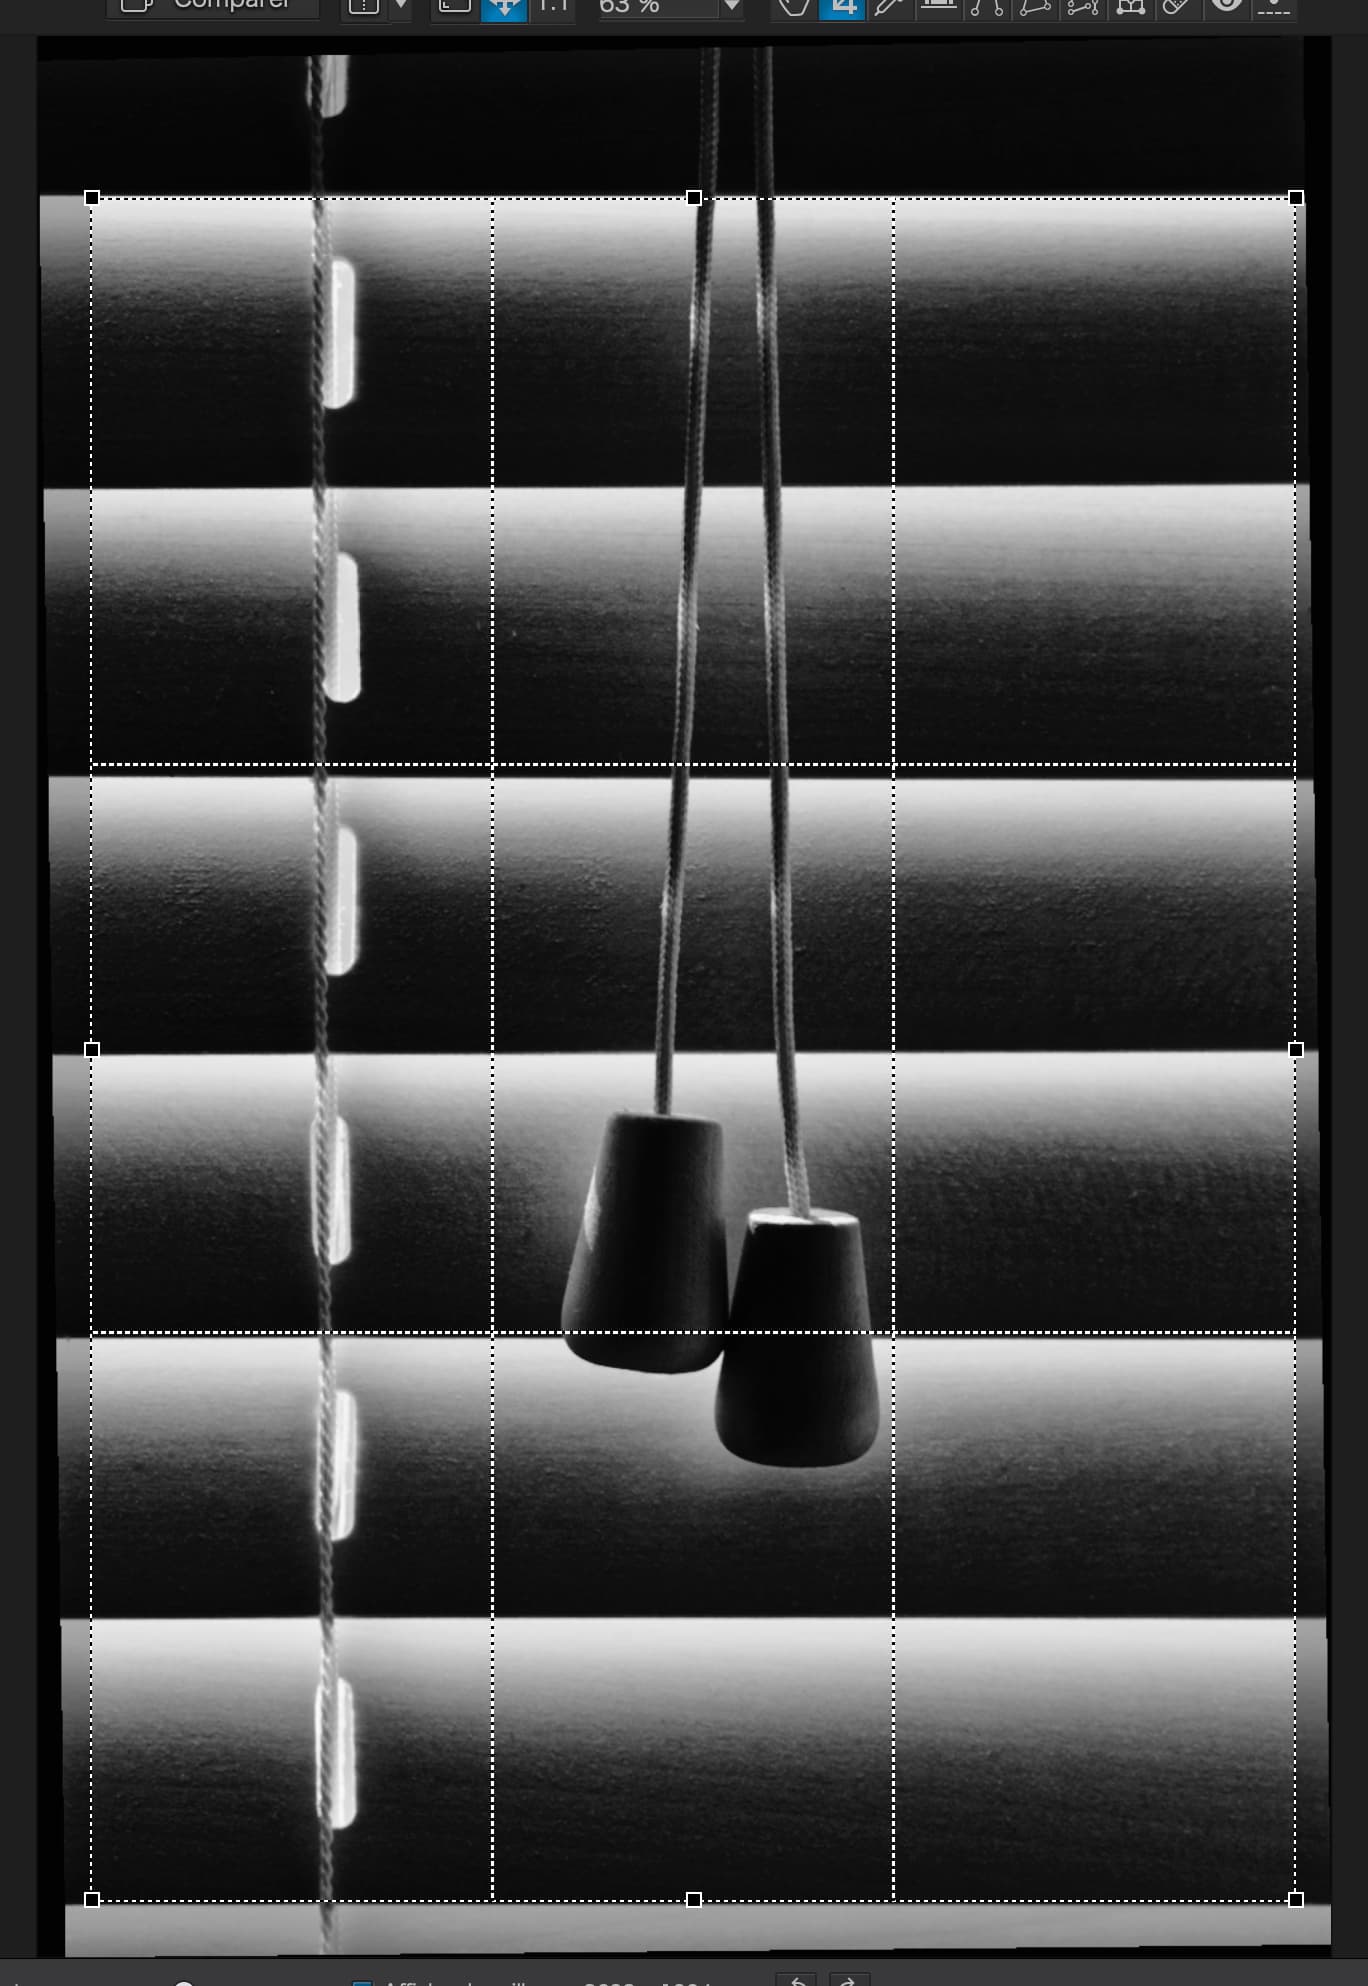
The more I stare at your photo, the more I enjoy it. Zoomed in I see the fine detail. The top is the “top” of the upper blade, and the bottom is the “bottom” of the lowest blade. To my eyes, it needs a little more width, to the let, so it feels “balanced”. Not much, just a little. I love the way the shading goes from so bright to so dark. Everything was obviously lined up perfectly, wit precision. Do any of those parts have any color? Just curious. The pull knobs are perfect too - if they were any higher or lower, the image would’t be as good as how you positioned everything.
Wow, you really want to overwhelm me, but a lot of that is for printing, which I hardly ever do. Who knows, maybe in the future?
Anyway, time to stop, and just play for a while.
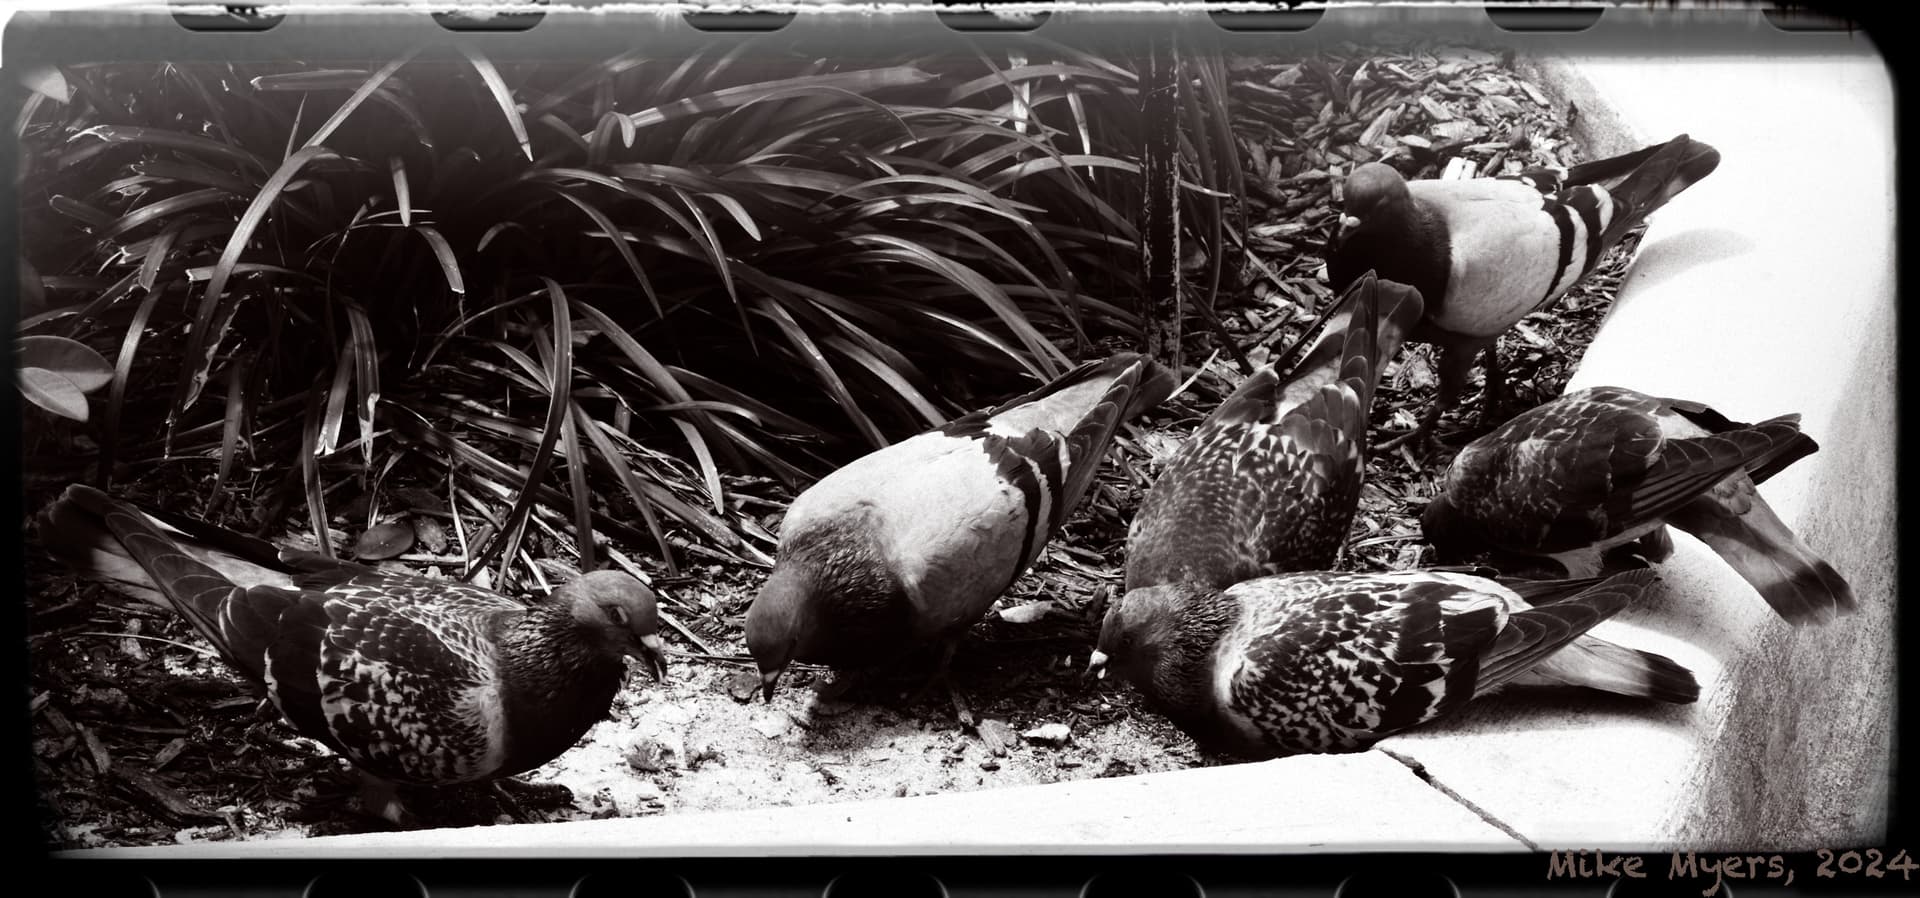
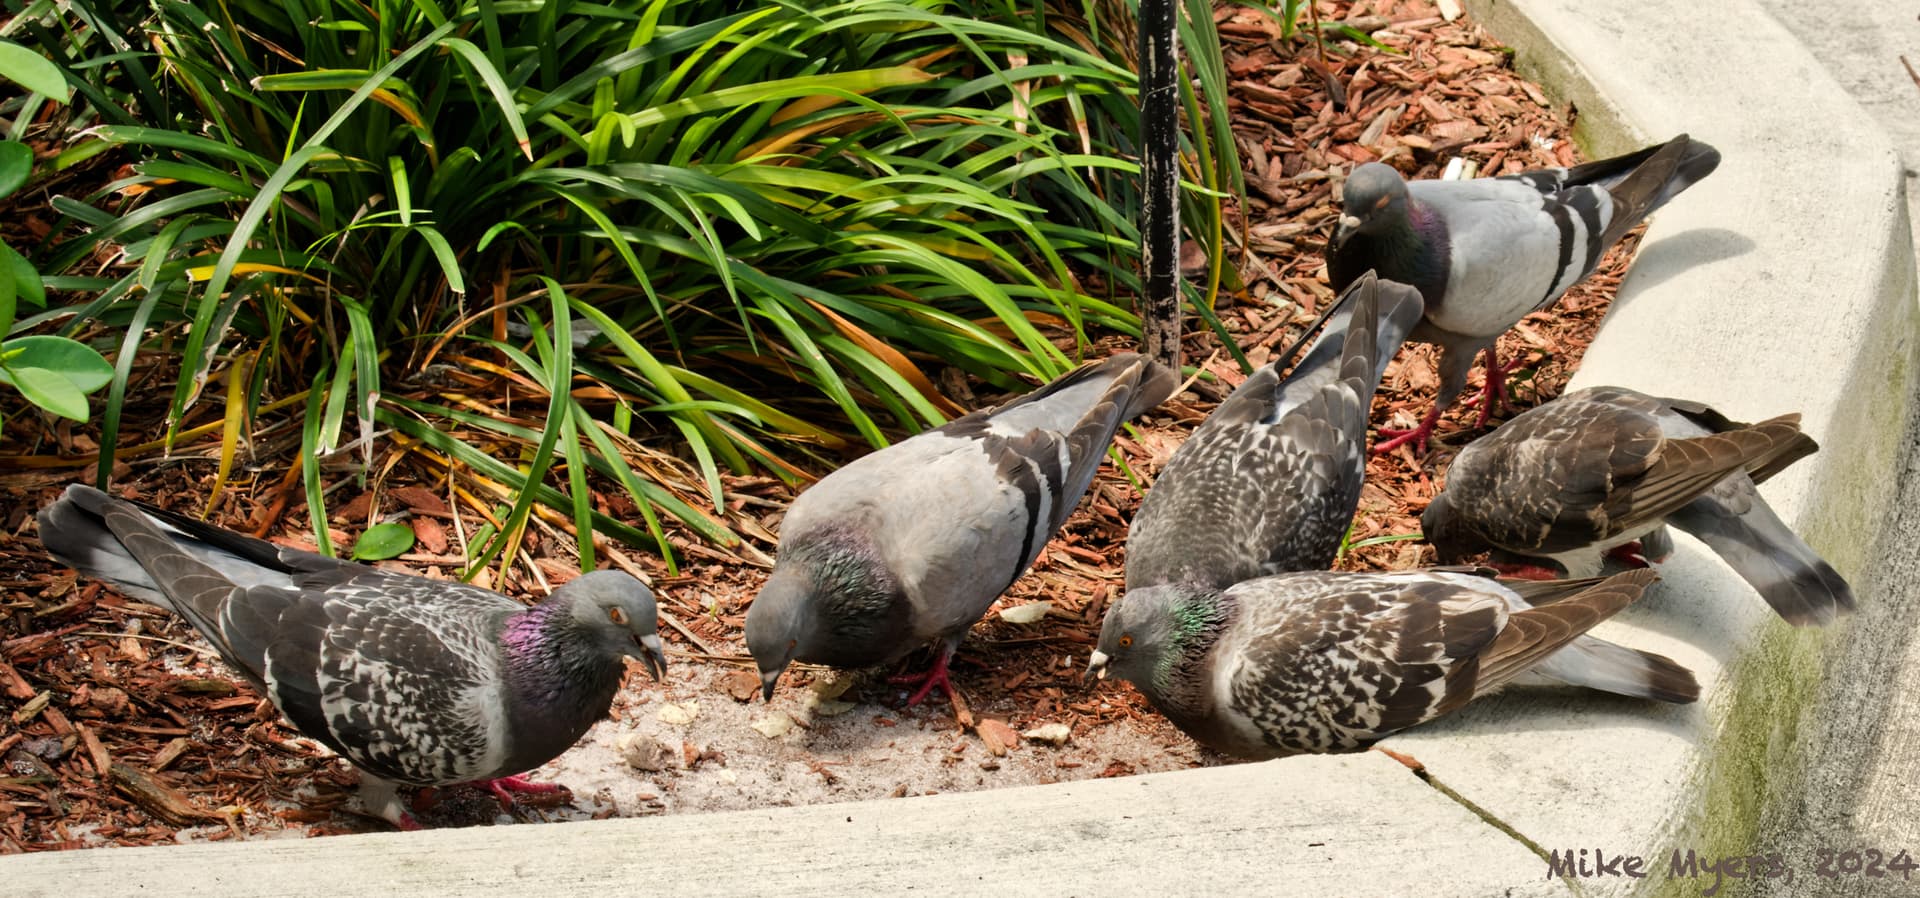
This is from my D3 with an old lens (inexpensive Nikon 28-70 3.5-4.5 D) I won’t use any more. Instead, from now on, my walkabout lens is likely to be my Nikon AF-S Nikkor 24-85 3.5-4.5 G VR ED. I took a dozen or so photos of pigeons, and one of them seemed interesting. D3, just out for fun, and food shopping.
I fed the image to DxO Filmpack, tried several, and found something so strange I liked it. The more I enlarged it, the more I liked it - almost to the point of wanting to print it. Almost.
I need a break from all this struggling over color controls. Still playing with my D3, but I’ll recover my sanity soon, and go back to the D780.
The real photo, if anyone cares:
No it’s not.
I’ll take your word for it, and starting tomorrow or Tuesday, work my way through it.
First thing it said on the page was:
“Learn how a digital image changes when it goes from camera to display device to printer. Understanding how this “color management” process works can help you achieve a more pleasing image.”
Not today though, and I need to first do my Pelican homework for @Wolfgang. Thanks to @Joanna, I think I have a head start, but I’ll start on this by Tuesday. If I get lost, you are the person I am going to ask for help.
I’ll beat @Joanna to the punch - my pigeon photos would have been better had I been able to get closer, or use a longer lens, or simply taken my D780 instead I’ve learned my lesson, I need to fill the screen with my image, but I wasn’t anticipating anything like this when I left my home. The D3 doesn’t have that many pixels, and when I got home, reading about the lens I used, it’s also not very high-tech. Why use a Yugo. car if I have a Jaguar. …or my Mazda. On the other hand, I’m finding out for myself what does (or does not) work for me.
My feelings tell me that a one-number Nikon is the top of the line. D2, D3, D4, D5 and D6. I wonder how Joanna would feel about a D6 compared to her D850. I’ve never been able to afford a D6, or even a D5, and nowadays I’m not sure if or why I would want one.
No work tonight - work starts tomorrow, Monday.
The D3 was quite good her days and Ken Rockwell was very pleased with it in 2007.
Nowadays and in comparison to other DSLRs, it looks less overwhelming.
Nevermind using whatever camera you like to take along for a few snaps … but sticking to less gear can greatly accelerate the ability to use that (limited set of) gear.
The quick answer is no because I imagined it as a B&W. The framing is virtually straight out of the camera, apart from changing the aspect ratio a little. As can be seen from this screenshot of the crop tool…
The sooner the better
They used to be the “professional’s” camera but they now lag well behind more modern models. The D3 only has & 12Mpx sensor and even the D6 only has a 20Mpx. These were designed mainly for sports reporters and the like.
Joanna would politely ignore any of that range because she already has a far superior 46Mpx, which takes stunning images that I can enlarge to make stunning large prints. Even my previous camera, a D810 can do better than the D6 with 36 Mpx.
Thanks @platypus for making that point. @mikemyers, as long as you keep on swapping and faffing with all these esoteric or old cameras, you will never get the hang of any of them.
I might have a few old cameras but they stay firmly in the cupboard, allowing me to master the best - my D850. As the saying goes if you are a Jack of all trades, you are more than likely a master of none.
Having said that, the image of the blinds was taken 19 years ago on my D100, with a 6Mpx APS-C sensor - treated in PL and then enlarged and sharpened for printing with Topaz Photo AI.