I usually print my work on my Canon Pro 1000, and perform output sharpening via Qimage. However, I am sending a few images to White Wall for fine art prints, and am struggling with output sharpening on the submitted file. I do not like the method in Qimage, and am equally uncertain about NIK’s output sharpening using the 1400 dpi value for an Epson printer. Does anyone have any useful experience for file prep sharpening for a third party lab?
I use Topaz Photo AI to simultaneously enlarge and sharpen. Then I send the sharpened TIFF to Canon’s own Professional Print & Layout software for final output.
I have been extremely happy with the results that Topaz gives.
You mention 1400dpi resolution. You should not be using dpi, but ppi and for larger size prints, 240ppi will be perfectly fine. You can even use 150ppi when it gets to exterior wall size prints
Your comment prompts me to look at Topaz; I hesitate to accumulate more software but ought to give that a look.
I always get my ppi/dpi mixed up; the dpi in NIK refers to printer resolution.
White Wall asks for 300 ppi so I’m content there.
Thanks for your endorsement of Topaz.
No – only printing myself on a Epson P800 with Nik Output sharpening
(PS layer, custom layout … ).
note
-
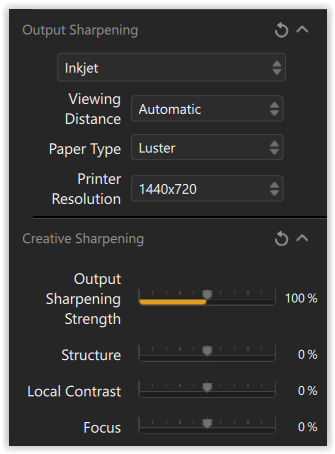
the Viewing Distance determines how much sharpening is needed
always export to the exact final output size before sharpening -
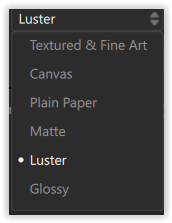
the Paper Type determines the strength of sharpening
paper with rough surface needs more sharpening than glossy paper -
the Printer Resolution depends on the printer
Epson: 360 dpI / Canon: 300 dpI → x multiplier
.
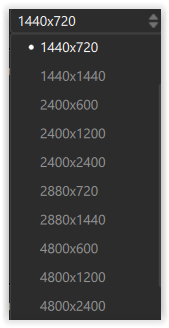
increasing the resolution (= finer forward transport steps) e.g. from 1440x720 to 2880x720 produces finest details on high gloss media for close viewing distance,
but normally doesn’t make sense (laying down more ink results in a darker picture)
.
So, what to do?
Depending on your order, you can select the paper type, but otherwise you have no knowledge or influence over the printout. You may want to contact the printing provider and then try it out.
Thanks @Wolfgang. Your thoughtful response reminded me of facts I once knew when using NIK regularly. Time to do a bit of testing in the studio before I make an order! ![]()
The provider (White Wall) has provided info that coincides with the Epson 360 dpi. I suspect that there is not an appreciable amount of difference between my Pro 1000 and their Epson printer regarding output after the soft proof. Theoretically, my hard proof on Baryta should be quite similar to their print on Baryta.
The Canon Pro 1000 prints at 2400x1200dpi and I have never printed at less. In fact, I don’t think you can.
I would have my doubts about that.
Sort of puts one in a quandary doesn’t it? Seems all the labs use Epson for inkjet prints. ![]()
Well, try it out and then you know. ![]()
As you noted, I use Nik Output Sharpening to compensate for ink bleeding (as part of the printing process, if you will), but not “creatively” to compensate for lack of image sharpness, magnification, or anything else.
The level of “output sharpening” depends on the printer (droplet size, etc.), ink type (dye/pigment ink), and media (glossy/glossy/semi-matte/matte/textured paper). In general, the coarser the surface, the more sharpening may be required. That is, when I want the least amount of sharpening I set Nik to Glossy.
About 15 years ago, my first printer that could print on fine art paper was an Epson Stylus Photo R2400 with the option to set it to 5760 (Photo RPM) for the finest details. However, it turned out that there was no visible difference with the next lower printer resolution. And with higher resolution, the printer applied more ink to the paper, making the images noticeably darker … even today.
Also, I don’t print out ID cards or anything similar to check them up close (at nose length). ![]()
Thanks for your input. As I already have creative sharpening on the image, I am looking only for output sharpening to compensate for the ‘ink bleeding’; I’m not comfortable in the manner in which Qimage One does a file output that can include sharpening (blind), so I think I’ll return to NIK for that where I can see what I’m doing. Thanks for your reminders as stated above. I’ll report back when I see the final images. ![]()
If you check the sharpened image on your screen at 100%, it will most likely look exaggerated, inspite your print out is correct. The Automatic setting (see screenshot) works reliably for normal viewing distances and I rarely check this on the monitor!
So far I’m printing from PS. I make sure that the image is the right size, add a sharpened layer that matches the paper and adjust the level of the dark tones individually so that they don’t drown in the black level of the paper – sounds complicated, but is easy to do on my calibrated screen.
If I don’t want to print “borderless” (my picture frames cover the tiny border), the final step is to add my custom layout, which prints fine double black lines around the sharpened image, plus title/copyright/signature/year on the white border – replacing an individually cut passe-partout.
![]()
This is what I remember from when I used NIK. As already mentioned, it takes little to no noticeable sharpening for glossy, which is what I chose for the Baryta, which is in the glossy category. Test prints came out perfectly. ![]()
I was previously using Nik for sharpening. I was also not satisfied After testing Topaz Sharpen AI I don’t use any other, because results are perfect. You must just verify, if the selection is good.
The new update to Topaz, just released, adds a new lens blur correction, which seems to work better. And the processing speed seems to have improved
So the final prints came from White Wall this week, and I am happy to say they matched my hard proofs (on the same Hahnemuhle paper) nicely. Colors, blacks, gradations, sharpness, etc. all matched wonderfully from close visual inspections (pixel-peeping with a loop) with the hard proofs side-by-side. The output sharpening through NIK proved spot on. Thanks for the workflow reminders @Wolfgang – it has been a while since I used NIK. While my proofs were printed on a Canon, and White Wall’s on an Epson, observers here could not detect which was which. ![]()
I’m happy to have an outside lab option for prints larger that I produce.
Nice to hear – and thank you for your feedback.
I don’t know, but maybe it’s just that some Epson-users discovered that you can choose a lower quality and save ink and printing time. If you look at an A2, perhaps the natural viewing distance is around 1.5 meters and then it probably matters less if it is 5760 (like with P900, 2880 with P800 or P600 or 2400 dpi that both Canon Prograph 1000 and the new 1100 uses. even paper matters, but there is no chance that it is a disadvantage that you can choose yourself to scale down if you want compared to actually not being able to do so. I have to say that I am probably a little surprised that Canon has not increased the precision of their Prograph 1100, but that may even be because there is other limitation that makes that choice irrelevant.
Because what still sets the bar in this case is also the precision with which the ink is controlled by the print heads.
I asked Bing Copilot just in case:
"
The Epson SureColor P900 uses ink droplets in the following three sizes.
3.5 picoliters
2.8 picoliters
1.5 picoliters
These different sizes help the printer to create highly detailed and high-quality prints. Do you have more questions about your printer or anything else I can help with? " (end quote)
"Canon imagePROGRAF PRO-1000 can work with variable droplet sizes. It uses Canon’s FINE technology (Full-photolithography Inkjet Nozzle Engineering) which enables very small and precise ink droplets
The Canon imagePROGRAF PRO-1100 can work with ink droplets as small as 4 picoliters12" (end quote)
It should theoretically be a fairly clear advantage for a P900 to provide a 2.4x higher resolution than for example Canon’s new Prograph 1100 while even being able to work with a droplet size that is at about a third as large as the Canon printheads can achieve - even if that precision isn´t shining through all that much all the times. If it should be totally pointless, I doubt Epson would have bothered to double the resoliution compared to both Canon and Epson own earlier models.
What matters far more compared to previous models, such as my old P600), is the ink economy and operational reliability. These have been improved drastically. So, with the P900, the ink consumption might not at all being in focus as much as it was before as long as the ink is used to print pictures and not just to clean the print heads. The last time I printed after the whole summer without use, an automatic cycle started and was done in around a minute and the nozzle check was perfect. Haven’t had any real ink problems with the P900 since I bought it so with this printer the ink problems have become such a non-issue that I don’t even think about it anymore. So, the new smart diagnostic system works and makes a lot of difference.
It is only if the printer has been standing for a very long time that any diagnostics are run. In general, it is possible to print immediately after switching on, which never happened with the P600, which was always churning for several minutes before it could be used.
What I think is more important to the true precision of a P900 is the variable droplet size. However, it makes it difficult to speak in terms of “dots per inch” nowadays. What is a dot in such a context???
When it comes to sharpening output when printing, I have sometimes used Bicubic Sharpen especially when printing old repro photographed or scanned positive color slide films since Photolabs other sharpening tools doesn´t work at all with the textures of these films. The downside though with Bicubic Sharpen is that it causes problems when there is for example leaves on trees and bushes that turnes oversharped areas white-ish, so of that reason I use Topaz Photo AI 3 since it was released. It is one of the few softwares out there that can handle both noise and sharpening with images like that and it has made a lot of difference.
I am not entirely comfortable with Topaz AI either yet, because sometimes it gives pretty strange results (artefact patterns) and they have a feture called Face Recovery that often just is too much to my teste. I think I have to talk to Joanna about that.
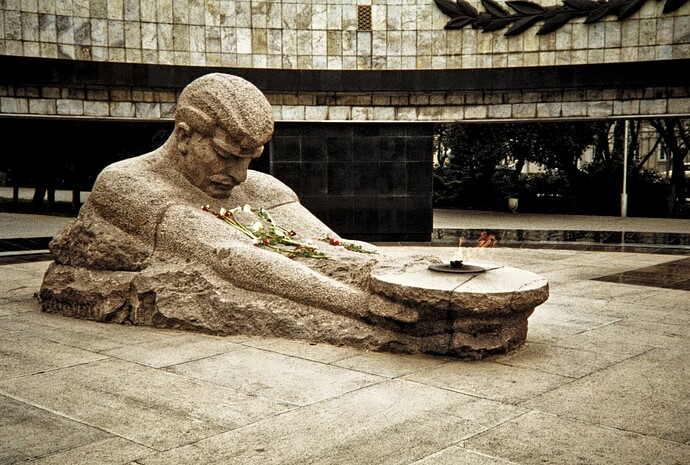
@Joanna I will show you a little strange example of how Topaz AI handled a picture of a former Soviet monument of the 26 Soviet commissars that was murdered when the communist commune in Baku Azerbaijan was overthrown in 2018. (The monument is no more since it was destroyed after the fall of the Soviet Union)
The quality is as it is since this is taken with Agfa CT 18 color slide film in 1978. First the copy as good as I could manage:
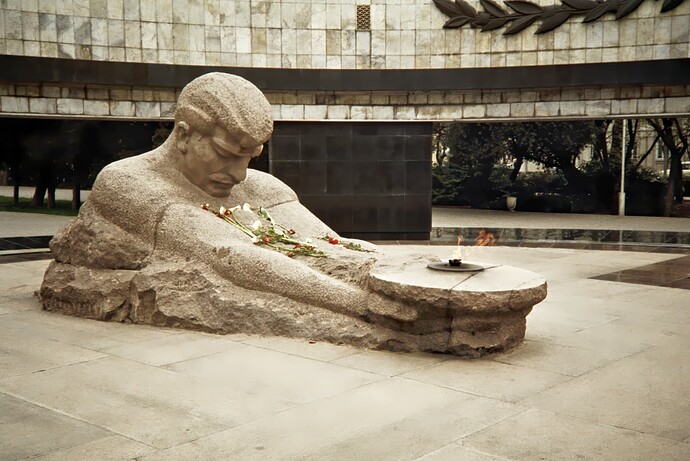
Below you can see the same picture processed by Topaz Photo AI. Note especially the heavily smearing effects of Topaz “Face Recovery”-function in the face of the sculpture that is way too much to be acceptable. It starts automatically to process faces even of a sculpture in this case.
In the second picture you can see it has erased all the textures from the granite in the face. Of course I can turn it off or adjust it a bit but this was the default.
Topaz can be absolutely fantastic especially with old scanned or repro photographed color slide pictures - it’s denoise function works unlike Deep Prime XD even on JPEG-files and that goes even for the AI Sharpening that also can make small wonders where Photolab is completely impotent. So that is why Topaz since some time is a very important part of my present workflow for these images.
Can’t say anything about the Epson SC-P900, Canon Pro 1000/1100 or Topaz AI because I haven’t worked with them yet.
In 2015 I replaced my Epson Stylus Pro 3880 with an SC-P800, the larger version of the SC-P600.
SC-P800 standard settings (v 6.75)
-
Plain Paper / Bright White Paper
Level 2 quality, Printer resolution Normal 720x360 dpI
glossy or matte black -
Presentation Paper
Level 3 quality, Printer resolution Fine 720x720 dpI
matte black -
Photo and FineArt Papers
Level 4 quality, Printer resolution Super-Fine 1440x720 dpI
glossy / matte black -
extra
Level 5 Max quality, Printer resolution Super-Photo 2880x1440 dpI
glossy / matte black
Initially I’ve used the highest setting for max. quality, but the pics turned out to dark. From very early on I made custom paper profiles and tried many different papers.
Not so long ago I mentioned to use proven test images,
e.g. from https://www.northlight-images.co.uk/printer-test-images/ .
To control ink coverage download and check
For quality reasons print unidirectional
- reducing potential print head misalignment issues
- allowing media to absorb the ink
without → extra Drying Time per Print Head Pass
.
Please note:
I don’t use Nik Output Sharpening for creative sharpening or to make up for lack of sharpness or magnification, but to compensate for ink bleeding with my printing ( see … ).
Wolfgang
