Off-Topic - advice, experiences and examples, for images that will be processed in PhotoLab

Which is why it has been suggested that you play with several virtual copies of the same image, in order to see what effect different treatments have, compared to each other. Did you know you can rename virtual copies on a Mac? This means you can more easily differentiate between different versions than just VC1, VC2, etc.

There is a world of difference between the AI that Boris Eldagsen used to create an image and the AI that DxO uses to get rid of noise.

Is it enhancement or correction?

Before electronic computers existed, computers were (mainly) women who computed stuff. Give them a mathematical problem and they would work it out. The problem, it all took lots and lots of time and was prone to human error.

Then came the idea of, first mechanical, then electronic, computers, which did exactly the same job, just a lot quicker.

Whereas a human computer used “real intelligence” (the brain), electronic computers were crafted, by a human, to mimic that intelligence, or at least to logical process to solve the problem. Essentially, the necessary algorithm was recorded so that it could be executed by the machine.

Noise reduction is just an algorithm, that has been recorded, as computer code and that simply speeds up the operation. It goes something like…

  • is this pixel noise?
  • are the pixels surrounding it noise?
  • compare the surrounding pixels to see which provides the best replacement

This is something that could be done by a human but, when it comes to a 45Mpx image, you could expect to wait rather a long time for the result, so it makes sense to provide an automated method. Of course, a noise reduction algorithm is only ever as good as the replacement strategy it has been taught by a human and is simply a faster way of coming to the same result but, as testified by the number of competing NR tools available, some are better than others.

In fact, although labelled as AI, NR algorithms are not truly intelligent - they are simply executing an algorithm taught by a human. It’s just that AI is the new buzzword to help sell so much software nowadays.

On the other hand, AI image generators are taught to “replace” the creative process, in deciding what should constitute an image of a requested subject. Think of it as asking someone else to create a collage, using bits of other people’s images, possibly without the originators’ consent. A bit like the way so much modern “music” is constructed by sampling other musicians’ work.

Is it photography? Well, if you account for those bits of images stolen from other photographers as photographs, then possibly. I would argue it is the result of having taught a machine how to stick bits of images together, which may or may not produce a pleasing result - a sort of machine artist.

But it is definitely not photography, as is commonly understood by using the light entering a camera to record what a photographer sees.

What is worrying is that AI is now being used to create, not only still images, but also video. Take a look at the whole business of “Deep Fake” videos, where one person’s face can be superimposed on another person, so that the viewer gets the impression that someone they know is doing something uncharacteristic. This could lead to AI newsreaders, presenting AI generated news of events that never happened.

Fortunately, Boris Eldagsen was up front and declared his image to be fake. @mikemyers this is where photojournalistic rules come into play. But, if an image is declared to be a work of art, which most images tend to be, then I see no problem with “tidying up” an photograph, or even creating a work of art, based on one of more photographs.

The aim of DeepPRIME is not to create something that you couldn’t be bothered to photograph yourself, it is just another (very efficient) tool for improving your own work.
2 Likes

I was going to write what I think it means, but I think this very short definition on the internet does this better:
Artificial intelligence leverages computers and machines to mimic the problem-solving and decision-making capabilities of the human mind.

Yes, thanks to recent posts here, I think that is a wonderful idea. I assume I would do this, immediately after creating a Virtual Copy, before doing anything to it. Seems to me that in the past, renaming my PhotoLab files using macOS confused PhotoLab, so I stopped doing so.

Can you please explain when, and how, I can rename my PhotoLab files such that both PhotoLab and macOS accept the change, and I don’t have issues? When I use PL5 to compare my different Virtual Files, will this still work properly after doing the rename?

Maybe some day a future version of PhotoLab will provide an “information box” into which I can enter the changes I made, how I did it, and why, so years from now I will be better prepared to remind my memory of what I did, and why?

I agree with you, but where do we draw the line? Do the image improvement tools from other images go too far? If we change the color of a bird, or part of the bird, is that “legal” in this regard?

Wearing my old PhotoJournalist hat, none of these things would have been “legal”, unless I was creating a Photographic Illustration - they cross the boundary from being Photographs.

I thought the only line to be concerned about crossing, was if the image was altered. I guess I shouldn’t be asking the here - I should find one of these contests, possibly the one that rejected the image I was describing, and read their rules.

Question specifically for @Joanna - I’m pretty sure you are comfortable with all the tools available in PhotoLab. Are you equally comfortable with software like Topaz, that show various possibilities and you select the one you prefer? How about Luminar?

…and as for me, for now, I’m not going to pay attention to any of this, other than how to properly rename my VC images to quickly remind me a year from now what I did, and why.

I’m not going to debate this, but the eventual goal of computers will include all the choices available, and decide on its own which is best. It may be “taught”, the way all of us are taught, learning along the way. So while I don’t agree with you, that doesn’t matter.

I don’t agree with most of what you wrote about AI, but for us, in this forum, it comes down to this:

I have lots of thoughts about this, very few of which are relevant. I would like to be able to use PhotoLab to the best of my capacity to learn it. I know I have access to image editors that can simply replace the sky if I wish, but that’s not my goal.

There are a lot of people in this discussion who I am leaning from, especially about how how to best use the tools that PhotoLab provides. As always, tools can be used for “good” or for “evil”. PhotoLab seems to be especially good at taking an image captured by MY camera, and turning the image into what I thought I saw with MY eyes. And as always, “GIGO”.

Garbage IN > Garbage OUT.
If I don’t get it right in the camera, anything I do later is just a band-aid.

Life was easier when I just took snapshots.
Now I want more, much more.

Time to shut up, put away the computer, make breakfast, and start a new day.

Absolutely not. Quite the opposite, actually. I see AI as something leading up to software that can “think” on its own, eventually. In the meantime, I see it as the combination of many people’s ideas into a mostly coherent way of thinking, and/or doing. I certainly believe that it can start off as being “programmed”, but given all the data available to it, I think it comes to its own conclusions.

I’ve been doing that for a while now. There are probably an unlimited explanations of AI, most of which seem to be a program that can do a well, perhaps better, than a human, and do it instantly. I also see it as an almost instant way to learn about most things that I want to ask, if it hasn’t been programmed to avoid them. Regarding this forum, I see AI to “enhance” my ability to do many things, seemingly instantly.

I’m trying to do so, but “better” is true, but AI can do so much more (or has been trained to do so much more). To me, AI is both useful, and scary. My interest in AI dates back to the 1980’s movie Wargames. The computer gear the kid had resembled what I had in my home, computer, old analog modem, software to “speak” what was being written. That movie is why I’m afraid of all this.

Me too, to all of that. I do the best I can, with what I’ve got, and when I travel, all I have with me is my old 2015 MacBook Pro, and the lighting in my room is constantly changing.

I have a friend on these forums, who is very talented and has access to all the gear he needs. He has been creating a series of “faces” which came from the “Dall-E” software. To me, they are amazing. I would like to do the same thing, but for me, I want to be working on images that came from me using one of my cameras.

Prediction for the future - I will capture a high-resolution image in raw format, and feed it into a computer program that I have access to, which will eventually output a perfect image reflecting what I saw while standing there, taking the image. The software won’t “create the image”, only optimize it. Over time, the software will learn from my adjustments how to do this better in the future. Eventually all I will need to do is release the shutter. The computer will do everything from then on. …would I buy a device like this? Doubtful.

Back to AI for a moment. I think all of us should watch this video:

AI

I just watched it, and I don’t even know what words to use to describe what I learned.

Joanna, watch it all the way through, and you will see how Google has been allowing AI to teach itself how to get better, and better, on a scale I never imagined. Everything I thought I somewhat understood an hour ago, was/is wrong. Watch it, and learn for yourself.

This is the movie “War Games” from 1983, but that was just kid’s play compared to what is already possible. And it almost happened, in real life, based on secret information that has been recovered: Almost WW III

On the one hand, I’m going to stop talking more about this, as it relates to photo processing. On the other hand, later today I will try Bard myself.

…and back in my own “real world”, over the next two days, as suggested up above, I plan to start trying out all the PhotoLab tools I’ve been ignoring, creating a VC for different attempts (once I learn how to rename a VC without confusing things).

Perhaps a future addition for PhotoLab 7?
Another use for AI in image processing?

Getting back to my own little world, both my D780 and my M10 are semi-permanently set to full manual mode. I feel more comfortable with the Nikon, as this matches the way I’ve learned to shoot. With the Leica, I don’t yet feel that comfortable - I’m used to setting most the controls manually, but allowing the camera to fine-tune at least one of them, so I’ve either been using Aperture mode, or Auto-ISO. For the sake of learning PhotoLab, I will leave or turn things to Manual as long as I have time to think about what I’m doing.

For “grab shots”, when I don’t want to be carrying the Nikon, and want something smaller than the Leica, my Fuji X100 became a replacement for my iPhone, which I’m now underwhelmed by. For walking around I left it in (A)uto mode deliberately. I like leaving the Fuji with the viewfinder set to optical, not digital, meaning no matter what the settings are, I see the world through the viewfinder just as it appears to me with my eyes, regardless of the settings. Anyway, a few days ago, I went out on my balcony and took a single image of Biscayne Bay, then put the camera away.

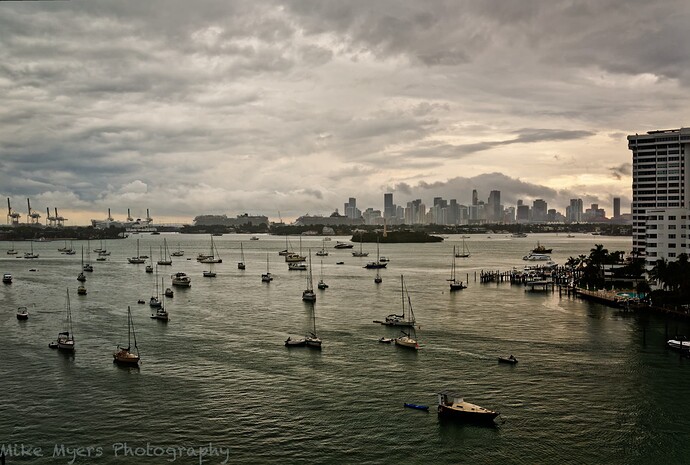
The next day, with more discussions here about what I considered “obscure” PhotoLab controls, I felt anxious to start to try them on my own. The only camera with new images was the Fuji, and I had just that one image of Biscayne Bay to play around with. Instead of processing it like I did before, I started trying things I never used to mess with, always looking at the full-size image to see what had changed. The biggest thing I wanted to “bring out” was the sky, and a control-line allowed me to carefully manipulate the sky until it blended into my image. The only cropping I did was to cut off the sides, so the camera lens corrections by PhotoLab were no longer visible. After a few hours of this, I stopped to make dinner. I continued on later that night, and more yesterday.

When I use the COMPARE tool, the original image looks ready to be deleted. It had zero redeeming features, and looks as dreary and worthless on my screen, as what I saw with my eyes. I remember seeing the clouds, and wondering if I could improve them.

In the “finished” image, there were three “dust specs”, which was impossible, but that’s what they looked like. I figured out they really were birds, but I deleted them anyway, grudgingly. To me, they were just detractions from the image, but most of my brain (not all of it) was pushing me towards deleting them. There is hardly any cropping, only enough to get rid of the curved edges of the image due to PhotoLab corrections.

I could blabber on about what I thought and did, but after two days of this, I no longer see anything I want to change or correct. There is hardly any color, but around 4pm that afternoon, sort of shooting into the light, that’s all I saw with my eyes.

Here are the resulting files:

DSCF4930 | 2023-04-09.raf (48.0 MB)
DSCF4930 | 2023-04-09.raf.dop (18.0 KB)

My goal is to capture a difficult image with my D780, and process it differently a few times, with VC to show each result, and then to compare them. My plan is to make three or four virtual copies at the beginning, and label them accordingly as I go along. Also, I was thinking of making a time-lapse video, taking one frame, removing the top change on the history list, taking another snapshot, and continuing to the end, when I was down to the original image - then reversing the order, then play it back in slow-motion. Lots of exporting, but it might be fun to see how the image was manipulated, step by step…

Oops, I forgot to add this - I’m not really posting this image so others can try the same (but you’re all welcome to do so) but rather to ask what I may have done poorly, or what I might not have thought of doing at all. Suggestions and criticisms will both be welcomed, and if you think I really messed up, please feel free to say so. But please keep the suggestions only to tools within PhotoLab for now.

On second thought, the more you all feel like editing this image yourselves, the more comparisons I will become aware of… :slight_smile:

It’s already in PL6. It’s called DeepPRIME

Experience comes with (a lot of) DIY – not with typing.

Believe it or not I quite like the shot. With what looks like slight sepia toning, it adds a different look to a familiar image. To be honest with you. It is too cluttered but for me the slight toning makes the difference.

I am pleased to see that you are getting used to your D780 with the better view finder.

Mike, where have you been? DeepPRIME and DeepPRIME XD are both AI based noise reduction tools and from what I’ve been reading, they still do a better job then Lightroom’s new AI NR tool.

Mark

Hmm, this didn’t look like what I deal with by using DeepPRIME, and I (incorrectly?) thought that DeepPRIME processed the entire image, but maybe the bottom line is that they are similar. I guess you are correct.

I didn’t like the image from the camera, it seemed too blueish. I used the white balance tool on the white sailboat, and it looked awful. Then I used the white balance tool on the large building at the right, and it looked nicer. I tried to adjust the white balance manually, but I never found a setting that worked for me.

Perhaps the viewfinder is the single nicest thing about the 780. Most of what I need to know is right there, and it’s more obvious than the Fuji, and infinitely more obvious than the Leica. For a carefully composed shot, the Nikon has the others all beat. Yes, I am very much getting used to it, to the point where I miss all that with my other cameras. They have the information, but it’s more obvious in the Nikon. Once the exposure is set to my satisfaction, I just need to pay attention to both of the “level” controls.

Yeah, it’s just that I never thought of them as being AI. To be honest, I didn’t think that much about them, but they seemed to be a necessary tool most of the time. I started using them even when I didn’t think I needed to. But with the small window to show what the tools do, they always seemed to improve the image. It’s just that I never considered them to be using AI.

I actually also mentioned that DeepPRIME and DeepPRIME XD were AI-based in an earlier response to you. The AI functionality is what allows these tools to selectively apply noise reduction differently to different parts of an image as needed. That is why it is so labor-intensive and takes so long to run on computers that do not have a supported graphics card.

Mark

Here I am with my Intel powered Mac mini. Excellent specs, but no graphics card, and buying a separate card apparently is extremely expensive. When/if I (can afford to) replace it, graphics will be high up on my list of things to consider.

To be honest, I’m not really sure how any of the “settings” and “tools” actually work. I’ve been learning what they are, and what they do, and how to use them. I have been, and am, oblivious to all the behind-the-scenes stuff of HOW they accomplish what they do. 99.999% of what I care about is how >>I<< can get the tools to do what I want. Sorry, but when you guys (and gals) lose me, it’s usually because I’m not smart enough, or intelligent enough, or familiar with digital processing to truly understand WHAT is being done. It’s like the apps such as Topaz that I send an image to, and they take my blurry image and make it look sharp and clear. All I know is WHAT they do. I don’t have a clue as to HOW they do things. Even now, I’m not sure if “AI” is the right term for DeepPRIME. Because you guys tell me that’s the case, I accept that. But if it’s just following a set of instructions, is it really “intelligent”?

If I wake up really early tomorrow, I found a spot to take a new construction photo, backlit, and will use my D780. But if it doesn’t have any sun-lit areas, it’s not going to accomplish what I want. Or, I can take the same photo as last time, from the same point of view, and use that for my testing.

I said I would never again comment on your images of Biscayne Bay but…

You are duplicating the same functionality by adjusting the Tone Curve and Selective Tonality and Contrast. A well manipulated Tone Curve does fairly much the same as Selective Tonality and Contrast combined.

The four fine contrast sliders are cumulative, so you need to be careful when adding mid-tone with global as these tend to accentuate each other.

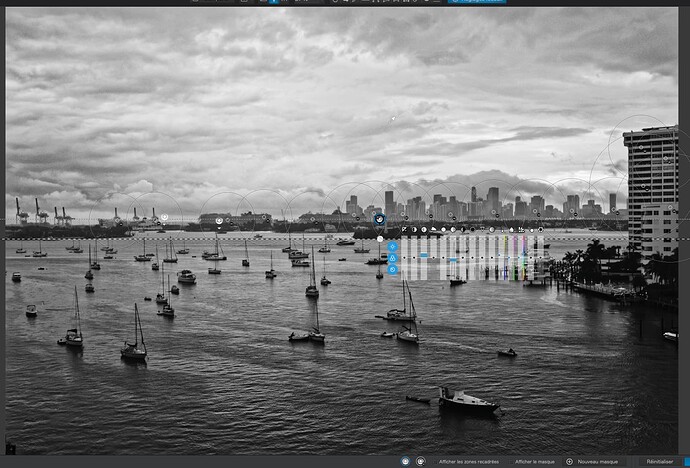
Local adjustments - Control Line…

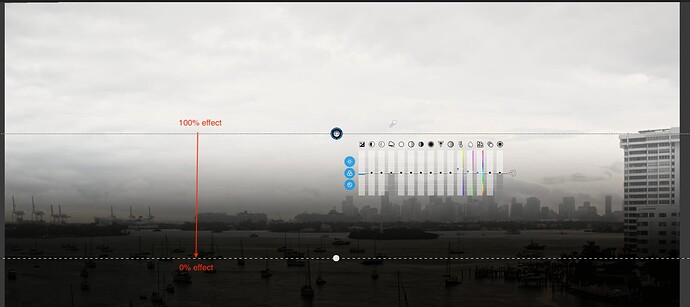
This screen shot shows where the mask was applied and it is obvious you are using it as if it were a graduated filter. It is not.

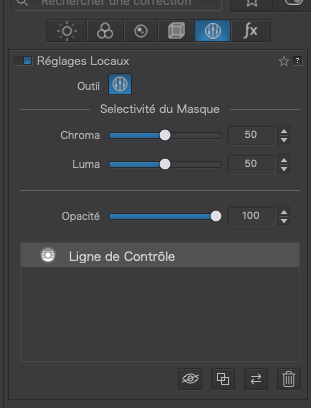
You haven’t touched the selectivity sliders…

Capture d’écran 2023-04-20 à 11.11.11

… so you haven’t separated out the sky from the cityscape and everything within the light area will be affected.

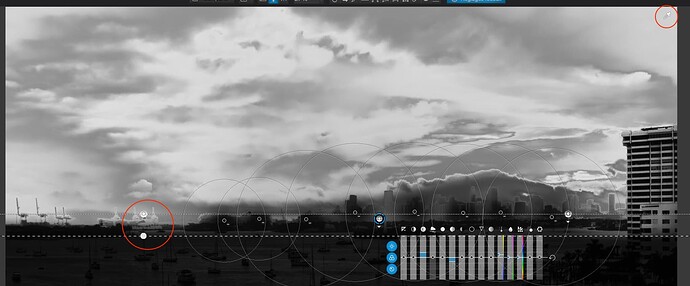
Adjusting the selectivity sliders gives you much more control over which parts of the image are selected (masked)…

Now, because you can add more Control Lines and Control Points to the same mask, you can end up with more of the sky selected…

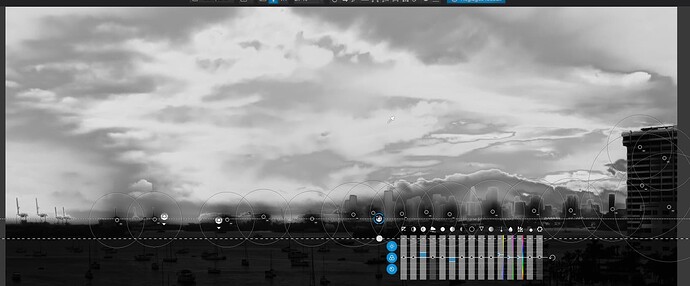
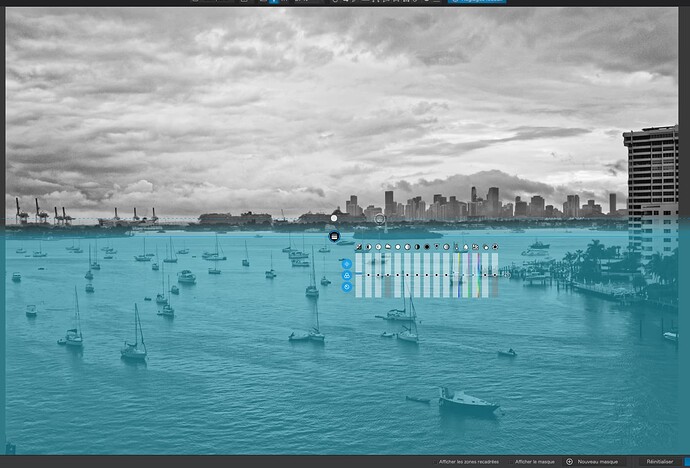
Now, at the moment, the cityscape is included in the mask, but this can be removed by adding negative Control Points to the same mask…

The key is to show the masks and make everything you want to change white and everything you want to ignore black (or at least dark grey)

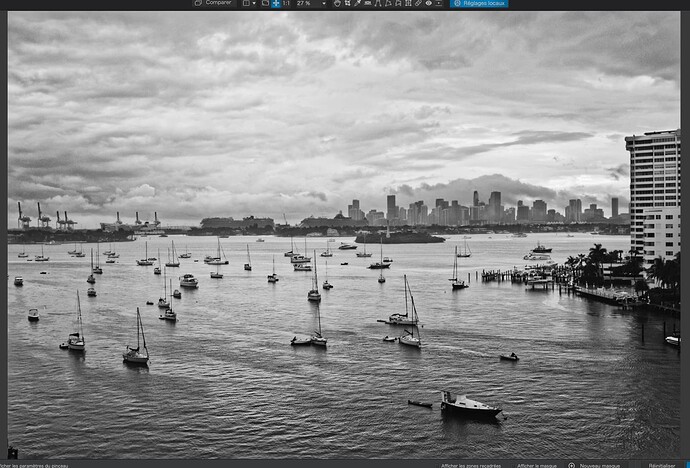
Now, turn off the masks, make adjustments to the sky, and the result is…

Now, I can add a new graduated filter mask to the water area, extended with the brush to cover the building…

… and lighten it a tad, to give…

It’s not perfect, and I’ve converted it ti B&W, but that is up to you to work on.

DSCF4930 | 2023-04-09.raf.dop (59,3 Ko)

2 Likes

Thank you for taking the time to go through everything, step by step. I read it once, now I have to go through it slowly, and understand the differences between what I did, compared to what you did, and see it all for myself on my screen.

I don’t think I’ll end up with an identical result as you did, and I think I know why, but I do know I’ll have a better understanding of how to use the PhotoLab tools more effectively.

I think it would be great if others in this forum were to edit the same image, and compare the results. Or, better yet you could upload an image here, and all of us could edit it.

@mikemyers – to reiterate from Joanna … but that is up to you to work on.


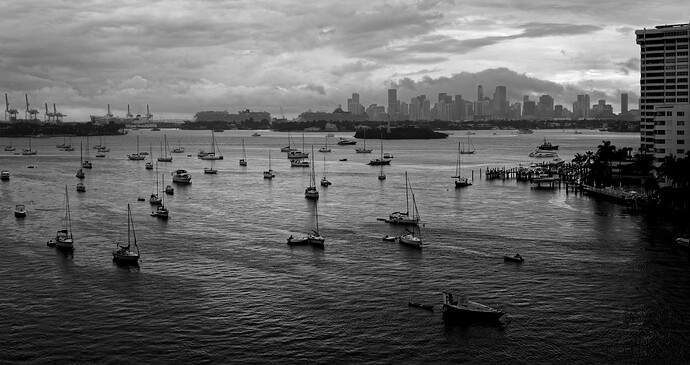
Your (original) photo was taken late in the day, the light almost gone, the pic sharp enough, little interesting colour, sky and background / skyline quite dull and low contrast, an overall quiet atmosphere, nothing spectacular / no eyecatcher. – The most interesting part with some contrast (catching my attention) was the building at the right (while not the pic’s topic) and all the many little boats floating on the water.

Tried to focus on guiding the viewers eye and using the less distracting B&W rendition. I did not enhance sky or skyline and kept the building at the right to stop the view from leaving the pic.


not dop, but a full size JPEG ( no competition ) … to maybe put your brain ‘on track’

I understand - my goal was to learn more about editing controls, and I’ll start by making a VC and doing everything Joanna suggested, in order. My goal won’t be to make a good image, but rather to learn how to edit more like @Joanna.

That was my plan for today, but from early morning through half an hour ago, I was concentrating on how to re-assemble a 1911 bullseye gun, that wasn’t cooperating. After lots of reading, and watching, and a few discussions, it is all back together and works as it should. Once again, “anything is easy once you know how to do it!

I hope many people here are learning from these explanations. DxO should take some of these posts, and make them into training tools.

I would like to do things your way. Let me start with the first image you posted:

Are you suggesting I start with the tone curve, and use it for all these adjustments? From what you wrote, doing both may be duplicating what I’m trying to do. I didn’t realize that before. Before I continue editing, is what I just wrote correct, should I first start by adjusting he individual settings in the lower part of your image, for “highlights”, “shadows” and “contrast”.

Since you usually seem to edit the tone curve, that sounds reasonable to me - and doing both is likely to lead to a mistake, doing the same thing twice.

Based on what you wrote, if I go to the tone curve and make a huge change, those other settings remain as-is. It seems to me that the two should work together, and anything I change in either of them should change what I see in the other.

If I understand you correctly, and those two areas are “connected”, when I change the highlights, doing so in the tone curve, should be reflected in the setting for “highlights” under “Selective Tone”.

Regardless of this, I think I should probably adjust one of them, and ignore the other, or I’ll be “duplicating the functionality”.

Also, maybe I’m wrong about this, but when I open an image in PhotoLab, I look at all the adjustments in the window at the right, and starting at the top, I work my way down through all of them, usually in the order in which they show up on my screen.

Another option would be to look at the five adjustments listed under “Search For Corrections” at the top, and click them, one by one, making the appropriate changes for each one separately. I think I did that many years ago.

I’m probably misunderstanding you but it seems that you are trying to devise a recipe that you can follow by rote for any image. Except, one size will never fit all.

My approach to image editing is to look at what I’ve captured and then decide on what aspects of it need work. For example, is it too contrasty / lacking contrast?, do the shadows need opening up?, are the highlights to bright / dark?, etc. Once I’ve identified an aspect that needs work then I choose a suitable tool for that job. Those with sliders are the easiest to work with and have a shallow learning curve, while the tone curve is probably the hardest as it has a steep learning curve. The latter though is very powerful, see Joanna’s comment:

1 Like

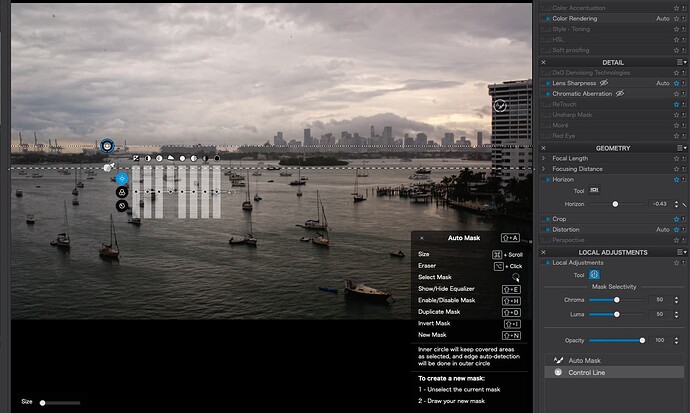
Sorry for copying so much, but this is where I am stuck. As the image below shows, I have created the control line, and the next thing I wanted to do was to de-select the building at the right, bottom. I think you want me to create a control point to eliminate that, and I tried to “paint” out an area with auto mask, but nothing I have tried has worked.

Here’s what I’m up to…

Is there a trick I’m missing about how to add a negative control point to the mask I have just made, using the control line??