How to create photos like "the masters", and is PhotoLab a useful tool?

Well, I guess I should have a big headache from bumping on all those windows, but the editors of those magazines loved what I sent them, and wanted to send me to more events than I had time to cover, as I also had “a real job”. The checks they sent me kept getting bigger, too. I gave them what they wanted, and I often sent a few photos that I especially liked, which rarely got printed because they wanted “racing action”.

From the reverse point of view, as a reader of various magazines, I preferred looking closely at photos that showed me details I was interested in, and it didn’t matter one way or another if the photo was aesthetically pleasing. I didn’t read those magazines myself looking for aesthetically pleasing photos, I had my own priorities for what I wanted to see.

Have you ever read “Sports Illustrated” - I think that’s the name - and thought about why they publish the photos they do?

These discussions on Sports Photography could go on forever. I can talk about my own experiences, but it would be better to post something from a better authority on this topic.

There are many articles on this - here is one I’ve enjoyed:

Sports Photography

Those ideas represent what I have learned to consider “most important”:
"As a sports photographer we generally look for peak action that shows athletes performing so gracefully or powerfully that we can imagine ourselves doing the same, and intriguing feature photos that capture a moment of pure emotion that we can all immediately relate to.

In the context of a sports contest, these are the bread and butter moments of our working lives as sports photographers.

When the two overlap, there is a rare magic at play."

Rather than my continuing this discussion, it would be better to read up on what some better sources have to say, and then decide “what’s important”.

The subject was your person, not sports photography in general.
Again, how did you “capture the action” in your photo’s.

George

George, if you’d like, I can start a new thread about Sports Photography, and describe in detail what I did. You are right, what I could write would be about how to cover a radio control car racing event as both an author and as a photographer. For better or worse, it will be a description of what I did, and in no way will it be a “how to” article. I had my own reasons, and my own purposes, and all of it was basically "how to give the magazine a race report, written and photographed to the standards they expected. And I should add that it took me a long time to get to where I could catch up with what the other photographers were able to do. I learned from what they did, and I learned from feedback from the editors.

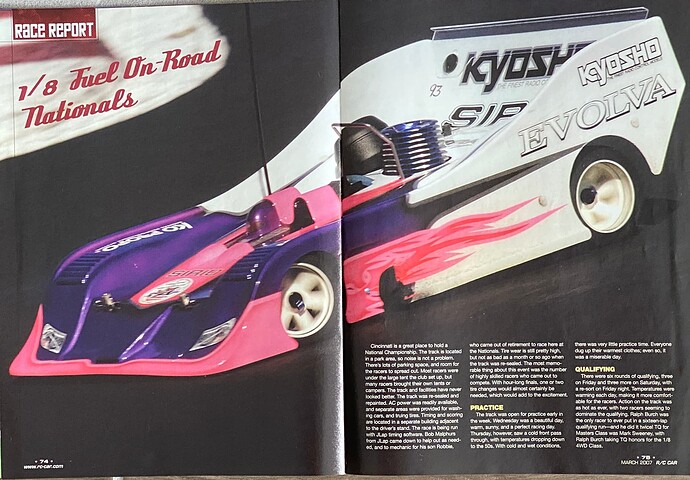
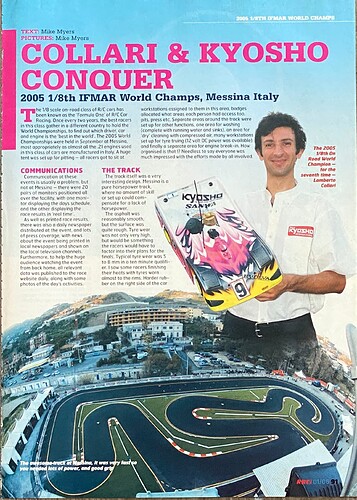
I’ve got a thick folder full of my race reports. I will copy one here from the 2005 World Championships, in Messina. The helicopter photo is not mine. All my photos were taken with a Nikon D50 camera:

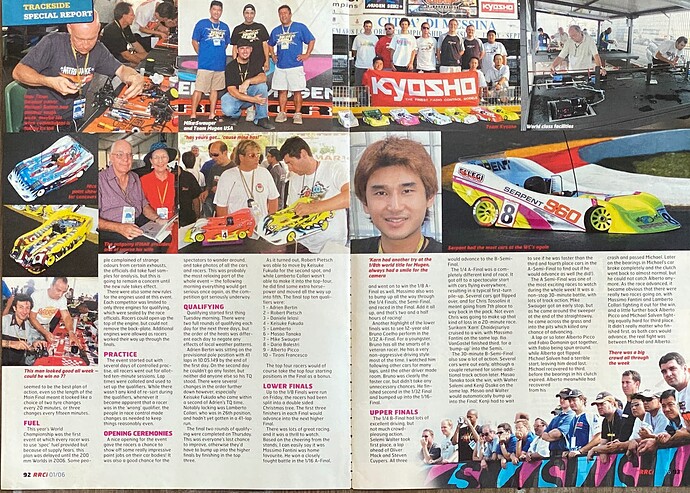
This may well be my favorite photo taken at any radio control car race. It’s also the only photo I’ve taken that a double page spread of just my photo:


The “tilted” image is from the magazine editors, not from me. My photo was level. :slight_smile:
The real “problem” was how to get a sharp car with blurred wheels.
That too a lot of practice, and probably a lot of luck too…

@mikemyers,
You keep changing subject. The question was how you capture the action!!!

George

1 Like

Sorry about that - I thought my magazine photos would speak for themselves. Maybe the following is more of what you want:

Main goal: Select the spot on the track where I want the car to be, and pre-focus, shooting from as low as I comfortably can get, to try to make the car look more “real” and less like a “model”.

I always found a spot where I could get as close as possible to the track, but not so close that I could get injured (and make sure I could protect myself if anything went wrong).

Whenever I had one, use a right-angle viewfinder adapter, so I could look down into the viewfinder. It was too uncomfortable (and dirty) for me to lay flat down on the ground as I had to do years before.

Watch the car as it is maybe 20 seconds before this spot, decide if it is likely to be by itself, or in traffic with other cars. If it is likely to be with other cars, zoom out so they will all be in the photo.

Gene Hustings, the president of Associated Electric, gave me the advice to do the above, setting up the picture in my mind ahead of time, and waiting for the car to get to the exact spot I had selected ahead of time.

Depending on what camera I am using, and the reaction time, while I am panning with the camera, press the shutter release so that the car in the final image will be where I wanted to photograph it. If there are multiple cars, I want many of them to also be in the photo. Using a slow camera, like the D50, I had to press the shutter button when the car was still about three feet away from where I wanted it to be. With the D2 and D3, this was irrelevant, the camera was as fast as my finger.

After reviewing the photo, decide how “long” I can make the shutter speed, so that the car is sharp, and the wheels and the track are blurry, which implies motion, correct as seemed appropriate, and try again. …and again.

ISO - back when I took these photos, I couldn’t use a high ISO speed, so I went as far as I dared, so if the magazine printed the image very large, it wouldn’t appear too grainy/noisy. Nowadays, and with PhotoLab, that’s no longer a concern.

Shutter - I was mostly using (S)hutter-priority, and that became the most critical setting. Sometimes I set the aperture to what was necessary, but with shutter priority I wasn’t very concerned with it. If anything, I wanted a wide aperture so the rest of the image would be less sharp, making the car stand out more.

Focus - I didn’t trust auto-focus, so I would usually manually focus on the spot where I expected the car to be. I did also try auto-focus, with mixed results.

I always wanted to take as many photos as possible of the car I thought was most likely to win (at any given time during the race). If the lead changed, and another car took over, I concentrated on both. If a car dropped out of contention, I ignored it. When the race ended, whichever car won, I wanted to have a good collection of those photos.

At the beginning of the race, I would go to either (or both sides) of the driver’s stand, and shoot the drivers before, and in the first minute or so of the race. If allowed, I would go up on the driver’s stand, and shoot them from the rear. If there was an empty spot on the driver’s stand, I would move to the front and shoot the cars on the track in places that looked the most photogenic to me. At the beginning of the race all the cars were bunched up together, and that made for a great photo - if I couldn’t get it from the driver’s stand, I raced to a position on the track where I could get that photo.

When the (nitro powered) cars came in for refueling, I would shoot down from the driver’s stand, and capture the pitman filling up the fuel tank, and if it was a long race, I would photograph the pitman changing tires on the car. If I couldn’t get these photos from up on the driver’s stand, I found someplace else to hopefully get them.

If it was a long race, maybe 45 minutes or an hour, I would find my favorite (most photogenic) places on the track, and photograph the car(s) I thought had the best chance of winning.

At the end of the race, I wanted to get photos of the winning driver, as he was walking down from the driver’s stand, and if possible, with his car, which usually was not allowed, as the car was headed to an impound area where they checked to make sure it was legal. I tried to get photos of the winning car being inspected, in case the magazine wanted these - usually not.

When it was possible, I wanted to get photos of both the cars, and the drivers off in the background on the driver’s stand.

Composition wasn’t that important to me - I wanted extra room in my photos so I could crop. Timing, meaning the split second when I captured the image, was VERY important - the difference between a good photo that looked exciting, and a dull, boring photo that didn’t show any “emotion”.

Lenses were whatever I needed - wide angle to show much more of the track layout, normal focal length lens quite a bit, and a long enough telephoto to get my close-up photos of the car, the “action photos”. I never shot with any lens longer than 200mm. The 200mm lens made it easier to get a close-up view of a car, but they never looked as exciting as the photos I took with a wider lens when the cars were close to me.

Camera gear was usually a DSLR - Nikon D50 (once), D70 (quite often), D2h (for a while, until it broke as it usually did, meaning a return to Nikon), and then a D2x for a long time after that. Then I got a D3 which was my favorite, with the larger viewfinder and so many improvements. By the time the D4 came out, I had mostly retired from RC photography, and I bought a D750 which I thought (and still think) could do anything.

To avoid possible issues, sometime during the race I would change the memory card, and the battery. Doing this when I had time was far better than worrying about either. Image settings wore the best JPG resolution I could get (I hadn’t yet switched to RAW).

Typically, every night I would get back to the hotel around 6 or 7, have dinner, then select the best 25 or so photos out of the 600 or so that I captured that day. When I had internet, I often sent photos early, but the major magazines just wanted a small collection of my best photos, after the race was over. My rule was to finish a day’s racing with a collection of those best images, and to make notes of what was happening. Then do it all over again for each day of the event. For the major races, I always arrived a day or so early, introduced myself, and tried to figure out where I wanted to photograph from, if I was never there before. Local races need to be posted no later than the day after the race, as after that, people seemed to have lost interest. There were a few forums where we discussed the race, and that’s where I posted my images. I also uploaded all my images for many races, and told people where they could see them. They could (and did) select image of their own car, and bought copies from my image server, Smugmug.

If I knew the people putting on the race, I gave them copies of my better photos the day after I took them. We always had a very good relationship. One of them told me to leave all my Nikon gear at home, and to use his extensive Canon gear. The first day I was terrible, as the camera seemed to be so difficult to set it the way I wanted. As the days went on, I got more used to it, and it was almost as easy as using my Nikon gear. I thought it was a wonderful learning experience.

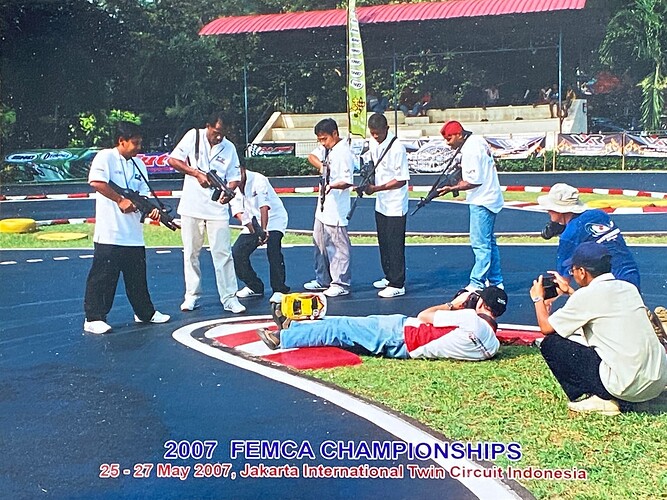
Being friends with all the people at the race, I was allowed to take some photos, such as this one, that was very much NOT intended to be released to the internet. That was 15 years or so ago, so I think it’s safe to post it here, although this is a photo of me taking my picture:

George, I’m not sure what else you might want me to write. I think what I wrote is a good summary of how I captured the action, which was similar for all the races I covered. I’m sure I’ll read in the responses how I really messed up, but for better or worse, this is what I did, and how I did it.
I’m very surprised you didn’t use the P-mode. To many posts where about you using the P-mode. Where was that good for?
Capturing the action is not only a technical matter but also a compositional matter. I must admit I don’t see much opportunities for that with car racing, either mini or maxi, except for some kind of panning.

George

To me, P-mode is, or I should say “was”, for when I didn’t care about the shutter speed or aperture.

For racing photos, shutter speed seems to be very important, depending on whether I want a sharp, clear, photo, or if I want to show. motion. So for those photos, once I found a shutter speed that worked, I locked it in.

There weren’t too many photos where I decided I needed more depth of field. If I shot the drivers while I was up on the driver’s stand, unless I forgot to do so, I would adjust the camera to also have the track reasonably sharp in front of them. As I recall, if I had no particular interest in either setting, I left the camera in Program mode.

After the discussions we’ve had here recently, I doubt I will have much use for Program mode. My Leica is semi-permanently set to Aperture Priority mode, and Auto-ISO. I may set my D750 to auto-ISO. Most of my negative feelings about it date back to when too high an ISO resulted in an awful image, but with PL5, that’s irrelevant. I guess old habits die hard.

I did photograph full-size car racing at Homestead Speedway. It was SO much easier than photographing the r/c cars. I had lots more time to think, and I could use a monopod.

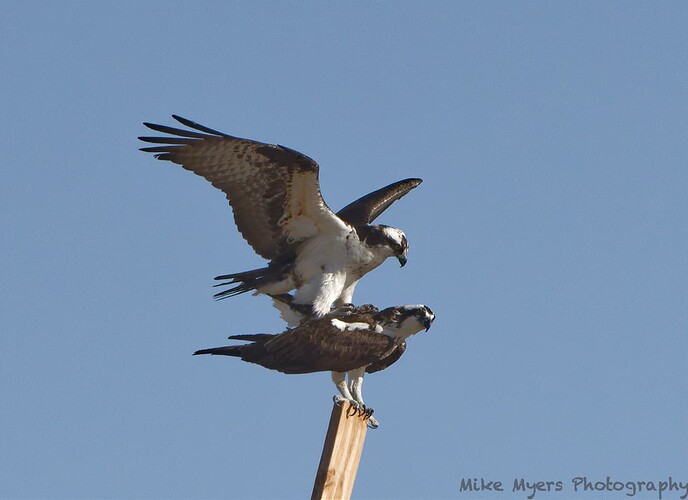
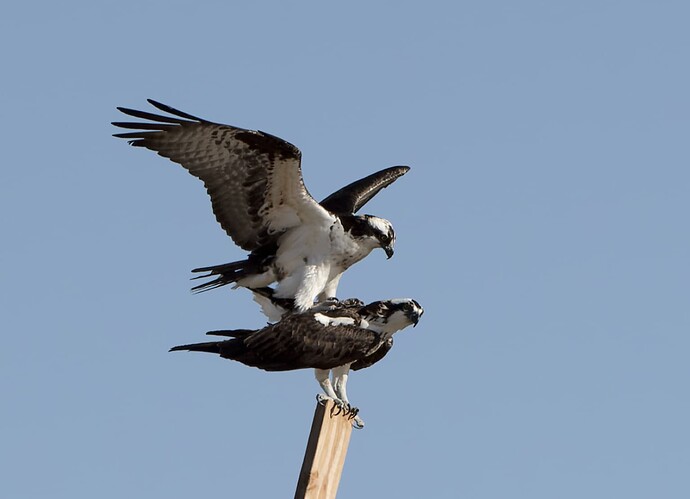
Time to upload another photo from Colorado. My friends in Colorado knew of a nest where a pair of Osprey were showing up every so often. After many “false alarms”, we found an Osprey in the nest, and parked the car where we had a reasonable view. Susie used her new 600mm Tamron, while I got to use her older 70-300 Nikon lens (much older than the similar lens I bought). My camera was set to ISO in shutter priority mode, and the camera selected 1/3200th at f/9. I rested the lens on the side window of the car, being scared of stepping outside of the car and maybe scaring off the bird. It was then that its mate showed up, circled around the nest, and landed on top of the first bird. All this time my camera was firing away as fast as it could, with me trying not to breath or do anything to cause the camera to move. Eventually the second bird flew off, with me still taking photos. Susie and I were both feeling very excited!

There was a wire going across the top right of the shot, so I flunked my photojournalism credentials by using the PL5 “repair” tool to send it to oblivion. I like what I knew how to do in PL5 with the image, but I exported it to Topaz AI Sharpen which made the feathers look a little sharper. I’ll upload both the RAW image, my .dop file, and the finished Tiff.

It is what it is. If I want to do better at this, I think I ought to invest in a 600mm lens like the one we found for Susie.

I can’t claim much credit for the photo - the birds did their thing, while I tried to not mess up my photo. There are lots of shots I like, but this is by far my favorite.

Because it was exported to Topaz AI Sharpen, I now have a Tiff file, not a finished and fully edited RAW file. Any advice on how to do better next time would be welcomed. I don’t think I screwed it up too much, but I really needed a longer focal length lens. There are two “.dop” files, one from before exporting to Topaz AI Sharpen, and one from after.

MM2_0543 | 2022-04-17.nef (27.7 MB)
MM2_0543 | 2022-04-17.nef.dop (15.3 KB)
MM2_0543 | 2022-04-17_openWith.tif.dop (11.9 KB)

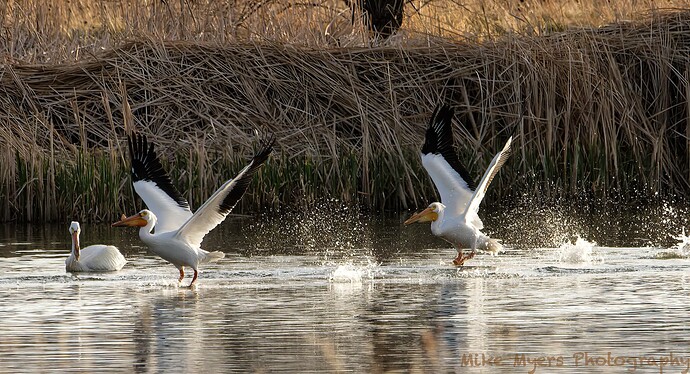
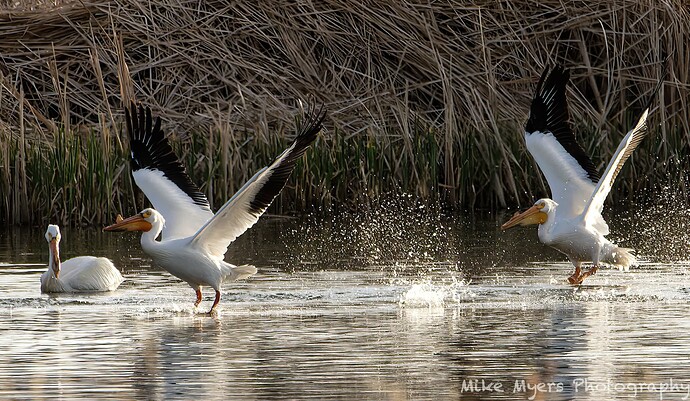
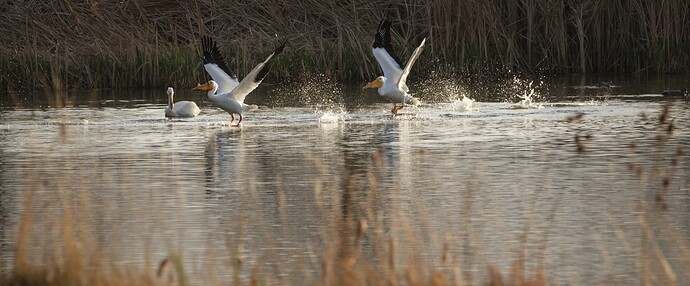
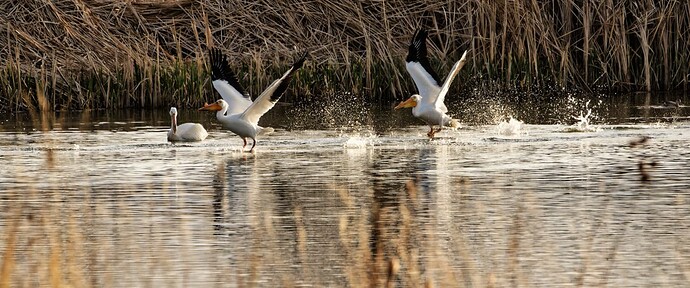
Another bird photo, this time taken with Susie’s 600mm lens. The flock of pelicans was fishing in the lake/pond behind Susie’s house, and I went to get my camera and her lens to shoot them from the treehouse they built. With my left hand, I held the base/foot of the lens against the railing of their tree-house, hoping the camera was being held still enough. The 750 was set to shutter priority again, set to 1/2500th, ISO 2500 and f/9.

The image looked very noisy on my screen, but PL5 took care of that. I then sent it to Topaz AI Sharpen again, which made a nice improvement in clarity.

The EXIF data implies it was taken around 9pm, but that’s because the goofball using the camera forgot to set the DATE/TIME to Colorado time, as in 6pm. It was starting to get dark, and I guess the Pelicans were finished catching their evening meal. Once again, I captured sequences of shots (manually) as first one bird, then the others, prepared for take-off, skipped across the water, then got airborne. Lots of photos, but this one shot was by far my favorite.

I’m probably going to edit it more later today. I wanted to include all the splashes they made in the water, but I want to remove more of the image from the right side. I might get rid of the tree at the top, as now I think that’s distracting. Maybe I’ll zoom in a lot closer to the birds. Too many choices…

I’ll attach “Plan B” at the bottom.

Several files to attach…
MM2_1389 | 2022-04-26.nef (30.5 MB)
MM2_1389 | 2022-04-26.nef.dop (12.7 KB)
MM2_1389 | 2022-04-26_openWith.tif (14.2 MB)

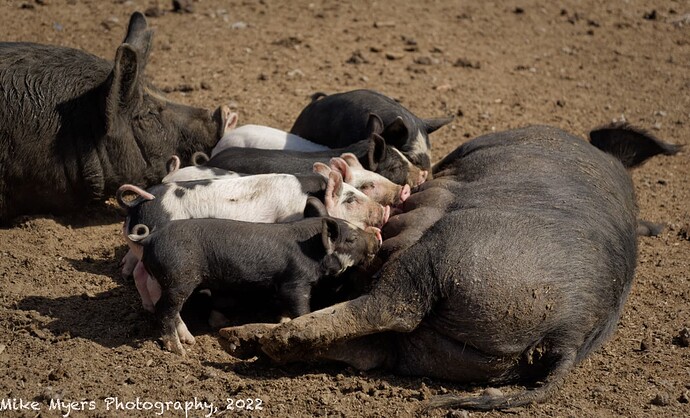
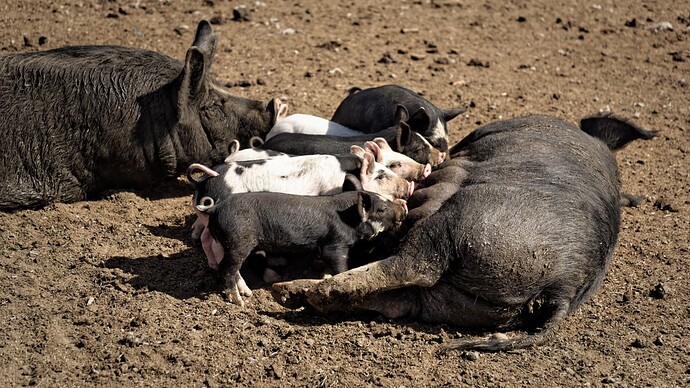
One more photo before I put away my computer gear, and get back to work preparing for tomorrow’s range session. I almost stumbled across this photo, and quickly grabbed a shot immediately, hoping the camera settings were correct. It’s my “standard” 24-85 travel lens, with the ISO at only 800 (I should have raised it, but I was moving from the barn to outdoors), and I had the camera in Aperture Priority at f/4.5 (for the earlier shots inside the barn). So, the camera selected a shutter speed of 1/4000th, but by the time I noticed all this, the Pig Family decided dinner was finished.

My mistake. I didn’t need ISO 800 for photos in the sunlight, and f/8 would have been perfectly fine. I took the photo first, then checked the settings later, to maybe get a better photo, but that was not to be.

I don’t know how I ever existed without PhotoLab. I guess I used to use Lightroom, but that now seems to me like it’s from the Caveman Days. I know I’m wrong, and I know I’m not being realistic, but that is how I feel, right or wrong.

I’m sure I’ll find out otherwise by tomorrow, but as I’m writing this, I don’t think even @Joanna , or even @Wolfgang is going to change what I did. Famous last words - every time I feel that I’m finished, I find out about so much more I could have done, or that I didn’t do properly.

MM2_0601 | 2022-04-19.nef (30.7 MB)
MM2_0601 | 2022-04-19.nef.dop (13.6 KB)

well, you applied the DxO Standard profile without any edits and went to Topaz …

… with the given pic, I might go with something like this

for better composition


MM2_1389 2022-04-26.nef.dop (310,2 KB)

M = Masterfile
VC1 = Mike
VC2 = Wolfgang
VC3 = Joanna ( post #255 )

1 Like

I don’t know why you put up the second DOP. It doesn’t contain any changes made in Topaz AI Sharpen

What it does appear to contain is the use of PL’s Unsharp Mask, which is neither necessary nor advised when you already have the lens profile.

Here is my version using nothing but PL5…

… and here is my DOP…

MM2_0543 | 2022-04-17.nef.dop (5,0 Ko)

I agree with @Wolfgang about the crop. But I would also say stop playing with your new toy (Topaz AI Sharpen). Using fine contrast more judiciously can bring out amazing amounts of detail without having to leave PL and what you did with this image is a bit overcooked to my liking.

Here’s my version…

… and here’s the DOP…

MM2_1389 | 2022-04-26.nef.dop (25,8 Ko)

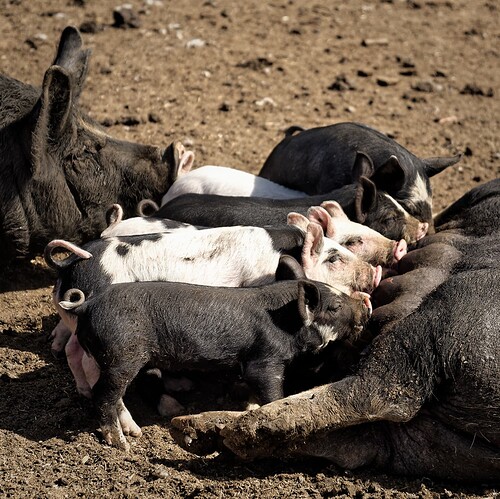
There really isn’t much wrong with this image apart from the rather flat contrast, but this was due to your insistence on using global Smart Lighting on all your images, even when it isn’t needed.

I boosted up the fine contrast for the shadows and highlights and reframed it to allow more “breathing room” around the pigs.

Then I added a couple of Control Points to selectively raise the shadow detail…

And the DOP file…

MM2_0601 | 2022-04-19.nef.dop (28,4 Ko)

1 Like

Two thoughts. First, about the crop. Both you and @Wolfgang see things so differently this time than I do. Both your images look “unbalanced”, “top-heavy” to me. I’m trying to understand what I’m missing about this. My first attempt at the image showed what I wanted, but in a small image, the detail in the birds was lost. My second attempt zoomed in a lot more, to show the birds more clearly. With both your view, and Wolfgang’s image, all that beauty and detail I struggled for so hard is lost - unless the image was enlarged, a lot.

I need to think about this for a while, because at first glance, it feels to me like an upside down bowling pin, with all the “weight” near the top, making it feel unstable. Maybe I’m not saying this very well. I’d like to know what I’m missing here.

The other thought was when I saw the image on the screen, the detail in the feathers and especially the head was missing. You’re right, Topaz AI Sharpen is one of my new “toys”, but it cured that instantly. I know the image was in focus, I know the camera/lens was not moving on top of the wood railing on the tree house, but there was a good bit of wind, and I suspected the railing itself was “moving” which cost me the detail, especially in the heads. Of course, on your images up above, the head is smaller, so I don’t see that detail because of the size anyway. It was really my first time shooting at 600mm, and I really wanted to capture what I saw in my viewfinder, with all the detail. What I really needed was a rock solid tripod. I’m surprised things came out as well as they did.

Regardless, I will download your .dop files, and “disect” them, to try to understand how you created the same sharpening effect using only PL5. To me, that is obviously preferable, because the image remains a RAW image, rather than being converted to a TIFF. (Whether or not that makes such a big difference is something I’m not sure of - but to me, the TIFF image is like a “dead end”, no further processing permissible, while if I keep it in PL5 I can make additional changes, or correct changes I’ve already made - meaning there are big advantages for me if I avoid using the Topaz software.

I will compare your images to what I did with Topaz, early this afternoon.

I suspected both .dop files might be the same, as Topaz was making changes outside of the file PhotoLab created. From what you just wrote, that Topaz was also using the .dop file to include the changes from the “unsharp mask”.

If I don’t use Topaz, this will not be an issue in the future.
If I do use Topaz, which .dop file should I be posting here in the forum - and why?

Even more confusing, what does any of this have to do with the Lens Profile? I would expect the lens profile information to be included in both .dop files - am I wrong?

Time to stop typing, and study what you did from within PL5 to “sharpen up the feathers”.

I’ll have to do some more thinking about this. Why do you feel “more breathing room” is more important than making the subject of the photo a little bit larger? I always leave more “breathing room” when I take the photo, so I have it to use if I need it, but why not fill the image with (in this case), the pigs? My version makes me feel “uncomfortably close”, feeling I want to step back. Your version feels perfectly close, no such emotion as in mine. People viewing the image don’t feel that with my zoom lens, I was quite safely distant from the pigs - I think the feel “uncomfortable” as if they want to step back.

Most of the time, I want breathing room. If it was a house, or a car, or a statue, breathing room feels essential. In this case, that’s probably also true, as you noted, but I thought the closer I got, people would react the way I did - and want to move their head a little further away from the image.

Just curious - the little piggies, and the symmetry, were what I was after. Everything else was less important.

What we both did was to include the reflections of the birds. Yes, the top is darker than the bottom but, with reflections that is fine.

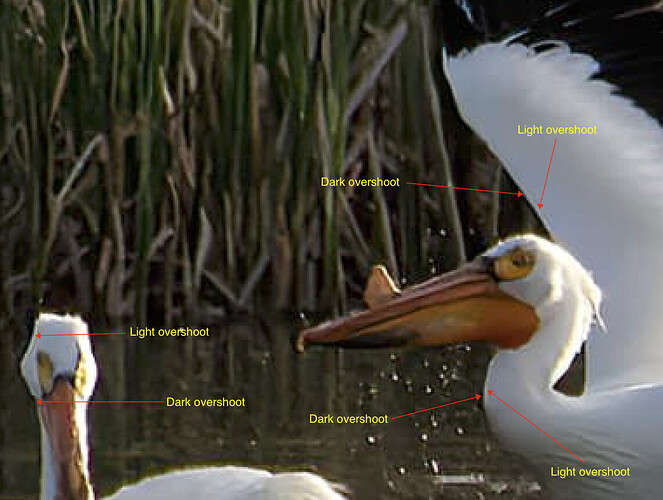
And the problem that you have created is over-sharpening. I have taken your TIFF file and zoomed in on it…

You can see that Topaz AI Sharpen has created a lot of “overshoot” on transitions between dark and light - something that PL fine contrast doesn’t do as much.

Then you’ve got to consider that, if you were to print the image, your crop gives a finished size of 3005px x 1631px, which would print (@ 240ppi) to only 12.5" x 6.8"

Using Wolfgang’s or my crop, which gives an image of 4480px x 1874px, would print to 18.7" x 7.8" and could possibly enlarge more than that without the transitions becoming as obvious as with your sharpened version.

No, what you needed was a 1200mm lens. Then you wouldn’t have had to lose over half the image area and incur the wrath of the low resolution jaggies and the need to sharpen.

Topaz doesn’t touch the DOP file - it is proprietary only to DxO and will only ever contain adjustments you made in PL and nothing external.

Do a Google search for “photography negative space”.

Your version makes me feel that you were either too close or trying to crop out unwanted background distractions.

In which case, why not concentrate on the piglets, crop it more and get the symmetry of a part-pig on both sides?

3 Likes