Hmm, I didn’t think people would see the reflections in these photos - in other photos, where the water is still, the reflections were certainly a part of “my image”. I need to think about this some more. I see both points of view, but my favorite was the last one I posted way up above - but maybe I’ll try to not use the Topaz software that much any more. PL5 apparently is still a better tool.
Once you point things out, they are obvious. I’m not sure if anyone else would notice, but I think your main point is why use Topaz at all, if PL can not only do the same things, but do them better.
I ain’t got no argument with that!!! I still need to try it myself, with m original RAW image before I ever exported it to Topaz.
You wrote I need a 1200mm lens???
I found a used Nikon 1200 for only $6,000.
Such a deal!!!
The day after I buy my Ferrari, I’ll get one of these too.
I’ll need to think about this. I like your version, as art, but I think most people that view the image would prefer to see the whole thing. Maybe this forum could use a “survey tool”, as in '"Do you prefer “A” or “B”? ’
I’ve got more images to go through from Colorado. I will avoid the Topaz tools, and just use PL5.
So often in the past you were ‘not contented’, that I saved the effort to add my dop-file …
After deleting my interim version, the pic is now → VC2, @Joanna’s version added as → VC3.
Deactivate the local adjustments and reactivate them step by step to see, what & why I did.
Actually, I wasn’t referring to the editing, but to the cropping.
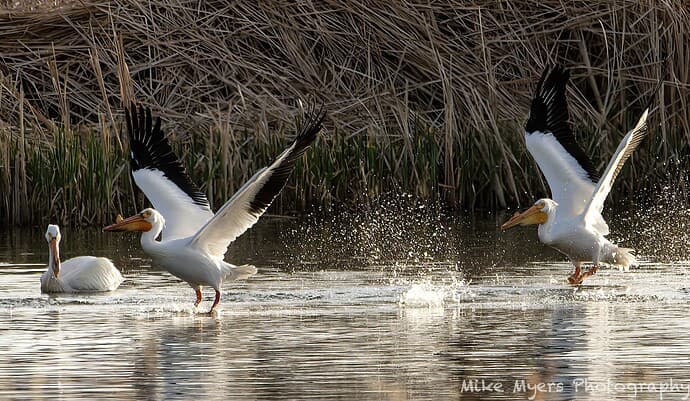
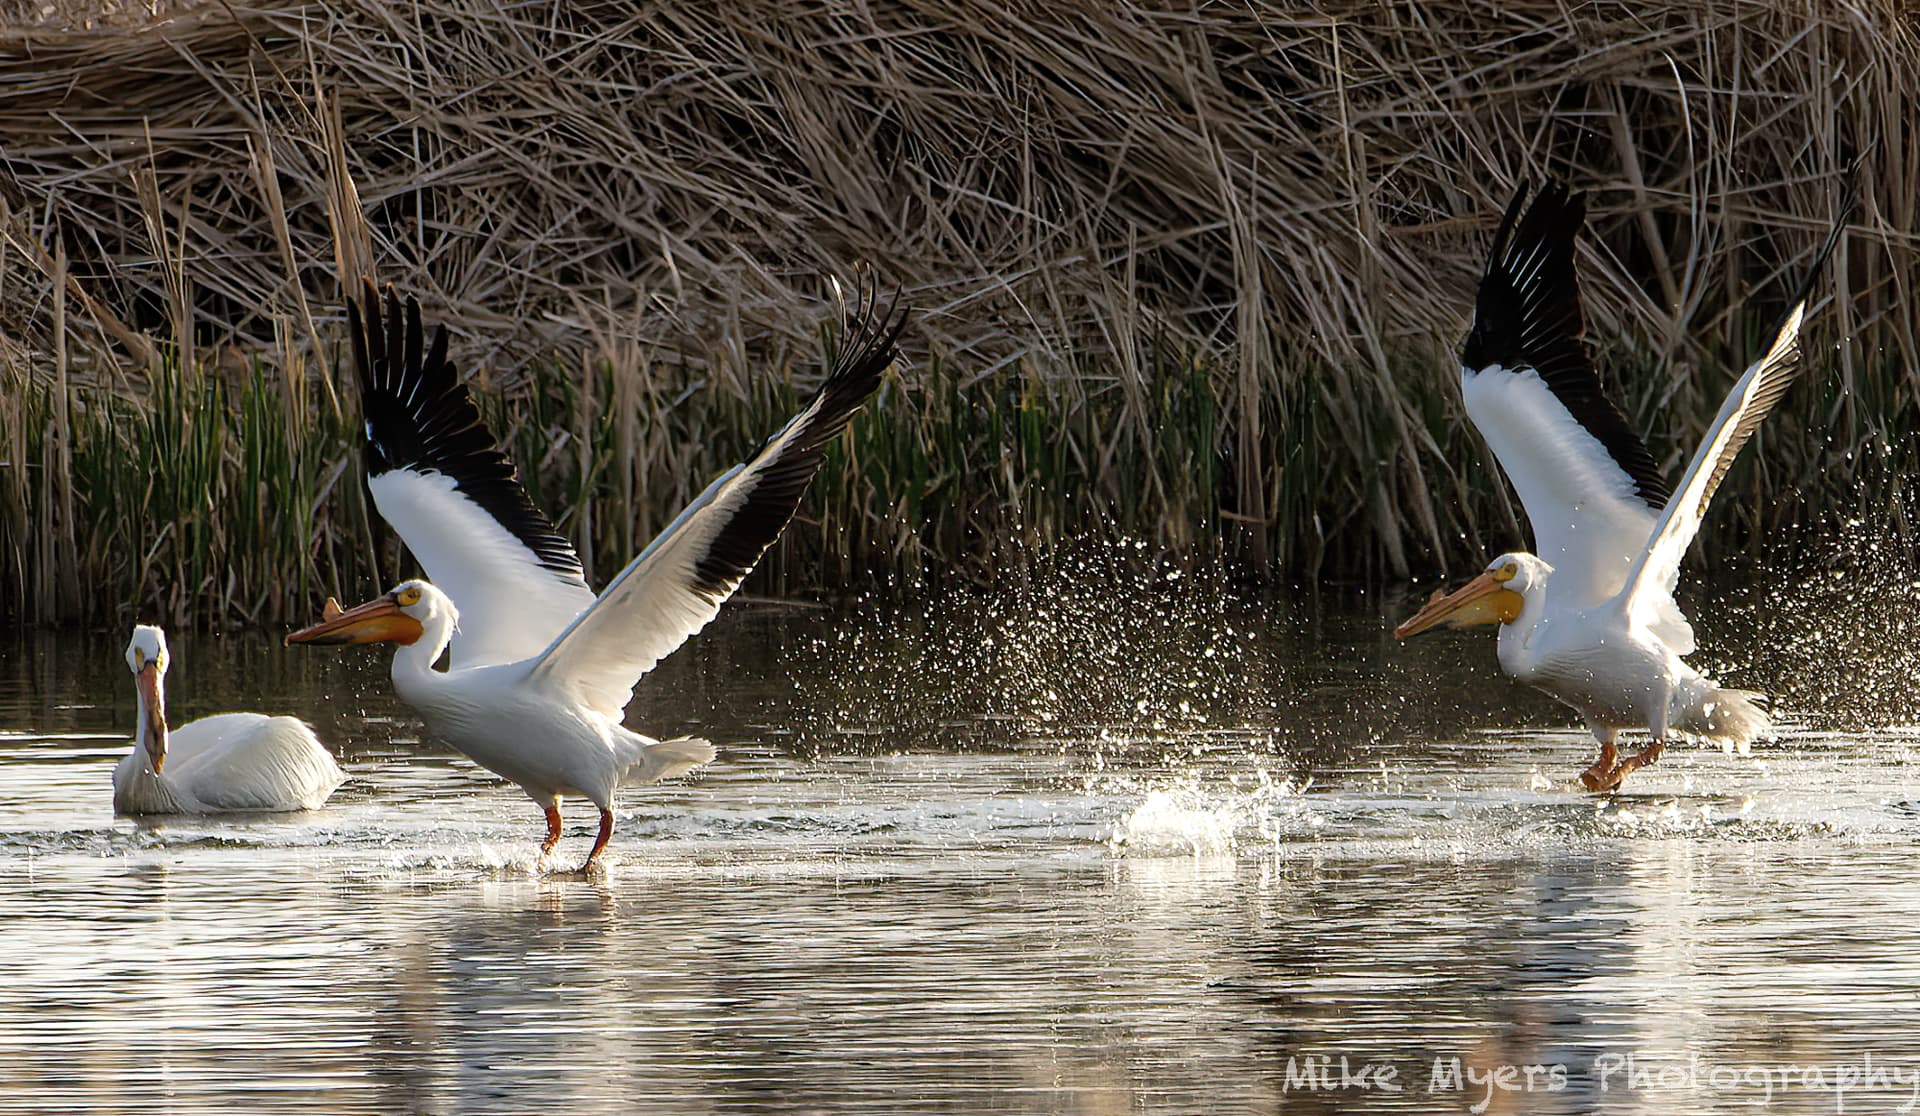
To me, both your finished version and Joanna’s look “wrong”, or at least not what I wanted the photo to be. My first version was what I wanted, but after seeing it on-screen, I revised it as my second version. I wanted the Pellicans appearing very large in the photo, so they stood out. Both of you saw it differently. I was trying to find out why you did that. I apparently saw “the scene” very differently than you two.
The editing details are over and beyond the cropping. I will do what you suggested over the upcoming weekend.
I think that I see “the obvious”. @Joanna and @Wolfgang see the not-so-obvious.
In a year of playing around with this image on my computer, I don’t think I would have seen this.
Unconventional? Certainly. But everything that has to be there, is there.
Brilliant!!!
I need to remember this from now on, and try to use my imagionation (my word) to SEE better.
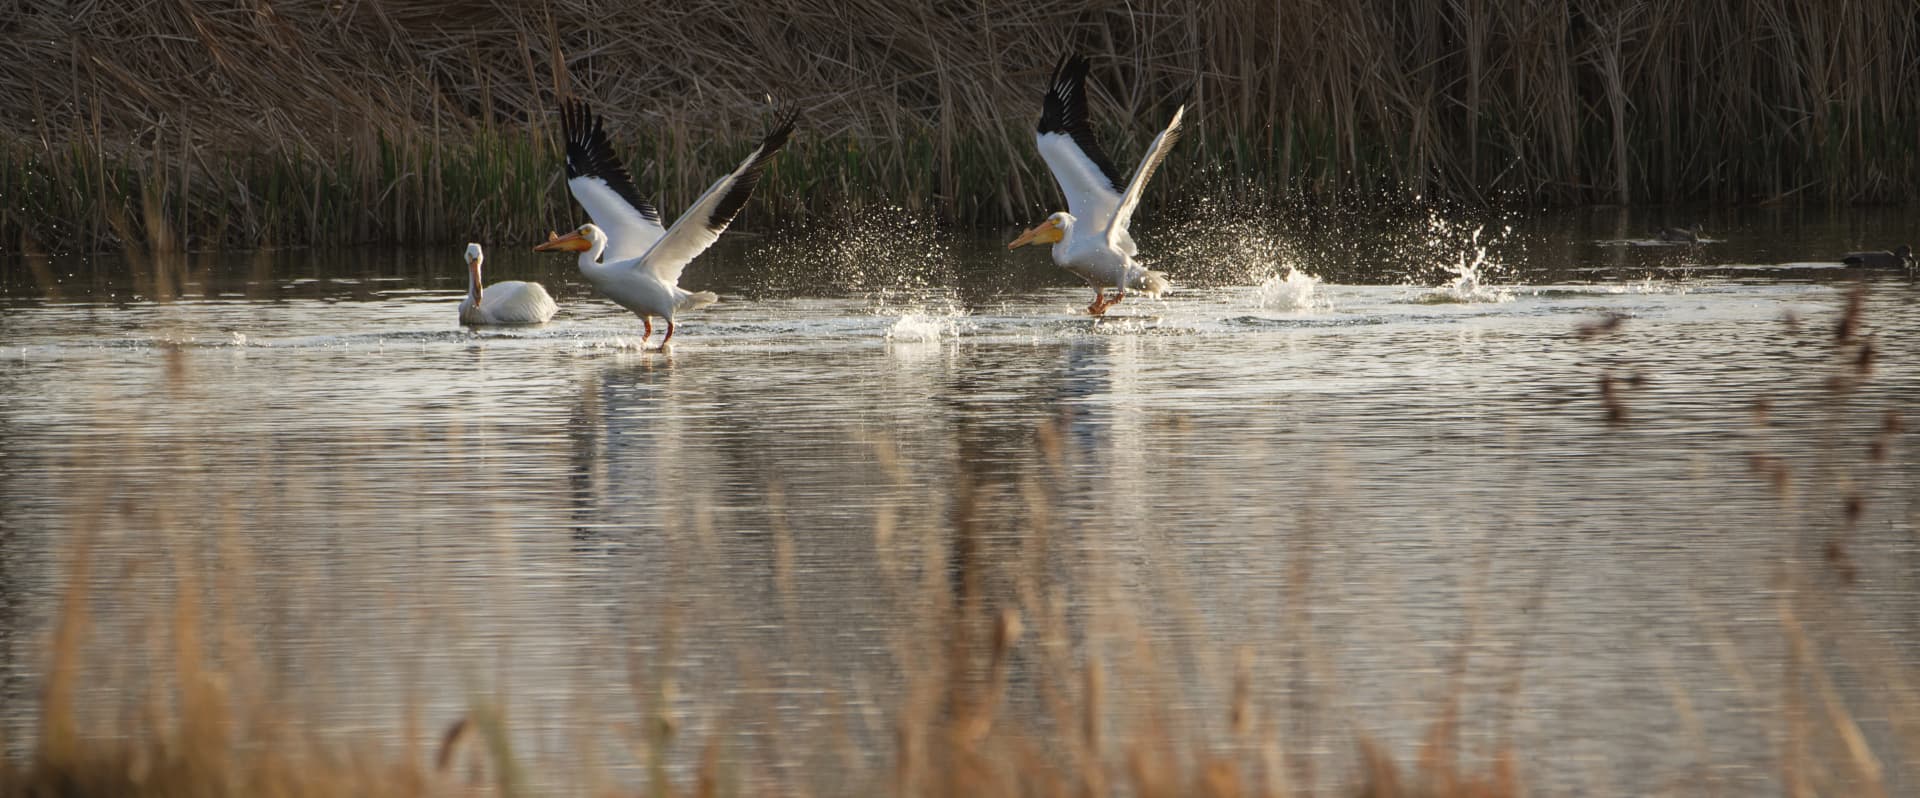
My goal, was to capture images of the Pelicans. That they flew off was a bonus. I cropped it a lot, to make the birds more visible. Joanna and Wolfgang cropped differently, to show the surroundings, which decreases the detail in the birds. In explaining, please ignore the editing - now I know that what they both did is better than what I did, and I won’t be using Topaz as much in the future, but I’m puzzled why they both cropped it so wide. To me, the weeds were a distraction, so I got rid of them. But by doing so, I got rid of the reflections in the water, but the reflections didn’t seem to do much (as I saw them). In retrospect, the tree at the top of the image certainly is distracting, and when I re-do this image, they tree will be gone.
When you don’t like the proposal, you do it different – simple as that. No reason to react ‘unhappy’.
Nobody is taking the toy from you.
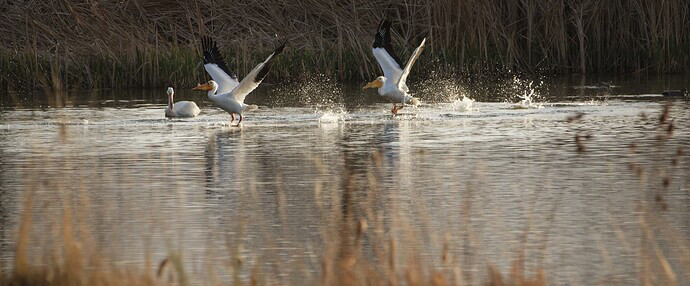
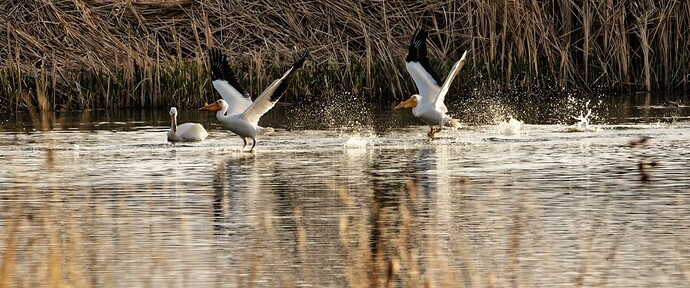
You have chosen a pic with the birds in action (taking off as you explained now – I’m not in wildlife),
so nothing static.
To show this action, I started with some wide crop, experimented with the nice light, dimmed fore- and background to bring out the subject and changed sizes to finally decide for a wider crop, which then made it a better composition. Playing with my adjustments you see, what & why I did.
Better to compare / judge the different versions in PL. The forum software doesn’t handle the colour
profile, which results in muted colours ( → no picture forum ).
What do you mean you “dimmed foreground and background?” Did you use control points for this? I’ve only been using PL5 for about 2 months and am pretty weak on Local Adjustments - I only really know how to use the gradient tool and auto mask. I feel like I’m missing out on some of the more powerful features - are there any tutorials or anything that you would recommend?
I’m not in the slightest “unhappy”, I’m just trying to understand the “why”.
I took 20 or so photos as the pelicans swum around, fished, got in formation, and so on, and then totally unexpectedly to me (I know nothing about pelicans), one took off flying, then two more, while I pressed the shutter button as quickly as I could. If I were smarter, the camera would have already been in “high speed burst mode”. I enjoyed those “take-off” photos more than the others, by far, especially with the “skipping” over the water. I guess none of this is obvious from the photos. Anyway, when I viewed the photos, this particular photo not only had the wings showing up the best, but there was another pelican watching in the direction of the two birds that went flying. Eventually four pelicans flew away, and one continued moving around on the water, probably looking for more fish.
I was curious why both you and Joanna edited the photo is such a similar way. As for me, I was so pleased at capturing the action, I wanted to show it as prominently as I could - I did it once, but as I was posting, I changed my mind, and cut away more of the photo that I considered less important.
I was trying to find out “what I missed” when you both saw things so differently. At the moment, I was less interested in the “processing” than I was in the “cropping”. Of course in retrospect, I’m not sure you even “had a reason”, you just did what you felt was best. As for me, not haven taken photos like this of pelicans ever before, I was thrilled with how to make the three birds look best, and to remove anything else I consider distracting.
Yes, over the weekend I will “play photo detective” and study what you did, viewing the image in PhotoLab of course with your .dop file:
You probably know by now that I’m never “contented” about anything. In my world, there is always room for improvement. I feel with PhotoLab like I’m in the 5th grade, and you and Joanna are in graduate school.
Regarding the use of PhotoLab, I’ve accepted two things - first, that I will never “catch up”, and second that “I know enough to get by”.
Regarding composition, etc., while I’m wide open for new ideas (as in Joanna’s interpretation of the piggies), I need to do what I feel is best, based on the way I feel and see and remember.
Just beyond the home of my friends, there is a good-size farm where they raise sheep, chicken, and pigs. When sheep are about to give berth, they are moved to an indoor pen, so the owner can make sure of the health of the newborn, and step in if the mother for some reason rejects the newborn lambs (in which case the lambs are moved to a separate pen and bottle-fed). I found it fascinating, but I didn’t like my photos - too dark and dreary, and there was still blood showing from the birth which I didn’t really want to photograph. So, for four or five days, I then walked to the large outdoor pens, where the animals grow up.
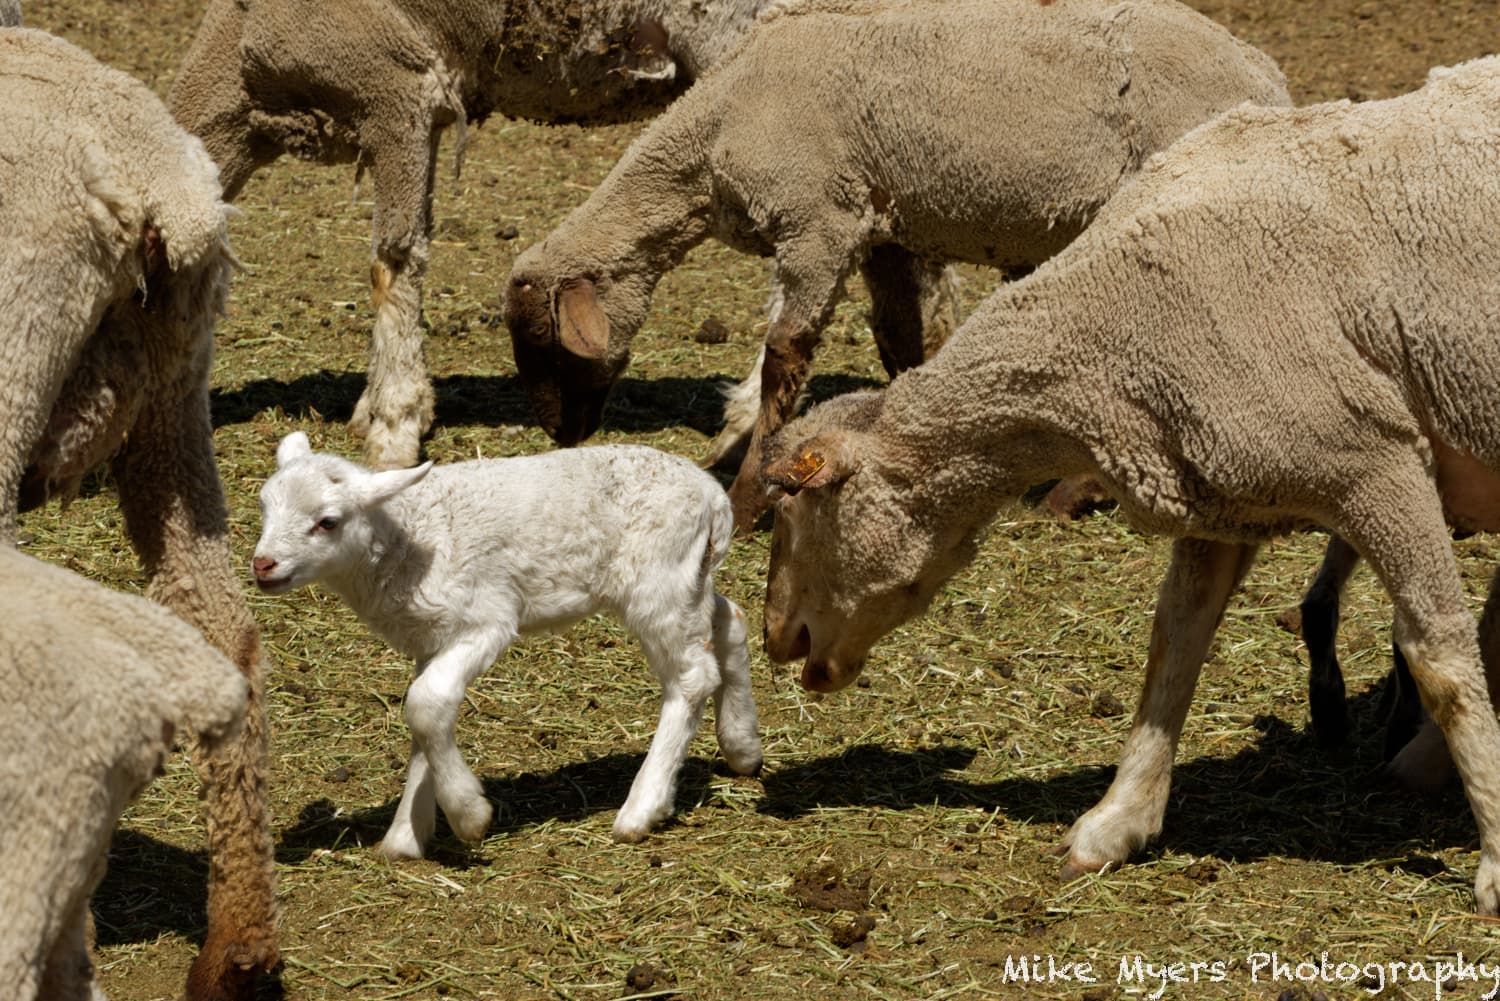
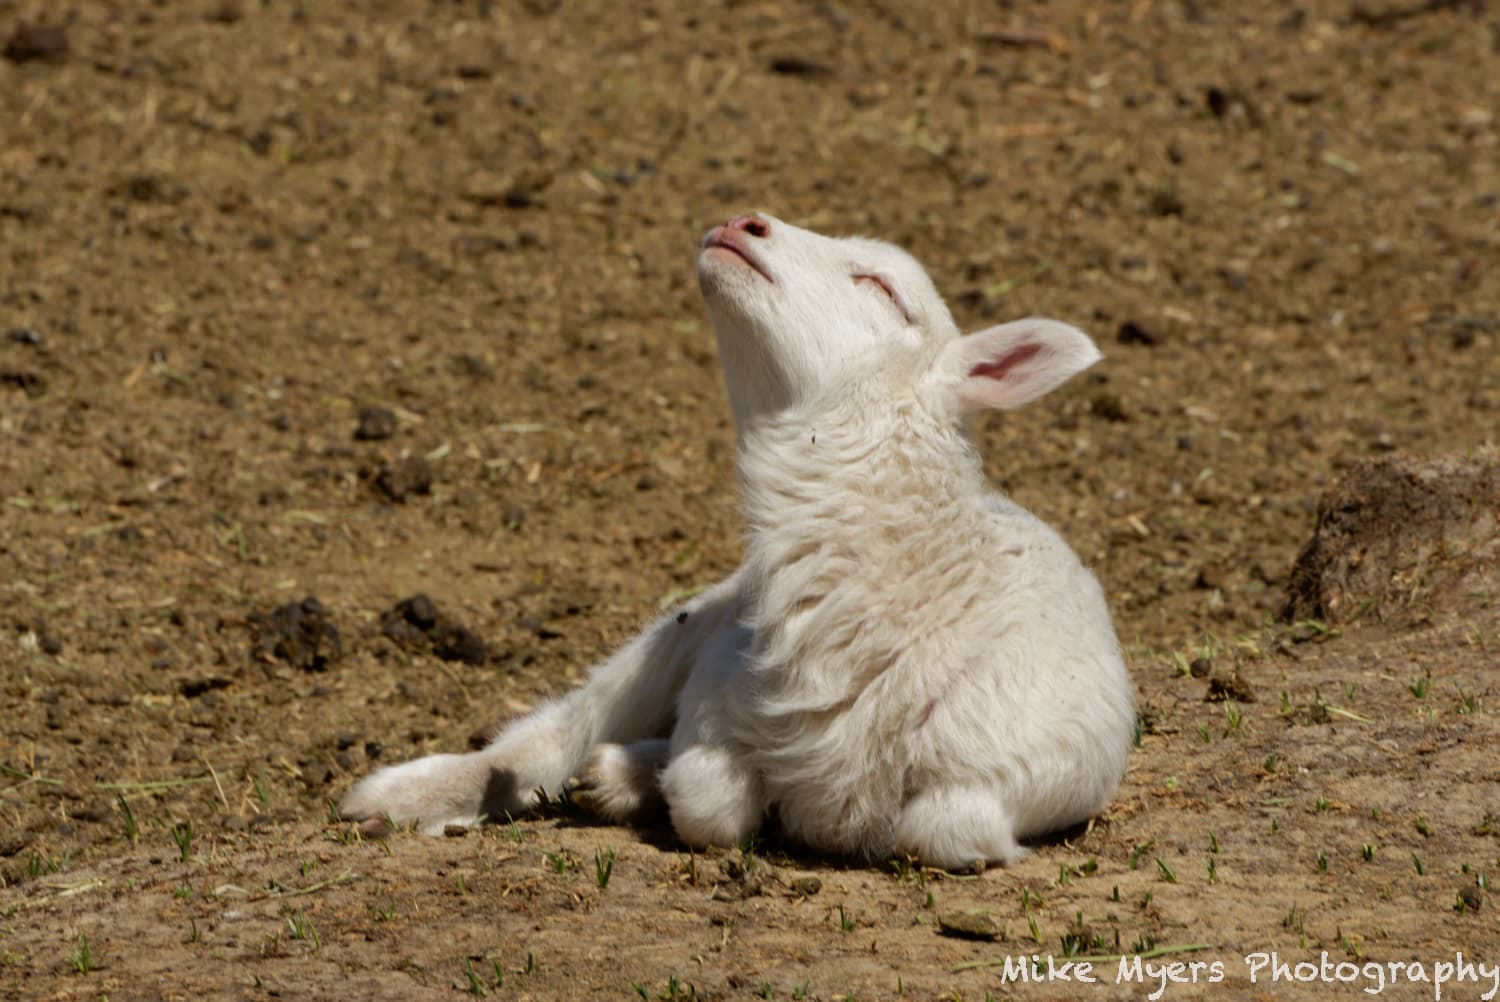
There was this one newborn lamb, much more adventurous than the others, walking around, then sitting in place, then getting up and walking some more, always with what I think is its mother close behind. This photo is one of a sequence, but I got what I wanted - the newborn lamb, still with huge legs, surrounded by other sheep, and either I was skilled enough, or more likely lucky enough, to get a photo where the center of attention is obviously the lamb. (The color sure helps!)
Every time I open the image in PL, I change the crop. This morning I gave up, and just selected the whole image. If your head and eyes go right to the head of the newborn, I succeeded. Whether or not the image is “good” will maybe be determined by any feedback I get. Once again, for better or worse, I’m happy with it, and when I wanted the lamb’s head slightly sharper, I avoided Topaz, and tried to do everything in PL5. (…and if any of you feel a tighter crop would be better, please go for it. I have tried four or five times, and each time I’ve given up…)
I couldn’t find a much better crop than the SOOC framing.
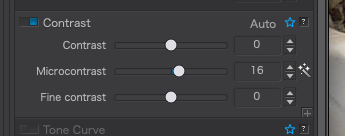
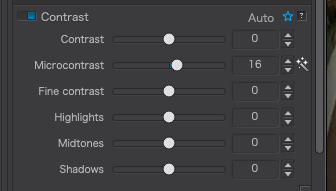
I reduced the exposure just a tad more than you did and, instead of looking for sharpening as a tool, try using the fine contrast, especially on highlights, as I have done in my version…
Oh, and try to open up the aperture if you want more sharpness. You start to get diffraction softening above f/10, which then. forces you to try and sharpen stuff to get back to normal.
Unless it’s exceptional, I mostly use f/10 and adjust the ISO if there isn’t enough light for the shutter speed I want.
@Wolfgang, I am confused, but then again, I am easily confused. I clicked on both links, to download the two files to my download folder, then copied them into the folder with the original image. I now have two files in that folder 253.html, and 255.html.
In the past, I downloaded a new .dop file which PhotoLab then used instead of my original .dop file. I understood that - the new file would have the information for a VC2 and a VC3, which I could use to figure out your changes, one by one.
I thought this weekend would be good for doing that, but I’m stuck, and don’t want to break anything. How do I get to the revised .dop files, to learn what you did, and why? There must be a .dop file inside of the files you sent me? Maybe??
Awesome!!! …and out in the open, so lighting and background are great too. I’ve never seen anything like this. You “did good!!”.
I never even thought of doing that - how did you apply fine contrast to the highlights? With a control point? I don’t remember seeing a control point slider that says fine contrast. What I get includes “Microcontrast” and “Clearview”. I assumed there was no way to select “fine contrast” for a Control Point. I will gladly do it your way, once you explain how!!!
Sigh, I did try to find a way to crop the photo of the young lamb, but now that I see it cropped as you did, it becomes a much stronger photo. I’m disappointed that I didn’t get closer to what you did. I liked the photo before, but cropped as you did, it gains a lot!!!
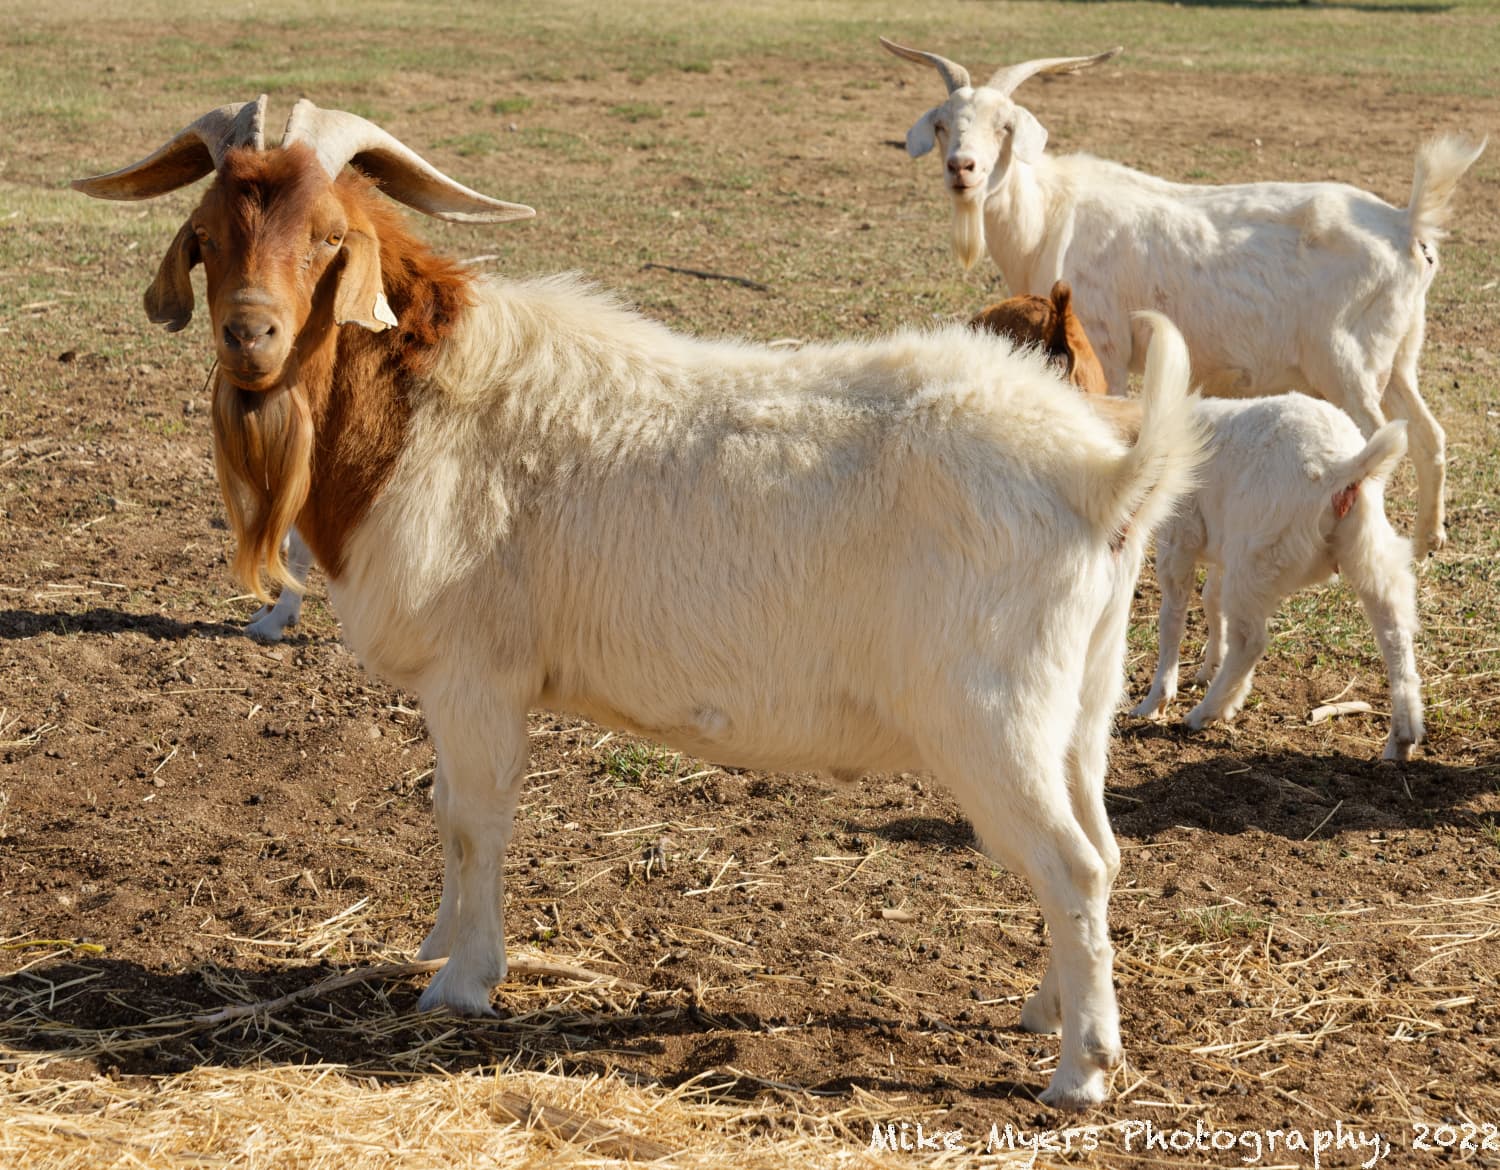
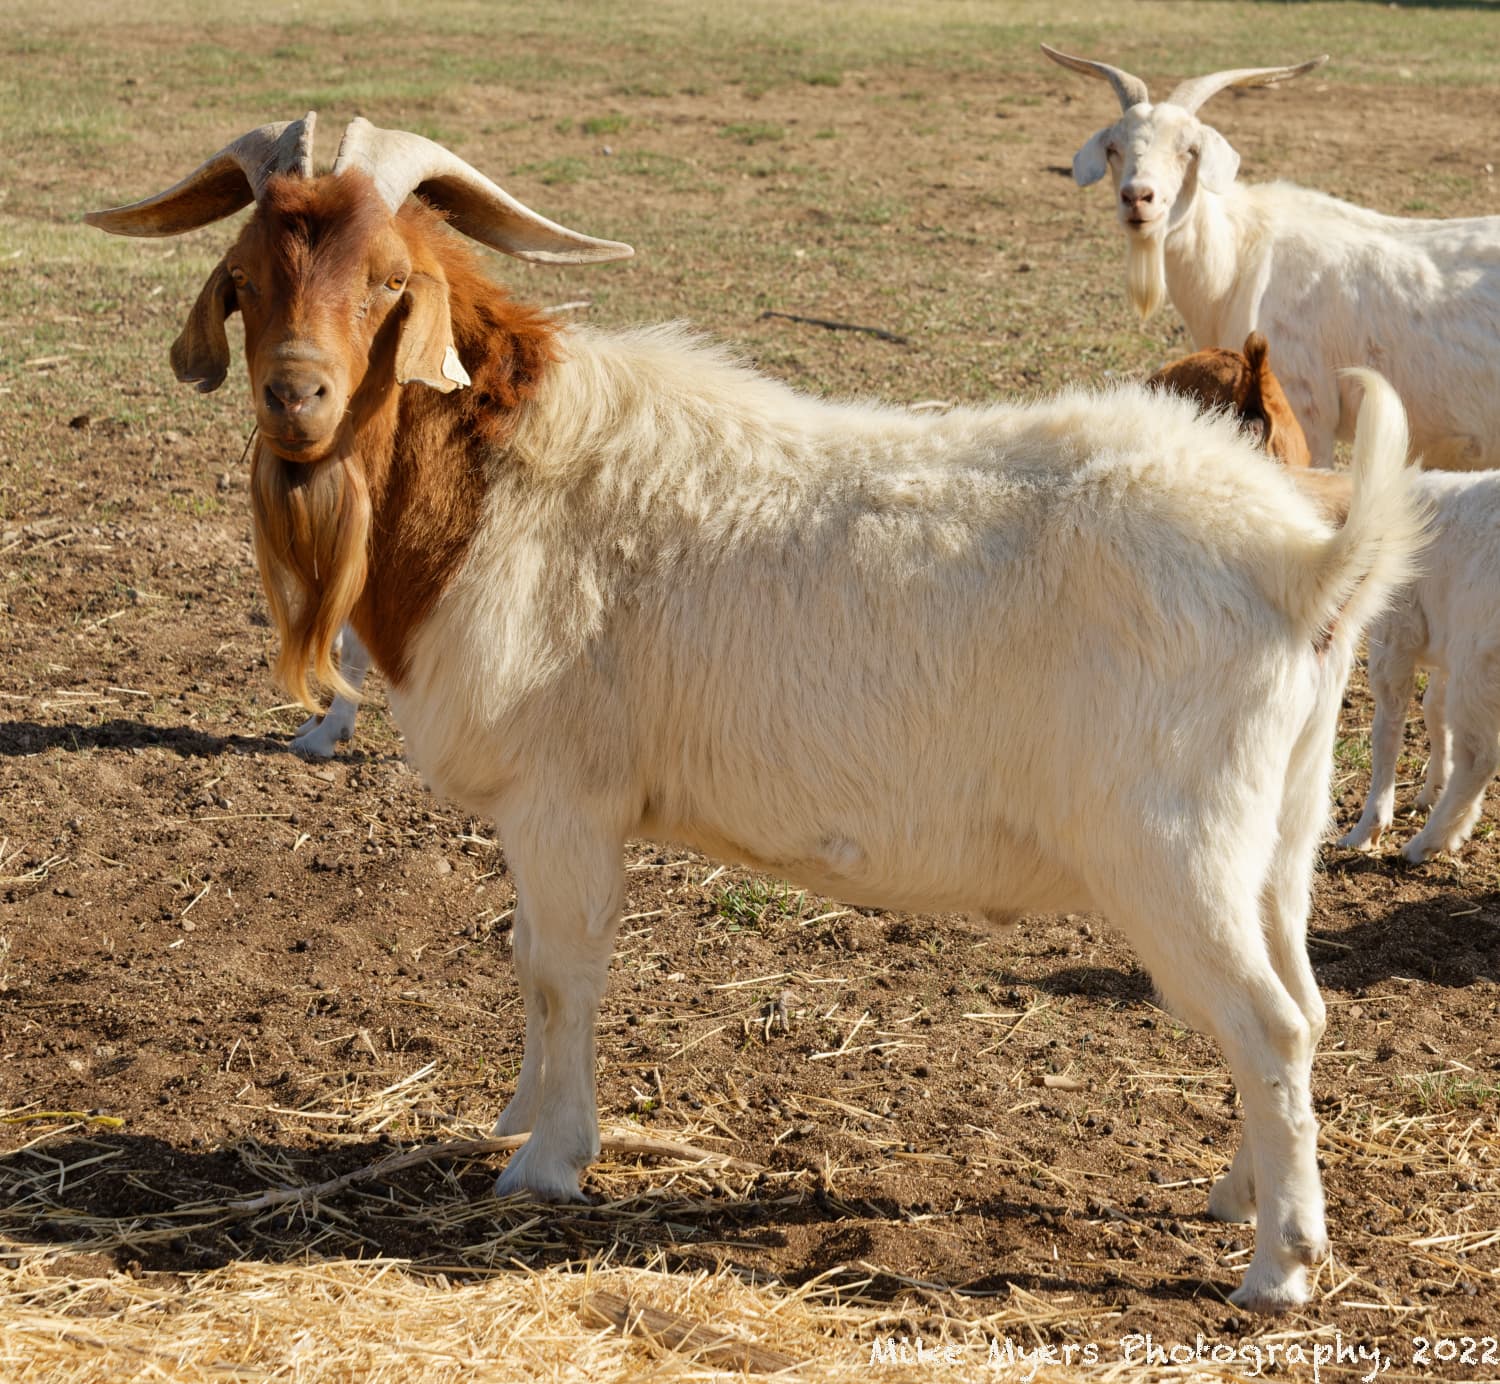
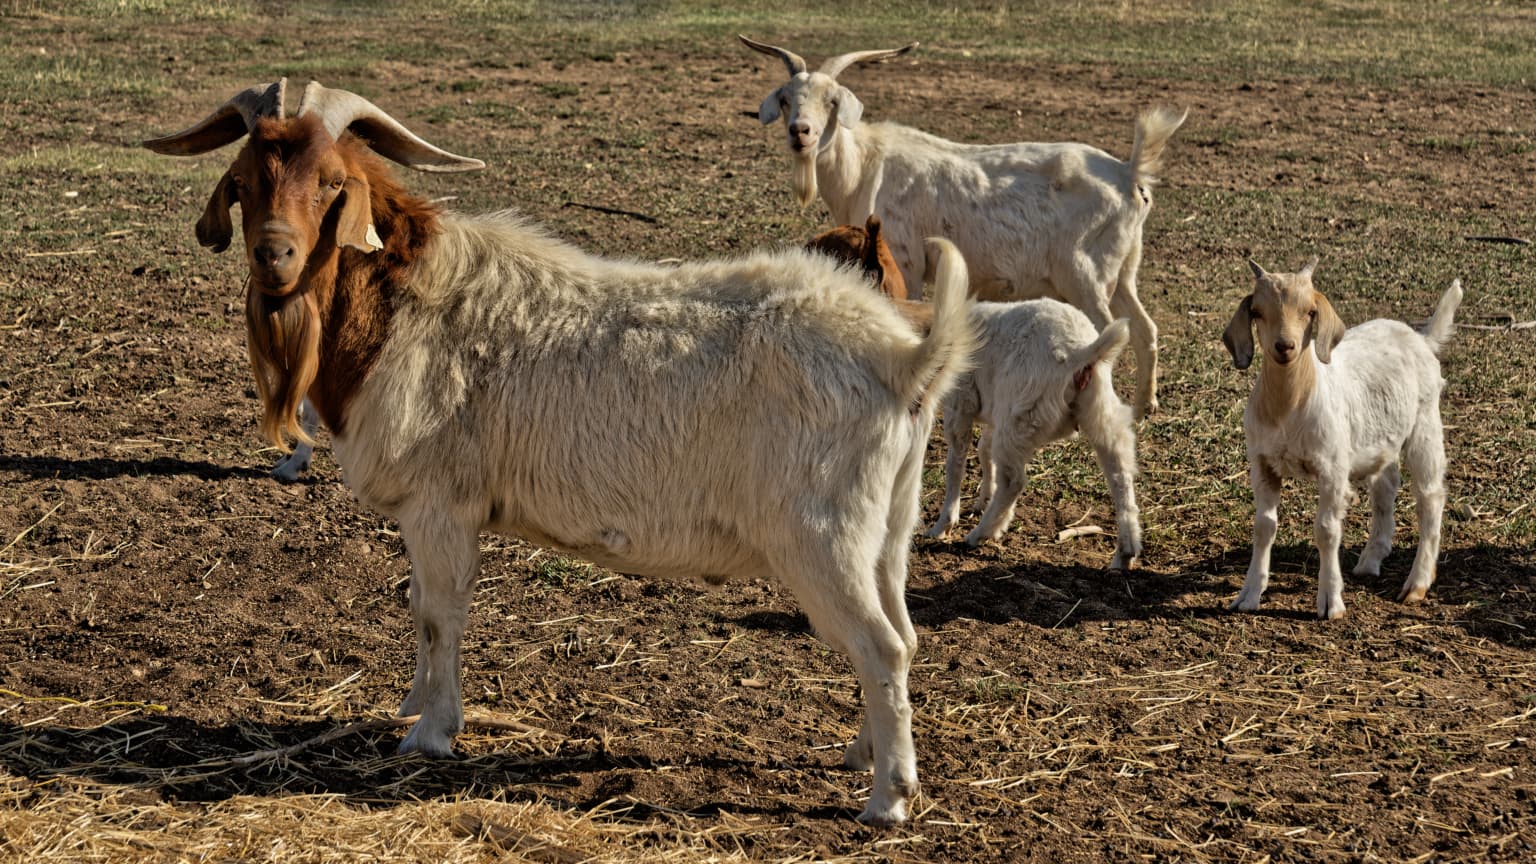
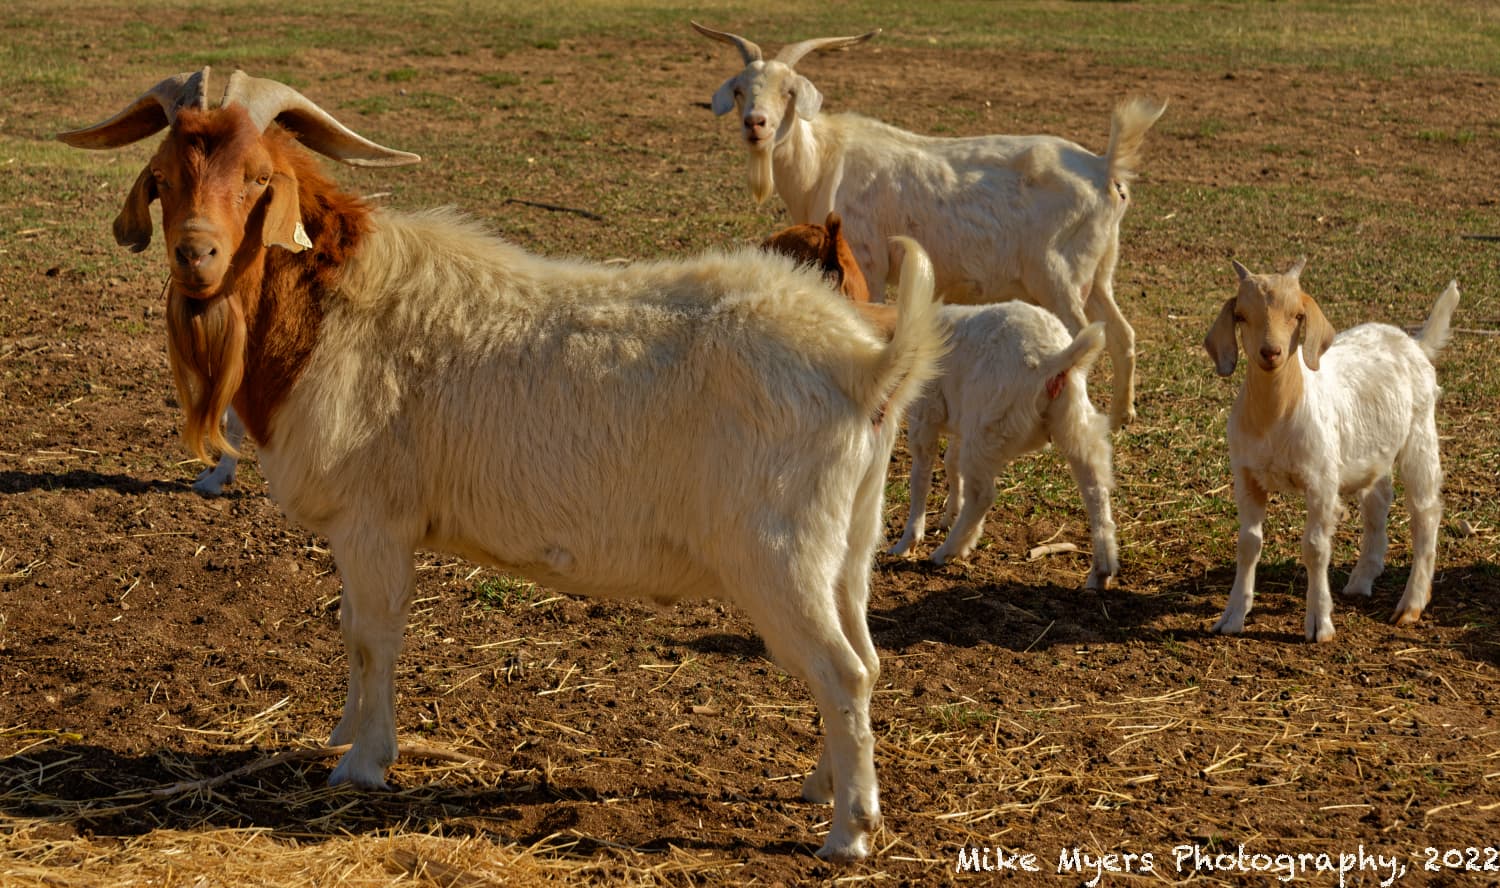
I just spent almost half an hour trying to crop a photo of a goat, and nothing excited me. Susie wanted me to get a good photo, and I snuck as close as I could, got the goat’s attention, and got what I thought was my best photo - but there were other goats in the photo too. I cropped them out, then brought them back, then removed one of them. My favorite photo was to crop out everything but for the cropped image of the main subject, but then it left out “the herd”, which I thought made the photo more powerful. I’ll post it here, below. After what you just did with the baby goat, I’m wondering how you would crop it.
There will be a (M)aster file and a VC1, cropped more…
As I was posting this, I thought I’d try to split the difference, and crop a wee bit more, leaving the main subject intact, but removing the rear end of the others… When I look at the upper image, my eye goes back and forth between the two goat heads. In the lower photo my eye stays on the main subject. That alone means the lower version is “stronger” (I think).
Nope. Just using the FilmPack additional sliders in the Contrast palette.
And this is the weird thing about the “rules” of composition, like the “thirds rule”. They are not hard and fast rules, only suggestions based on what people seem to find attractive in an image.
Well, here’s my attempt at the group, where I’ve not cropped anywhere near as strongly.
These photos were all over-exposed in that you didn’t place the highlights anywhere near low enough. Fortunately, there is enough exposure range so that I could lower the overall exposure to avoid blowing the highlights and recover the shadow details to suit.
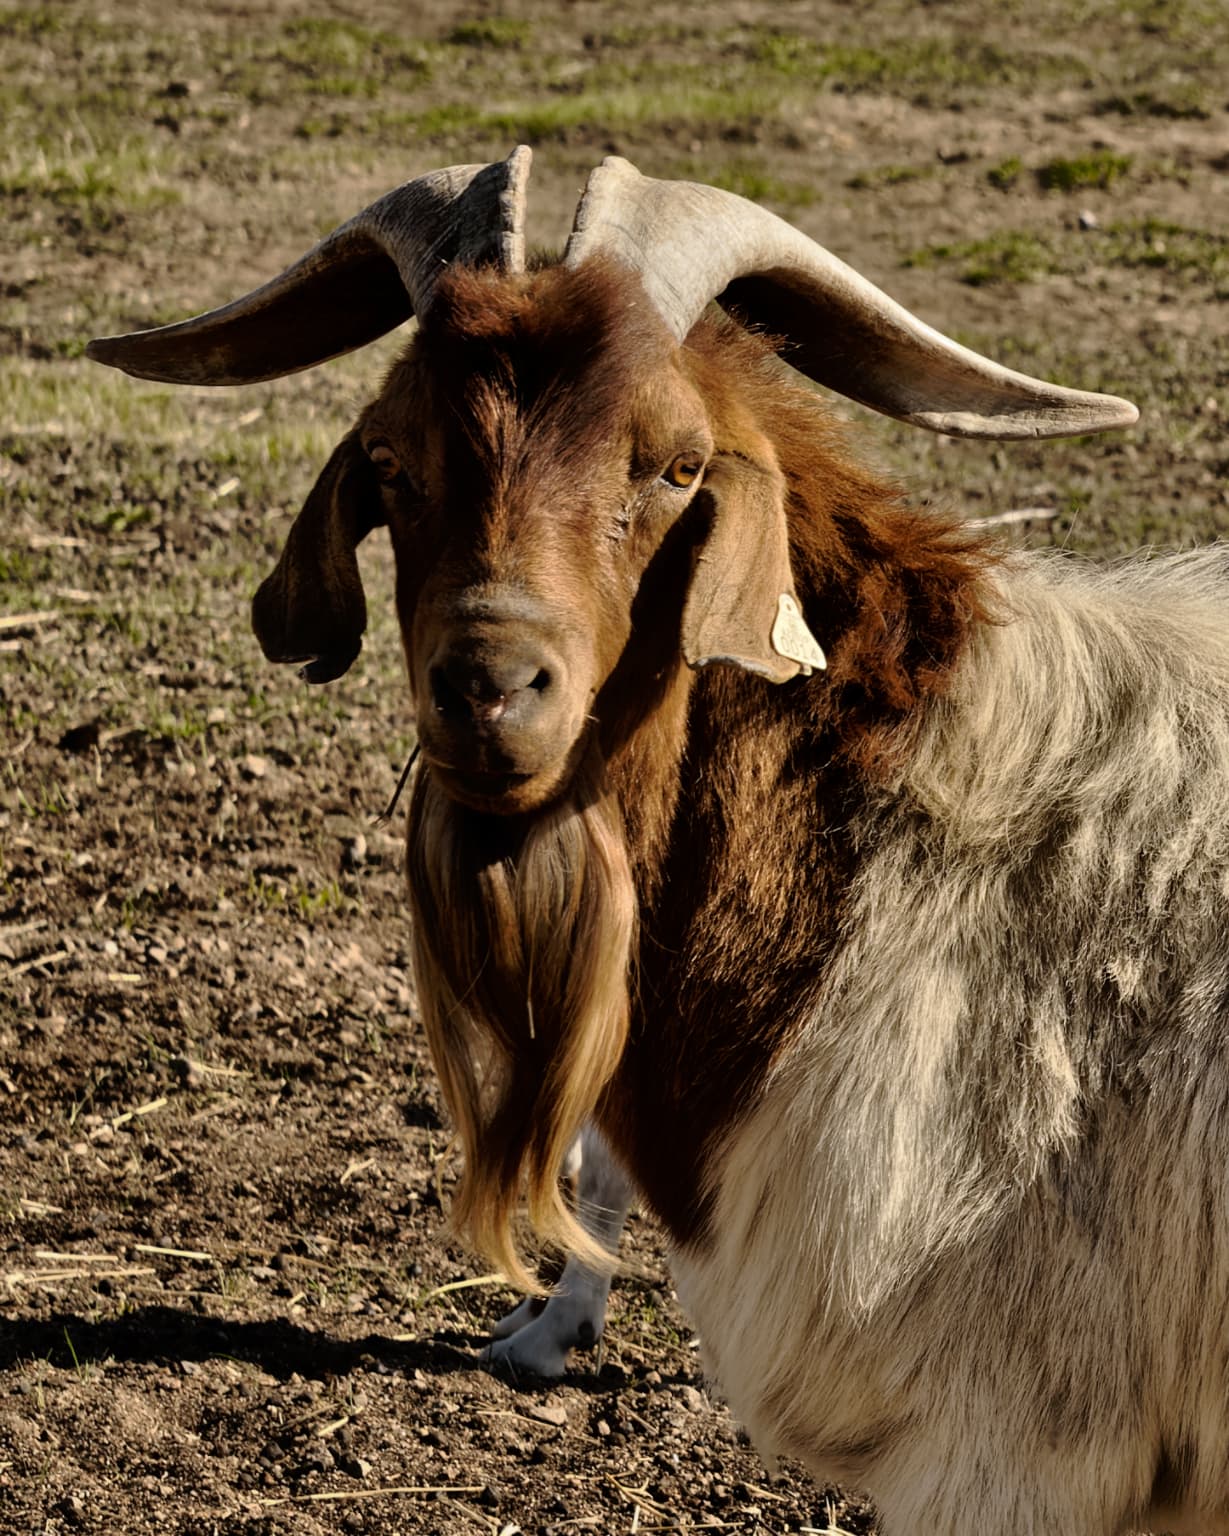
I also played with the “portrait” of the foreground animal…
Is there a selector that will turn on options like this, when available, automatically?
I mean, if they’re available, why “hide” them.
I’ll remember now - thank you, and. I’ll always be looking for a hidden + in the menus.
Back to work… I re-edited my image, using some of the things I think I’ve learned, and re-doing other things. I noticed my image is more “green” (grass) at the very top. I’m trying to figure out if that’s something I did, or you did.
I thought I remembered the goats as being more “white”, but the way you adjusted the colors and brightness, I think what you did is more reasonable. I guess my exposure was a little off, and perhaps my memory is also a little off.
Oh, and your version has a lot more “contrast” on the fur, but I don’t remember seeing that on the goat when I was there. Regardless, it gives your version more “life”, I think, but maybe too much?
No, they are optional, although I can’t understand why. Once turned on, you just resave you workspace and they will always be visible.
Not bad.
A few things…
You were shooting contra-jour, so the parts of the goats nearest you are in shadow and intrinsically low in contrast compared to the few parts of some of the goats that were in the sun
You used matrix metering, which is going to give you an average exposure but, not necessarily, a correct exposure, especially when you have wide dynamic range
With digital sensors the number one “crime” is to over-expose. Any part of the image that is more than 2 stops over the 18% grey reading will be irretrievably blown, whereas you can recover detail from anything down to 10 stops below the 18% grey reading
Your eyes and brain together can render a very wide range of lighting conditions to be equally clear, because the whole process of seeing relies on your brain remembering some bits while your eyes have moved on to the next
Fur is notoriously difficult to render
What I have done is possibly overkill, but it was intended to show that you can “sharpen” an image with tools other than those labelled “sharpening”. It’s up to you to dial in as much or as little of the fine contrasts as you deem suitable.
For me, the number one takeaway from this example is to use spot metering in manual mode. Then you could have spot metered the bright part of the small goat and placed it at +1 EV, then reframed without altering that exposure.
I was you who told me about back button focusing - now I use it most of the time because it allows me to focus and reframe. I’m suggesting back to you that using manual spot metering allows you to do the same with exposure.
My routine…
back button focus
spot exposure reading
take my time to reframe and compose without having to worry about 1 & 2
Don’t forget, once you have an exposure for a particular location and viewpoint, the light isn’t likely to change that much between shots so, once you have done an initial reading, you normally don’t have to worry about rereading for every shot.
Especially if I am shooting contra-jour I set the exposure to spot read the brightest part of the scene, even though it may not be in the frame, and place that reading at something between +1 and +2 EV, depending on how bright I want the brightest part to “feel”. I can always brighten ups an image but I can never dull down over-exposure.


