Editing high dynamic range images in PhotoLab 5

Maybe you bookmark those articles that you think are helpful (aka homework). :slight_smile:
Happy New Year!

Screen Shot 12-29-21 at 10.55 AM

Certainly - please give me some time to locate and organize them.

Well, I would say that article is fairly conclusive and that I wasn’t jumping the gun in not waiting for a possible (mythical) Nikon D880.

Body Weight (g) Weight (lb/oz)
D750 750g 1lb 10.5oz
D810 880g 1lb 15.5oz
D850 915g 2lb 3oz

So, only about 8oz more for the “naked” body.

In my experience, what makes my D850 heavy is my 28-300 lens, which weighs in at around 1lb 12oz and effectively doubles the weight. With something like the 50mm attached, it really doesn’t feel that heavy.

I just stumbled across this (new) but it could be a grey import :roll_eyes: :wink:

Your decision has to be whether you really need the 45Mpx that a D850 gives you. You don’t need it if most of your work is aimed for web pages unless you find yourself continually having to crop to get a decent subject size.

Of course, unless DxO allow bigger uploads, you wouldn’t be able to share D850 RAW files here :wink:

On the subject of things going out of stock, it would seem that Manfrotto are stopping the 290 CF tripod that you got. I jumped last night and ordered one as a replacement for my 055 aluminium, which is considerably heavier.

This has been the aim of this whole thread :grinning_face_with_smiling_eyes: You never know, one day you might make as good a digital photographer as you were an analogue one :rofl: :rofl: :rofl:

And a very happy, healthy and productive New Year to you.

only this thread? :stuck_out_tongue_winking_eye:

if he gets any better in this he can go back to OOC-Jpegs and a set of 512Mb SD cards and mimic the old analoge way! :grinning_face_with_smiling_eyes:
No need for rawdevelopers applications anymore.

having spare time means internet which means GAS which means… bigger house?

1 Like

Interesting coincidence - I was just reading a fascinating write-up about one of my favorite cameras, the Leica M8. If you’re curious: Thoughts on a Leica M8

Thinking back, one of the reasons others in this discussion were so disappointed in M8 images, is because of its lack of technical features and how much/little can be done in editing - it can’t do, and wasn’t, designed to do, what can be done with a late model Nikon or Leica.

But I think these are the key thoughts from this review:

  • " DNG files from the M8’s 10MP APS-H (2/3rds full-frame, 1.33x crop factor) CCD sensor are sharp and detailed. There is a unique digital ‘grain’ to this sensor that is pleasantly reminiscent of film.

  • Apparently the output from the M8 was modeled on Kodachrome slide film. Thorsten Overgaard has written about this and claims to have heard it directly from Stefan Daniel, Leica Camera’s division head of product management, during a briefing at the annual meeting of the LHSA in 2010. Whether this applies to the raw or jpeg output is unclear, but I find the comparison compelling. I tend to use the M8 as if it is loaded with a roll of 160 ISO slide film, and that, I believe, is the key to understanding this camera.

  • Imagine that the Leica M8 is a less expensive Leica M7 with an unending roll of Kodachrome with a built-in digital scanner. The removable bottom plate will help with this illusion. This may not be as much of a stretch as you think, as the M8 is a bridge between film and digital imaging. Being both modern and antiquated makes the M8 somewhat timeless, and in a market where obsolescence is the rule, any relevance this 14 year old camera enjoys today has to have something to do with quality.

  • Even the sensor’s dynamic range is just a few stops more than a typical slide film, providing a precedent for how to expose for best results (i.e. expose for highlights).

  • As with film, you can push exposure in-camera (change ISO setting), or in post-processing (Lightroom). I recommend leaving the camera at base ISO in all but the lowest light. If you prefer a more mid-tone exposure, there is plenty of detail in the shadows waiting to be revealed, and an image exposed this way will still have contrast and dynamic range when pushed. Conversely, there is nothing waiting for you in the blown highlights of an overexposed raw file but a white abyss. Beware."

If I accept the above, I’ll leave my image editing to my Nikon D750 and Leica M10, and pretend the M8 is shooting Kodachrome - the final image is finished, not ready for editing.

On the other hand, when I’m using my more powerful cameras, while I should try to get the image as perfect as I can in the camera, as Joanna initially made it clear, maybe using a different exposure will allow me to get the most out of my image, with editing being an integral part of my creating a photo.

To answer - no I do not NEED 45px, my work is aimed at web galleries and other online distribution, and since DxO won’t allow me to post those huge raw files, that’s another reason NOT go go beyond what I already have.

You were SOOO right - that tripod is awesome. Anyone reading this should consider buying one before it’s too late, and THANK YOU for pushing me towards the one I bought.

Ouch - I don’t always use heavy lenses, and the body going from 26 ounces on my D750 to 35 ounces on the D850 put an end to any of those thoughts.

I will also wish all of you a happy, healthy, productive, and exciting new year!

Hi folks,

I haven’t been here for a rather long time, but did not forget experimenting on this subject a bit further.

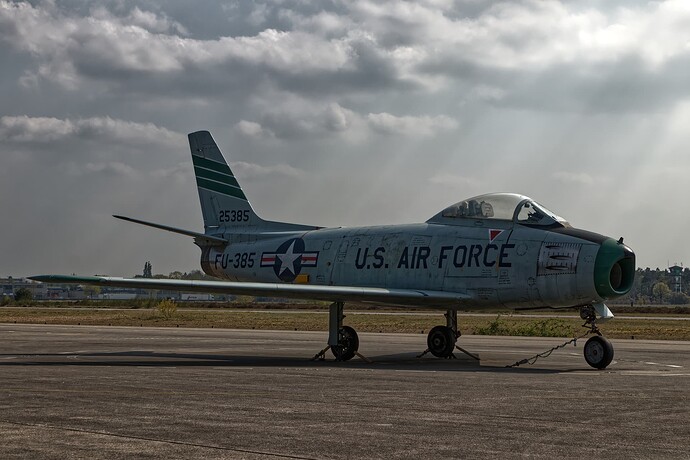
I recently went to an Air Museum in the Netherlands (on home ground of former Soesterberg Air Base hosting the 32nd TFS with F-86, F-102, F-106, F-4E (YES!!!) and finally F-15C/D’ s).

In attachment a .CR2 and the final result from PL 5.2.0-4872.
IMG_5377.CR2 (27,8 MB)
IMG_5377.CR2.dop (11,0 KB)

This time I tried not to use any additional App besides PL5. In which I partially succeeded. All I did in the end (16 bit TIF export from PL5) was further dehazing and enhancing detail in Affinity Photo.
Exported as .JPG in the end. I kindly ask your views on this (Still learning). Tell me what is good and what is less good or even bad. All’s welcome.

Regards, Jeroen Veenvliet (the Netherlands)
Hello Jeroen,
in order to help you as good as possible we need to know which configuration you have.
PLv5 elite and Filmpack v5 elite?
if so then you can filter, mask out the sky by local control line.
and turn up blacks and touch up colors by saturation, clearview ,
fine contrast, vibrance. green of the nose touching up by HSL. about 5 min work.
IMG_5377.CR2.dop (21,3 KB)

didn’t bother to level out, just colors and lumination.
ok did some more finetuning and on my 2k BenQ it looks as vibrant i can make it. looks a bit CPL kind but still good , and forgot no deepprime so now deepprime added.


IMG_5377.CR2.dop (21,9 KB)

about this: (personal opinion no professional skills what so ever in photography)
sky looks abit too dramatic and doesn’t align with the foreground, (no shadows of clouds) Those streaks of sunbeams distract me. the sky looks like the main subject now.
colors; plain is somehow a bit flattend, washed out. if that’s the main subject that should be shining.

in my take v3 i tried to visualize what you would see with your own eye’s. (you can HDR in your brain) so i used a pull (highlights down) and lift (shadows) to lower dynamic range in the image.(white/black)
brushed up the colors tickled the details with fine contrast instead of hars clearview/microcontrast globally and used local on the sky to get some structure in the clouds for decoration.

Hello Peter,

Many thanks for your good criticism, this I can learn from. Yes, all depends on personal taste and perception. However, your results look more natural whereas mine are more on the dramatic side of the spectrum. I see the differences between them. I’ll try replicating your versions. Done a bit already.

IMG_5352.CR2 (27,1 MB)
IMG_5352.CR2.dop (10,4 KB)

IMG_5383.CR2 (29,2 MB)
IMG_5383.CR2.dop (9,4 KB)

Thanks again Peter.

1 Like

My first thought was what a beautiful sky! The clouds, and the sunbeams - lovely. Second thought was that the plane was too dark, obviously because it is in the shade, not in the sunlit area, but a little lightening like what @OXiDant did made the plane much better - but then the image was very boring without the sky which “made” the original image.

Second thought was the horizon was tilted, so the plane appeared to be moving downhill to the right, and if I squint my eyes, the whole image is “offset” to the right - if you had more space there, it would be balanced better. His second image fixes the plane and the horizon, but to me, what was so unique about the photo is lost.

I guess what @GIBF4 wrote is true, but for better or worse, that sky and the sunbeams are what “made” the original photograph. Without them, it’s just a boring photo of a plane. If the photo was being made for an album of different kinds of airplanes, the modified version is likely better, but I prefer the first image (and would like it even more if there was more “space” in front of the plane).

1 Like

yes and no.
yes as in if the sky was like that.
no if it’s “arteficial brought in” to make it more dramatic.
i took a look at @GIBF4 his adjustments.
1 drag down tone curve mid section.
2 40% spot weighted smartlighting (that’s why the plane looks washed out.)
3 contrast -20 even more details turned down.
4 vibrance 10 saturation -10 (can’t say why this would be a choice)
rendering also neutral color and tonality.


i tried to get those streaks out but those are that deep hidden.

thus now i chose to keep lumination level on plain as much as possible the same.
dramatised the sky as much as possible and keep contrast and color vibrance on the plane as good as possible.

IMG_5377.CR2.dop (22,9 KB)
it looks like i used a CPL and turned it to the max.
so i backed down a bit and the streaks are gone.
v4 is modified as much as possible keeping the sky as it is.
IMG_5377.CR2.dop (22,8 KB)

if the plane is the subject: left is too flat, right is too dark contrasty.
Jeroen is the one who is remembering how it looked for real.
probably the middle but slightly darker.
i do acknowledge that the framing could be wider to create more “natural space” but maybe there where distracting people or objects which would enter the framing at a 24mm.

my take …
different White point, reduced Contrast, high Clearview but reduced colour (HSL), Local adjustments


VC2 → IMG_5377.CR2.dop (155,3 KB)

1 Like

Nice one. (didn’t download the dop. Different pc.)
By white point you mean lumination? Brightnes? Or more WB?

I always have a love hate relationship with clearview.
I use it global often at 15% but not more for saturation, clarity, sharpening.
But to gain structure in the sky it’s often a mis and hit. (local adjustment.)
I would love to have the advanged contrast sliders in local adjustment.
Fine contrast would be much more gentle to use in higher levels then microcontrast/clearviewplus.

1 Like

Hi Peter – check …

  • Horizon + Crop
  • TonCurve (White Point + Gamma) + SmartLighting Spot Weigthed + Contrast
  • ClearView + HSL (multiple)
  • Local Adjustments (multiple)
  • :slight_smile:
1 Like

Good afternoon ya’ll :slight_smile:

Thanks for all the extra information; seems I have some homework later this evening…
Again, each their own flavors, tastes, and interpretations. However, I’ll try replicating what you’ve done for me to make some further assessments and steeping up my learning curves.

Thanks again for putting effort into arranging all the different solutions based on my earlier, quite basic and mediocre, RAW file. I’ll go sit and rethink how to establish the same, or close results. Those being a mix of yours. You see, I quite like the somewhat dramatic look in photos, but should better not overdo it. :slight_smile:

PS: @Peter; I’m on PL5.2.0-4732 Elite with Filmpack v6

2 Likes

Practicing at the moment. Some results. Don’t mind the composition, its a bit off (Canopy and fuselage had to be covering the building (slightly higher) in my opinion).

IMG_5307.CR2 (27,5 MB)
IMG_5307.CR2.dop (10,1 KB)

Jeroen

Back to initial subject and composition.
Done renewed approach. Too much? or more in line with what is should be (focus on the plane, shining more and more attracting the eyes?) Agreed, the earlier one was too dark (Thanks Mike :-))

Jeroen

Hi Jeroen,
when you use a high amount of ClearView like I did to quickly enhance structure on the plane and for the sky, what I normally don’t do at all (you wanted some ‘drama’), you get a darker pic and stronger colours.

To see the effect, check with my version and disable / enable the HSL tool and adjust the settings to taste. Strong colours look catching for the moment … Do the same with Local Adjustments. Disable them all and enable them step by step. With your mouse over the pic, press [ M ] to see the mask.

It all depends, what you want to convey – a military jet, a big toy … whatever.

have fun, Wolfgang

2 Likes


@Wolfgang 's version “my take…” is just a bit more natural.
HSL, by dragging the pins around you can select more carefully a group of colors
1 use colorpicker for the initial colorselection.
2 shift saturation to -100 (selection gets grey) (if not visible enough shift lumination to 100.
3 use pins to get all you want “grey”.
selection HSL
selection HSL 2
4 check by choose a daft color the selection (first set sat and lum back to 0)

5 adjust accordenly in what you see.

6 double click on colorpin (outer wheel) to reset colorchange choice and use the three sliders saturation, lumination and uniformity to finalize desired color.

7 pick one of the other channels and proceed for say “red” repeat step 1 to 6.

Clearviewplus has some “intelligents” in choosing where to place microcontrast to enhance sharpening and saturation.
see this post to see which slider and contrast type does what.

Have Fun!

1 Like

I guess my problem is me, not the editing. All the. edits make the plane look better, but if I was going to hang one of them on my wall, it would be the original version, with the lovely sky.

I guess I’m either ignorant, or spoiled.

nothing to do with both.

compare it with the old VOC- warschip paintings.
those are all dramatic in colors and waves and sky.
paste this in google “voc war paintings” hit show images and you know what i mean.
(Do you think that they never had a battle in plain blue sky and low windstrenght?)
everyone is free how to interpret a taken rawfile.
1 by memory for the reality you witnessed (not the actual reality because that’s mostly the oocjpeg (edit if you have “natural” profile active.)
2 what you intended to capture, sunset? awb does a trick with you.so you need to go by memory.
3 what you like to show.
4 goofing around to create something new.

Your head is wired for “true images” wile now a day’s “true” means natural looking.image atered in covering flaws.

In this case the take away was sky or plain? which is the lead subject to catch the eye?
how far can you go in contrasting, edging out, lines in the image before it brakes?
You can only find the center if you know where the edges are. :slight_smile: