Also note that those 4 sliders are related … the “Advanced settings” sliders are (effectively) sub-sets of the “Fine Contrast” slider. eg. If you were to set Fine-Contrast to +20 and all 3 Advanced-Settings sliders to -20 … then the result is the same as all 4 sliders = 0.
2 Likes
Yes that is correct. I decided not to mention it because I thought it might detract from the main purpose of my post which was that @ohaya may have already been using FilmPack features inadvertently.
Mark
Oh, good … I’m pleased I got that right ![]()
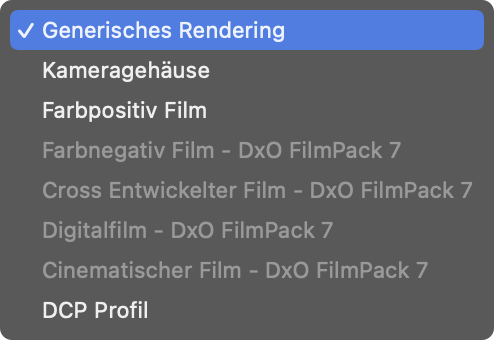
This means that if I choose a Creative Picture control in my Nikon Z7, DPL v7 will automatically apply the corresponding Numeric film rendering (Nikon ones start with a "N - ").
Mmuuahh – almost fell of my chair!
Happy New Year to you all.
1 Like
Hmm, now I wonder if this can be right?
Try to pull Fine Contrast to 100. If you for instance also pull Midtones up you will still increase your contrast a lot!
I think you may be misunderstanding what John is saying. He is referring only to the four Fine Contrast sliders. which includes the one labeled Fine Contrast and the three advanced Fine contrast sliders below it labeled Highlights, Midtones, and Shadows. Those three sliders are a subset of the Fine Contrast slider. So, for example, moving all of them to -100 would be the opposite of moving the Fine Contrast slider to +100, and result is an overall Fine Contrast setting of approximately 0
Mark

1 Like
Thanks Joanna, your points are spot-on and echo lots of my experience having using DxO PL6/7 for 1 year.
You mentioned that in Smart Lighting spot mode, one can simultaneously place boxes around bright and dark part of the picture to equalize them (I think I have seen similar effect). However, it seems by default DxO was only looking for human faces and put boxes around them if DxO detected any faces. Does it sound like they are trying something else?
Hi there.
Every indication is that the Spot mode is primarily aimed at facial recognition, possibly because the is what some UX designer thought might be a good idea.
But I can assure you, I have been using it for determining black and white points for a long time. If it puts up rectangles over faces and you don’t want or need them, just delete them. The range will change dynamically as you add or remove rectangles.
I think the main aim is to try and recover detail in specified “spots”, which can be useful for faces but anything else as well.
You need to play with it, using a similar kind of image that I demonstrated, but make sure you surround a large enough area around a highlight or dark spot. This seems to give the algorithm a hint of the context and helps it to work better.
Add, remove, move, resize and watch how the overall image reacts, because it doesn’t just affect the rectangles areas.
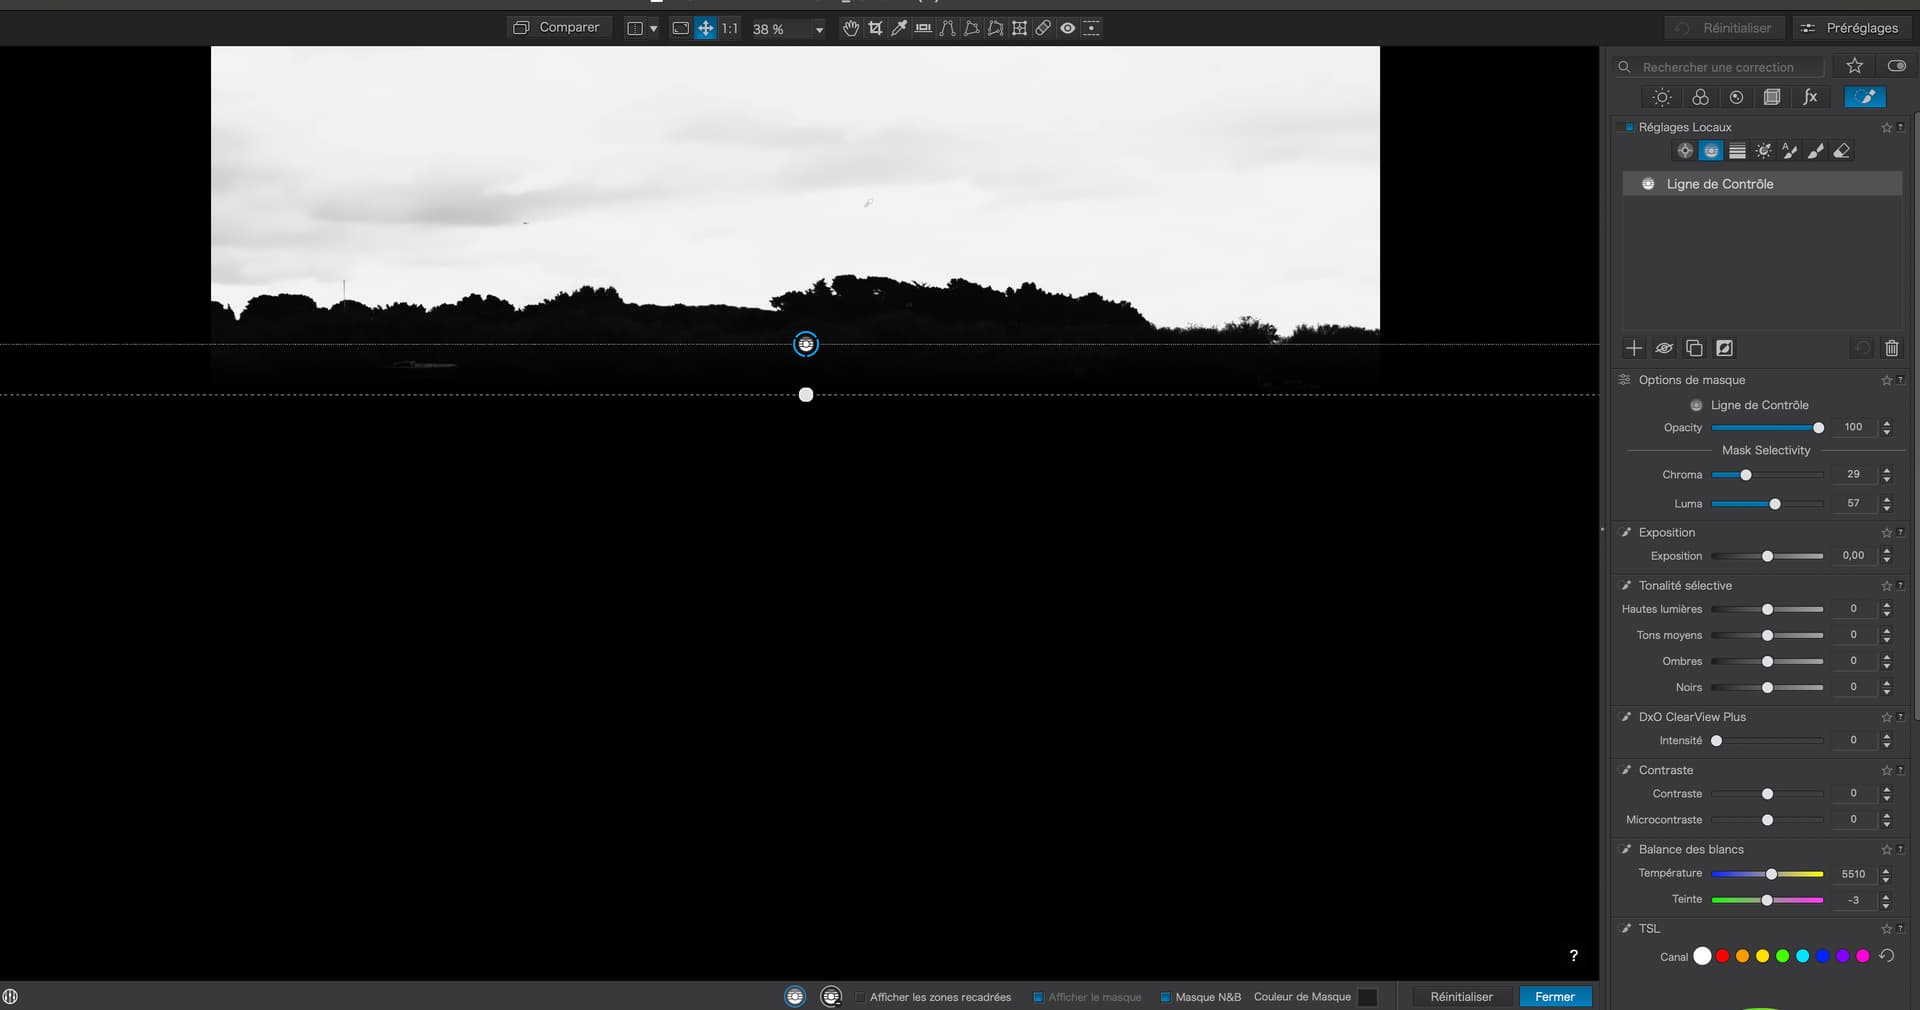
Another thing I tend to do with high dynamic range images is to start by making the over and under-exposure indicators visible.
So, starting with the untouched image…

… I activate the exposure warnings and adjust the ends of the Tone Curve until the warnings light up…
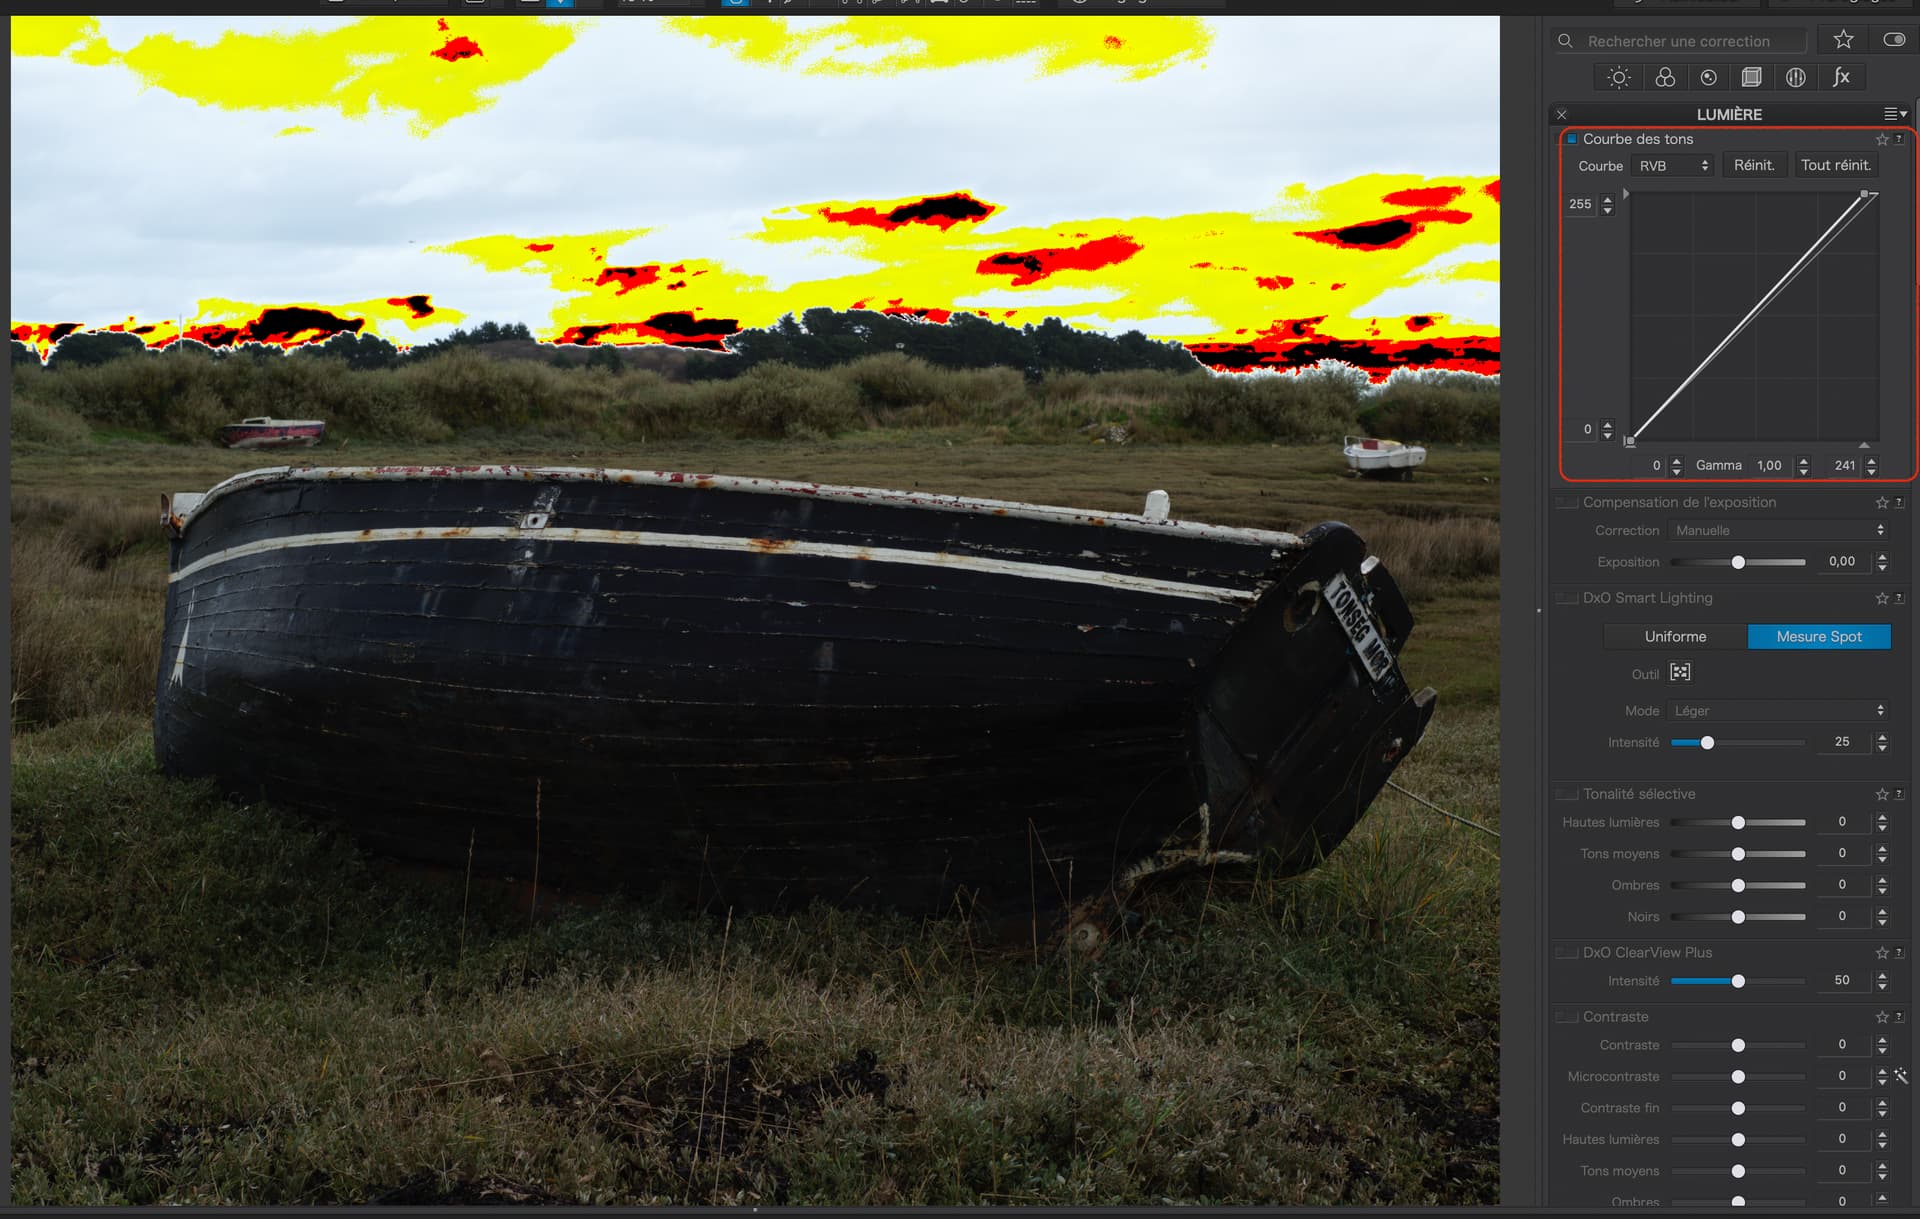
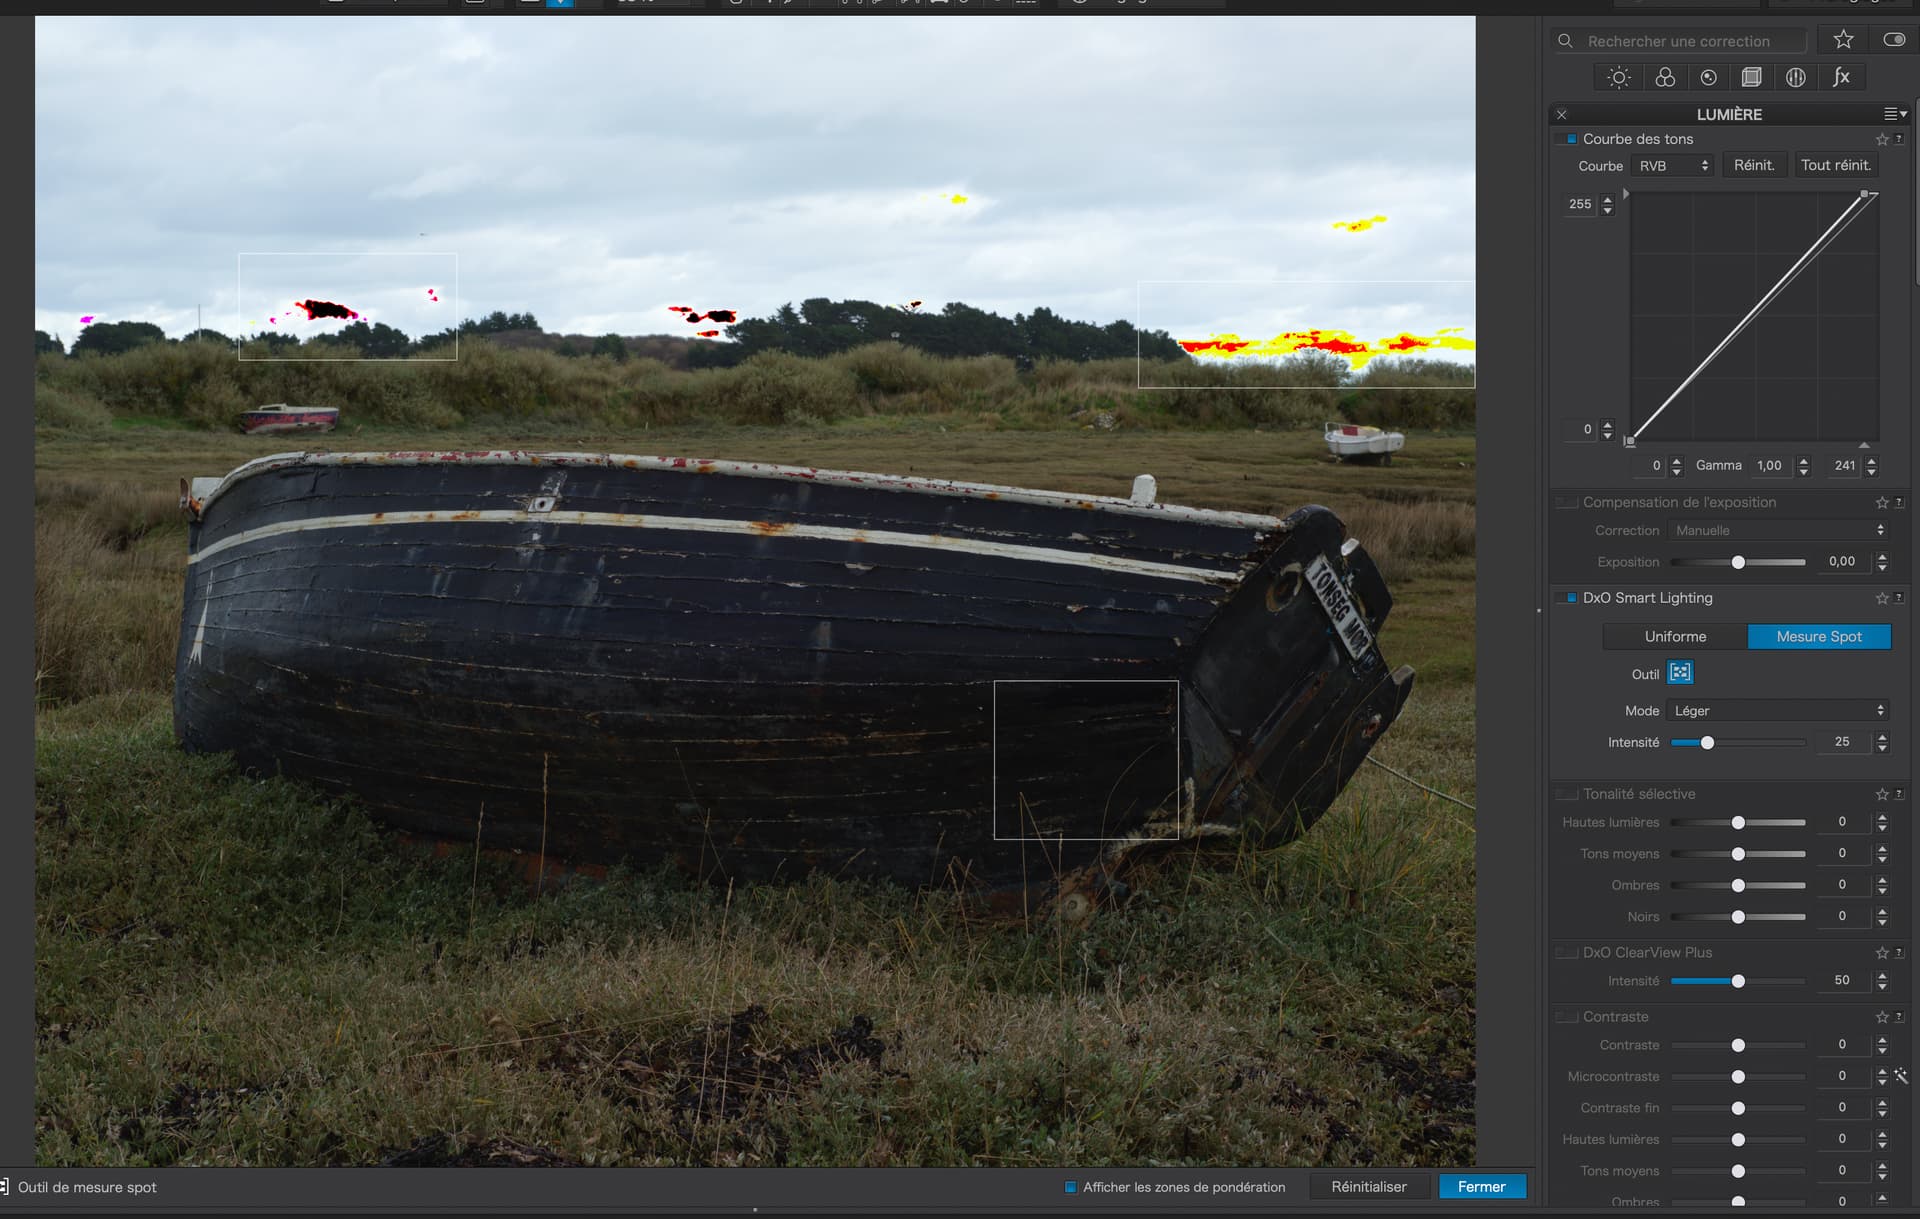
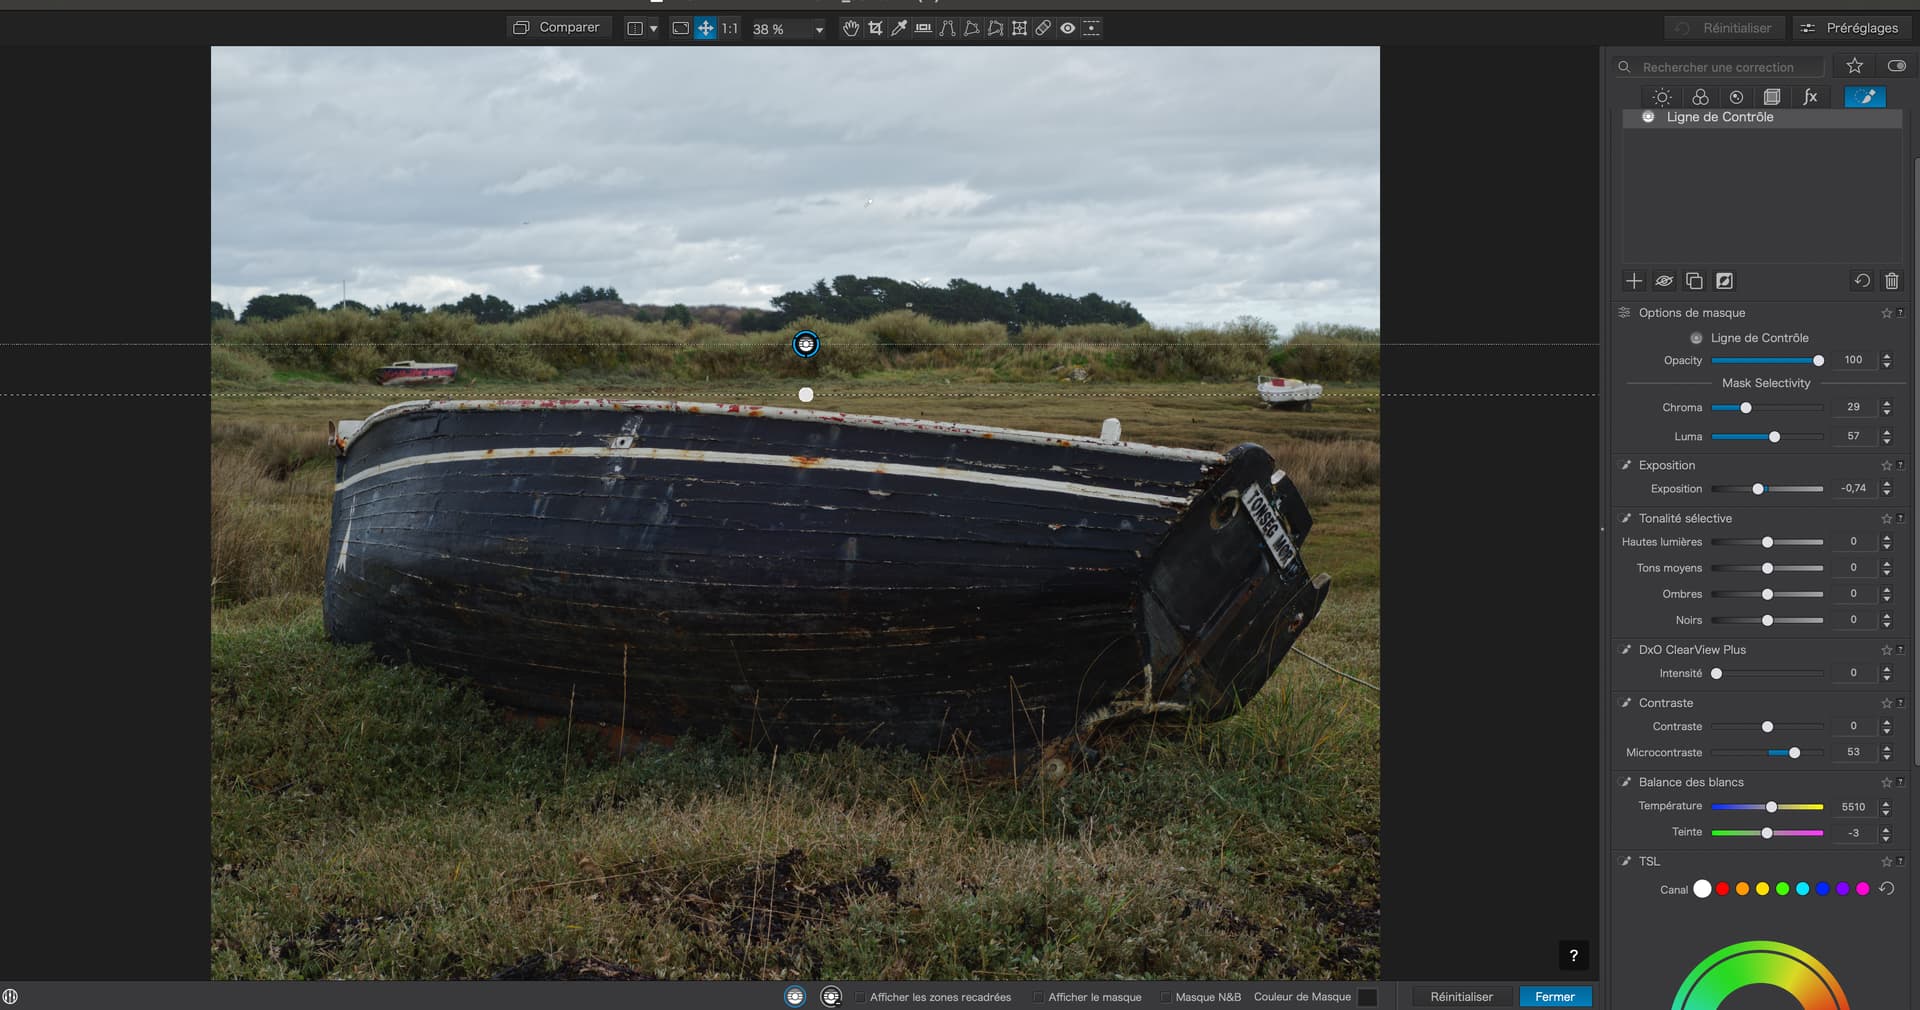
Then I can see where the brightest part(s) of the sky are and surround them. I also placed a rectangle on the dark hull of the boat so that Smart Lighting would bring that into range…
Now, I can hide the rectangles by closing but not deactivating the tool, hide the exposure warnings, reset the Tone Curve ends that we only altered to find the high/low points; and start to play with the Tone Curve to improve the contrast, etc of the image…
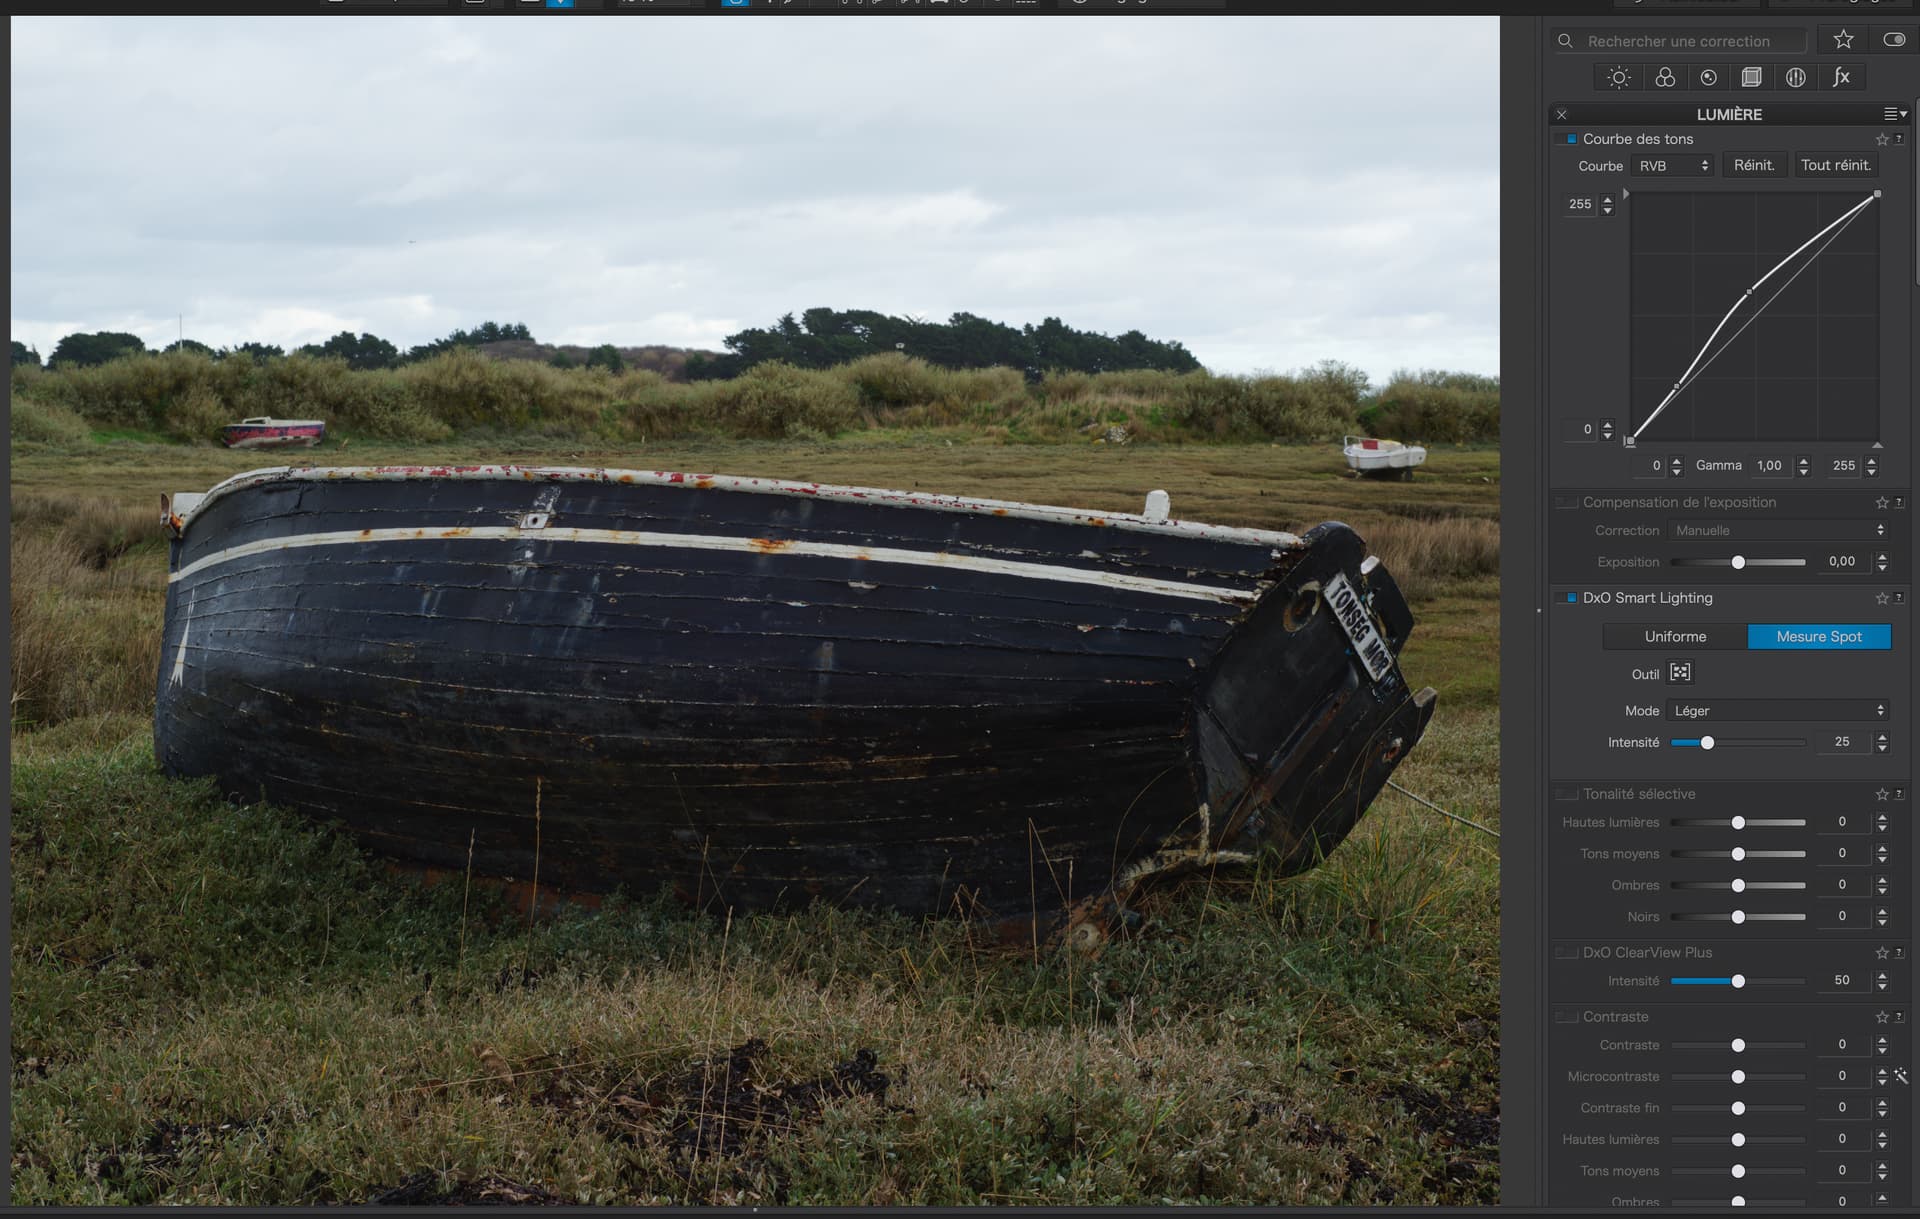
In this particular image, I then went on to use a Control Line to improve the contrast in the sky only…
10 Likes
Thanks a lot for the micro tutorial, I learnt a lot about the tool and I didn’t even know there was the exposure warning indicator, but now I do ![]()
Without reading the manual …
lol that’s very true. So far the interface is so good that I barely have to refer to the manual to use them, that’s a big thumb up for the dev.
Welcome, you’ve asked some interesting questions and got a ton of advice - exactly what the forums are for! I’ll add my twopenny worth, apologies if you know all this already…
You mention you’re fairly new to shooting RAW and also that you think your processed images are deficient in sharpness and color.
In my experience, 90% of problems with sharpness are caused by focus, aperture or shutter speed. And these cannot really be corrected in software. A simple way of eliminating these is to remember there’s no such shutter speed as “Too fast” unless you want to convey movement in the picture.
So when shooting, select a shutter speed that will give you a sharp picture handheld. The rule for this is to use the reciprocal of the focal length as a minimum.
eg if using 100mm lens minimum shutter speed should be 1/100 second.
Secondly, think about Aperture - do you want a shallow or deep depth of field. Wide aperture (small number) gives a shallow depth of field around the focal point. Narrow aperture (large number) gives deep depth of field around the focal point.
Lastly adjust the ISO to get a decent exposure. (Because both. shutter speed and aperture affect the amount of light hitting the sensor)
White Balance - I always do this by eye. That doesn’t mean everybody should, but be aware the colour picker depends on there being a decent neutral colour in the image. Also, do this after tweaking the exposure as the exposure setting will alter the perception of colour.
Image stabilisation in lens and camera will help, but this is a good place to start. In a perfect world, your mastery of the camera means you use the software to build out, not correct the image!
On Clearview - it is designed to dehaze images. Settings less than 20 are preferable, anything over will add artifacts to most images. I try to avoid it altogether. Use the contrast tool or tone curve to introduce contrast instead.
On DeNoise - PhotoLab is brilliant with Noise but that doesn’t mean you should use it in all cases. If you have visible noise when magnified to 100%, then use the least aggressive noise reduction that solves the problem.
1 Like
If I may add, the following…
If the subject is moving, make that half the reciprocal - 1/200
If you are moving as well, make that a quarter of the reciprocal - 1/400
In addition to shuttertime:
With ibis and ois , dual is, they claim 5 stops. It’s fun to go as low as you can.
Handheld 1/2 sec on a 100mm… Can be done.
But in clear winter weather with no wind and no movement is the only change there’s no glare of fussyness. (less leafs and other greenstuff which can be waving at you, no heat waves, no dansing insects much more change to have a clean shot.)
Most of the time heat waves, wind motionend materials, moving objects like cars bikes people animals ruin your sharpnes some can be frozen and cleared by shorten shuttertime but some are just there : dust,air polution heatwaves…
Night shots in water reflection some haze of motion is great.
About clearview and such. There is much posted here about those contrast sliders and tools.
Contrast has a few main choices. Plain contrast, contrast bound it’s selective tone counterpart’s .
High, mid , shadow and black. When you have Filmpack that is.
If so then you have a nice fine contrast slider for gentle contrast, faces and stuced walls and other structures which don’t cary microcontrast. In my eye’s a very good alternative.
Then micro contrast itself, this is also used by optical module for lens sharpnes, set magic want active and you see this slider adjust in each image.
Clearview plus is a combination of Dehaze and Clarity function in other applications. By using some “AI” it tries to identify in the image where to put the microcontrast dots and where to leave it (sharpening edges) alone and only saturate the color. In 15 max 20 it’s quite usefull
Note: Contrast slider “black” isn’t the same as blacklevel.
In order to “Dehaze” only, (which is infact the wrong title, because dehazing means sharpening in order to defeat heatwave distortion so clarify should be a better word.) , like a polaroid sunglasses for watersurface, the tone curve tool suite you best. Draging down lowest part a bit you enhance the saturation in the colors. Put more Clarity in it so to speak and you can see through the fainted colors better. The light reflection clare is suppressed.
As last possible use is localadjustment.
Inthere is also some contrast sliders which you can use as a extra brush.
If global microcontrast/clearview don’t work you can lower this and then use local adjustment to attack the parst which needs just a tad more.
Ohaya, Is was
@Pathal, Not in Photolab but probably in Nikons own proprietary RAW-converter. That might be an advantage when using the camera manufacturers RAW-converters instead of general converters.
1 Like
@Stenis , if I remember correctly, DxO introduced Nikon renderings a few weeks or months ago…in FilmPack, I presume.
@Stenis
I do reconfirm that in PL v7 we have the support for Nikon Creative Picture Control as it was already there for Fuji cameras, the ones for Nikon start with “N-”
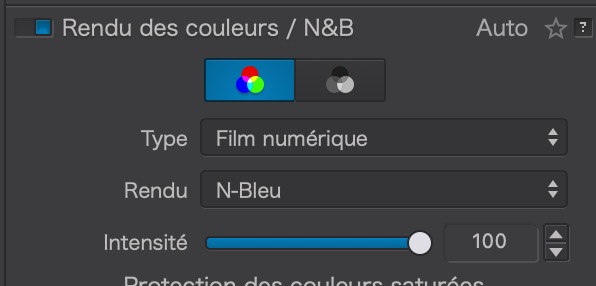
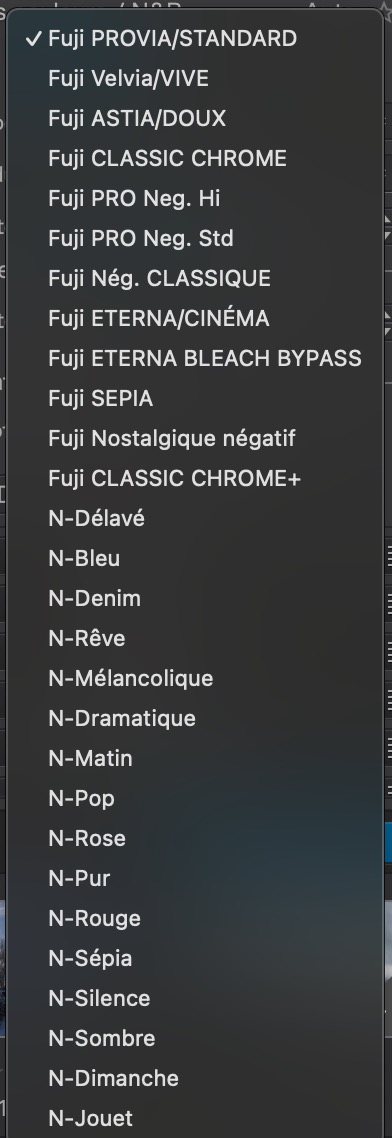
…only if you have licensed FilmPack. Without FP, the respective options are shown, but greyed out (unusable)