Workflow, Output Sharpener to Print

I use PhotoLab 5 and Efex Pro3 for editing and then move onto Sharpener Pro 3 for output sharpening. This is then saved to a folder.

As there is no workflow allowing printing from Sharpener Pro 3, how do members send the finished TIFF to the printer (Canon Pro 200) ?

I have the Canon 1000 Pro printer and use Canon’s own print utility

Thanks Joanna, do you use Sharpener pro first ?

No, I use PhotoLab exclusively because it allows me to do everything starting from the RAW without having to create intermediate files. Then export to TIFF and, if necessary, Topaz Photo AI to resize and remove any remaining blur.

So you don’t use Sharpener pro ?

Nope, because it would mean buying Nik Collection, for which I have no need.

@Mel

How do you have been printing in the past? Just open your processed file in that application and do the same as before.

Personally, I’m using Nik Sharpener ever since (and long before I went with PL).
Still finish my files in PS 


Hi Wolfgang. This was my go to workflow, (old technology) so I thought I would try the DXO suite.

Black and White Workflow

Camera: Sony Nex 7

Lens: Sony E 18-200 mm

Printer: Canon Pixma Pro 200

Print: Monochrome, Black & White

Resize Software: PhotoZoom 8

Editing Software: Photoshop CS2, Picture Window Pro

Open RAW (ARW) file in PWP

Carry out Clone if rqd.

Transformation>Convert to 48 bit, save as a TIF (should be already in 48 bit if RAW file)

Save in Print Ready folder

Open in PZ

Use S-Spline Max

Set to 600 ppi

Size to A3 (297w x 420h, portrait, 420w x 297h landscape) set to Crop

Set Strength to 50

Set Crispness to 50

Set Vividness to 30-50

Save as TIFF

Open in PWP

Go to Transformation>Colour>Monochrome>Extract Channel with Luminance

or

Go to Transformation>Colour>Monochrome>Channel Mixer (Amount to be 100%. Adjust

Exposure as rqd. Adjust sliders to taste)

Save

Open in PS

Go to Image>Adjustments>Shadow/Highlight>Load Default (Try My Default2)

Save

Open in PWP

Go to Transformation>Sharpen>Unsharp Mask.

Soft subjects: Amount 150%, Radius 1,Threshold 10. (flowers, people, cats, dogs)

Portraits: Amount 75%, Radius 2,Threshold 3.

Moderate: Amount 225%, Radius 0.5,Threshold 0. (products, indoor and outdoor exteriors)

Maximum: Amount 65%, Radius 4,Threshold 3. (for lots of well defined edges)

All Purpose: Amount 85%, Radius 1,Threshold 4. (could be done twice if not sharp enough)

Halo: Set between 5%-15%, say 10%

Save

Thanks Joanna.
I think I will go with Output Sharpener Pro then print with Canon Professional Print and Layout.

You might want to carefully set up a couple of your own presents as it has a tendency to lose the odd setting.

Oh, and I didn’t have a profile for the paper I wanted to use today. So I used the Canon “automatic” profile 1 was amazed at how good it was.

Yes I start with a preset and modify it.
As you say the presets do get lost - must be a bug.

My go to paper is Canon Matte A3.

Incidentally, my black and white don’t show any metamerism.

I know, it’s great! I use Canson Baryta Photographique II 310gsm - it just feels like “real” paper and I’ve even had a few people questioning if some of my prints were LF done in the darkroom.

Sorry, I don’t get those details. :person_shrugging:


Longtime ago after raw-development, I did the “creative sharpening part” directly in PS or with different Nik PlugIns (e.g. Color Efex, Viveza, very seldom in Nik Sharpener).

Since using PL (and lens profiles applied) I try to control “the focus on the subject” with local adjustments like Contrast, Microcontrast, ClearViewPlus (carefully!), Brightness (Highlights, Midtones, Shadows etc.) 
 if I don’t cross over to Nik.

Then after further edits / adjustments in PS (the pic must be in the final size !), I apply Nik Sharpener globally to make up for some sharpness loss from printing.
Screen Shot 03-02-24 at 06.21 PM
shown here for my Epson P800 / with Nik 6 Sharpener
(from old PS I use Nik 3.3)

Thanks for that Wolfgang - sorry about the lengthy Workflow.
I am now trying Joanna’s suggestion, using the Canon Professional Print & Layout, but hit a problem.

Printing problem with Canon Professional Print & Layout

Camera :Sony Nex-7

Lens: Sony E 18-200

Printer: Canon Pixma Pro 200

Software: DXO PhotoLab 5, Silver Efex Pro 3, Nik Sharpener Pro 3, (Output Sharpener), Canon Professional Print & Layout

Paper: Canon A3 Matte

The problem. When clicking PRINT in CPP&L, I get a popup saying “The selected paper size does not have wide margins
Printing with a paper size that has wide margins is recommended.”
What does this mean?

The Pro 200 has a maximum printing size of 3 mm. from the top edge and 5 mm. from the bottom edge, making a maximum printable length on A3 paper of 412 mm. (A3 is 420 mm).

I set the resize in PhotoLab at 41 cm., so I can’t see any reason for the popup.

The input and output image sizes I have made the same at 273.35 x 410 mm. (correct aspect ratio for this camera) In CPP&L, so the image should fit on A3 paper

Am I missing something ?

Checking in PhotoLab’s print modul with your printer’s margins
(3mm at the sides and 5mm at the bottom)
a pic already resized to 410 mm length should fit without problem.


( disregard my printer )

@Joanna can help you further with Canon’s print application.

Yes, that’s what I thought Wolfgang.
3 mm. at the top and 5 mm. at the bottom, should fit. The sides should automatically adjust if keep aspect ratio is ticked, so why the popup?

Greetings.

I must admit to be totally amazed at just how much work you were doing in your old workflow.

Something you definitely didn’t need was when you were creating 600ppi files. This is something folks do when they don’t realise that the printer resolution is usually stated in dpi and older Epson printers used to state 600dpi.

However, your Canon Pro 200 has a printing resolution of up to 4800 x 2400 dpi. But you don’t need to create images with that magnitude because you need to remember that it takes many dots, of a combination of different colours, to print one pixel.

When you have finished working on your image in PhotoLab, export it to TIFF at 240ppi. This is perfectly for a print to be viewed at arms length without the viewer seeing the dots that make up the pixels, or even the pixels themselves.

I just looked at one of my prints from my Pro-1000, which has the same dot resolution, through an 8x loupe and I had to look hard to see any dots, let alone pixels.

I create prints for exhibitions up to A2 and mount them on foam board with no margins.

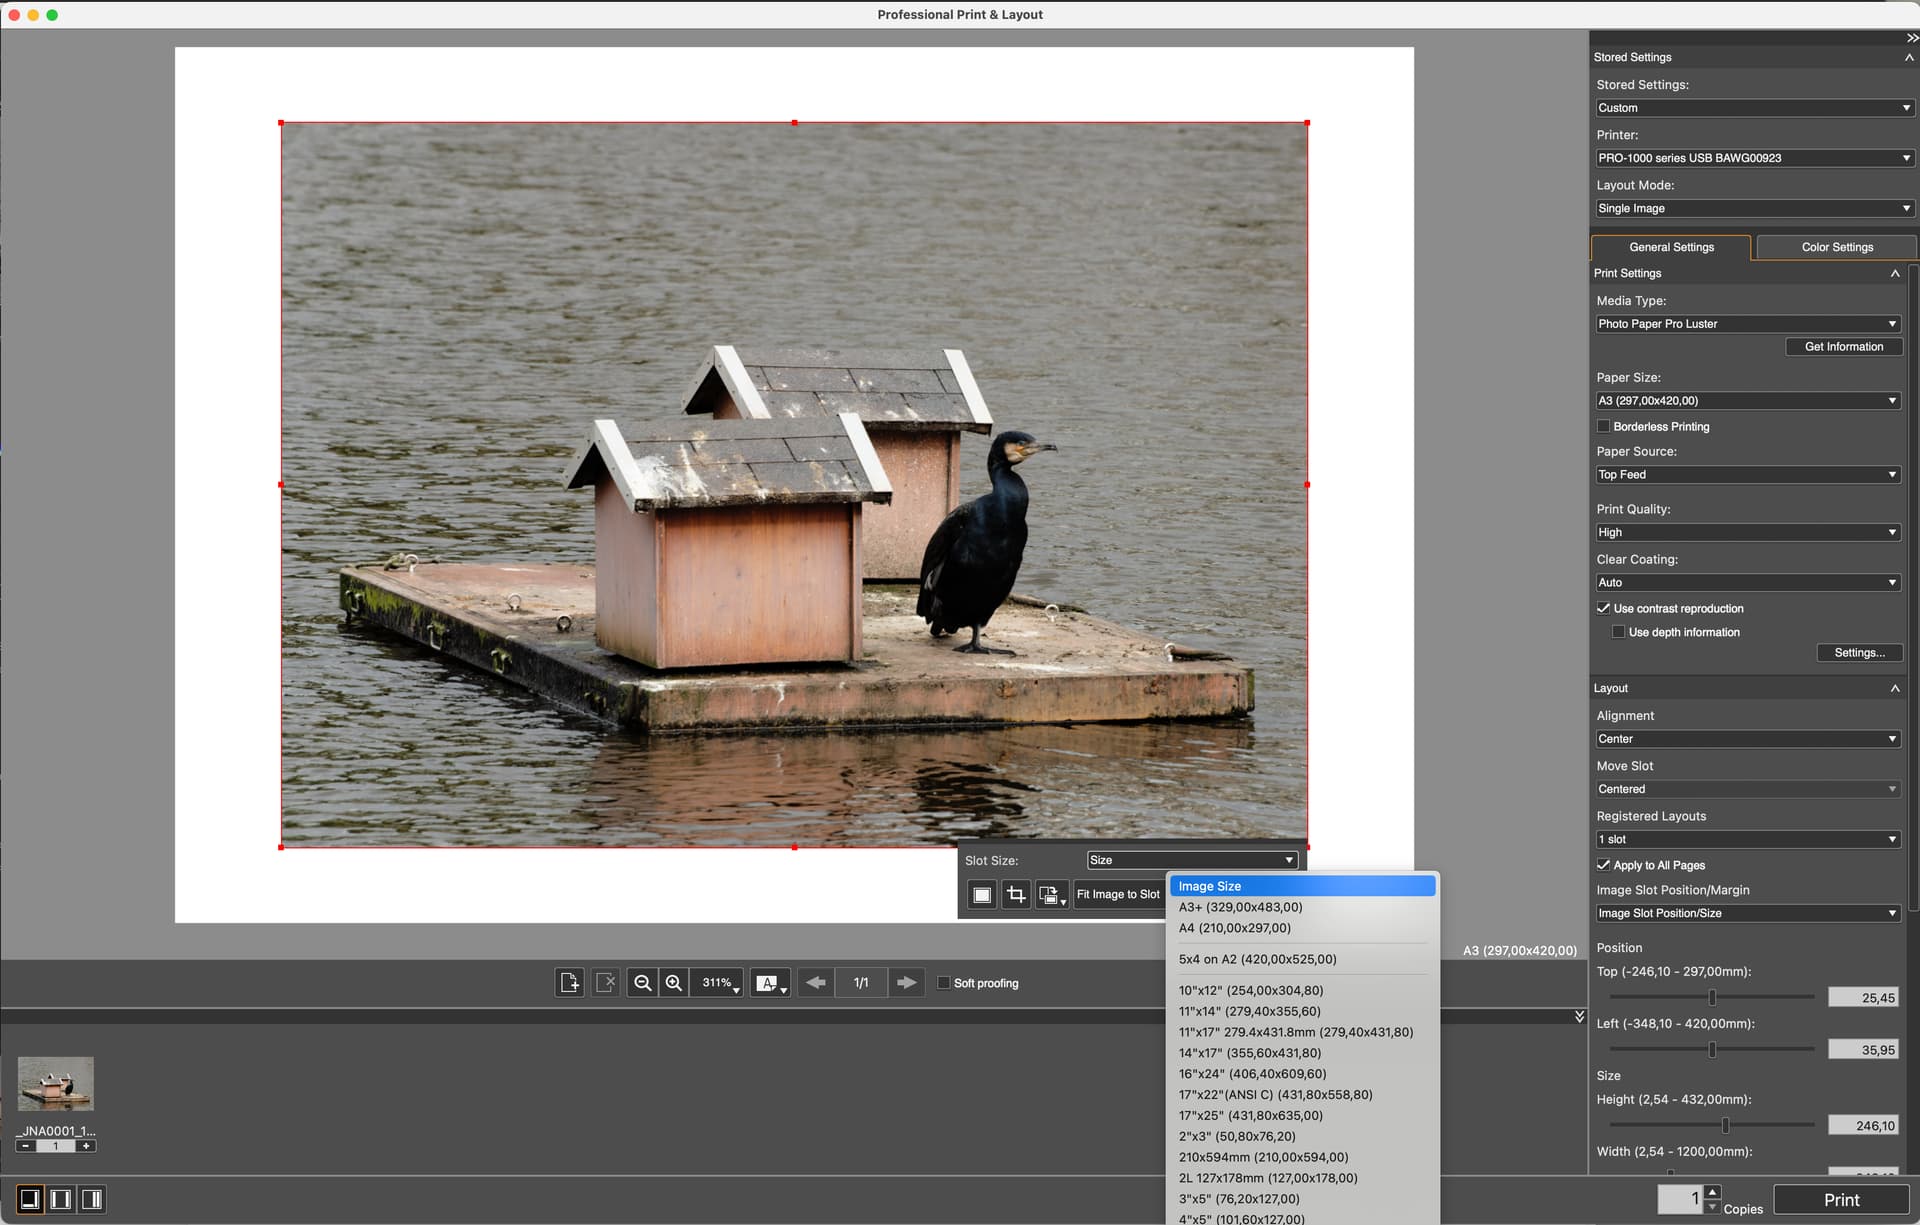
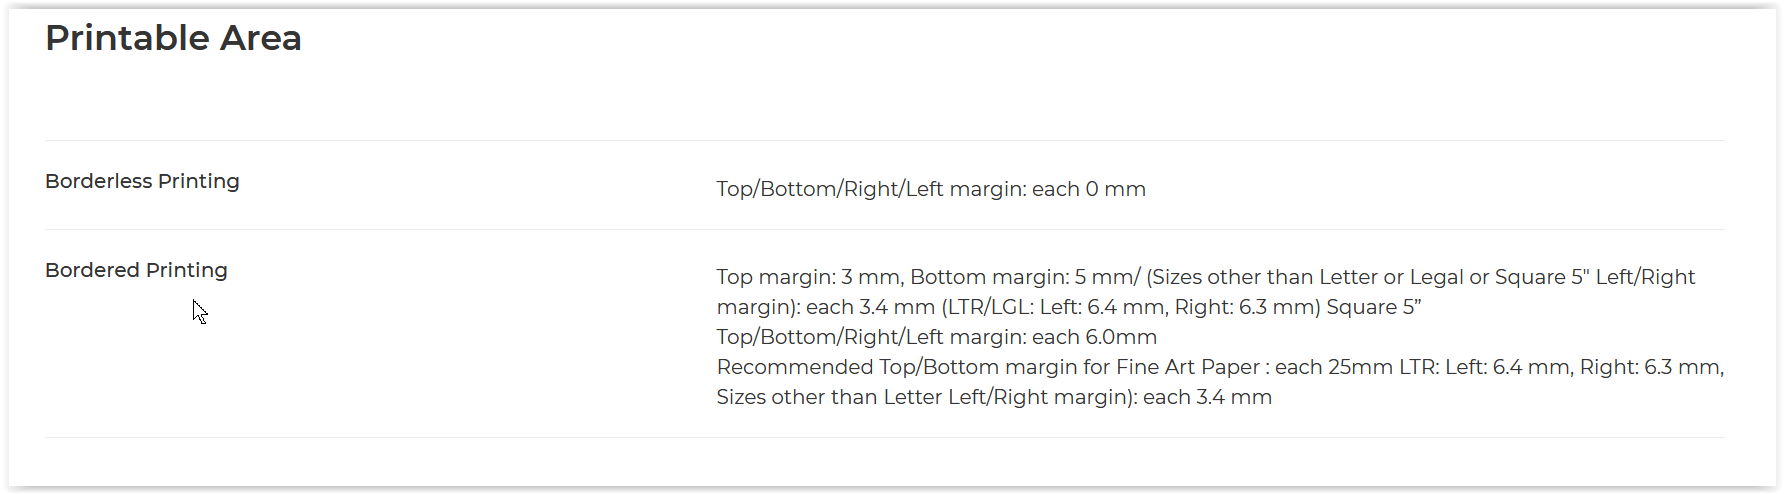
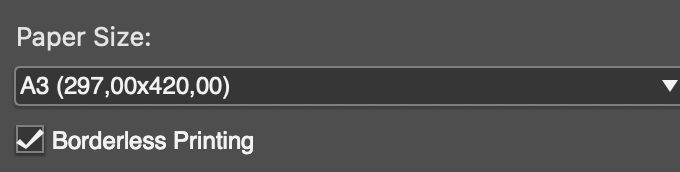
The Pro 200 can create such borderless prints if you check this box


Capture d’écran 2024-03-03 Ă  11.54.51


Now, how to size your image for precise printing.

The Pro 200 prints up to A3+ so, if you want to print to A3, you need to do a bit of maths


420 mm = 16.5 inches ( 420 / 25.4 )
16.5 x 240ppi = 3969 pixels.

297 mm = 11.7 inches ( 297 / 25.4 )
11.7 x 240ppi = 2806 pixels.

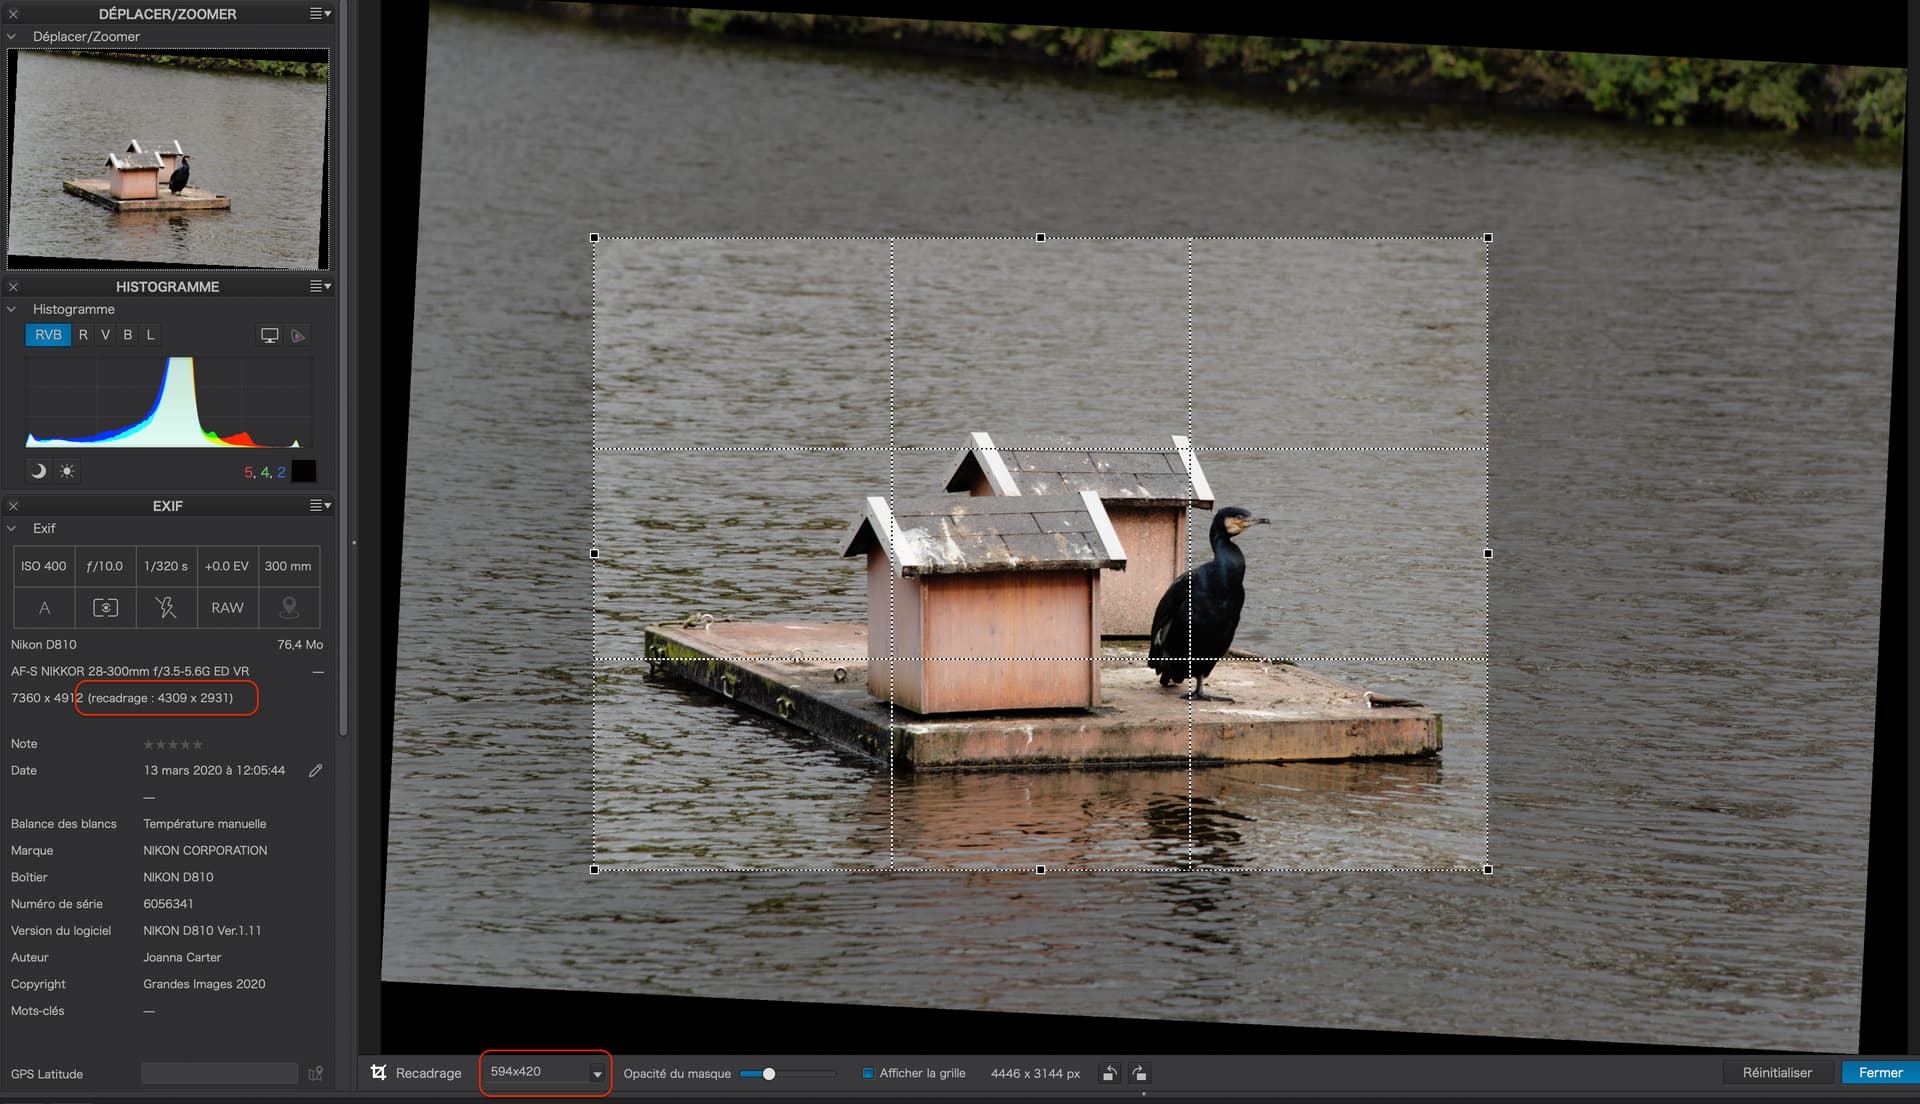
So, assuming you have cropped to 420 x 297 proportions, you will have dimensions that match the proportions of your paper.

If the cropped dimensions of your image are less than 3969 x 2806 pixels


 see the left sidebar, you are good to go to export without having to use separate resizing software.

Note the proportions on the crop selector are the A2 sizes, which are the same as A3.

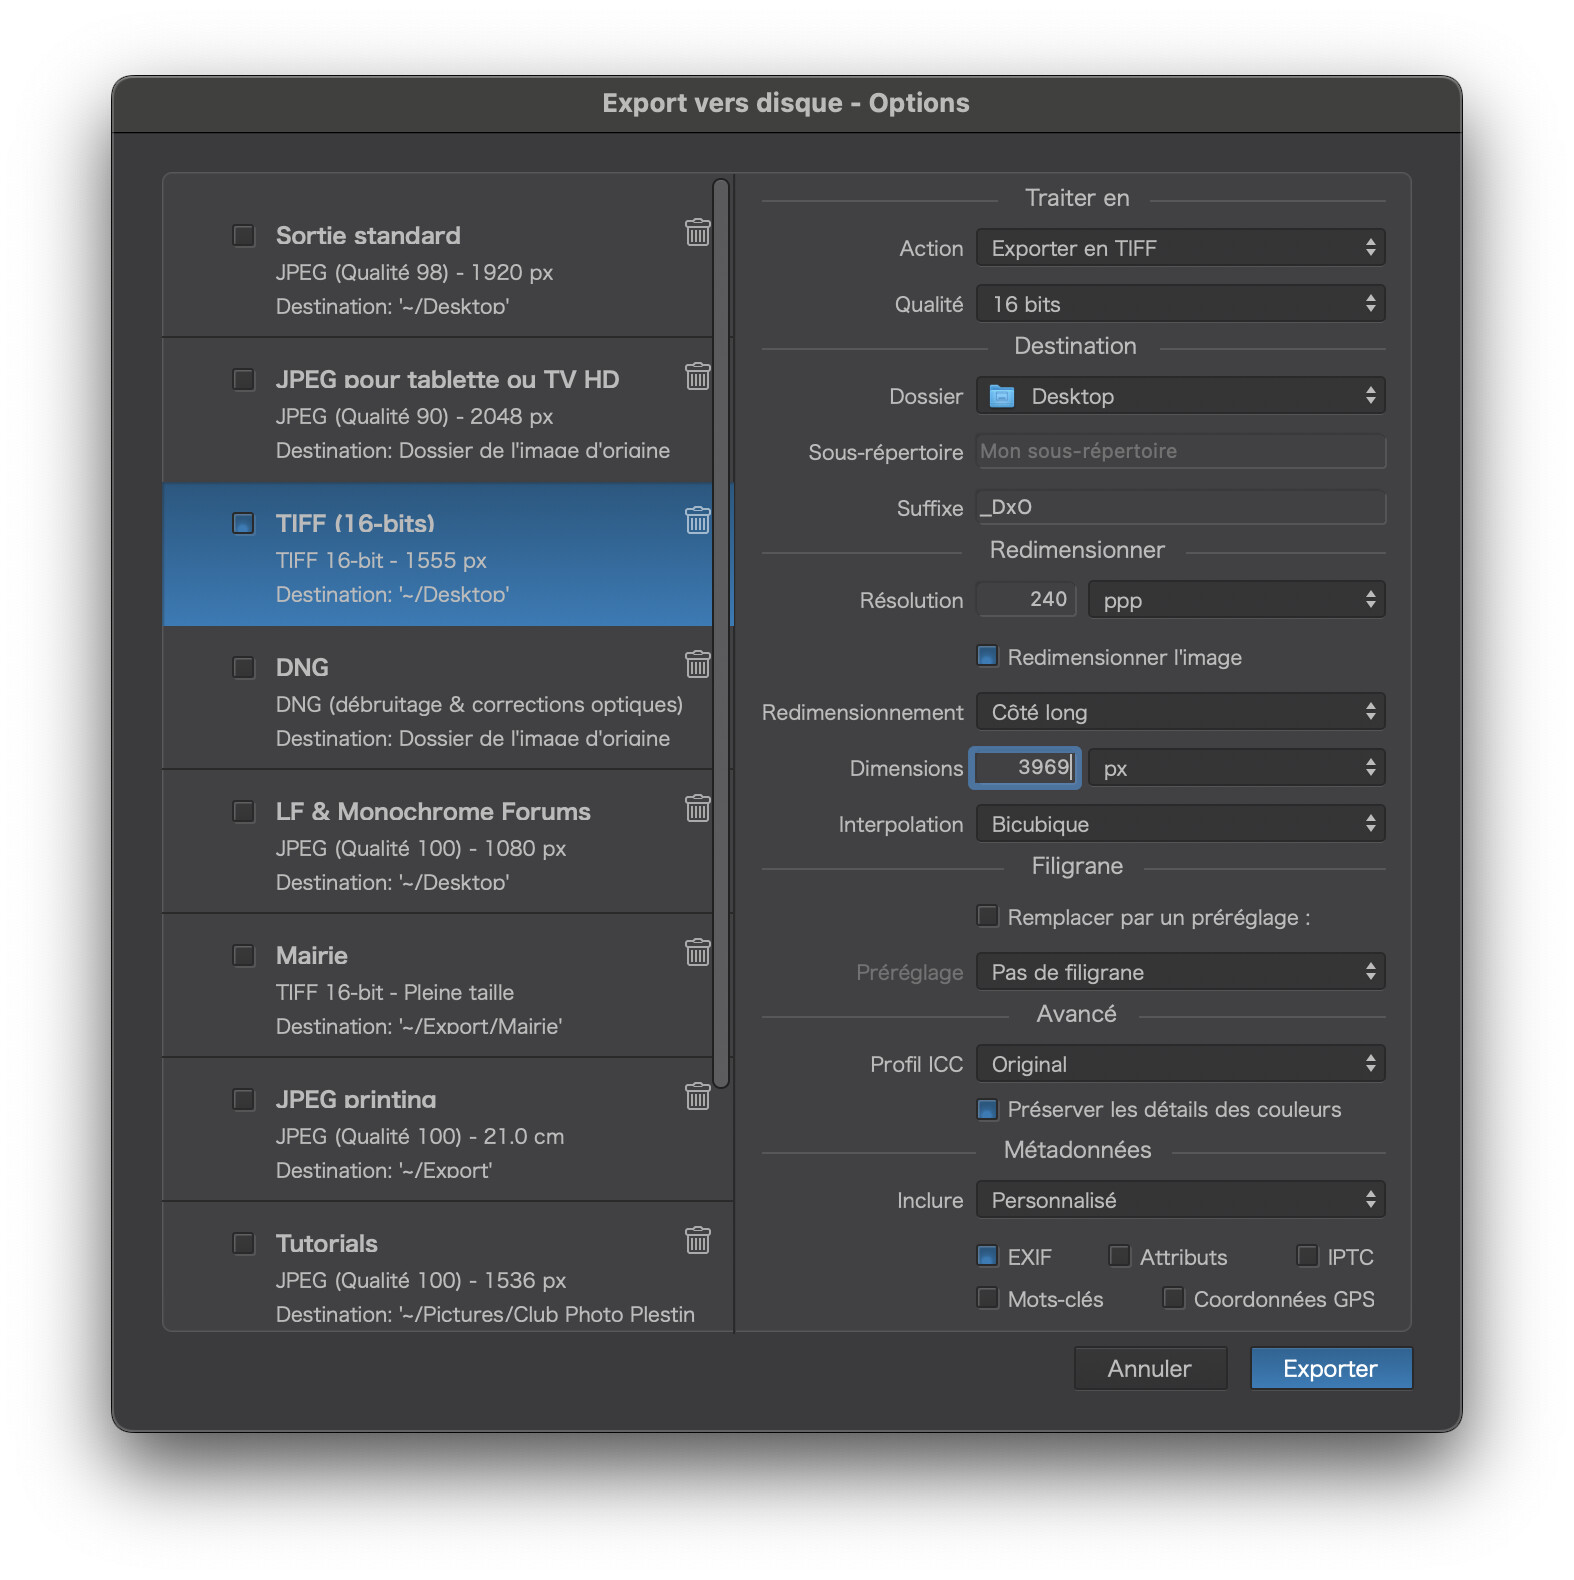
Here is my TIFF export preset for printing, with the pixel dimension for a full A3 print


If the dimensions are significantly less, then I would use Topaz Photo AI to resize it to 3969 x 2806. This will take care of final print sharpening if needed.

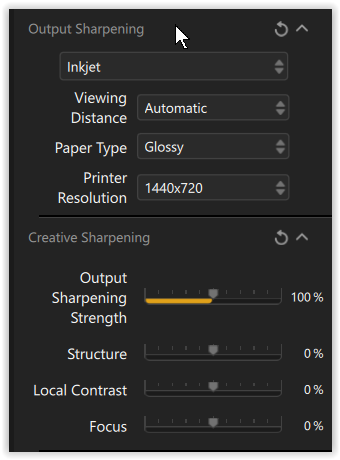
Otherwise, I have found PhotoLab’s sharpening to be perfectly adequate when resizing downwards.


With Canon’s PP&L, if you don’t set it to borderless, when you drop the exported image file on the page, you will get this


 where a border is suggested, but if you select “Image Size”, you will get


 with a barely perceptible white margin on one or two of the sides.

Which is why you select “Borderless Printing”, which gives you an image which is minutely larger than the paper size and ensures no visible border


I hope that helps. If you need more info, just ask.

Thank you Joanna for a very comprehensive reply. I will need to study that a bit more before i understand it fully.

The only reason for the 600 ppi was after viewing a youtube video by Northlight Images https://www.youtube.com/watch?v=9rE1t8woCR0 where Keith says you might as well use 600.

Thanks again Joanna

Hi Mel,

after having watched the linked video I searched for the differencies with the “print quality Standard / High” and found this
→ Canon : Inkjet Manuals : PRO-200 series : Basic Printing Setup
and how to set it (custom)
→ Canon : Inkjet Manuals : PRO-200 series : Setting the Print Quality Level (Custom)
but not as detailed as mentioned by Keith Cooper.

[ with Epson I print ‘unidirectional’ to avoid head misalignment 
 don’t know for Canon ]

.

Regarding the print margins, it seems to be media dependent, see 


(from Specifications - PIXMA PRO-200 - Canon Europe) and more here and here.

IF your paper is ‘categorized’ as Fineart Paper you might need to enlarge the margins,
hence the popup. Maybe check for custom settings to circumvent 


Thanks Wolfgang and f Joanna.

Tomorrow I will fire up the printer and try to print ignoring the “popup”
I’ll let you know how it goes