Problem to obtain "true colors" with photolab 9

Hi,

I am using an X-Rite ColorChecker Passport to calibrate my camera (Sony A7III), and I am encountering an issue. According to the X-Rite chart, the colors on the ColorChecker should correspond to specific RGB or LAB values.

I have no problem obtaining those values (or at least getting very close) when using Darktable with all processing disabled except Exposure and White Balance.

However, I haven’t been successful with PhotoLab. I disabled everything except Exposure and White Balance, tried the default settings, attempted to import and create a color profile, and even checked the exported files—but each time, the colors are off (sometimes significantly).

It seems as though PhotoLab is applying some kind of processing on its own, regardless of the user settings.

So, is there a way to obtain “accurate” colors in PhotoLab, similar to what I get in Darktable? This is quite important, as the photos are used for technical purposes, not artistic ones.

I’ll give this a try in the morning and see if I get the same results.

I found this which may be useful: Using X-rite Color Checker™ in DXO PhotoLab 8™ - Ed Ruth Photography Instructor in Bakersfield California

1 Like

Use PhotoLab’s calibration tool.

Learn more about the tool here:

1 Like

I asked my butler about this, having no experience of my own, and this is what it said (ignore personal context bias):

To achieve technically accurate color with your Sony A7III in DxO PhotoLab 9.6, we will utilize the built-in Color Calibration tool. This tool bypasses the need for external software by generating a custom profile (DCP) directly within the app.

As a professional restorer, think of this as “digitally cleaning” the sensor’s bias before you begin your archival work.

  1. The Capture Phase (In-Camera)

To ensure technical accuracy, the “baseline” image must be captured perfectly.

  1. Lighting: Place the X-Rite ColorChecker Passport in the same light as your subject. Ensure it is flat to the camera to avoid perspective distortion.

  2. Exposure: Avoid glare on the patches. Use your Sony A7III zebra settings or histogram to ensure no patches are clipping (especially the white patch).

  3. Format: Ensure you are shooting in RAW.

  4. Initial Setup in PhotoLab 9.6

  5. Open DxO PhotoLab 9.6 and navigate to the Customize tab (Press D).

  6. Locate the Color palette on the right-hand side.

  7. White Balance: Select the Raw White Balance tool (Press W for the picker) and click on one of the light-grey patches (usually the second or third from the white patch) on the ColorChecker. This neutralizes the light source.

  8. Using the Color Calibration Tool

This is the technical heart of the process.

  1. In the Color palette, find the Color/B&W Rendering sub-palette.

  2. Click the Calibration icon (it looks like a small grid/target) or the Create Profile button at the bottom of that box.

  3. An overlay grid will appear on your image.

  4. Alignment: Drag the four corners of the grid to align precisely with the corners of the 24 color patches on your physical ColorChecker Passport.

• Tip: Ensure the small central squares of the overlay match the center of each physical color patch.

  1. Chart Type: In the tool options that appear, ensure the Chart Type is set to ColorChecker Passport Photo 2 (or the version you own).

  2. Click Save and Apply.

• Give the profile a descriptive name, such as Sony_A7III_Studio_Daylight.dcp.

  1. Applying and Verifying the Profile

  2. Once saved, the profile is automatically applied. You will see the Type in Color/B&W Rendering change to DCP Profile.

  3. Technical Verification: Check the HSL Tool (Press S to open the palette). With the profile active, the colors should appear natural and “flat”—this is your mathematically accurate starting point.

  4. Batch Processing: To apply this to the rest of your shoot:

• Right-click the calibrated image and select Copy Correction Settings (Cmd + Shift + C).

• Select the other images from the same lighting setup and select Paste Selected Corrections (Cmd + Shift + V), ensuring Color Rendering is checked.

I also asked my butler “Describe how to ensure that PhotoLab is not applying some kind of processing on its own, regardless of the user settings, for that type of calibration.”

This was it’s response (but don’t blame me if the butler got into my shroom stash and is hallucinating):

To ensure that DxO PhotoLab 9.6 is not applying “hidden” corrections that could skew your technical calibration, you must move the software into its most neutral state. By default, PhotoLab applies the “DxO Standard” preset, which includes exposure and contrast enhancements.

Follow these steps to establish a “Zero-Base” for your Sony A7III calibration:

  1. Set Global Preferences for a Clean Start

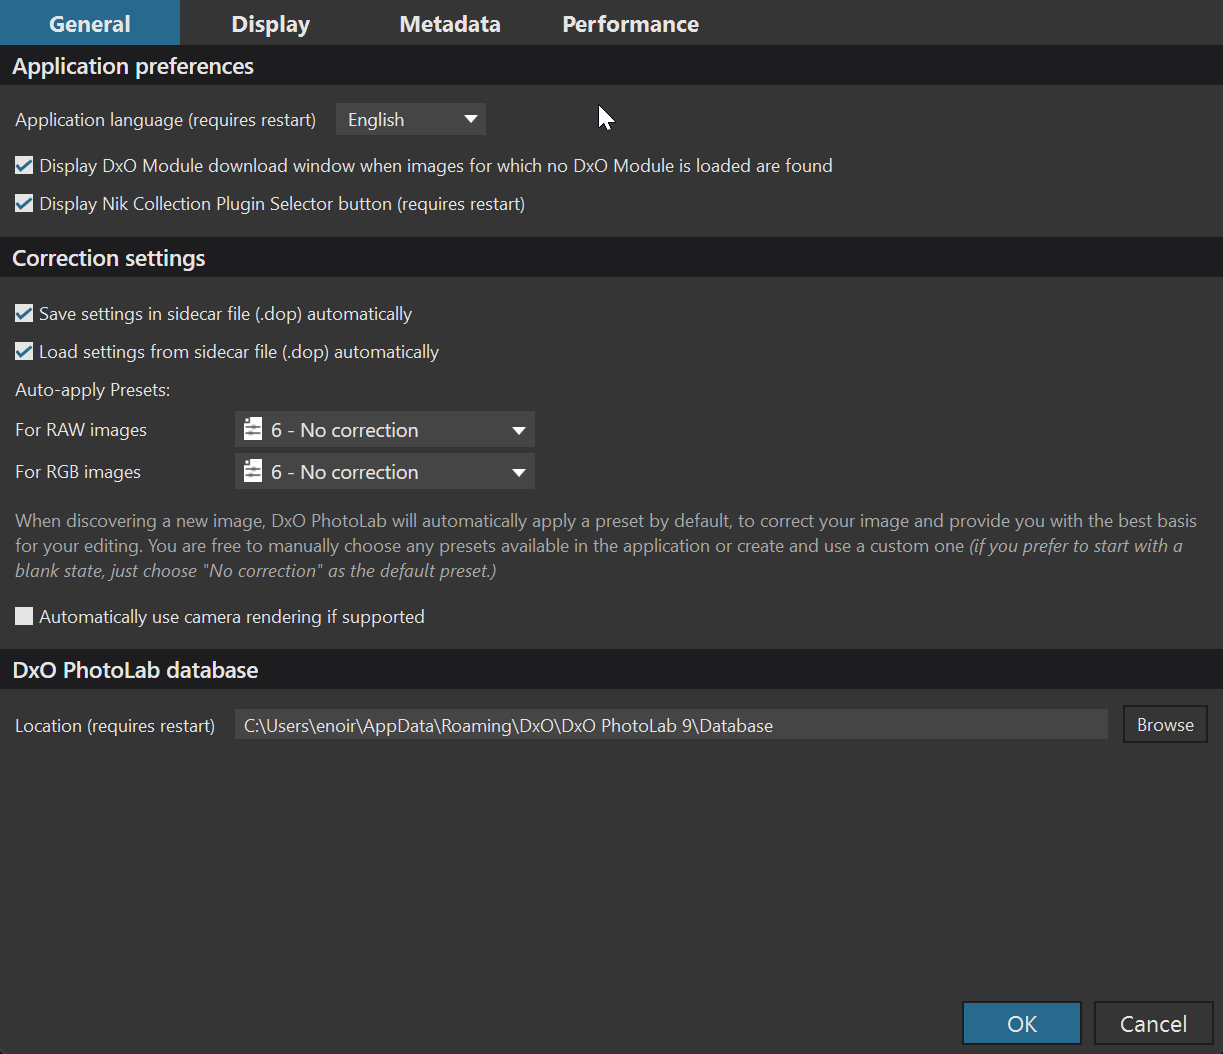
To prevent PhotoLab from automatically processing images upon import:

  1. Open Preferences (Press Cmd + ,).

  2. Go to the General tab.

  3. Under Correction Settings, change the “Default preset for RAW images” to 6 - No Correction.

  4. Uncheck the box Automatically use camera rendering if color profile is available (if visible) to ensure the software doesn’t try to guess a look before you apply your X-Rite profile.

  5. Force the “No Correction” State on Your Calibration Image

Even if you’ve changed the global preferences, existing images in your library might still have the “DxO Standard” preset applied.

  1. Select your calibration image in the Image Browser.

  2. Go to the Apply Preset button (top right) and select 0 - General Purpose > 6 - No Correction.

  3. Verify the Palettes: Ensure the following tools are explicitly Off in the Customize sidebar:

• DxO Smart Lighting (This is the most common “hidden” processor that alters tonality).

• DxO ClearView Plus.

• Selective Tone.

• Contrast / Microcontrast.

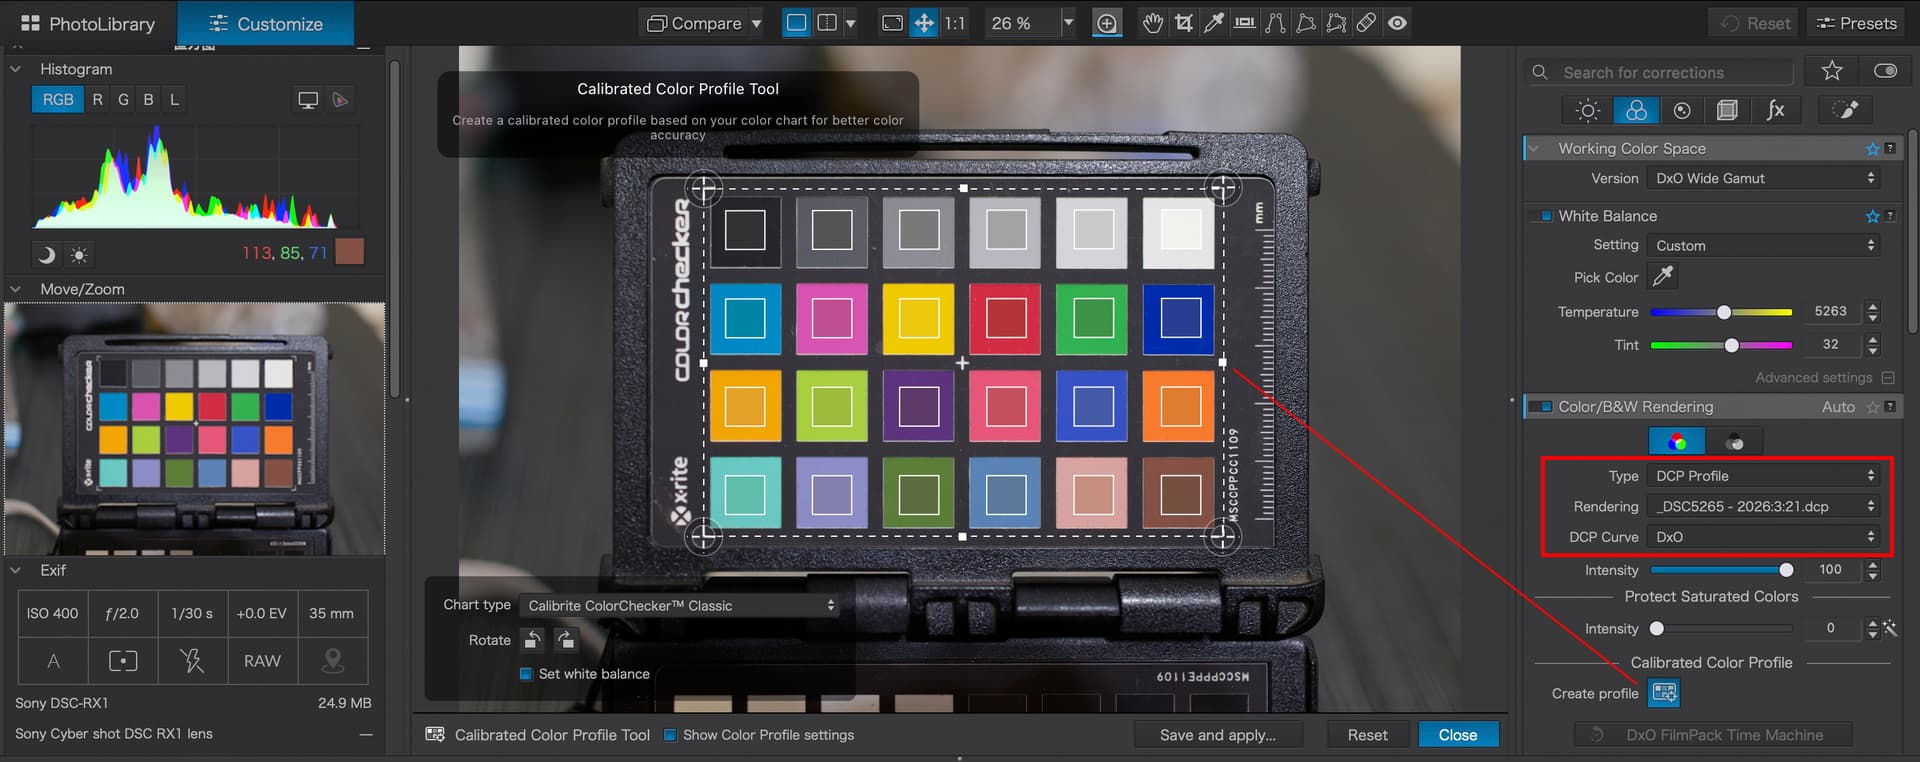
  1. Neutralize the Color Rendering Palette

Before you click the Calibration icon to align your grid:

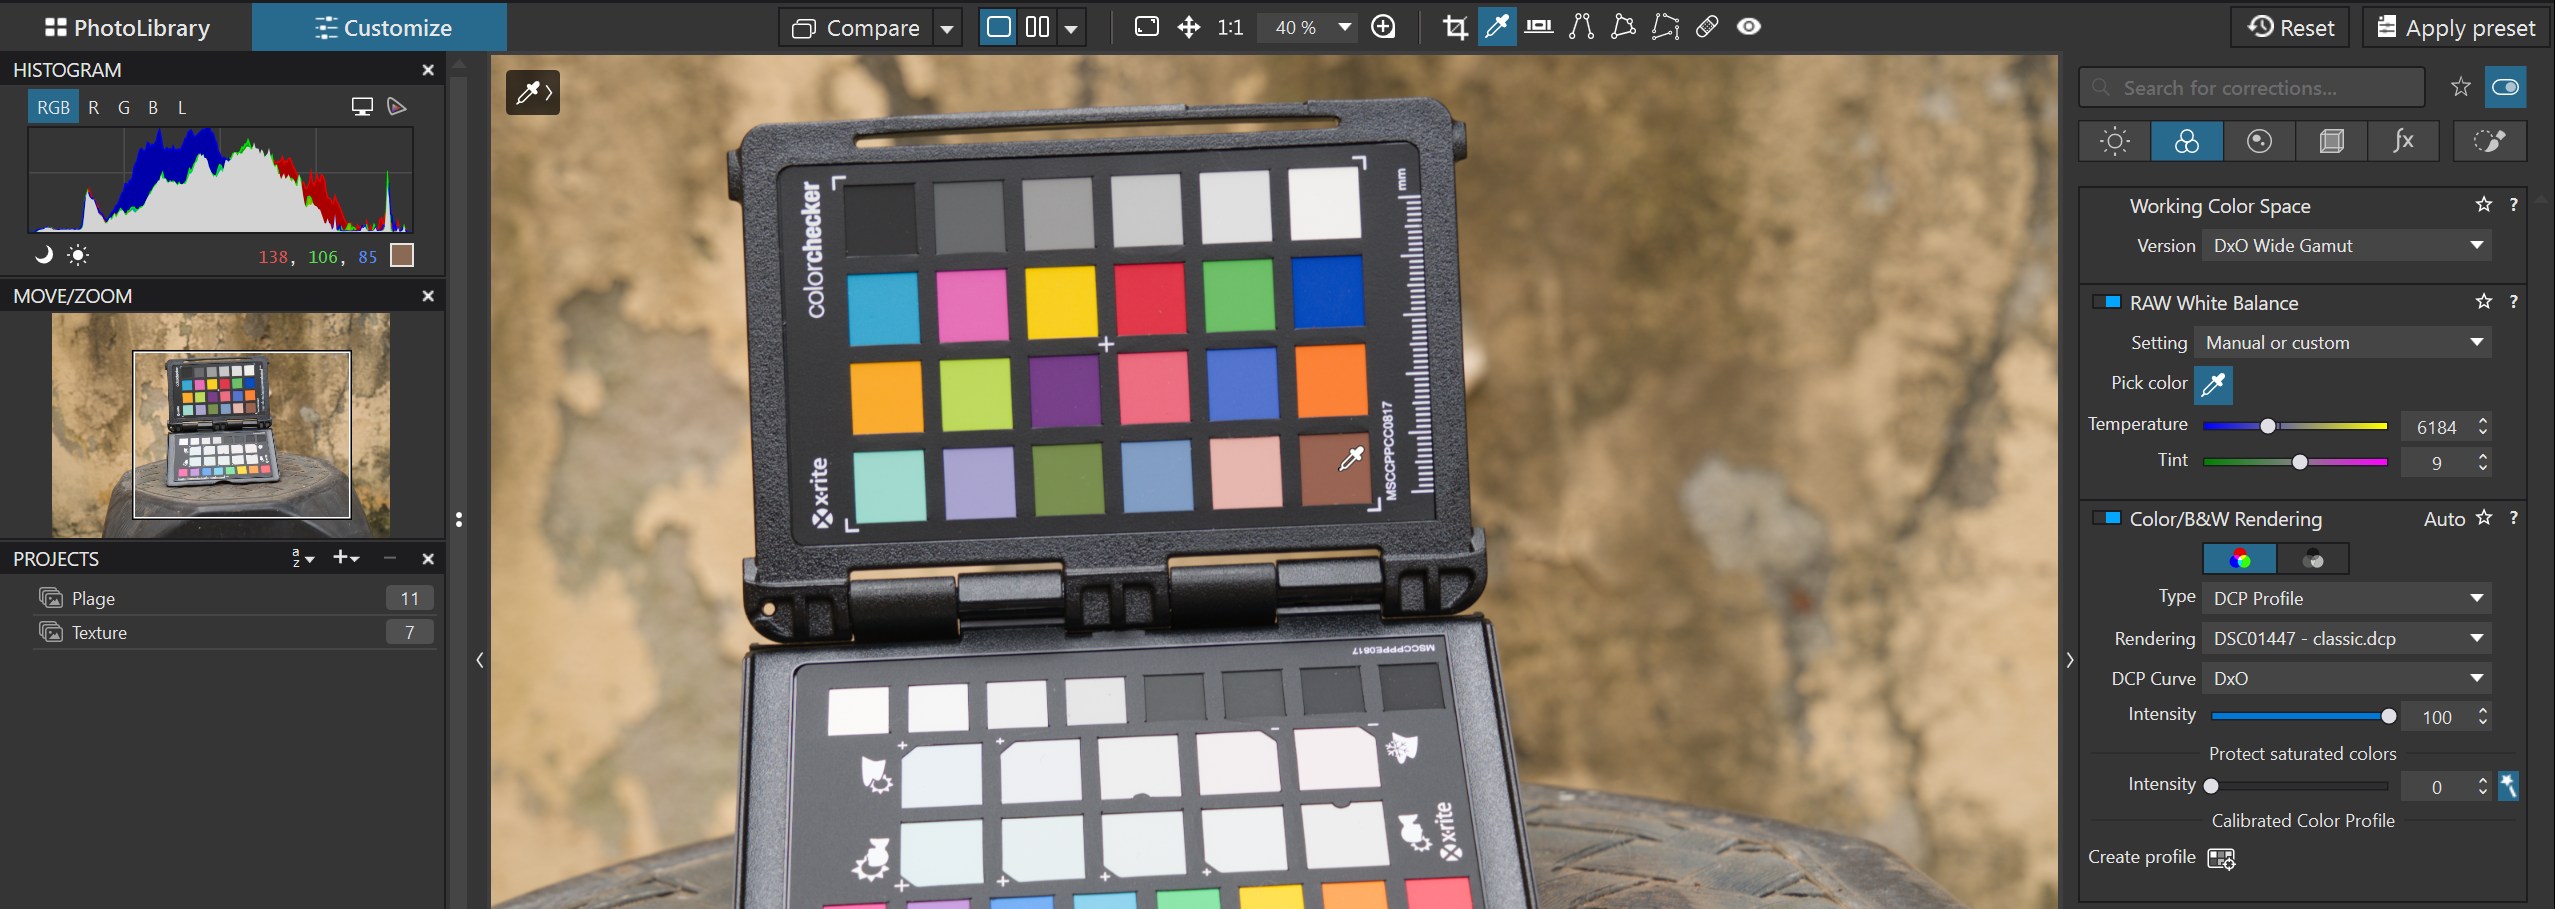
  1. Locate the Color/B&W Rendering sub-palette.

  2. Ensure the Category is set to Generic renderings.

  3. Set the Rendering type to Neutral color, neutral tonality (if using the Classic Legacy color space) or simply Neutral color (if using DxO Wide Gamut).

  4. Set the Intensity slider to 100 (this ensures you are seeing the “pure” base rendering before the DCP profile takes over).

  5. Bypass Optical Corrections (Optional but Recommended)

For technical archival work, you may want to disable lens-specific processing during the profiling stage to ensure the color patches are measured exactly as the sensor saw them through the lens:

  1. Go to the Detail palette.

  2. Turn Off the Lens Softness (or Lens Sharpness) tool.

  3. Turn Off Vignetting (Note: If your ColorChecker is large and near the edges of the frame, vignetting correction might actually help accuracy, but for technical “linearity,” most archivists prefer it off during the profiling step).

Pro-Archivist Tip: The “Linear” Check

If you want to be 100% certain the software isn’t adding a “S-curve” to your data:

• Open the Tone Curve tool (Press T).

• Ensure it is a perfectly straight diagonal line from the bottom left to the top right.

• If the 6 - No Correction preset was applied correctly, this curve will be untouched.

DXO could implement the “Butler” feature, since the necessary GPU capacity is available. Based on the original question, I would like the process steps listed here to be executed automatically. The individual steps could start with a default setting that can be adjusted by the user or interactively via the Butler.

1 Like