I have been playing with masks in PL9 to get a handle on what all options are in the new grouped masks. There has been much confusion with the new grouping feature and I believe I now understand what they do. I hope that this explanation will help others understand masking better.
I will not discuss what each mask type does but rather the options available for how they can be combined and what the options for combining them are.
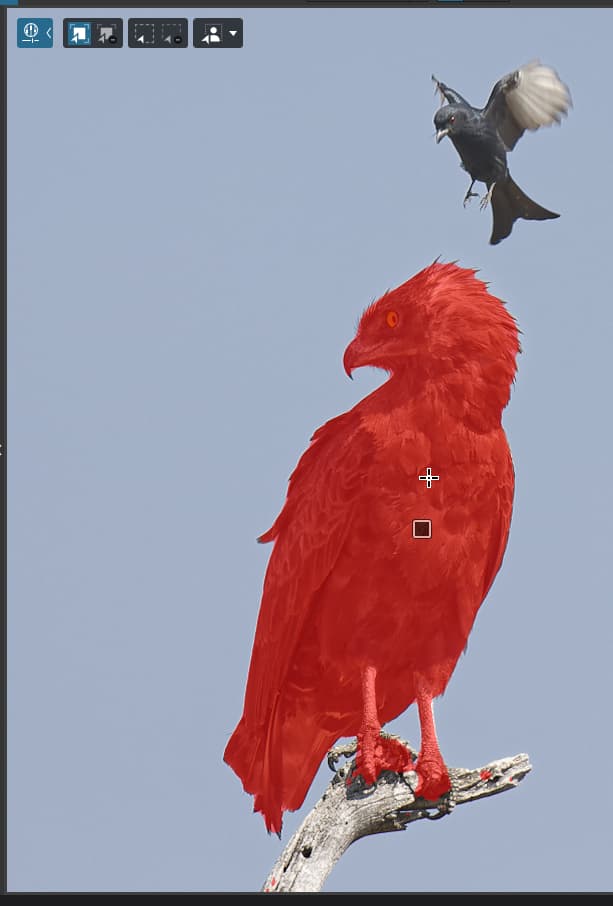
To start, I have a photo of an eagle sitting on a branch being mobbed by a smaller bird. This photo gives me the option to mask various subjects in fairly good isolation.
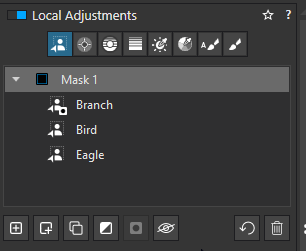
I have create three AI masks that are grouped together in a group titled Mask 1 as shown in the screenshots below. I am not using AI subject masks in this discussion.
Here is what I did:
- Created an AI Mask for the eagle by clicking on the eagle.
- I wanted to include the bird in the mask group so I
a. Clicked Mask 1 to select the mask I wanted to add to
b. Clicked the New sub mask button at the bottom of the mask list panel
c. Clicked on the bird to add it to Mask 1 - I noticed the eagle mask included some of the branch which I wanted to exclude from the mask so I:
a. Clicked Mask 1 to select the mask I wanted to add to
b. Selected Remove a selection in the overlay menus (Windows)
b. Clicked the New sub mask button at the bottom of the mask list panel
c. Clicked on the branch to add it to Mask 1 as an Invert shape sub mask
Now you may notice that the Branch mask has a little Invert shape symbol indicating this mask will be EXCLUDED from Mask 1. If you select the Branch mask and then click Invert shape you will now add the shape to Mask 1.
NOTE 1: Invert shape only works on sub masks to add or remove shapes from the mask and can be created by either the method described in 3. above or by creating a normal sub mask and then inverting it with the Invert shape option.
NOTE 2: Masks groups allow you to create a group of shapes to form a group mask than can be adjusted as if it is a single mask. Individual sub masks cannot be adjusted in isolation.
Side Note: The Invert mask button inverts the whole mask group but I find it confusing because it inverts the individual sub masks rather than just put an invert icon on the mask group name (try selecting Mask 1 and click Invert mask and see what it does to the sub masks)
Note 3: All mask types can be sub masks
Conclusion
If you have a need to join multiple areas (shapes) together into a compound mask then use sub masks to build up your mask group.
Use the Invert shape option to exclude a shape from your mask group, similar to negative control points.
Use the Invert mask to invert a mask group or a single mask that is NOT part of a group.
I hope this helps to explain how mask groups, Invert shape and Invert masks work.