PL8: The new Tone Curve - - Discoveries and learnings

As one of the most important enhancements in PLv8 (at least, in my personal view), I’ve spent a fair bit of time & effort in trying to get a full understanding of it’s features, and quirks !

The following is the result of experimentation and observation - - and even reading the user manual !! … Thanks to @Wolfgang for pointing me in that direction.

a) The main functional difference in PLv8’s implementation - versus pre-PLv8

  • PLv8 introduces the concept of a Luma (or Luminance) channel - separate from and in addition to the RGB channel(s).

  • The manual states its purpose as follows;
    image

  • This is a completely new parameter (and not one that, previously, had been somehow included “within” settings for the RGB channel) … as evidenced by this little experiment:
    – Using PLv7, make some obvious changes (on a test image) to the RGB channel.
    – Close PLv7 and open PLv8 in the same folder
    – You’ll see the changes to the RGB channel - but the L(uma) channel will be “neutral”.

b) The new L(uma) channel is completely separate to & independent of the RGB channel

  • The built-in presets provide a clue to this in their labelling … For example;
    – the “Light Contrast (RGB)” preset assigns settings ONLY to the RGB channel
    – the “Light Contrast (Luma)” preset assigns settings ONLY to the Luma channel
    – the (RGB) and (Luma) presets are designed to be used in combination, without overriding each other.

  • ONLY the “Linear” preset assigns settings to BOTH the RGB and Luma channels.
    – in which case, I reckon it would have helped in our understanding had the Linear preset been consistently labelled; “Linear (RGB & Luma)”

1 Like

Some UI features of the new Tone Curve implementation (that were not immediately obvious to me).

  • Looking at the (activated) Tone Curve, there’s (very !) subtle grading of its grey background - - being lighter in the top-LHS zone … to indicate that movement of a curve-point in that direction will result in lighter tones - - and darker in the bottom-RHS zone (for the opposite indication).

  • The Histogram showing in the background reflects the state of the histogram as it was without any Tone Curve changes applied (intended as a reference point). Changes made to the Tone Curve are not reflected in this background Histogram - one must refer to the main Histogram panel to see the impact of such changes.

The Tone Picker tool has some nifty features; image

  • Activate it and move the “picker” around the image - and you will see reflected on the Tone Curve where the tones (beneath the picker) are represented.

  • Click on any point (on the image) and a “point” will be created on the Tone Curve that reflects the corresponding tone (beneath the picker) in the image.
    Note, tho, that any changes to the Tone Curve point will affect ALL instances of the corresponding tone thru-out the image … not only to the area just beneath the picker.

  • And, my favourite feature ! … Click and hold the picker on the image …
    – a new point will be created on the Tone Curve (reflecting the selected tone)
    keep holding-down the mouse - and now up/down movements of the cursor will result in corresponding changes to the point on the curve for the Y-axis.

Deleting Curve-Points … -

  • Points can be deleted by clicking on them and pressing the Delete key (but not the Backspace key, as the manual incorrectly suggests !) … This perpetuates previous PL behaviour.

  • Or, by double-clicking on a point … Emulating LR behaviour (apparently).

4 Likes

Using Gamma settings on the Luma Curve

The Gamma slider has always been available to adjust “tonal contrast” (my terminology - I’m not a color science expert - I hope I’m not offending any purists reading this).

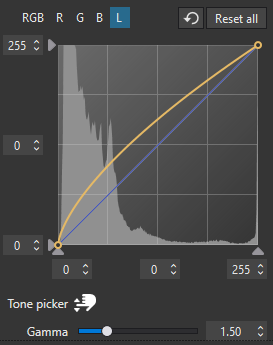
  • Moving this slider to the right (effectively, in a visually perceptive sense - see above !) will globally “brighten” the image … and moving it to the left “darkens” the image.

  • And, the result is applied in a manner (logarithmically, perhaps?) that impacts “darker” areas of the image more so than “brighter” areas - thereby protecting highlights.

So, given that the new Luma channel is completely separate from the RGB channel(s), using the Gamma slider on the Luma channel alone should be a simple and effective means of “brightening” under-exposed images whilst protecting highlights and colours.

  • Like this: image - Gamma = 1.5, on Luma Curve (only)

  • I’m not yet convinced, tho, that this is working as effectively in practice as it sounds in theory (?)


Edit: See below for results of testing for this speculation.

1 Like

Creating custom Tone Curve presets … is straightforward and easy to do.

I’ve tweaked a couple to include “handles” for easier manipulation of Curve Points - Available here for download;

JohnMDefault(RGB & L[Gamma]).preset (1.0 KB)
JohnMLinear(RGB & L).preset (1011 Bytes)

They should work equally for Win and Mac.

  • Installation for Win users - - Save the ~.preset files into folder; “%UserProfile%\AppData\Local\DxO\DxO PhotoLab 8\ToneCurves

  • For Mac users … @Joanna or @platypus ???

2 Likes

That will be ~/Library/DxO PhotoLab v8/ToneCurvePresets

1 Like

Although I didn’t notice the subtle misdirection of the Linear preset (which really is not so much a preset as a reset), I did ask DxO to include the bracketed channels on user presets also.

But here’s the fun bit I just realised. It’s not as simple as “RGB” or “L” or “RGB + L”. It could also be “R+G+B+L”, for example. Because the “RGB” curve is separate and distinct from each of the R, G, and B curves.

You could boost the blue midtones, drop the red highlights and S-curve the greens, and also make some adjustment to the RGB curve and Luma curve.

At this point I think letters just get confusing. I imagine one or more coloured dots — red, green, blue, and white, plus a “triplet” RGB dot.

1 Like

As always – use the presets that come with the all-new tone curve as starting points.

Modify them if necessary and save them as custom presets.
Screen Shot 09-21-24 at 10.44 PM

Thanks, John. Very good summary of new PL8 features!

1 Like

This is not about editing but maybe some will find it interesting, if not already known and explained elsewhere.
I tried RGB and Luma “spike curves” on the 16 million colors 8-bit and 16-bit TIFFs, attached.
The experiments with these presets and Working Color Space choices make me scratch my head…

As a side remark: I wanted to add (99,0), (100,255), (101,0), (255,0) points but for RGB channel it wouldn’t let me add (101,0), so I used (102,0) instead. Looks like yet another minor bug.
You may also play with the gamma presets attached. They are all “full presets” in terms of tone curves.

Gamma_V0.50_L2.0.preset (577 Bytes)
Gamma_V2.0_L0.5.preset (576 Bytes)
Spike_L100.preset (624 Bytes)
Spike_V100.preset (647 Bytes)

16m8b_rgb.tiff (1.4 MB)
16m16b_rgb.tiff (2.7 MB)

You should send DxO a bug report on this, as it’s unlikely they’ll see it otherwise.


I just tried and succeed. On RGB, R, G, B and L channels.
Drag points or enter numeric values works and I can set desired values.

PL8.0.0 build 417 Win11.


How did you manage to get the tone curve presets you provide ? And how to load them in PL ?
I can save presets internally in PL, but find no option to save to and load from disk. Which can be usefull and should be a mandatory option for any preset.
Have you these options or did you copy them manually from where PL saves them ?


What makes you scratch your head ? What does not work as expected with those charts and presets related to color spaces ?


I suceeded for L channel but not for RGB. If I enter 101, PL resets it to 102, even though the “previous” point is (100,255). Strange. I’ll try to edit it directly in the file tomorrow.

ToneCurve presets on Windows are saved in “%LocalAppData%\DxO\DxO PhotoLab 8\ToneCurves” and that’s where I copied them from after saving in PL. That’s probably configured in the local user.config, which I don’t dare to touch.

It’s unclear how (r,g,b) is transformed by the curve. Look at RGB curve with WCS set to ‘Classic (Legacy)’. I don’t get the meaning of ‘x-axis’ and how the corresponding y-value is used. It seems that in this case the RGB channel x-value 100 corresponds exactly to (r,g,b) pixels with at least one component equal to 100. This is very strange to me.

EDIT: Removed an edit which was obviously wrong for linear tone curve.

I think that the mapping for RGB is simply (r,g,b) → (f(r),f(g),f(b)), where f represents the curve.

The problem with Spike_V100 was that it had (99,0),(100,255),(102,0) points (102 instead of 101 for the last one, because PL8 “corrected” entered 101 value to 102), and PL8 internally changed f(100) and f(101) values, probably to smooth the curve. This was what confused me.

I managed to get a good RGB spike at 98, i.e. curve with points (97,0),(98,255),(99,0):
Spike_V98.preset (666 Bytes)
This curve is for some reason not “smoothed” by PL (how it could do it?), and the formula holds. Conversion to floating point numbers and roundings may also interfere.

For Wide Gamut, the input (r,g,b) (assumed to be in sRGB) are first transformed to WideGamut before applying the above formula, hence different outcome.

I used the 16 million colors 16-bit TIFF provided by @Wlodek (See above) to test this speculation … and confirmed that the Gamma slider on the Luma channel does do a better job of “brightening” an image - c/w using the Gamma slider on the RGB channel.

  • I created a VC of the image, and applied Tone Curve = “Linear” for both the (M)aster and the VC versions … then;

  • For the (M)aster version, I set the Gamma slider = 2.5 on the RGB channel - - and the Gamma slider = 1.0 on the Luma channel.

  • For the VC version, I applied the opposite settings … setting the Gamma slider = 1.0 on the RGB channel - - and the Gamma slider = 2.5 on the Luma channel.

  • Then, using the Compare button, I checked the result on both versions … to find much better colour retention for the VC version - whilst achieving “just-as-good” brightening (according to my eye) to what was achieved for the (M)aster version.

1 Like

Something I’m finding quite annoying, when for comparison purposes I’m applying different settings to different channels across multiple images, is that channel selection is not “sticky” !

That is;

  • Every time a new image is selected (from the Image Browser), focus always returns to the RGB channel.

  • So, if making (for example) changes to the Gamma slider for the Luma channel on multiple images - one must be diligent to re-select the Luma channel after switching to a new image.

2 Likes

You can copy/paste just the ToneCurve to multiple images and then fine tune the gamma individually, without having to select L each time. But you probably know it very well and so the “stickiness” point holds.
EDIT: Oops, that doesn’t work either. Sorry.

Some other basic observations:

  • On grey pixels L curve operates as expected, with a small error (up to 4% ?).
  • For constant L=0 curve (i.e. only with (0,0) and (255,0) points) you will not get completely black picture, like you would get for the RGB version (although all greys will go black).
  • Similarly for constant L=255 curve (i.e. only with (0,255) and (255,255) points) – you will not get completely white picture, like you would get for RGB=255 curve (although all greys will go white).

I think that most tools in PhotoLab return to a default state when changing images and in fact I prefer it. It may be inconvenient if you want to apply similar settings individually to multiple images, but most of the time I process each image separately and want a standard starting point .across all the tools. There are a few sticky features that I don’t care for, most notably the global HSL color wheel’s hue picker and the selected color range which I have to remember to reset when changing images . I also have to remember to deselect the most recent LA mask when changing images, which I find annoying.

Mark

Yes - that’s VERY annoying !!

A “nice to have” …

For the HSL tool we can Click-&-Hold on any of the channels and the settings for that channel will be momentarily re-set/undone … which is a great help in evaluating settings for that channel

It would be great if the same feature applied for Tone Curve channels … To reset (say), the Luma channel to a Linear curve (just for the time that we Click-&-Hold on the “L” channel).

2 Likes

YES, still a real bug since PL7 and if there is a reason to keep the LAs edit mode active,
it shows the need to reinsert a visible LA icon/switch in the top bar like in PL 6.

@DxO_Support-Team

4 Likes