In my experience rolling the mouse past each entry is much faster. It’s not that the arrow keys are slow, they’re just slower than passing the mouse over the list.
Mark
In my experience rolling the mouse past each entry is much faster. It’s not that the arrow keys are slow, they’re just slower than passing the mouse over the list.
Mark
I’ll let you have the last word on this one, Mark.
Hi John,
It is not a contest. ![]() . Just relating my experience.
. Just relating my experience.
Mark
It seems there may be some misunderstanding regarding the functions of the HSL tool and the hue mask. To clarify, the HSL tool allows you to select a specific hue range (e.g., red) and adjust its hue (for example, changing red to blue).
On the other hand, the hue mask creates a mask based on a selected hue range (e.g., red), allowing all reds in the image to be masked. You can then apply any correction available in the local adjustment to that masked area. After creating a hue mask for the reds, you could still use the local HSL to shift their hue to blue.
Before suggesting that something may be confusing for ‘users,’ it’s important to understand the intended functions of each tool. The suggestion to deactivate the local HSL when a hue mask is created doesn’t quite align with how these tools are designed to work.
Ian.
Ok. I din’t understood that either. Good.
I suppose saturation, luminance and uniformity sliders work too ? Or not ?
Anyway @John-M summary is very helpfull.
Hi John and others
I’d like to add two important details:
Pascal
John
I had the opportunity to talk to the DxO team about this point.
Curve presets are “partial”.
This means that they complement each other.
I admit I don’t understand this choice choice for a initial proposal.
Pascal
Which leads again to a long lasting problem : the lack of technical documentation from DxO. We already had long discussions about the new color workspace when it appeared without any definitive explanations from DxO. Now, a new topic is emerging. Implementing sophisticated functionalities is useless if we can’t understand how they work.
Hi John,
coming back to your comments & observations
Hue Masks;
…
However, there’s a conflict to be aware of - For example ;
– Set the HUE Mask for a range of reds/oranges in an image … and then select the blue-channel via the HSL sub-tool and attempt to change its Hue … and, of course, nothing happens - because the HUE & HSL selections are mutually exclusive.I’m all for avoiding confusion for users, in which case, it would have made better sense for the conflicting HSL sub-tool to be disabled when the Hue mask is active.
The Hue mask allows to select a color range to then apply any Local Adjustment.
Currently it “replaces” the → missing picker in the local HSL tool

Improved Comparison mode;
…
…
- It’s mildly confusing, tho, that all VCs with Soft Proofing activated are labelled as such (instead of as “Virtual Copies”, which is what they actually are).
No, labeling things as they are helps keep track of things.
New Loupe tool;
…
a little tip
For example, you want to know which noise reduction settings are appropriate. When you use the New Loupe tool, you get a live review, which is great. However, the calculation may take some time (depending on your computer).
To circumvent make use of a Virtual Copy.
apply the first settings to your file (you can mark it as “reference file”)
make a VC and apply the second setting (active file)
invoke the New Loupe tool, which shows the active file
click and hold the Compare button to compare with the referenced file
(otherwise select comparison) until the first settings appear rendered
both renders are cached and you can toggle between them instantly !
Missed opportunities !
…
(about) the new Local Adjustments user-interface
- It would/could have been a great opportunity to slay this disadvantage (of the new LA UI over the old LA Gizmo) by highlighting changed LA sliders in similar way that changed Global sliders are highlighted … Perhaps, something like this;
.
YES, please mark those local adjustments, that are not at their default position/value.
greetings, Wolfgang
This is a thorough and fair assessment of PLv8 upgrade, I reckon.
That’s a good/fair observation, Ian - but … it’s only partially correct;
One must be savvy enuff to understand that (using your example of working with “reds”) the HSL sub-tool will actually work only if it has been set to operate on the same range of red hues (or, a sub-set thereof).
I still reckon this will be confusing for users - and I would have preferred that the new Hue mask came with some in-built protection to avoid (inevitable) user confusion.
My humble apologies - You may consider me suitably admonished ![]()
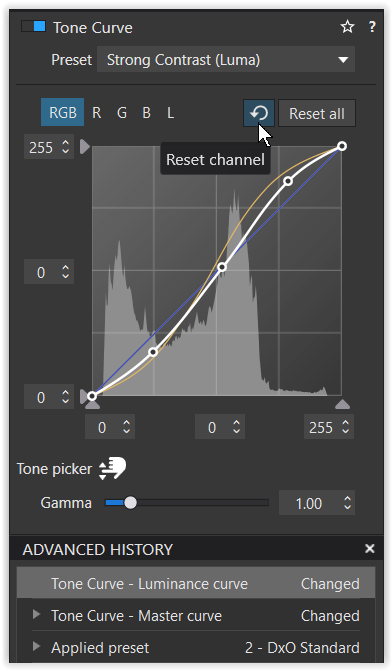
For clarification: I used the term “Luminance” as per its reference within the Tone Curve.
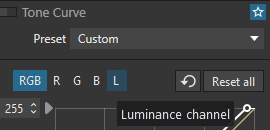 - L = Luminance Channel
The user manual has a bet both ways, with the following explanation ;
... the L channel, for luma or luminance, lets you adjust tones while preserving color.
Yes, the built-in Tone Curve presets are “partial” (in that some affect only the RGB channels - and others affect only the L channel) … and ONLY the “Linear” preset affects ALL channels.
I’m finding there’s quite a bit of nuance in the result of separation of the Luma/Luminance channel from the RGB channel (for which, previously, it was combined within). I reckon it will take me some more experimentation (and pondering) to understand this properly.
Regarding the new Enhanced Tone Curve, I noted;
To see this in action, select each of following Tone-Curve presets in the order listed ;
Now, Ctrl+Z will not undo those selections in reverse order (as is expected when using Ctrl+Z).
Actually, that’s not quite accurate !
– The RGB and Luma settings will be “un-done” - but the result will not be reflected in the Preset-label displayed … which is what makes it confusing !
The issue does not arise if ONLY RGB-specific or ONLY Luma-specific presets were selected … it occurs when a mixture of RGB AND Luma presets were selected.
A truly insightful thread. Many thanks to you all!
Yes, agreed. And whose job is that? DxO piles up new features without taking the time to produce the decent technical documentation we’ve been asking for for years. After each new release, the “try-that-and-guess-how-it-works” game starts all over again, and we’re glad that John-M and others are trying to sort out the mess for DxO.
It would have been a very nice resource to have a white papers library explaining various features and technical implementations of them.
When I started to use Lightroom some 12 years ago, the Adobe’s white papers had a strong business bias and were rather poor. Official whitepapers always carry some procedural burden. But some of their (famous) designers were still full of enthusiasm and shared much of inner workings and intentions on the forum, without having to care too much about corporate secrecy rules. Spending two days on their forum was worth two months of practicing. It’s much different now, so it’s a point for DxO to activate their people here. Decent SmartLighting explanation would be my favorite topic.
Some initial observations. PL8+FP7+VP4/Win11, i7 14th gen, RTX 4070, 32GB RAM, 2 M.2 disks, Nikon cameras here. Switched to PhotoLab some 10 months ago from old Lightroom. Just finished in PL8 a 500 photo project (concert in badly lit room, some very noisy images) and 900 snapshots for private use (landscapes, nature, streets, people, mostly in good light).
PL7.9 → PL8.0 upgrade went smoothly. My presets, preferences, main and modules databases were carried over automatically (I have entered the license key during installation, if it matters). The preview and thumbnail caches (10+ GB in my case) were NOT migrated, probably because it would require re-rendering to be in sync with the new engine, which could take days. EULA and 37 days offline limit are still the same.
Loupe:
At least 50% of my images are taken at very high ISO, so inability to display live DeepPRIME results was my first concern, when I switched to PhotoLab (PL7). It took me several months to “learn” DeepPRIME in PL7, with my preferences changed several times after dealing with new types of photos, noise level, particular subject properties, color temperature, and even the lens. I hope I’ll learn DPXD2S much more quickly because of previous experience AND the loupe. That said, I would like to have two or more loupe dimensions to choose from (small ‘±’ button could be used in loupe for more than two dimensions). I have quite strong hardware and I can choose to wait, say up to 7 seconds, for the final preview to appear. But even the current implementation made my workflow noticeably smoother and faster.
Still missing: Full preview on demand. Generally I look for emotions or harmony more than for details. Hence for most of my work I use the whole image displayed on a 4k monitor for overall perception judgment. I look at 100% or 200% only if the image is exceptionally good and worth pixel-peeping, or if the image resized to 4k monitor looks suspicious in terms of focus or artifacts. Given the fact that some other corrections are displayed only at 75%+, and I started to use 45mpx input (which uncropped is well below 75% treshold on 4k), the full correction preview on demand is still missing. Loupe shows only 100% resolution or more, so it’s not meant for this purpose, even if it could be enlarged. Currently I use the workaround given by @Wolfgang recently somewhere in this forum (export + ‘Compare’), but full preview on demand would distract less.
DeepPRIME XD2S:
Hard to say what’s missing here, as we are at the edge of technology. Surely, there are known algorithms using object recognition to better deal with noise, but they are too energy greedy for practical home use and are even more prone to artifacts. Maybe they are/will be offered in a cloud, like some AI Microsoft services in the future, after restarting the Three Mile plant they bought recently. But that’s getting crazy…
Tone Curve:
You can use ‘level indicators’ to precisely set coordinates of anchor points. This is of particular importance for deep shadows, where PL7 ToneCurve usefulness is questionable, IMHO. Few months ago I asked for ‘DeepBlacks’ selective tone slider in PL7, but now one can emulate “DeepBlacks selective tones slider” to some extent using the ToneCurve and level indicators. Also the histogram at the curve background gives some hints for choosing anchor points. I almost never used ToneCurve in PL7 but this may change in PL8.
Filmstrip performance:
I often work on projects which start with 3000 images, so I appreciate the difference. ‘Select all’ is much faster. Usually such improvements come at a price, but so far no bad side-effects seen (using it few days only, though).
Compare tool:
Nice to have new functionality, although I don’t use it too often. Most of the time I use “press and hold” the Compare button.
Missing: switch to synchronize magnification and navigation, while comparing side by side two images coming from the same source.
Hue mask:
I used it for fun on one photo to change the shirt color. It worked really well but the subject was too easy to make a general, reliable opinion. I rarely use local adjustments anyway (except for retouch, but that’s generally considered not to be LA) and only if they don’t require too much time. Most of it is adjusting slightly face exposure, which is usually easy.
Missing: Some combination of luminance and hue mask would probably be useful for me. Maybe some polygon tool to limit the mask area quickly (like in Nik?).
Missing: Better face recognition in SmartLighting. It seems there’s no improvement here. But that’s a rather minor issue for me, as I often add some other areas anyway.
I’ve lost faith in DxO’s quality control after recent huge memory leak during exports on Mac. So far I haven’t experienced any major issues with PL8.0, typical for new versions. It looks more like a minor release. I’ve documented elsewhere in this forum two minor bugs with PL8.0, one with tone curve and one with compare side by side. These are obvious and should have been detected by DxO acceptance tests, so my doubts about DxO QC still remain.
I have the inverse problem and will post images.
Moiré problems wich do not exist at all in PL6 XD appear strong in PL8 XD2s in feathers.
Sharpness lacks. Differences are very visible on feathers I checked. Not in a more natural way. Images will talk. With evidence.
This maybe is not du to deepprime XD2s but maybe to the new lens modules.
I’m still finishing my tests.
Agree 100%. That’s what I miss too.
Here too.