PhotoLab 5, sharpness and focus

I looked out the window to see a mostly clear day, but it was still hazy - looking at downtown Miami it was all dull, not much contrast, bit I could see lots of detail. However, there were seven cruise ships tied up in the Port of Miami - I’ve never seen more than that.

So I set up the tripod again, and tried with my M10 and a 50mm, which didn’t get in all the ships.
I tried then with the M10 and my ancient Summilux 35mm, but the results were not sharp.
So, back to the D750, this time with my 24-85, but zoomed in to just capture all seven ships.

Working on that image is discouraging. I don’t know enough “tricks” (techniques) to compensate for the blur due to moist or dirty air. I did the best I could, then tried to use much of what @Joanna taught me to make the image better. I didn’t find a good way to crop the top and bottom, leaving the “panorama” that I wanted to show. At 100% size, it looks fine on my display, but not razor sharp. Maybe that’s as good as it’s going to get, unless I do this again when the weather is better. It was like shooting through a dirty filter.

For better or worse, here are the results:

MM2_0198 | 2022-02-19.nef (26.1 MB)
MM2_0198 | 2022-02-19.nef.dop (35.0 KB)

yes sorry type error
without processing
are you on a mac? then @Joanna can help you more effective.
what i do a workflow is
1 use FRV as first culling app.
2 then Adobe Bridge, aslong as dxopl isn’t safe enough in building without destroying xmp’s, to add keywords and iptc data along the exifdata of the rawfile.
3 open DxOPL and start editing
(if i need to check something like under of overexposure % i export to FRV 2.0, and other things wile i am there.)
and continu after that in dxopl.
i use it as checkingtool for exposure on rawlevel (histogram in dxopl is srgb or adobergb)

Yes, I’m on a Mac.

My workflow is to ingest images from memory cards using PhotoMechanic, which renames files and folders in an organized manner. Normally, I do any culling while still in PhotoMechanic.

From there, I open images in PhotoLab 5, and do my processing.

As I recall, there were good reasons to use FRV - maybe I should use it after ingesting images with PhotoMechanic? You write that you are checking exposure in FRV. I guess I’d like to learn (re-learn) how to do this.

I mostly try to follow @Joanna, @Wolfgang, @Platypus, and now you. I’ve always struggled with what you write, but once I figure out what you mean, it has always been very helpful.

By the way, I don’t understand what is going on outside. I just took a snapshot with my D750, same lens, same everything. The “smog” or whatever it is, is awful. Shooting “into” the sun makes it even worse:

MM2_0202 | 2022-02-19.nef (29.5 MB)

I think the camera is working fine - here is an earlier photo taken right outside my building:
MM2_0200 | 2022-02-19.nef (26.4 MB)
Viewed at 100%, to me it shows off what the camera and lens are capable of.

Maybe ignore my cruise ship image - like I said earlier, I think it was like shooting through a dirty filter.

This might explain it, if I knew enough to understand the details better:

well , that’s no surprise for me. most people have problems to follow my mind bobbles when it’s out and about spinning as a wheel.
i always have a clear internal view of what i want to hand over as in a filmstrip/movie with lots of branches of extra details and options to do when you can or need but then slowdown to the processing speed of the listener that’s a problem. a mental image transferring to words is as compressing a 3D dts5.1 UHD movie to plain FHD 2.0 stereo movie => lots of info gets lots in translation :slight_smile: :crazy_face:

I have found it’s well worth the effort to try to understand what you mean. It would be helpful If you had a “roadmap” at the beginning, and/or a “review” at the end, to summarize things in an easy to understand manner.

The way things are, I try to figure out where you’re going, then think ahead, only to find out shortly after that I made a mistake, and am now lost. So, I go back to the beginning, and start again.

Example - for what you wrote about FRV, it would have helped me if there was a short paragraph at the beginning outlining what you were then going to write, and I would follow it more easily. For someone who can’t spell FRV, let alone use it, it would better if you had first written FRV has the following two tools to display sharpness, or the lack of, in an image, and then wrote what you did. I found myself looking at green/yellow lines, with no idea what they did, why they were there, or what they were telling me.

Had you given me a short summary first, then gone into the details as you did, I would almost certainly understood what you were saying better than wondering what the funny colored edges were there for.

:slight_smile:

In my case, it meant going back to the beginning of what you wrote, and starting over, and at the same time, searching for information on FRV which you certainly helped with your links. I’m sometimes slow, and always very stubborn, and persistent, and if I think it’s coming from a good source, I’ll take forever trying to understand. And, as I’ve done before, I’m likely to mis-understand, and come up with some silly explanation of what you wrote. Sometimes I am very slow to learn the most basic things…

Or, as I was taught long ago:

  • Tell people what you’re going to explain.
  • Then do the explaining.
  • Then give a summary

Maybe think of all of us as being totally ignorant of what you’re talking about, or at best, misinformed. :slight_smile:

1 Like

It seems to me like the biggest detriment I have in capture a sharp image of distant objects has nothing to do with me and my gear, but the weather.

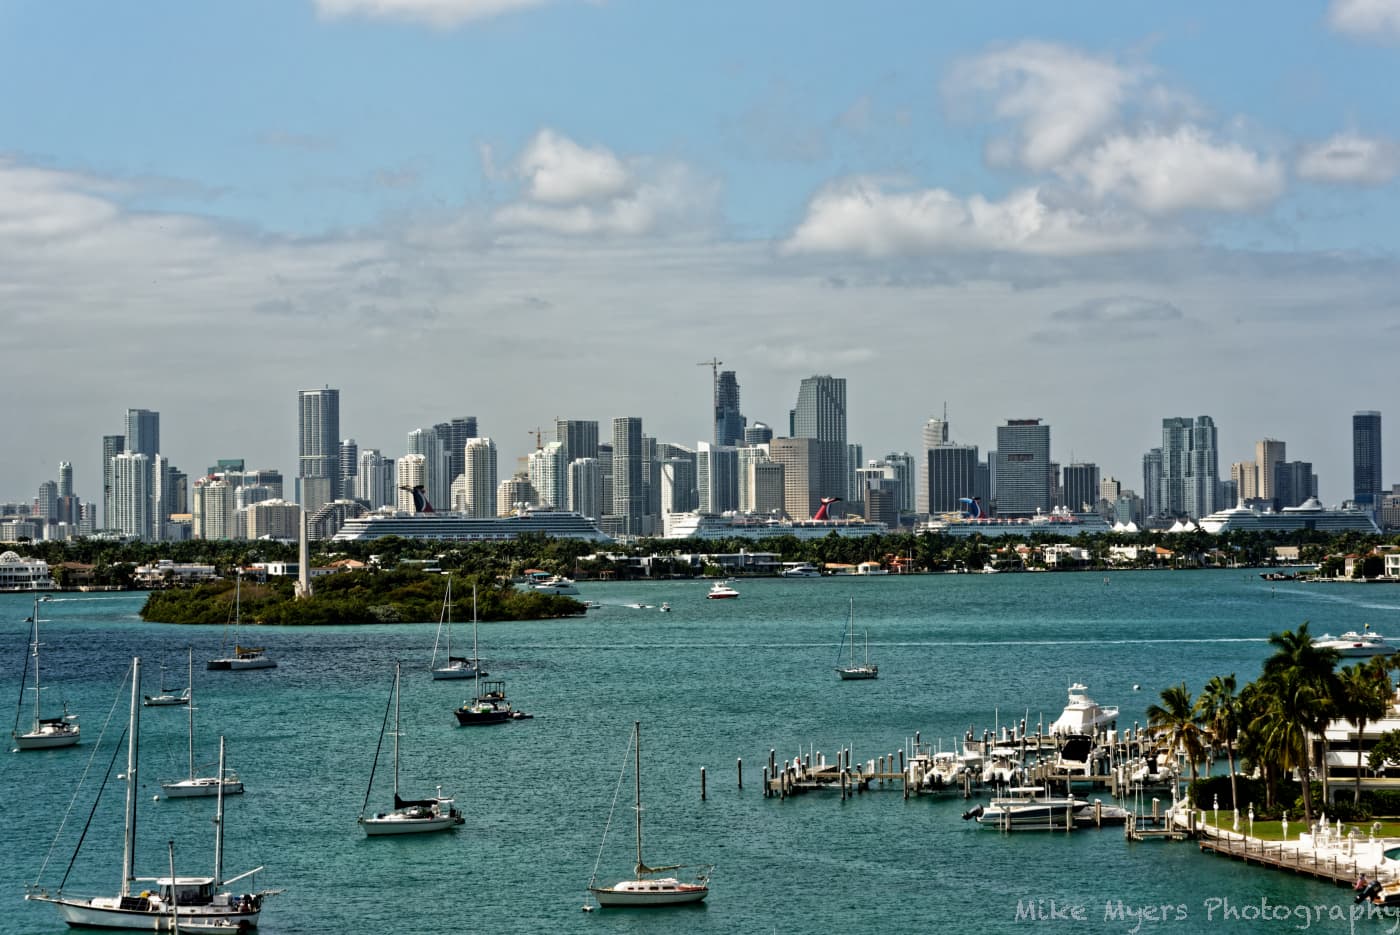
I woke up around 8am, looked at the skyline, and it was better than yesterday, but not really clear. By 10am it was better, and at 11am I took the following photo with my D750 and my 24-85 lens, zoomed out to 85. Shot at f/10 and 1/1600th, on tripod, with Nikon remote shutter actuator, with 2 second delay. The buildings and ships looked reasonably clear, and while I was still under a clear blue sky, the photo shows this huge “cloud” formation that was moving towards me. By 11am, the buildings were no longer clear to my eyes, and it hasn’t changed much over the past hour.

I’ll post the latest image, but first a “how-to” question.

Since I have two monitors, can I use one full display for full-screen image of what I’m editing, and move the left, right, and bottom palettes to my other screen?

Here’s the latest image, which is more-so a test than a finished image:
MM2_0207 | 2022-02-20.nef (27.6 MB)
MM2_0207 | 2022-02-20.nef.dop (15.2 KB)

When I compare the above image, a jpg, with the raw image and dop file in PL5, they look very different. Looks like it changed quite a lot with exporting. Or this jpg doesn’t belong to the nef and dop.

George

I captured five images, but only edited the last one, MM2_0207, and that’s the only image with my watermark. Assuming that all three are from the same original image, what might I have done wrong to cause what you are seeing? When I look at this image on my screen, and click “Compare”, it is very different, but I assume that is from all the editing.

All the original images look underexposed, but my camera said they were correctly exposed. This is from my D750 that had major repairs done to it. I guess I need to look up “how to calibrate the exposure meter on the D750”, or let the shop do this if I can’t. …but that doesn’t explain what you wrote. I know it can’t be from the other four images, as the clouds are in different locations in the photo. This last photo was taken after I replaced the battery in the Remote.

I created a virtual copy, which I’ll work on from now on.

If you open the original image on your computer, with all the adjustments in place, and showing the watermark, how does it look different from the ‘jpg’ I created? Could it have something to do with DeepPRIME which I don’t get to see the results of until I do the export?

I expect @Joanna is going to tell me to turn off the ClearView Plus, and maybe some of the other sharpening, but I don’t think that explains what you just wrote???


Just your nef and dop.

George

Something is very wrong somewhere - here is my Tone Curve, which is nothing like what you just posted:

I would have thought this to be impossible - what might have changed the Tone Curve??? I can tell from the clouds that both of your images are from the same file?

Here is the .dop file again, in case it got damaged somehow while posting…

MM2_0207 | 2022-02-20.nef.dop (30.5 KB)

I’m curious as to what others see - either I’ve got a strange problem, or you do. The Tone Curve should make this obvious, as they are so different - and if they’re different, maybe all the other settings are different as well?

Here’s what I’m looking at on my PL5 screen:

That new dop file is different. Twice as big. Probably containing a master and a virtual copy.

George

Correct - in my screen shot above, you can see the (M)aster and also (1) a virtual copy I made. I didn’t want to mess around with the master, so if I do any more editing, it will be on the VC.

Did you check the Tone Curve again? Is it like I show up above, or like what you got last time? You can check both the Master and the VC.

I think we need @Joanna here - I can’t think of any acceptable reason why you got a .dop file with such a strange and different curve. Maybe someone else can download the files, and see if they get what you got, or the “original” like shown above.

My Tone Curve was a straight line, until I added the “S-curve”. At no point did I ever have a Tone Curve like the one you have on your downloaded files. I don’t see how it could be a bug in PhotoLab…

George, here’s another photo from later in the afternoon, same camera, but different lens - this lens can zoom out to 105mm, which wasn’t nearly enough - I needed to crop, a lot. Anyway, here are the three files again. Let me know if the same thing happens.

MM2_0217 | 2022-02-20.nef (27.6 MB)
MM2_0217 | 2022-02-20.nef.dop (13.7 KB)

Here’s a screen capture. If you see a different Tone Curve, one of us has a serious problem - very mysterious!

If you see it distorted again, with a Tone Curve not like what I just posted, I guess my next step is to close PL5 and re-start my computer. This should not be possible… unless either my our your copy of PL5 is confused…

@mikemyers
Hi,

Just tried to open your images to see how curves are loaded here.
(For MM2_207, I used the first dop provided, not the second one).

I put both nef and dop files in the same directory :
Window_picture_directory

Then I opened raws in photolab (Windows10 - photolab 5.1.2)
Optical modules loaded fine.
But photolab didn’t read dop files at all !!!

No virtual copy (I’m not sure you have) :

Everything off :
MM1_207_screenGrab :

Everything off :
MM2_217 screengrab :

My preference setting (in case it is related) :

So here photolab reads nothing in provided dop files …
Mac / windows photolab incompatibility ???

Check if both the image file and the .dop file have the “vertical bar” included in the file names: |

Wolfgang has issues because of this, so if I send him files, or work on files he sends me, I need to remove the " | " character.

Names seems correct. You can see them in window10 window screenGrab.
But I try renaming everything in case window hides this.

The same.
I renamed like this :


And still no dop read.

Same here. The dop file isn’t read at all with the last image. Or it contains no edits. Looking at the size it contains only one image, no vc.

George

1 Like

Hmmm. To my eye, this is a something or nothing shot. There really isn’t any composition and it is disquieting to the eye because, instead of being able to follow lines around the image, I find myself looking here and there with no sense of flow.

To start with, I took the full width of the image and changed the height to include some sky - essential to avoid that crowded/cropped feeling with the skyline…

But still not happy. So, I tried a different crop, which gave me a vague “circle” of boats, which started to feel like the eye could follow it around…

I also got rid of ClearView Plus (much too aggressive) added a little fine contrast all over and some micro-contrast, with a Control Line, to the sky only to bring out the cloud detail and avoid the dreaded empty blue sky look.

But I would still call this a “snapshot” rather than a composed image :wink:

1 Like