Interesting - I have trouble seeing this image. For starters, in India, everyone keeps to the left, so the image (to me) looks very wrong. Darkening the “chaos” doesn’t work for me, I’d prefer to eliminate it. Color and contrast look more “real” in your version than what I created.
I hate shooting from the seat in a moving car - I’m always so frustrated. In retrospect, we should have passed them, then stopped on the right, and I could have gotten out of the car to take a photo from in front of them. Hindsight. I still like this shot, but I think I’ll use the above advice to re-do the colors and contrast. As to focus, I focused first, then composed. In retrospect, I should have been using a different method (see above) to focus.
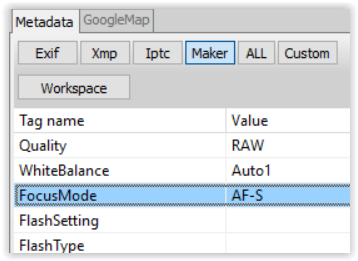
ExifTool reports, that you used AF-S (single shot AF)
together with Single Area AF .
Unfortunately you missed the focus on the fishermen & boat. Instead you got the waves behind them sharp. I tried to fix the problem to some extent … check / compare with the VC DF1_5322 2024-01-13.nef.dop (229,4 KB)
But then the pic with the 2 selling ladies (taken with the same lens) is in focus.
You really should check your equipment, what you are going to take with you the next time as well how you are going to work. – To come back from a journey with out-of-focus pics is not what you want.
This is what my D780 is now set to. I suspect it will do what I want, most of the time.
Yes, the camera was still set to single-point focus, and I was holding the back focus button in until I was ready to capture the image. That was mistake #1; I should have used area focus. With the “single spot” focus, the boat moved down, and the focus picked up the water behind the boat.
THAT, is/was my biggest mistake. Towards the last minute, I decided to take my Df, rather than my D780. I started to go through all the settings, but screwed up. I thought the Df was also in “continuous focus” that would continue focusing as long as I held the back button down. Wrong. I just got out my Df, and sure enough, as you pointed out, it was in S focus, not C.
Yes, I was holding in the back-button focus all that time, but as you noted, the camera focused once, and “locked” until the next time I pressed the button. Also, since the focus was in “spot mode”, when I pressed the button, I’m pretty sure the singe red focus mark was over the “water spray”, not the boat.
Solutions to deal with this problem:
As Joanna pointed out numerous times, concentrate on one camera, and as I now think of that, concentrate on one NIKON. (My Leica is so different, it doesn’t really confuse my Nikon thoughts.). Not sure what I’ll do with the Df, maybe sell it. I think my D780 is now my “forever camera”. I have zero interest in replacing it with any mirrorless camera with a tv screen viewfinder.
Most importantly, make up a check-list of all my settings, so when I arrive in India or wherever, I can go down the list and look for “mistakes” about to be made before I screw up. In addition, I saved all my settings to an SD card.
Also, from Ken Rockwell: To save your settings, first set everything about your camera however you like it (as I’ve explained above), then press: MENU > SETUP MENU (wrench icon) > Save user settings > Save to U1 (or U2) > Save settings > OK . The way my D780 is as of today is now saved as U1. If more corrections are needed, I’ll update this.
No idea what I will do with U2 yet.
On one hand, I wanted to bring the Df with me, and learn it. Apparently I did not do that so well. Half way through my trip I realized I made a mistake.
Hindsight is always 20:20. In several months, I hope to go back for a do-over. I’ve been going there since 1984. I hope to get this figured out eventually. I better get a lot of practice in BEFORE I head back, and make sure I’m satisfied with all the settings, and my ability to hold the camera steadily enough.
Makes sense - one more thing I should practice. I never even thought of that, as the auto-focus seems to work better than my doing it by hand. I guess I could try using Manual Focus, to re-learn focusing. It’s what I did long ago on my RF cameras, and still do on my Leicas.
11minutes, 55 seconds into this video is how I used to focus my Nikon SP, although I focused the long focal length lenses by rotating a large ring on the lens. https://www.youtube.com/watch?v=lzQcVhsX_Tk
Auto-focus? Didn’t exist back then. I still have this camera, but it needs a “clean and lube” if I want to start shooting it again.
You already start confusing yourself again. Or do you still have that thing and want to take it with you? Keep away from this kind of stuff and everything else distracting.
You also mentioned that you turned 80 and had cataract surgery. And then you want to focus with a DSLR whose screen is optimized for AF, but no more for manual focus – that’s really mad! Sorry to be so bluntly direct.
If you want to enjoy your holiday, meet people and get their stories … don’t forget to (also) take your Fuji X100S with you, when you still have it.
(The best way I know how to do that, is constantly taking lots of photos, and thinking about all the details every single time; like “control lines”, the next day all is well, but the next month? Or a year later? Yikes!)
I wonder - am I the only person here with this issue? Does everyone else have a bank vault for their memories?
Not caring about what was, helps to create new views on things. Question is, if one wants to illustrate or to create - using whatever material is around. My goal was to see what can be done with the source without caring too much for “rules”.
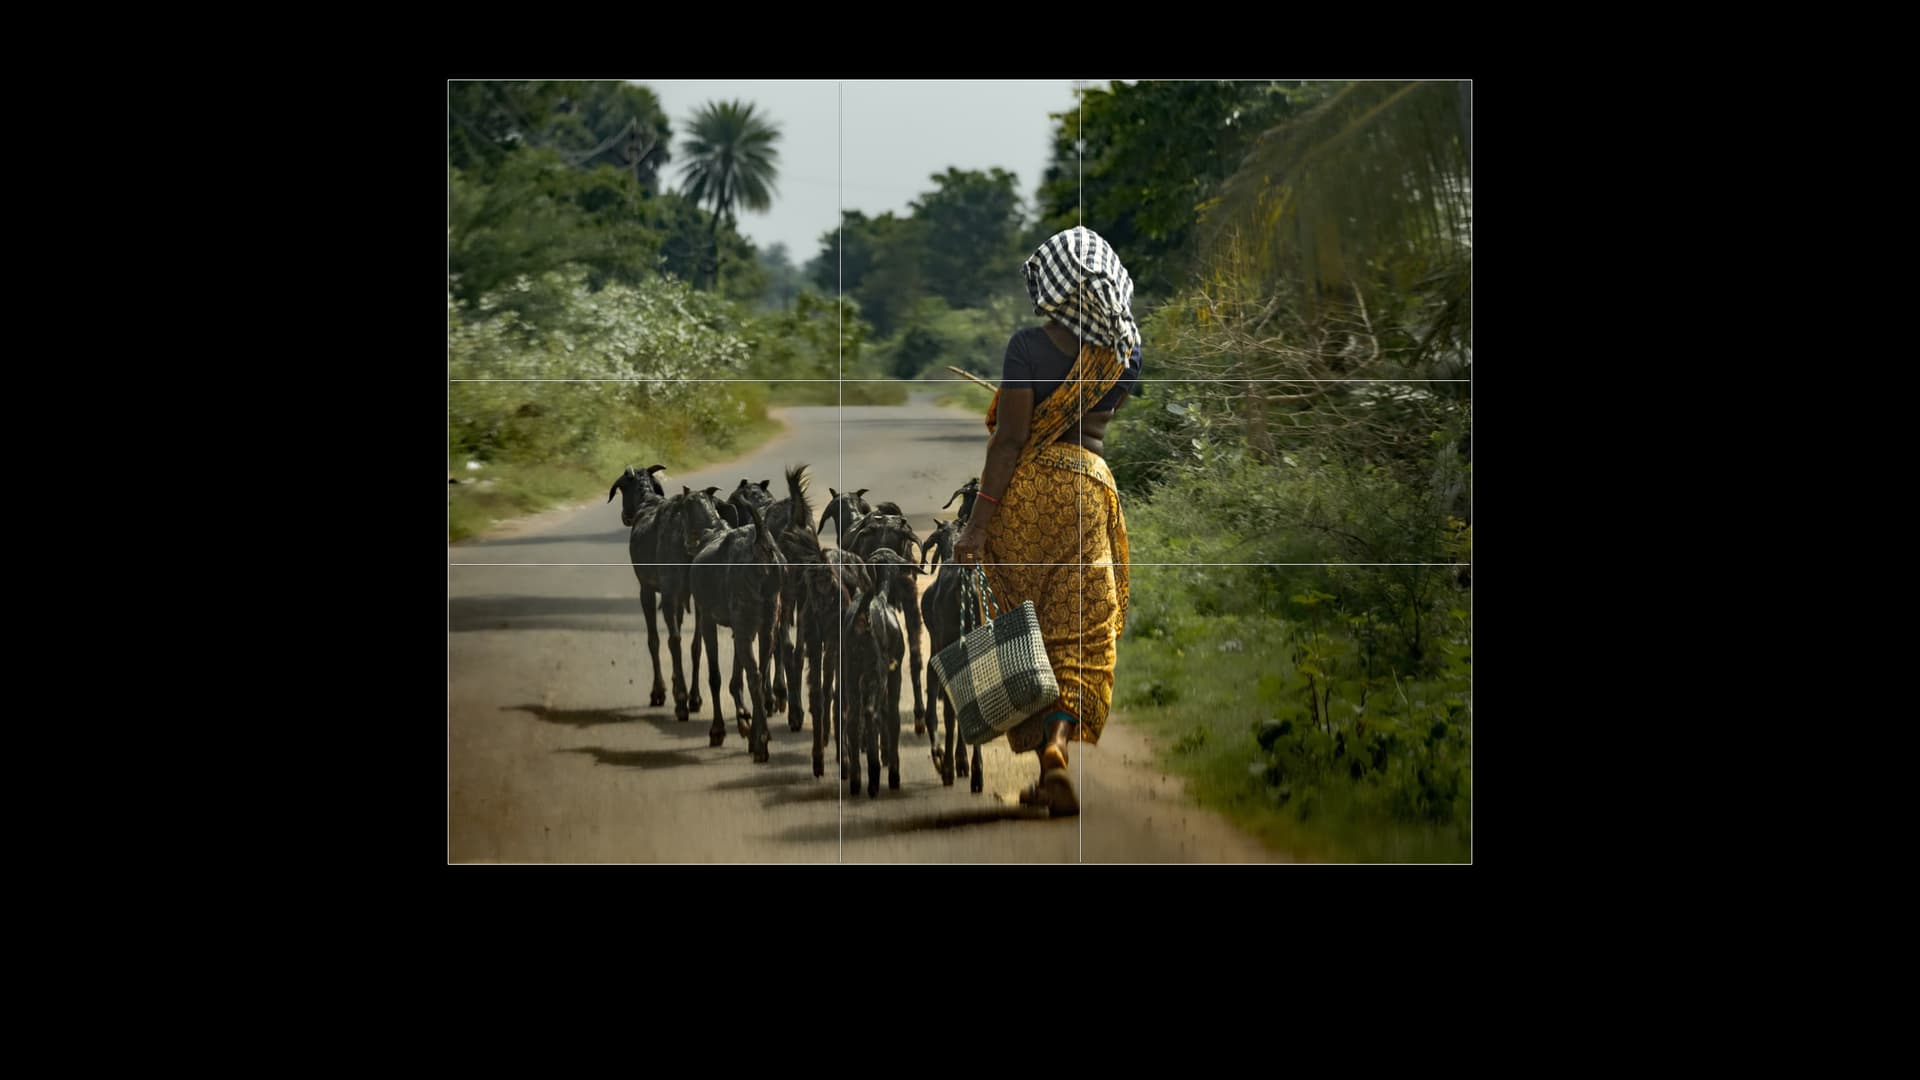
western vision scans images from top left to bottom right. That is wha I flipped the image.
prevent the look from sliding out too easily. That is why I darkened the lower RH corner
rule of thirds. I chose to ignore it. If you crop off the right edge at the tree, the person driving the goats divides the image according to golden ratio (5:3 approx)
golden ratio. I chose to ignore it to create an image that irritates the brain - well almost, because I cropped the top off to separate the top from the bottom to approx. 3:5
other compositional items:
a) see the dark circle extending into the picture from the right side?
b) see the three wedges in the right half? (sky, greenery, street)
c) see the leading line from top left to the person who stops the line to catch the eye?
d) see the tonal contrast between the goats and the sari?
e)
I’m happy that you had trouble seeing the image (item 4 seems to have worked)…but if you stood away from it, you could see the compositional components, but you’d also have to loose the thought that one drives left in India.
Notes:
Screens captured with Lightroom with its “lights out” feature and variable crop grids.
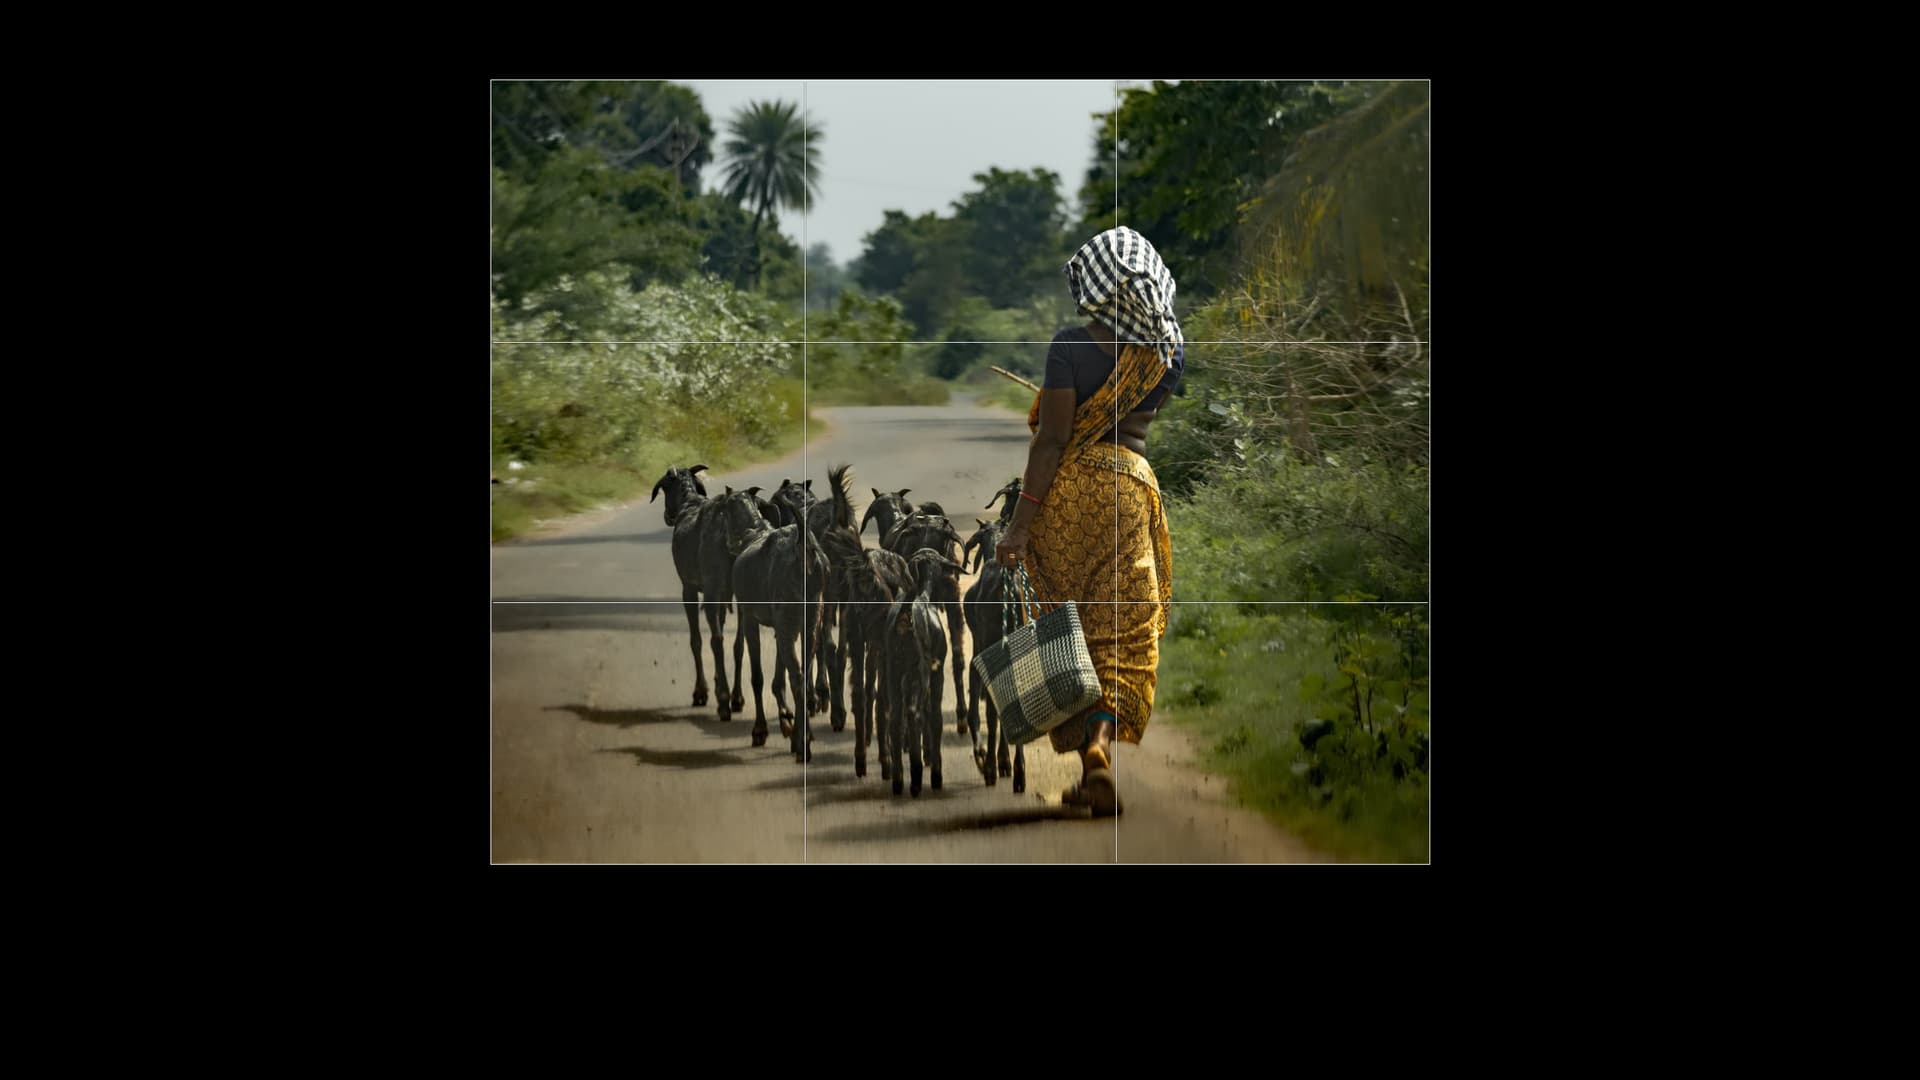
With the flipped image, we could even go to full square cropping.
From what I have seen, in a lot of African and Asian countries, in rural areas, people walk, or drive, on whichever side of the road they fancy, until someone comes the other way, when they might change back. The truth is that, apart from your “absolute truth” very few people seeing that picture would realise.
Of course I have that “thing”, along with a Contax IIa, a Contarex, a Nikon F4 some folding cameras, and lots of old stuff I enjoy looking at, and holding, but hardly ever use - well, one of my old Leica film cameras did get used several years ago, as I learned how to scan film. I am doing what I think you want - for actual “photography” all of that old stuff, including my Df, stays at home.
I was reminded of how we used to focus a lifetime ago, which made me think of my Nikon SP and my old Contax cameras.
I don’t understand. Yes, I turned 80 last December 22. Yes, I had cataract surgery in both eyes around ten years ago, more or less. And yes, I want to focus with my DSLR just like I used to. What would you suggest instead? As I see it, the cataract surgery is irrelevant, as long as my eye can focus on the camera screen, which it can, if I’m wearing my progressive glasses.
Yes, certainly I still have it, and I used it a lot in India when I didn’t want to carry the larger and heavier Nikon. I enjoyed my Nikon Df more than my Fuji X100F, but there were many times when I thought the Fuji would be better for me. I got the Fuji to capture some street scenes at night, that I couldn’t have captured with my Df - having the built-in electronic flash was very handy.
I may go places with or without my Nikon, but I hardly ever travel without my Fuji.
Actually, in reality, none of that applied. I raised my camera from my lap, made sure everything “important” was captured, and took three pictures. First was bad, this was the second, and the third had the bottom of the lady and goats cut off by the car hood - lousy photo in every way. All I did, was capture what I saw, assuming I could turn it into a nice photo later on, in PhotoLab. There was no time to “think”, only to “do”.
Lots of stuff you wrote - I don’t think any of that applies to me. I “scan” my image starting in the middle, and work outwards from there. No reason why, just habit, maybe knowing that the edges and corners can be manipulated or removed, so why worry about them when I’m in a hurry? I suspect we all “think” differently. Me, I don’t see any “wedges”, until after you mentioned them. Leading line? ditto. I guess I do everything “by feel”. I need to think about this some more, after slowly reading what you posted. If I was shooting something stationery, and had all the time in the world to select how I wanted the image to look, then I would likely think more like you wrote.
Golden Ratio? I don’t think that way, but I do have my “thirds” turned on, if for no reason other than it helps me keep my camera horizontal. Now, if I am not pressed for time, and I’m setting up to take a photo, then I will be thinking much more like the way you described. To me, it’s usually “street photography”; get the image NOW, because if I wait, it will be gone!
Hmm, driving in Madurai, India… I made this video to show what it can be like:
@mikemyers , what I was referring to is to “make” the picture, not to "take"it.
Trying to “see” the picture before you take the image is an important part of the creative process and if the situation permits it, previsualising helps to get a better headstart. @Joanna often mentioned previsualisation and posted a link to C.Waite’s presentation that also deals with seeing the picture before taking the image.
The next step of the creative process can be to “make” a picture" from an image (take, shot, capture…) This involves the usual steps like white balancing, exposure, contrast etc. - and it can, imo, include things like flipping an image.
Another step would be to actually print, frame and hang the picture, but I’ll let that be for now.
How do you get to the middle? In order to recognize the middle, we need to “inspect” the whole view and we’re mostly unaware that this happens (all the time). Try to see your surroundings without turning your head and eyes and you’ll notice how difficult it is to grasp it all without scanning!
Anyways and apart from the technical shortcomings of the shot, I find that the image can be made into a picture. All it takes is to drop the chains of conventions like “it must be sharp, follow the rules…” before “reassembling” the image more freely.
If you want to do street photography, it wouldn’t hurt to follow the techniques of the great Carter Bresson. I found this article
Here are my comments on the bullet points…
Focus on geometry
This is absolutely primordial. But it takes lots of practice to be able to see the geometric shapes instinctively. See point 7.
Be patient
There are very few of your pictures, that are very much documentary in style, that I would say absolutely relied on the “decisive moment”. You could just as well have followed the woman and her goats for a few minutes, possibly stopped the car, transferred to the back seat and shot out of the rear window even. After all, she was walking down a long road and I can’t see any evidence that she was going to disappear any time soon.
Travel
If you can but there are often plenty of subjects to photography in your own back yard and travelling can be as simple and inexpensive as walking around you own neighbourhoods.
Stick to one lens
In Cartier Bresson’s time, this usually meant a fixed focal length but we are fortunate to have a single zoom like the 28-300mm, where you can take anything from wide angle to distant without even thinking about what focal length to use. Just don’t try and take photos with your 2000mm eye that you’ll have to crop later.
Take photos of children
More difficult these days, but still possible, as long as you are not planning on publishing them for profit.
Be unobtrusive
You can do this, even with the D780, which has a pivoting rear screen which allows you to look down rather than at the subject
See the world like a painter
I cannot emphasise this enough. Helen was more interested in art than I was and she can turn out a fair watercolour. I really didn’t appreciate paintings until a couple of years ago when she showed me a series of documentaries on the impressionists by Waldemar Januszczak. Wow!!! You can watch some of them on YouTube.
Don’t crop
Something you do only too often. Even with street photography, Cartier Bresson was a master of framing in the camera. Think about it - cropping a 35mm neg is nowhere near as easy as it is now with high resolution sensors. But, nonetheless, the less cropping you have to do in post processing, the better the final image quality. Don’t forget the possibility of someone seeing one of your photos on the internet and wanting to make a big print out of it. It also helps you with composition in general because, if you have to frame out distractions in the camera, the composition benefits within the image area.
Don’t worry about processing
This is a luxury that not everyone can afford. I now do a lot of work for other photographers, preparing and printing their images for exhibitions. It means they can spend their time and talent on taking good, well-framed and composed images without having to go through the laborious post-processing for each one. Some of the most famous photographers employ their own “tame” printer, who they can sit down with and direct what needs changing without necessarily having to know all the techiques and which one has to use.
Always strive for more
I have said it before, but it bears repeating - after 60 years of photography, I am still learning - from other great photographers, from artists, from friends in the photo club and from plain old trial and error. I take inspiration from them, I copy them, anything to stretch my capabilities and imagination.
Oh, and I don’t limit myself to only one style of photography. When I first started doing LF work, my photography devolved down to mainly landscape. But, since then, I have found I enjoy doing portraiture, still life, abstract, concerts, etc.
I have just started teaching a series of courses, at our photo club, on composition and all that goes with it. As good as I might be, I have to produce examples and that tests my skills, so I am learning from teaching.
I said this a long time ago - set out to take some images, perfectly framed in the camera, that need no cropping.
You might think it boring but it is the only way you are going to stop producing mediocre images and move on to excellent.
I always do this, before raising the camera to my eye, but I often change my mind as I’m looking through the viewfinder. Sometimes I take more than one picture, as I might think of a different possibility… but usually I already know what the picture should be, before my camera is aimed, and even then, I often “crop” in the camera to include what I want, and just as importantly, to exclude what I don’t want in the photo.
I try to do that first, if possible - setting the white balance (I don’t), exposure, and so on. Flipping an image is never even considered. I don’t do that. To be honest, much of this is done while using PhotoLab. I just need to get the important parts of the image included within my image, and I’ve learned to always leave a little “wiggle room” for corrections such as additional cropping or corrections (perhaps camera wasn’t level?).
For me, this takes an instant, and “the middle” means the middle of what is most important, not the physical middle of the frame. I can’t explain “how” I do it - it just happens, and I far prefer to do this in the viewfinder if I have time.
Between that link, and all your ideas, there is a lot of excellent advice to consider. I will print your message, and keep it in my pocket or camera bag. I certainly can’t say I will actually DO all those things, but some can easily be incorporated into my “shooting style” if that’s the right word.
To me, “don’t crop” is silly. If I see a great image for a square format, I’ll bring out what I want later in PhotoLab. I guess I can also set my D780 to “square format”. I’ve been tempted to do that. Hmm, if your D850 has the U1 and U2 tools, this is what I might do - I’m using U1 right now, based on my RAW setting. I can change to U2, change the format to square, save the settings to U2, then go back to U1 for normal use. Supposedly all I will need to do to capture square format images is switch to U2 ? Will try this later today.
By the way, your list is so completely, totally, different from what I do now. Me? I try to keep an open mind, and when/if I see something interesting, only then do I think of the best way to capture that image. If I came across a beautiful “seascape”, maybe with boats and a lighthouse, I’d like to think I would follow your advice.
(By the way, feel free to use any of my images in your classes, if you want to point out things (not) to do.)
(Also by the way, you used to post more images here, with explanations of how/why you did things the way. I found those VERY helpful. A few other people did this as well. Maybe, if she approves, post some of Helen’s photos, along with her description of why she did what she did. …and you used to explain how you used various PhotoLab tools to achieve your goals. That would be MOST effective here, as PhotoLab often provides more than one way to achieve something - and I sometimes wonder if there is a better way than what I do. For example, I rarely use the HSL tool. Maybe I ought to be using it more often.)
Of course, I didn’t mean for image format. Your D780 has a square format viewfinder mask and it can be very useful to see what you are getting in the viewfinder. Our D850s also have 5x4, which is so useful not only for portraiture, but also for some other subjects.
But the challenge still remains - show an image that has not been cropped in post processing, but that is perfectly framed in camera.
Use the “My Menu” menu item (MY MENU/RECENT SETTINGS) to add the “Image Area” to one of the Fn buttons.
One more video, what it’s like to drive on the “back roads” around South India. The car’s horn is an essential part of driving. You’ve got to let people ahead of you know when you’re about to pass them.
Thinking back to some of the recent posts, I hadn’t really thought about it until now, but in India, with my D780, I feel like I am hunting for scenes within what I see with my eyes, or what the camera shows on the image. I have so many controls, to try to capture the most interesting part of what is in front of me - and I have all those tools available.
Sometimes I go out with my Fuji X100f, and many of those tools are unavailable - the only “zoom” is my feet. My attitude is that I have this viewing screen on the back of the camera (or the viewfinder) and I need to fill it with “scene” in a way that I enjoy. For every time this “works”, there are a dozen failures, as in “why the heck did I ever take that???” Of course the answer to that is to take lots of things, and sort them out into my favorites later.
I made a two hour trip to a hospital in a town I never heard of, and while the people I was with were going about what they needed to do, I was constantly scanning my world for something I might want to capture. I usually let the Fuji figure out the photography details, while I concentrate on the image, and the timing. With the Fuji, this is much more limiting than with the D780, and most of the “work” often has to be done with my feet, along with timing and anticipation. Long ago I kept meddling with the settings on the Fuji, and going back and forth between “raw” and the “film simulations” (jpg). I gave up on the film simulations, as I wanted a ‘raw’ image to feed to PhotoLab.
I wanted to show the “clutter”, the “crowded street”, all the buildings and shops, and I liked the way the awning filled in the top right, which goes along with… the guy walking out of the scene was a perfect “bookend”. It perfectly shows what I wanted to capture, and the Fuji narrowed my choices, but I had to find the right spot to shoot from to get what I wanted. Added later - I wanted to include a “street cow” in the photo, but I thought it escaped. Nope, it’s still in the photo.
…and I realize all it is, is a snapshot, but it is MY snapshot, organized the way I felt best.
…added later - I click on the “Compare” option to see how I changed it in editing. Yikes, the original image is ugly, compared to the edited version. I didn’t do all that much in PhotoLab, but it made a world of difference.
Feel free to edit/change it any way any of you wish - I’d love to see what others can do with this image!
 .
.