I have no idea what “affiliate links” are, and I’ve long since given up on worrying about ad tracking. Simply put, I don’t understand what you are talking about. I have more than enough trouble just understanding PhotoLab, Nikon, and all the books/manuals I am struggling to read.
Most of my shopping, most of the time, comes from Amazon. Or, B&H, and KEH. Or, Apple. Or Leica.
I’m learning how ignorant I am, about so many things.
I keep wanting to ask you how much you would sell your broken D4 for, but @Joanna would frown upon any serious interest on my part. I would rather have a D3 or D4 or D5 or D6 than any of the new Z cameras. How much better is the focusing on a D4 compared to a D3?
Sorry can’t believe that your are that naive. Especially not when it’s coming from someone who religiously quotes Ken Rockwell and has apparently seen as much as you have in life – even though Ken Rockwell is the last person for people really interested in PhotoLab to be learning things from.
And from what I’ve seen here so far, I’m not the first person pointing that out to you (and again I’m hearing others laughing ).
Obviously, I am that “naive”, as I never heard of the website to look at before going to access that website. I have virus protection running, and what I view on Google search, I just click on the link
I know about “tracking”, but all the junk emails go into my trash, and the few that slip by, I just delete. I’m not concerned with “tracking”.
I started with computers using IBM punch cards in the 1960’s, and worked my way through Unix, MS-Dos, Linux, and am now mostly with Apple. I’m not very paranoid about this, and I rarely click on what I think of as a “junk” website.
You are the only person I have ever met who wants to check on every website before clicking on it. You probably have good reasons to do so. My emails are searched for “junk” and stuff before they ever show up on my screen, and every so often I empty out my “junk email” folders.
So, if everyone on this forum wants to laugh at me, so be it. My attitude is I’ve got better things to do with my time.
A better reason to laugh at me would be that my D3 sensor has almost 20 years of “dust” on it, and it is still running the original firmware - both of which will likely be fixed tomorrow morning.
Two thoughts - please correct me if I’m wrong. I bought the D3 in 2007, and stopped using it when in mid 2015, when the D750 replaced it. So, the dirt on my sensor has been there for almost 20 years. I doubt it is going to fall off my sensor because of my brush - I suspect it will require the cleaning wipes. As you wrote, I’m better off letting a repair shop do the work, which will likely be tomorrow morning.
Also, regarding changing lenses, this is the automated sensor cleaning for the D780: D780 Sensor Cleaning
About my 70-300, why would I want to give up the added feature Nikon used on their “P” lenses? I know both you and Ken Rockwell love the lens you now use. Who knows, maybe it would be better for me.
AF-P lenses use a “Pulse” motor or “Stepping” autofocus motor and are even quieter and smoother to autofocus than an AF-S lens, making these lenses ideal when shooting video with a DSLR. The DSLR camera bodies that do feature a focus motor can utilize AF and AF-S lenses.
My question to you, is does this sum up the differences between your D3 and then your D4 ?
I always thought (incorrectly, apparently) that they were mostly the same camera, but the D4 was improved, especially in focusing. Was this your experience?
Also, asking again, what happened to your D4? Is it “dead”?
Joanna, what percentage of PL6 or PL7 users do you think print and share their finished images, and what percent do you think share their work digitally?
I suspect photographers good enough to realy create beautiful images, will have printed images as their end result.
I doubt this is true for photographers who do just about everything digitally?
Back when I was a kid, shooting film, developing and printing it, my goal was “large” prints (meaning 8x10 usually). I spent a huge amount of my time in my darkroom.
…I’m getting confusabobbled here, as my new “home” is sitting at my computer, even when I know I should have gone to bed hours ago.
@Joanna, what was the name of the software that you wrote about, where you could submit an image of a certain size, and they would greatly increase the size?
Also, how does it work? If I create an in camera image of, let’s say, 20 megapixels, Can this software expand it to say, 200 megapixels?
Finally, if you then print both images, will the expanded image look “better” than the original image?
I meant to ask you when you were posting, but I had too many other thoughts buzzing around in my head. I know you can’t add data to the expanded image that wasn’t there in the original image, so what’s the point?
Also, if the same lens was used on a D850, a D780/750, and a D3, I and printed at the natural size for each image, would all three prints “appear” equally sharp? With more megapixels, the image from the D850 should be larger, so I assume it will appear to be sharper. Correct? If all three images were printed on 8"x10" paper, would they appear the same?
(At some point, there will be a limit of how much detail the human eye can detect, meaning if all three were printed 4"x5", I doubt there would be an difference to the viewer.)
Stenis
(Sten-Åke Sändh (Sony, Win 11, PL 6, CO 16, PM Plus 6, XnView))
556
@joanna and @mikemyers
You write so much that you seem to get totally lost on color spaces. Listen to George. The camera settings for color space is just for JPEG. Joanna ought to know this but writes so I get totally confused despite she has to know camera color space settings. Today there seems to be few if any camera that are able to be set in P3. Hopefulle that will change since there are people using P3 even for print or have modern TV-sets with wider gamut than Adobe RGB.
Setting the camera to Adobe RGB in Joannas case to get a camera preview in Adobe RGB seems really odd and especially when using a monitor set for P3. That risks to mislead people who reads her. If you are used to P3 on screen, Adobe RGB is not really for you since it has its weight on green and blue compared to P3 that is more towards red and what the eyes see. I don´t see any reason using anything else than SRGB in cameras (as long as there is no P3-option available), if the case isn´t that you want to print the pictures in JPEG right out of the camera.
I also use P3 on my monitor despite I´m not a Mac-user and I do it because I don´t like oversaturate blueish Adobe RGB and I use it for printing too. The advantage of that is that I can use the same P3 color space both on my monitor and for screen and print in general. I also use P3 on my pretty new Samsung QLED, which also works fine.
With P3 through all I just need to make one type of JPEG-files (P3 for 4K) instead of having to alter between SRGB and Adobe RGB monitor settings and saving several JPEG-files with SRGB and Adobe RGB depending on if they are going to be used for screen or print. The risk with that is that one sooner or later uses the wrong file for a certain purpose. That will never happen to me anymore but it is a very common case when people write in forums when they have got lost when printing.
The discussion here so far about color spaces in cameras and why using Adobe RGB in cameras (until Geoge put down his foot) has been just confusing - especially if you are using P3-monitors or handheld P3 screens.
If I was Joanna, that I know prints by herself and also lives very much among P3 screens I would try to switch to printing in P3 instead of Adobe RGB. There is a lot to gain with a single standardized P3 workflow instead of using several different gamuts. I think it ought to have a great potential to boost the overall efficiency of all workflows really as long as you are printing by yourselves and not outsources printing. If you outsource printing Adobe RGB is still the standard to use.
I want to add something to the Ken Rockwell link. It was written in 2006. I don’t think Windows had color management at that time, like many other software packages. And most monitors where just sRGB monitors. So he is probably comparing the difference between sRGB and AdobeRGB images on on not color managed system on a sRGB monitor.
On a color managed system there would be hardly any difference.
Now, you must admit, that is not difficult to do - get lost that is
From what I do understand, RAW files are “marked” with the colour space that they were taken with, but that doesn’t change the RAW image data.
My procedure is to use AdobeRGB in camera, simply because, should I need to look on the rear screen, the jpeg preview I will see is going to be in the AdobeRGB space and gives me a better idea of what a wider gamut does to the image. It also allows me to see the same wider gamut preview when browsing images in macOS Finder and in my keywording app, because they all read the embedded AdobeRGB jpeg.
My apologies if you think that misleads, but although my workflow seems to work perfectly for me, explaining why it works is a whole different game, especially with different folks seeing things differently.
Then there’s the issue that PL automatically defaults to DxO’s own “Wide Gamut” colour space, which is even wider than AdobeRGB. Or, if you prefer, you can switch to AdobeRGB, but at no time will you be working in PL in the sRGB space.
When I scan transparencies, my scanner has its own ICC profile, which I use and then convert to ProPhotoRGB for saving the TIFF file.
Now, not wanting to be at all rude, this surprises me.
When I print, I use a dedicated ICC profile for the printer/paper/ink combination and the print driver converts the developed image’s colour space to the (usually smaller) printer’s space.
Because some printer/paper/ink combinations limit the gamut of available colours, I use PL’s soft proofing to ensure that none of the colours produced by my target profile exceed the available gamut. This is akin to darkroom printing a wide dynamic range negative onto the more restricted range of the paper.
To the best of my knowledge, I would say it is impossible to print in the P3 space as it is going to be far too wide.
I’m sorry to have to disagree on that but most labs that I have looked at demand files in the sRGB space.
I have found that, if you don’t want to use soft proofing for printing, working in PL in the old AdobeRGB space seems to mean you are less likely to create out of (printer) gamut colours.
Disclaimer - All the above is from my own experience of turning out beautiful prints, possibly not because I truly understand the “rules” but simply because, by trial and error “it just works”
Sounds great, but have you ever stopped to consider where all the fluff and dust bunnies go when they are vibrated off the sensor? There are an awful lot of nooks and crannies in the camera that they can lodge in until you turn the camera over and they fall back on the sensor.
This is also a great argument against mirrorless cameras, with which, the sensor is always “naked”, as opposed to a real SLR, where there is a blind that covers the sensor until the mirror lifts and you actually make the exposure.
It would make me nervous changing the lans and being able to actually see the naked sensor. As it is, I even ensure that the camera is facing the floor before and during the lens change.
If I may be so bold as to say that possibly the majority of folks who take pictures nowadays are not “true photographers” - they tend to be people who want to record a moment and a camera, or a phone, seems to be a good way of doing so.
In my opinion, photographers are artists, who don’t “take” photographs. Instead, they “make” images, imagining the concept, using a camera to capture that concept, then working on the captured image to create a finished print. And yes, I did say “print”
Do you know what I love most about prints? I am not nailed to a chair in front of a computer to see them. I don’t need an illuminated screen, mouse and keyboard. If my computer were to totally fail, including backups, I would still have something very precious - a good old fashioned print. In case of computer loss, I can even reproduce it by scanning or photographing the print. I can hang a print on the wall or hold it in my hand and I have something tangible, not just a transient collection of electrons whizzing around in a box until they hit the screen. I can sit or stand in my room and just meditate on a print. If it is large enough, I can “walk around” it with my eyes, taking time to examine the smaller details, sometimes discovering something I hadn’t seen before.
Computer files require knowledge of how to find the image and show it - prints just sit there in plain sight, waiting to be admired. Prints are about emotions and feelings, something that can get lost in the struggle to wrest digital images from a computer.
Oh, and you don’t normally keep anywhere near as many prints as you do useless digital images that didn’t really work but that you insist on keeping in the hope that one day, the pixel pixies will work their magic and they will turn into perfect images.
Which reminds me, with over 15,000 files, it really is about time I had another attempt at sifting out the dross
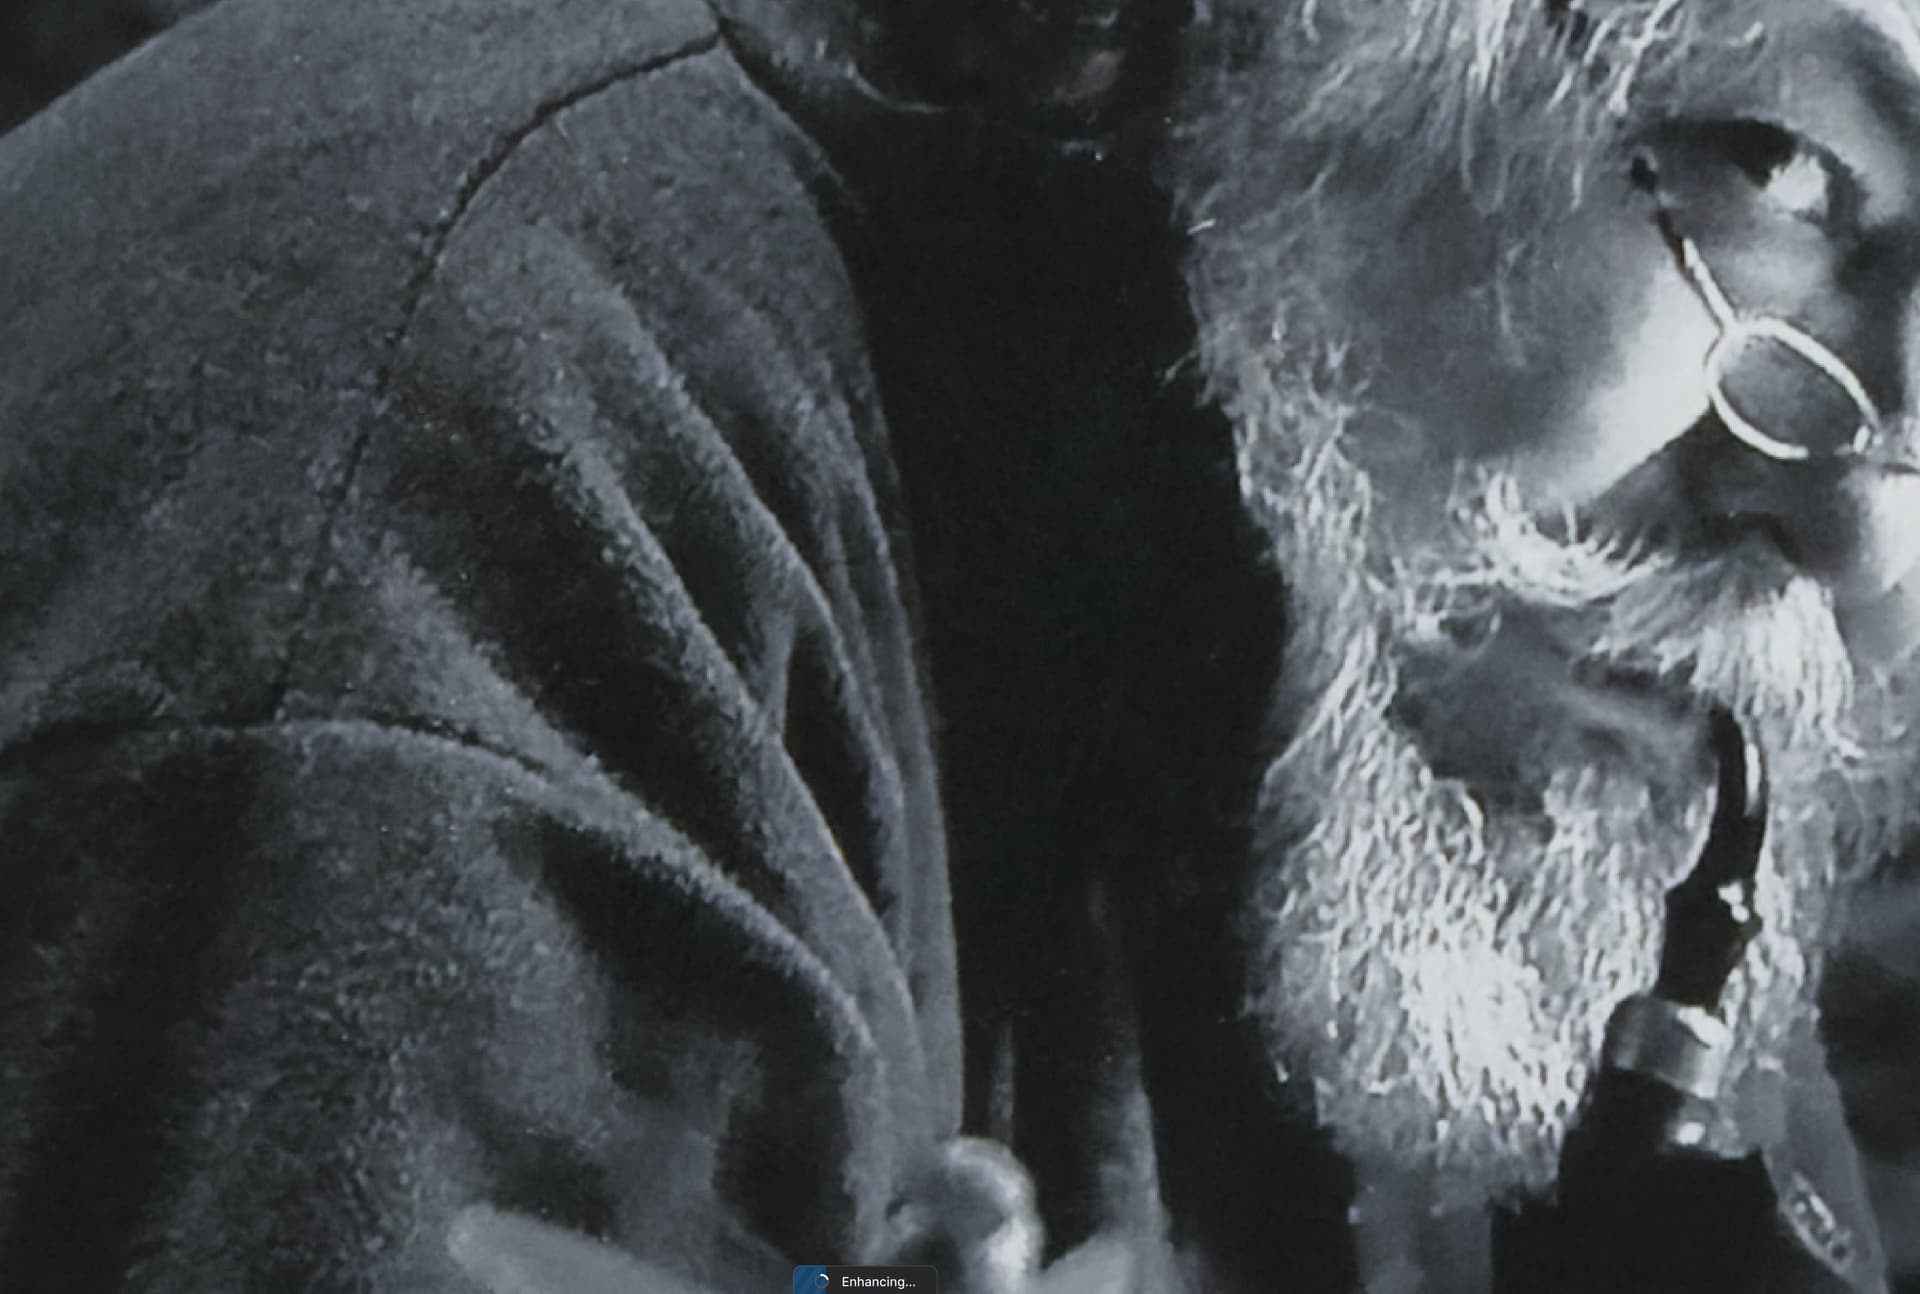
That would be Topaz Photo AI.
I just loaded a 20Mpx image and asked Topaz to enlarge it to what it said was the maximum possible. The result would be an image of 724Mpx !!! That’s the equivalent of a print image that measures about 11ft x 8ft. You’d better start clearing that wall
But, seriously though, I haven’t done anything near as big and am not sure of the finished quality. But, I have started the process and left the app to churn away, as it takes quite some time. I will post back my findings when it is done.
That will depend on the viewing distance.
Essentially, it intelligently multiplies the number of pixels according to an algorithm to give the same appearance.
The only color space that counts for the raw is the input color space: the sensitivity of the cfa for certain wavelength. The output color space is used after demosaicing the raw to a rgb raster image and has to cooperate with your chosen output device.
Do you know the color space/gamut of your lcd screen??? I don’t think so. So it’s impossible to judge the colors on that screen.
Hi George. I am only too well aware that any camera LCD is not going to show a perfect rendering but, at least, what I see is definitely “different” enough for me to appreciate there is a wider gamut. As to what that represents in technical terms, I don’t really worry because I rarely use such a small screen to do any worthwhile assessment.
I still work like it was a film camera, not expecting to see the real image until after the “film” has been developed
Some mirrorless cameras come without “blinds” but some do have them. Checking the menu or manual can show which camera you have or plan to use or buy
Example: Nikon Z9 and Z8 cameras seem to have no mechanical shutter, but the Z7ii has.
As for built-in sensor cleaning: Vibrating the sensor does shake off dust, but it’s important to hold the camera in a sensible way: Pointing the lens upwards while cleaning will only redistribute the dust. Hold your camera like when taking a landscape photo (or put it on a table) and the dust falls down into an area, where some manufacturers put a “sticky well”.
I’ve used Pentax (sticky gel type) sensor cleaners for my EOS 5D. Worked well, but felt like dentist work, poking around in confined space.
Well, after about an hour, here is a screenshot of a small part…
… of the enlarged image in Topaz at 100% zoom.
Whatever you do, don’t criticise it without standing about two metres or more back from the screen, as this would be, at least, the intended viewing distance…
Thanks, @Joanna. That answers all my questions - the viewing distance.
It brings up more questions, but that was the “key” for why you do this.
I hadn’t even considered this, while trying to understand.
A follow-up thought is what happens when you do this to an image, so viewers can see it from say, 15 feet away, and then someone gets up close? Seems to me that the only way to achieve that, is to start off with a larger image to begin with, more resolution.
This is why, when asked to do a wall-sized picture, I can always opt for my LF camera…
5" x 4" scanned at 4,800ppi = 24,000px x 19,200px, printed at 240ppi = 100" x 80"
… or with the D850…
46Mpx digital = 8,256px x 5504px, printed at 240ppi = 34.4" x 22.9"
… which means I can get away with enlarging the digital image by only 3x to get roughly the same size print - something that is not beyond the realms of possibility. When approaching the film print, you will more than likely start to see grain before you see pixels.
Of course, if I were to send the magnified digital image to a lab that uses a Lambda laser printer on silver gelatine paper, I would only get paper grain, just as I would if I had used a darkroom enlarger.
One of the major problems I have found with scanning LF prints is to get an adequate sharpness without provoking edge halos, so I would be loath to say which is going to look the best at an appropriate viewing distance.
Here’s an interesting page on resolution required for viewing distances…
Interesting indeed – and with some slack compared to what Wikipedia says (check the second paragraph below)
The maximum angular resolution of the human eye is 28 arc seconds or 0.47 arc minutes;[23] this gives an angular resolution of 0.008 degrees, and at a distance of 1 km corresponds to 136 mm. This is equal to 0.94 arc minutes per line pair (one white and one black line), or 0.016 degrees. For a pixel pair (one white and one black pixel) this gives a pixel density of 128 pixels per degree (PPD).
6/6 vision is defined as the ability to resolve two points of light separated by a visual angle of one minute of arc, corresponding to 60 PPD, or about 290–350 pixels per inch for a display on a device held 250 to 300 mm from the eye.[24]