Nikon Perspective Control Lenses - only for interested people

OK, to explain what I wrote earlier, both of these posts I disagree with.

WhenI lower the lens, raise the camera, and leave the camera pointing straight ahead, and aim at “something”, whatever the “something” is, I am not looking straight ahead. I am effectively looking “down”.

You can prove this to yourself. Aim your camera/lens at something a few feet away from you, camera on a tripod. Now, raise your tripod a lot. Next, lower the lens until that “something” is again in the middle of your frame.

You will now be seeing it from above.

…which is why if I raise my camera to photograph the hydrant, and lower the lens, I now see more of the TOP of the hydrant, and the horizon way off in the distance appears much higher in my photo.

If you have an doubts, I will do this example, and post the photos here.

The important thing is that as you raise your camera, more and more, you are now looking DOWN at that “something” With your view camera, you can shift, and twist, and anything else you want, but if the camera is that high, you will be looking DOWN at whatever you are shooting, regardless of what you do with the lens.

I’m sure you are already aware this, and we must somehow not be talking about the same thing, but there is no way to avoid it.

My photo of the hydrant with the camera raised a hypothetical one foot will NOT look the same as it did with the camera level with the hydrant, no matter what else I may or may not do. The two examples from up above are incorrect.

There’s a difference between lowering the camera and lowering the lens. The max distance of this specific lens is 11mm. No one will construct or buy such a lens for just lowering or raising the camera with only 11mm.
I’m trying to make some drawing to show the difference.

George

Example.
Shoot in landscape with a FF camera, 24x36mm. The field of view is 50 degrees. Focus on a subject at a distance of 50m.
Both the sensor and optical ax will be lowered. So also your angle of view lines. Your subject will move just a little bit, you won’t see it.
Now just lower the PC-lens with 11mm. The sensor doesn’t move but the image on the sensor is moving 11mm. That means it moves 24/11=46% over the sensor.

So the difference between moving the camera or the PC-lens on the subject is 11mm for the total system or 46% for the PC-lens.

George

Indeed. I worded that badly.

There is a nice animation of what a shift lens does in this article…

Well explained.

I run through your link. It’s also describing what @mikemyers did.

George

What I found, was partly on accident, not intentional. I know that shooting down at something will show things from “above”, while shooting them at the same level will show things “head on” They can’t be the same image, because of the viewpoint, irrelevant of any perspective control.

What I did not realize, and is now obvious, is that lowering the lens while keeping the camera level, resulting in shooting down at something, will seem to increase the height of the background, for me, in this case, the horizon.

The article Joanna posted above is fascinating, as it goes on to discuss things I never had any reason to think about. It’s a whole new toolbox that I can use, when appropriate. I suppose it’s the only thing I can do to make my Nikon + PC lens achieve things that otherwise require a view camera with the necessary adjustments.

The reality though is I will most likely achieve these corrections in PhotoLab, as it’s unlikely I’ll be carrying around a PC lens, along with the limitations of using one.

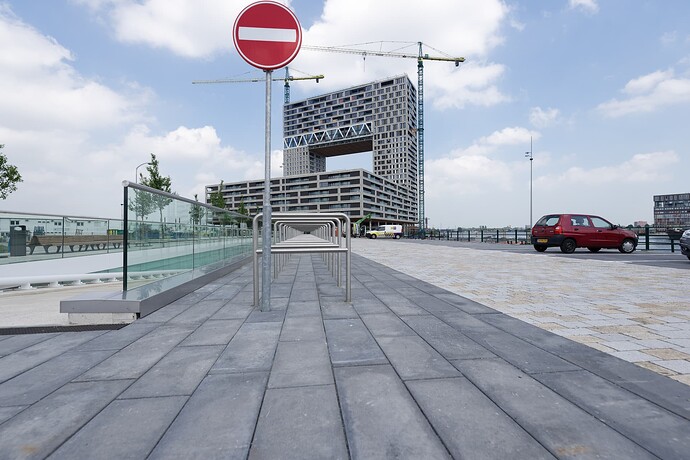
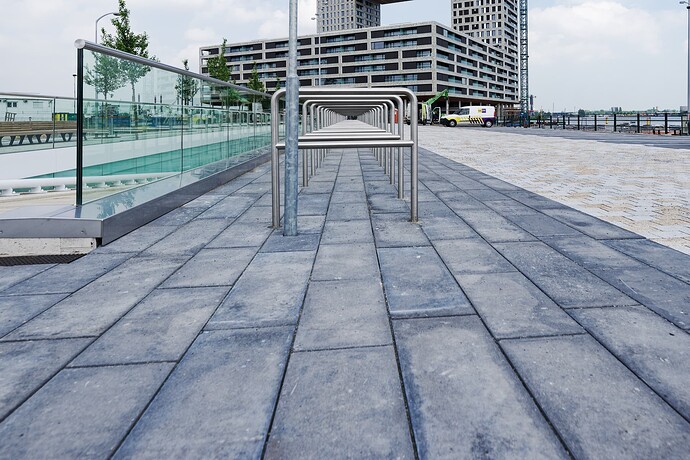
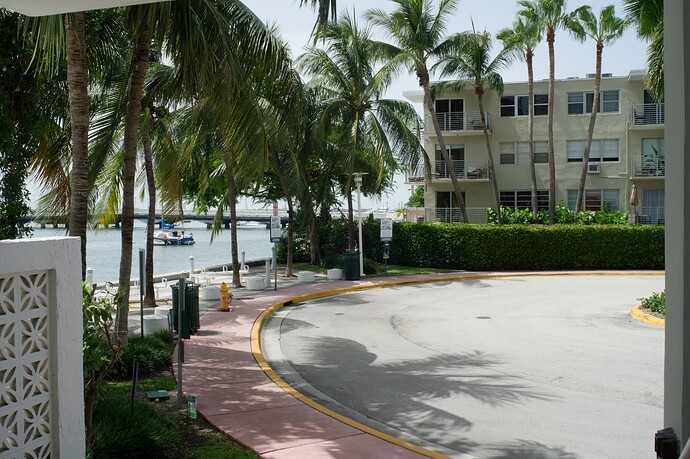
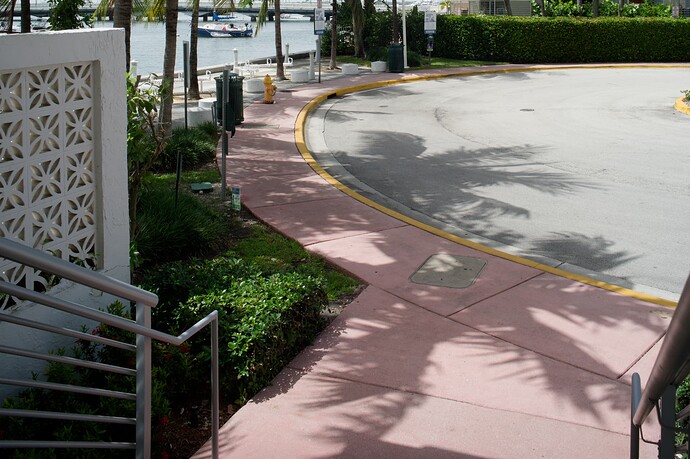
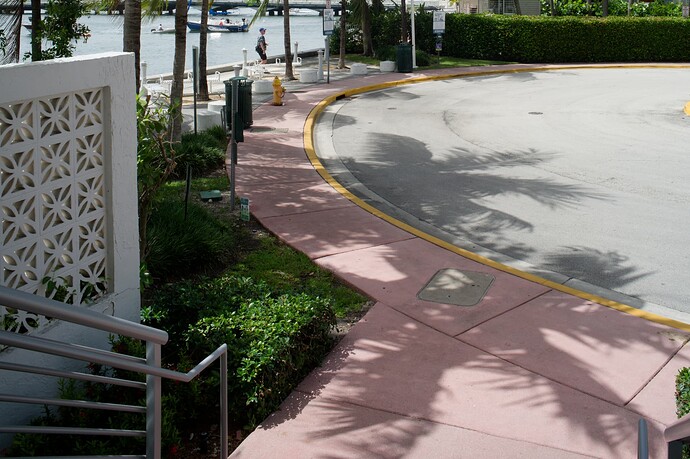
In the two test images I took (posted up at the beginning of this thread), the camera was held level, and the lens was lowered as far as I could (11mm apparently).

In the top image, the horizon is in the middle of the frame, midway between the top of the image, and the bottom, as would be expected.

In the second photo, look at how high the horizon moved in the image, almost to the top of the image. Then look at the bottom of the image, to see how much more is shown. Essentially, the “camera” is now looking down, although there is no perspective distortion for the reasons all of you have explained.

Those two photos were just an experiment to see what lowering the lens did for me. In addition to keeping the correct perspective, since the lens is now seeing “downwards”, the horizon is higher. Neither image looks obviously distorted to me. I’ve “lost” the top of my original image, and gained more at the bottom. The handrail isn’t shown in the top image, only the bottom.

But again, in all these years, I would have aimed the camera lower, and used my image editor to correct the perspective “distortion”, which is really a distortion - that’s what my eye sees when I look down, but our brains have learned not to notice any “distortion”. We just see “what’s there”.

I think this would work more conveniently on a mirrorless camera, where I view what is actually showing up on the sensor. It’s not important enough to me to spend many thousands of $$$ on a Nikon Z, but it’s a serious consideration for whether I want one in addition to my Nikons. A decade or more ago I bought an adapter that allows me to use a Nikon F series lens on my Leica M10. I should find where I put it, and maybe try it that way. I’ll first try to use the lens on my DSLR in “Live View” mode, which maybe will achieve the same end result, and I might see the full “corrected” image on my back screen. Might.

You’ve a FF camera. Now crop an image with a DX size crop. You can move that around your FF image. That’s exactly what happens with your PC lens. Your viewpoint doesn’t change, only your framing.
Look at your 35mm PC lens as a 17mm with the same image distance, like a FF lens on a DX camera. Now you can crop with the PC lens by moving the optical ax. This is the same as moving the sensor relative to the optical ax.

George

Technically, I agree with you. Or, I could get the 17mm lens, put it on my FF camera, and crop. My 24 megapixels would become what, 12 megapixels?

I still have a DX Nikon, my D2x.

Interesting concept, but I think I’m better off aiming lower, and correcting perspective later with PhotoLab.

If you want to crop the image later you must use a lower focal length, wider angle of view, to be able for cropping.

George

1 Like

Indeed.
@mikemyers think of the shift lens as the equivalent of using an FX lens on a DX sensor.

Except, the image circle for the shift lens is bigger than needed for an FX lens, which allows the image to be moved within that larger circle.

That’s certainly what I do, unless I want to use tilt corrections and, since I’ve already spent out on an LF camera, I don’t see any point in spending even more on a limited use shift lens.

As for your example shots at the beginning of this thread, there is absolutely no benefit to using a shift lens.

And, I have to reinforce, in neither shot were you “looking down”. If the camera were truly level, the only difference is that you were looking horizontally straight ahead from a slightly different height.

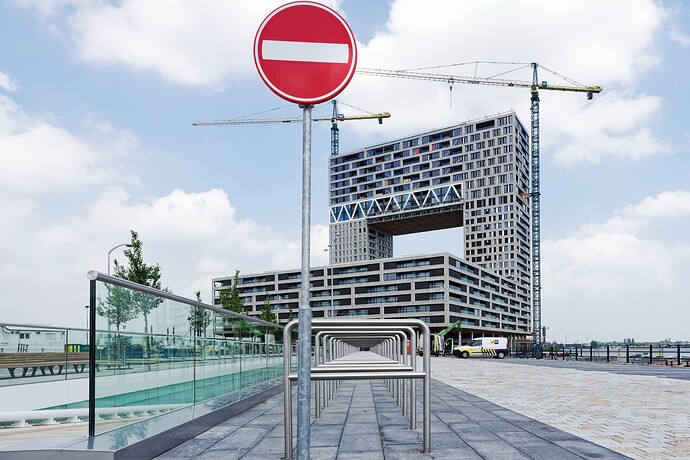
Real world example.

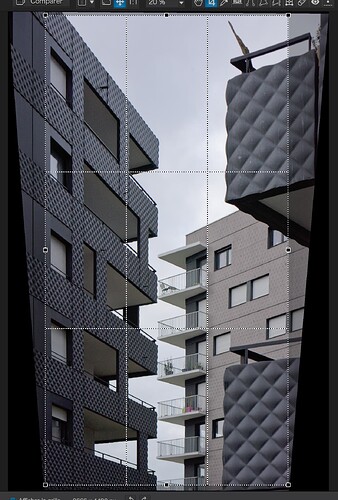
Taken, allowing room for correction of converging verticals…

After correction…

Adjustments required…

In this instance, there wasn’t enough room to use a shift lens without severely limiting the pixel count.

Gosh, how many times do I need to repeat, those shots were only to illustrate the difference, nothing more. I went to the top of the stairs near my building, and included the horizon and some buildings. It was never intended to be a good photograph, only a comparison. Of course there was no benefit. It was a simple test.

Yes, the camera was pointing straight ahead, but effectively, it certainly was shooting down - the image at the top was cut off, and more image was added at the bottom. If you used a string from the front of the lens, to the middle of the image, the string would be angled downwards. Yes, the camera was aimed forwards, but it was shooting stuff that was “lower”. If I instead pointed my camera lower, without using this lens, I would cover essentially the same area, but I would have annoying perspective - which I would remove by software (PhotoLab Perspective Control).

If you still don’t believe me, set up your view camera, on a tripod, and aim it at a building. While looking at the rear screen, continue lowering the lens as much as you can. You will clearly “see” on the rear screen that what is being captured is “lower”, and you are looking down at things.

With my fire hydrant shot, I can compare looking straight on at the hydrant, so I only see the front side. The higher I raise the camera, it shows more and more of the top of the hydrant, as I am now looking down at it.

Maybe I’m not using the right words, but you can prove this to yourself.

Or, with your view camera still on the tripod, pointed straight ahead, raise the lens as far as you can. If you were able to move the lens far enough, you would then see the “top” of the building, and see much less of the “bottom” of the building.

If you want to see the top of the building you are looking up at it. By using perspective control, and only raising the lens, you will eventually be looking at the top of the building, but vertical lines will remain vertical.

In my two photos, when I lowered the lens, the horizon got higher in the photo, and I could see more at the the bottom of the photo

None of your photos have the camera pointing straight ahead - not sure I even notice differences in them. Why would pixel count change? If you’re using a sensor of 50 megapixels, your photos will all be 50 megapixels? If you raise or lower the lens too far, yeah, you’ll cut off the top or bottom of the image. Nikon’s shift lenses are designed to take that into account, so no pixels are lost.

I hope you take two photos like what I did, which were taken specifically to show how the area covered by the lens changes (less on top, more at bottom, for my test). Move your lens a LOT, to make the changes more obvious.

All three of your images are looking UP at the buildings. To really see this, you need to start with the camera level.

Original FF image.

Then I made a DX crop and moved it to the bottom.

And one moving it to the top.

As you can see through the staples the point of view didn’t change. Just the framing.

George

I’m sorry to insist, but that is rubbish.

Was the camera on a tripod?
Did you check for a perfect level?

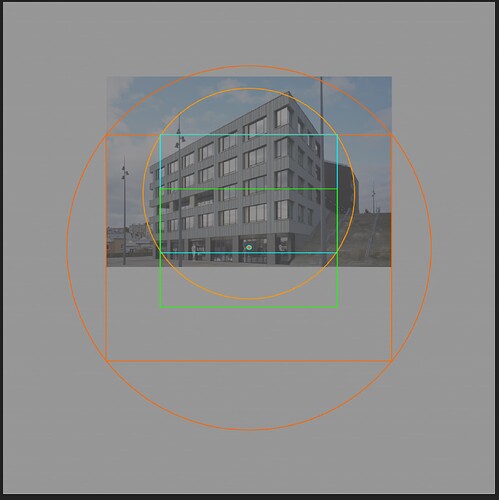
A non-shift lens on a 36mm x 24mm sensor requires an image circle of 43mm.

Your shift lens gives you an image circle of 74mm and thus, a maximum possible image area of 58mm x 46mm.

Shifting the lens vertically, “crops” an area 36mm x 24mm out of that rectangle. It doesn’t raise or lower the optical centre, it merely hides the U-shaped area that surrounds the 36mm x 24mm crop.

If you were truly “looking up”, there would be an even greater convergence of verticals.

Example…

  • The outer circle is the image circle of the shift lens
  • The larger rectangle is the maximum image area that that will fit in the image circle of the shifted lens.
  • The inner circle is the image circle of a non-shift lens of the same focal length, shifted up by 11mm
  • The smaller blue rectangle is the maximum image area that the 36mm x 24mm sensor can capture out of the shifted image circle.
  • The smaller green rectangle is the maximum image area that the 36mm x 24mm sensor can capture out of the unshifted image circle.

In reality, if the film plane is truly vertical, the optical centre would be at around 5ft from ground level at the base of the building, which is where I have placed it in this example, and that would give you an image area of the green rectangle unshifted and the blue rectangle shifted by 11mm.

This image was taken with a 42mm focal length and you can see that, for the framed width; there is enough height to accommodate the height of the building, even without shifting.

On the whole, it is far easier and better to not mess around with small format shift lenses like these and do it all in post processing.

That may all be true, but it’s not what I’m describing.

Look at something, anything, perhaps a simple box, and put it somewhere at eye level. Take a photo of the box. You will only see the front of the box. Now, raise your camera by getting on a stepladder, and look at the box. Now you will see both the front and the top of the box.

Then do this with you camera, same scenario. Take a photo of the box, keeping all of it in the center of the image. Then lower the lens as far as you can. Agreed, the box will simply be lower in the frame.

But if you want to take a photo of the box, centered in the frame, just like at the beginning, you will have to raise the camera more and more, until the box is again centered in the frame. As you do this, the box may look the same, but everything behind it will be higher, including the horizon.

Now, me, with my hydrant. I take the first photo, and the hydrant is centered in the frame, and I’m looking at the horizon also centered (vertically) in the frame.

Now, I lower the lens as far as I can. I find myself looking at the base of the hydrant, which is not what I want, so I raise the camera until the box is centered again. My new photo will include more of the “top” of the box (hydrant) as the camera is now higher, so in effect I’m looking “down” at it.

To answer your question, no, I was not using a tripod, but I lowered the lens as far as it would go. My camera has a built-in level, which I can use next time, but this effect is very obvious.

  • All I’m doing is taking a photo of the box, centered in my frame.
  • If I shoot normally, I get what I expect to get.
  • If I lower the lens, I only see less of the top, and more of the bottom of the box.
  • So, to include the whole box, I need to raise the camera.
  • If I raise the camera, regardless of anything else, I’ll be seeing the front, part of the top, of the box.

With your view camera, you don’t even need to take a photo. Aim the view camera at the box, or whatever, and while you’re watching the back of the camera, you will see the box moving downwards. Go as far as you can. Then, to get the box back into the middle of the image, you will have to raise the camera. If you raise the camera, you are no longer capturing the same image, as you will see more and more of the top.

There is a lot more going on. What I described is ONLY to show that the image has changed, as to capture the box in the center of the image, with the lens lowered, you will have to raise the camera.

I will do as you suggest, and take a photo of something, centered vertically in my photo, with the lens centered (not lowered) and the camera on a tripod.
I will then lower the lens as far as possible, and take a second photo. I expect the thing I am photographing not to be centered - I expect to see it much lower.
Finally, leaving the camera as-is, I will raise the camera until the subject is once again centered vertically.

Because the camera is pointing ahead, I don’t expect perspective issues in the three photos.

I do expect that to keep my subject centered in the image, as I lower the lens I will need to raise the camera.
I don’t believe it!!! That makes it impossible to do a valid comparison. You could move the camera by more than 11mm, simply by breathing.

indeed you will but you are not “looking down” on it, you are simply seeing more of the top.

It was a rough comparison, and it was obvious. The two photos I posted at the top show this.

Look at the first image. Look at the bushes towards the right, which are centered vertically. Or, look at the hydrant, a little below center, towards the middle.

Now, go to the lower image, where the bushes are way up near the top, and the fire hydrant is so high. Both of those changes are a result of lowering the lens. If I want the bushes to remain in the middle of the image, or the hydrant, the only way I know of is to raise the camera.

By only lowering the lens (a lot!), the only way to get them properly centered again is to raise the camera.

If you try this, you will get the same result, assuming you can lower the lens at least as much as I can.

Now look at those bushes

Unless you are prepared to do a valid test with a tripod with a geared shaft, I cannot take your claims seriously

@mikemyers
Changing your camera position changes your point of view, changing your lens doesn’t change your point of view.
In your example you change the camera position so your point of view.

Your max correction with the PC-lens is 11mm. So if you want to raise your camera, correct that with your PC-lens and want to get the same framing then that can only be done within the range of 11mm. With macro that will be a lot, but if you shoot a box within let’s say 2 meter you won’t notice any change.

Did you look at my pictures?? The look trough of the staples proved the point of view doesn’t change. With the camera at the same level.

George

PC Lens test
Three photos, on tripod.
Anyone with a PC lens can replicate this.

#6275 - Camera mostly horizontal, on tripod, viewing outdoor scene
ISO 2000, 1/320, f/16


Notice bridge/horizon is in middle of image (vertically)

#6276
Same, settings, but lowered PC lens all the way down.
Notice that everything has moved “down”, horizon is near top of image - because the lens is effectively shooting downward.
(Because the lens is so low, the camera acts like it is pointing down, which it wasn’t).

#6277
For this last photo, I raised the center column of the tripod, which you can see by looking at the concrete wall, at the left.
Very similar to previous photos I posted earlier. I really needed to raise the camera a LOT more, maybe a few feet, to capture the original scene. Even in this photo, if you look at the angled bars in the fence, the last photo shows less of them, but to get the proper angle of view, the camera would need to go high enough so none of those fence bars would be in the image.

Conclusion - by lowering the lens, the camera appears to be shooting much lower than when the lens was centered.

Conclusion - by lowering the lens, the camera is effectively pointing downward, which makes sense considering how low the lens was.