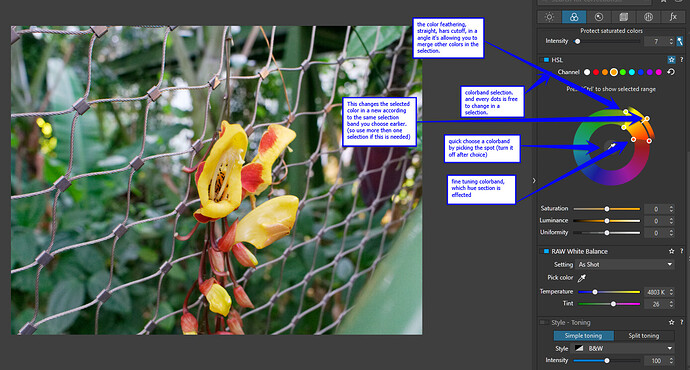
HSL has been renewed in User Interface and it has some new features to masking visuality.
Lets start with my old way of selecting and finetuning a colorrange which i want to change.
choose your color in the dots above.
Then desaturate this completely, it turns “grey” This gives you a view of what is effected and what not.
then use the four dots in the wheel to fine tune selection. (lose as much as not needed/wanted colorchange.)
Then saturate again till wanted level and turn the wheel of colorchange. (when changing color it’s better to oversaturate first to see the effect better and turn down this later to a point you like.
Use luminance to balance colorsaturation and lightnes to fit/blend in the image.
Latest move is the “Uniformity-slider” this slider does as the word says.
It’s a “feathering” it select more or less colors in the color-range you selected around the color-range and turn this in the same color. It damping nuance and color huerange, or to the plus it let slightly off colors be in the changed colors.
It’s not the same as the feathering you make with the outer points!
resume:
This video shows my old selection way and show you that a selection is depending on which color change you like to make with the outer pin. it’s just fiddling until you find the perfect spot.
click here for video
Ok now the new function:
it’s i think the first step in perfecting the selection modes.
What is does is exactly the opposite of my old selection methode.
It’s showing the selected colors which are in that “dot channel” you choose.
See video by clicking here
both methodes has there own pro’s and con’s.
when you working in multiple channel selections a CTRL+left mouseClick is better to readjust selection each channel because it’s popping out a grey background. (remember it’s only reacting on the colorwheel:)
see video
For initial selection the “Desaturation methode” works better, you see the grey plane’s turn up wile working the selection. And then the next channel again, if you have all channels “desaturated” the hole image would be “grey”. Saturate one by one and you see the selection per channel.
Then the CRTL+left click is come in handy.
you can click every channel and leftclick to see the coloreffect only on that section.
i tried to show you what i ment in this video. click here to watch
i have a color row of pencils which shows the difference of use.
i selected first all colors with “desaturation methode” in all channels i have to my use.
Note: the white dot/ channel is a form of colorcasting appling and can be used to desaturate a casting effect. (not the same as temperture of the lightsource but real reflection of a object or a shine through.)
This is a bad example because green is a color which is crucial for the image but it shows you what i ment:
click for video
Use full?
minory in my opinion.
what can u do with HSL?
ha!
shadow cast correction
changing images in new images
Saturation rendering
you can correct blown colors more detailed.
fun play one
and fun with bumblebees
To much side effects?
well local adjustments can help out in that.
But thats an other chapter. video
Hope i helped to discover the possibilities of the color tool HSL
Peter
