ReTouch → put to “logical” layers and ability to turn on/off them (layers). Example: i do some portrait, and put like 100-200 retouch points, like: 15 for face, 90 for hair, 20 for background, 25 for clothes → and its goes to mess. To fine tune, may good to “show only” “hair” layer, or “edit only” in “hair” layer.
4 Likes
I saw with the new Nik Collection v9, fusions mask seems released.
Does that mean we’ll have fusion masks also in PLB 10?
Finally, some merging capabilities for bracketing?

Mask setting sync / copy. Just the mask exposure, whatever settings (and not mask size, position, etc). Match by mask layer name.
Example: 150 outdoor photo, model with :cloths, bags masked nicely, do some microcontrast, some exposure on that. Masks named like: Cloth, Bag, Scarf. But later i realize, the color of the bags not the best, some temp, saturation, hue adjustment needed. Now i need to go one-by-one on the photos, select the already existing mask, manually change the hue, etc.
May easier to do something like: Select photos → right click - Select mask → Mask list come up - select what i want to copy the settings (may checkbox for multiple mask) → Sync mask settings (from first photo)
I just do it now (now! tonight) for approx 150 photo for 4 bag…
And “bigger” mask list window… Like if i select/scroll in mask list, its auto expand for larger size. For this shots i use like 15 mask.
May also ‘copy/overwrite whole mask’ for selected masks. With mask size/position, all settings.
4 Likes
1000% this.
I’ve been going through large amounts of motorsports shots and have had to completely build my workflow around how PhotoLab can’t really do this or intelligently sync certain mask changes. Ended up accidentally overwriting an entire batch with all of the masks from just one shot (rather than updating all the masks called “car” to reflect a certain change).
That was yesterday afternoon.
More intelligent mask behaviour would be a boon.
1 Like
Another “not for me but interesting” concept.
That is certainly a pain point, but I think all panels could do with a little smartening up. There are already collapsible sub-parts of some panels, plus the built-in help, but it’s all a little fiddly.
And it is long past time to fix the contrast and font size!
2 Likes
Speaking of the interface, it’d be nice to have more/different ways of refining some things, like colour.
The colour wheel is not very… precise. On the basis it’s a circle, let us specify any of the control points on the wheel as a value of 0 to 359 (not sure how this would function with overlapping so might need a bit more refinement).
The point is we should be able to reliably adjust one colour to another and replicate that without guessing between edits (without defaulting to cumbersome presets).
5 Likes
Masks:
Reset mask value (exposure, wb, etc, and NOT position, luma, etc) to default (photo global). Like: right click on mask → reset to global. Not need to crawl thru what i changed, and change back (double click, etc) to global value(s)-
Example: sometimes i mess up what i change, and good to start from basic (global). Sometimes i also does duplicate mask, but for different reason: on mask is for face exposure, and duplicated mask for only the WB → and in this case i not need to go down and reset each value(s)
Show in the Mask editor (values, like: Exposure, WB) if Mask WB is not the Global WB! Like: WB label is green if Mask WB value different from Global WB value. May also good in all other values to show its not the Global.
Example: other settings like Exposure is easy visible if its changed/modified form Global. But not in the WB! If you not remember you changed, or not remember what was exactly the global, you just wonder is the Global or You changed?
1 Like
Isn’t the existing button ‘Reset mask corrections’ enough for you?
1 Like
For fluidity these days, one must have 1. beefy hardware or 2. avoid the AI masking.
What everyone can do to enjoy faster previews and smooth sliders: don’t turn on noise reduction, especially any form of DeepPrime until export. If noise reduction is on and you have multiple AI masks, you are doomed. Everything will slow to a crawl even on the most robust of hardware.
There should probably be a warning when making changes on a large number of images (more than three?). I’ve had full sets selected for export and gone into the visible photo to make a small change and ruined a whole set. There’s no undo from here (as it’s not a single photo, perhaps going through all the photos one by one one can undo).
1 Like
Never realized  thx!
thx!
As much as that’s true (as in “that is how it is”), I do think some further optimisation is needed at DxO’s side and competing options fare better in this area.
But…
I hit a revelation recently. Applying Lens Sharpness Optimization to a mask is - for reasons unknown - a cause of huge performance loss for me.
So…
I’ve come up with a new approach to masking where LSO is applied as a global value and I do my in-mask sharpening via other options.
This has been a performance game-changer for me. Exports have gone from 25+ seconds to under 20. PhotoLab remains fairly responsive through an entire editing session; no more slowing to an unusable crawl after 3 edits.
I absolutely agree about the warning and the solution you suggested (going through individually and undoing the change) is exactly what I had to do.
It took ages and it was a huge PITA, because it’s not clear which history state is the ‘offending’ one that caused the problem.
Suffice it to say, I wouldn’t like to do that again!
1 Like
This lack of a warning has been raised many times but is clearly not seen as a change that would bring in cash so ignored
2 Likes
Adding panorama to PhotoLab won’t improve your workflow.
And that dear friends is why PhotoLab should not include a panorama stitching tool at all.
To make RAW corrections and repairing lens distortion while doing advanced noise reduction at the same time as one stitches 30000 to 120000 pixels together is beyond the abilities of existing computers.
The correct workflow to efficiently create majestic panoramas smoothly is:
- process all the images with identical processing, cleaning out any lens distortion (doesn’t work well with stitching except as a special effect).[1]
- make any local adjustments
- apply noise reduction
- export images as flat files, jpg or tiff
- check the quality of the images carefully (if one still wants to make changes to the core processing go back to step 1)
- create a separate folder for the panorama source images and put them there
- import them to the stitching software
- fiddle with stitching and perspective in the dedicated panorama program until one is satisfied with the panorama
- export panorama
- check again for stitching issues at 100% or 200% with an image viewer like FastRawViewer (€19), Pixelmator Pro (€50) or Affinity Photo (free).[2] If the longest side is shorter than 34,040 pixels (macOS), LilyView also qualifies.
- If there are stitching issues, then rebuild the panorama from the original images.
- If you like the final panorama but would like to produce stylised versions (sepia, faded edges, film burn, black and white), take it into PhotoLab, Affinity or another bitmap editor and create that version.
Since PhotoLab is a RAW editor and manager, including PhotoLab in the panorama process creation makes no sense. Panorama creation is not done from RAW files but from finished TIFF, PNG or JPG slides.
Introducing PhotoLab into panorama creation would be extremely confusing as it would make lazy or neophyte panorama shooters wonder why their panoramas turn out so badly. There would be no end of bad reviews.
If PhotoLab were to introduce a nanny wizard to stop panorama beginners from botching their panoramas, there would be a hullaballoo from those cranky eccentrics (lots of us here in feedback, and among PhotoLab users) who want to deliberately make strange or partially broken images.
If DxO really wants to get into the panorama and focus stacking business, it could certainly do so with an enhanced version of ViewPoint which requires TIFF, JPG or PNG images for processing. Panorama has absolutely no business in PhotoLab. Properly shot focus stacks might work.
I am so weary of the panorama panorama stitch me in PhotoLab crowd. Please read and reread the above until you understand the photographer’s process and what the application does behind the scenes when creating panoramas.
For those who argue that Affinity Photo is a RAW developer too and does panoramas. No, Affinity Photo is not a RAW developer. It’s a bitmap editor with a RAW import funnel. One can do nothing with a RAW in Affinity Photo. One must import it first, at which point it becomes a bitmap image. Bitmap images are what one needs for panorama creation. The same logic applies to Photoshop.
In the meantime, there are no end of great panorama tools on every street corner. Affinity Photo seems to rate about a 3 (my own experience is 4 as its limitations don’t affect my own panorama work). Hugin and Autopano are free and apparently work well. Photoshop’s panorama tool was excellent when I last used it more than ten years ago.
There’s a very good free app in the Apple app store which is drag and drop, Panorama Stitcher Mini. It only allows five files but otherwise is fully featured with no watermark. This is fantastic for small panoramas (what most of us create). The big brother is all of €15. I’ve tested the free version and after a few more tests, I’ll probably buy the full version. It’s drag and drop and just works and has the different alignment (Spherical vs Planar), crop (Superscribe, Inscribe, Manual) and projection (Rectilinear vs Equirectangular vs Stereographic). Just playing around with one random panorama has shown me I’m missing out on a lot without a projection switch which includes stereographic.
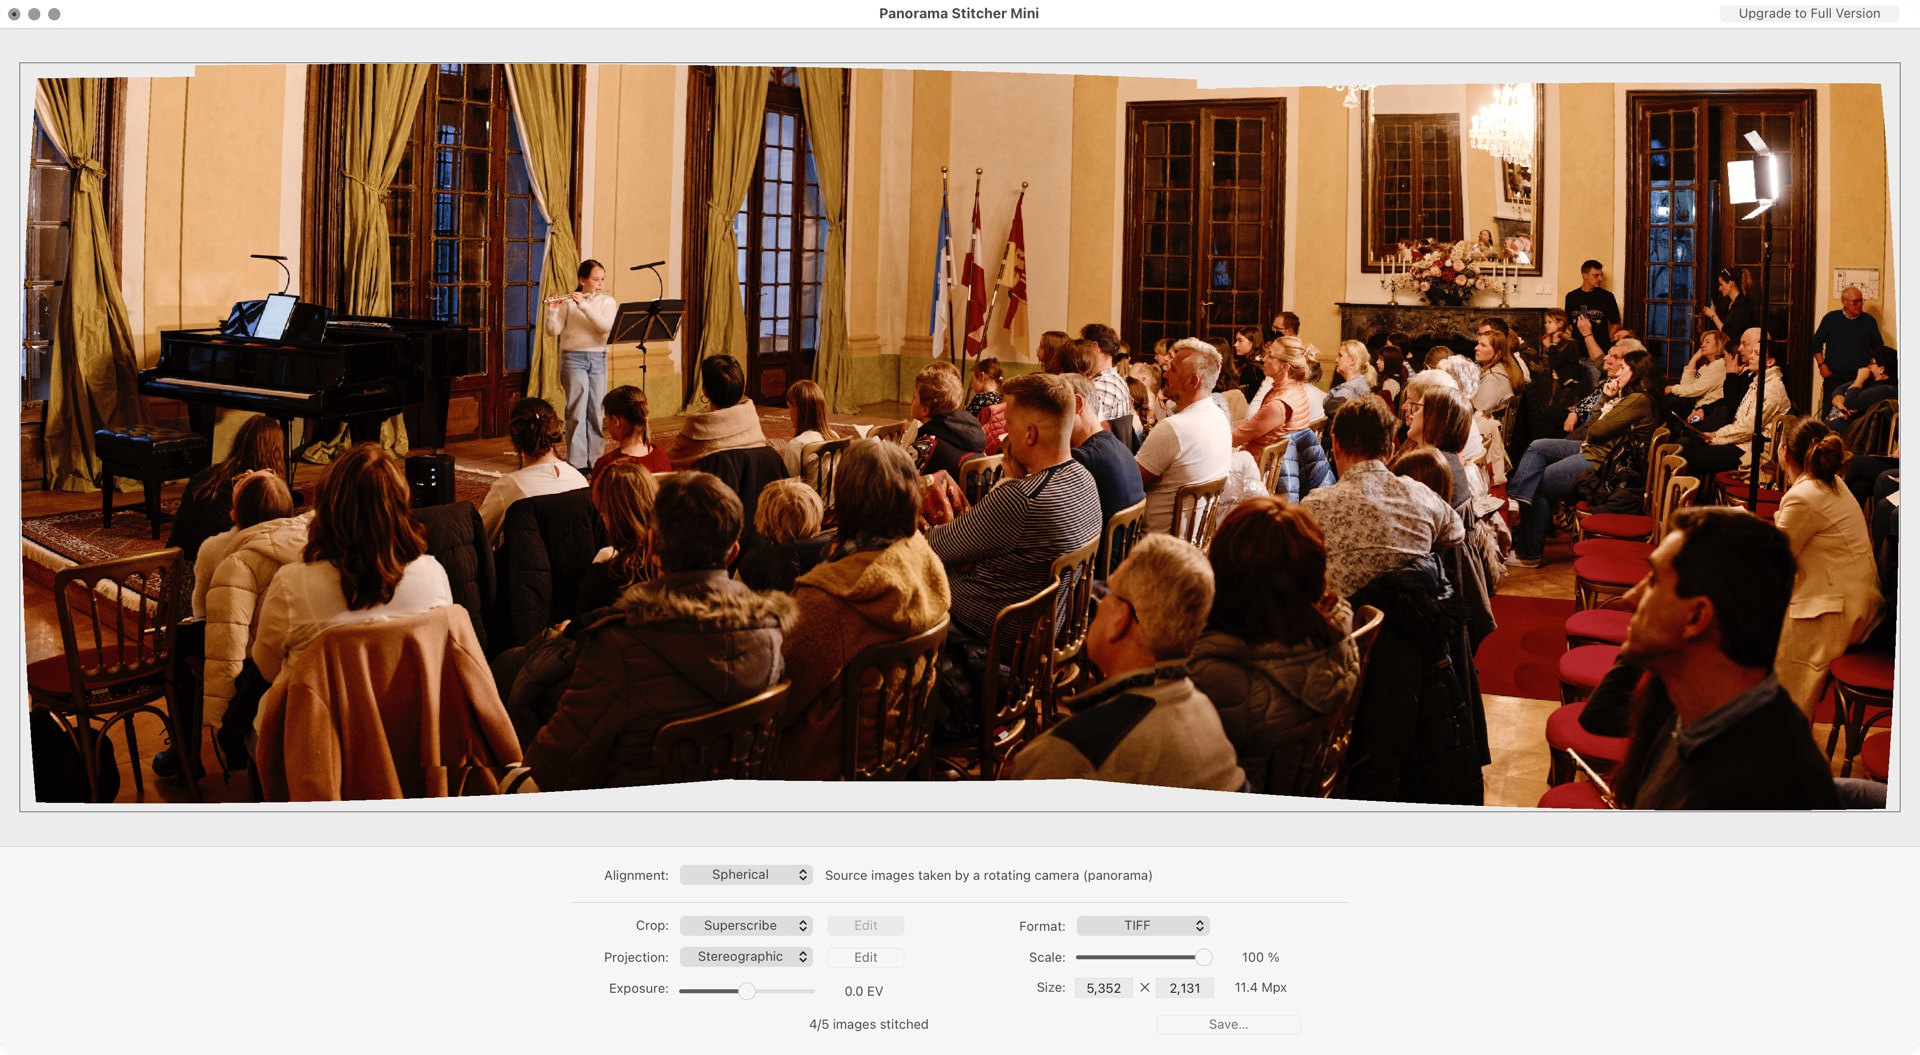
One could push the free version further by creating three panoramas and then stitching those together if one only very occasionally makes larger panoramas.
Then there is PTGui but it’s expensive (personal license €175 + VAT). I don’t think I’d like the interface, it’s very technical in an ugly and unpleasant way but it’s incredibly powerful.
In short, if one wants to work with panoramas there are excellent tools available for free (or already included in the other tools you own). There are panorama tools for every size of panorama and with a simple (Panorama Stitcher, Affinity Photo) for smaller panorama or complex (PTGui) interface for massive 80 image panoramas.
This is an Apple limit. The core image engine (the one used in Preview and Finder) cannot display an image larger than 34030px on the widest size or manipulate an image larger than 30000px. Exactly what you ran into.
PhotoLab would have to completely rewrite its image handling routines from scratch. It’s possible (Pixelmator Pro, Affinity Photo and FastRawViewer have all done it) but it’s a huge architectural change. Since the Phase One IQ4 150 maxes out at 14,204 × 10,652 pixels (Fujifilm GFX
100 II and Hasselblad X2D 100C max out at 11,656 × 8,742) there’s no rush for a RAW developer to change its image processing pipeline to accommodate images above 30,000 pixels on the longest edge.
All the panorama photos must be shot in full manual mode with no exposure changes or the stitching will look like a patchwork quilt just based on light alone. Affinity Photo seems to make some small tweaks to exposure to match the images, as did Photoshop but automated exposure adjustment often fails. ↩︎
XN View will show these very large images but is slow and clunky, if you have any of the previous three, they are much more responsive when viewing giant images. Free is expensive if the software doesn’t work well. ↩︎
2 Likes
But there’s one strange thing about it. From online PL User Guide, “Mask management” section:
9. Reset:
- On Mac: resets corrections for the selected mask or sub-mask
- On PC: resets all masks, sub-masks, and associated corrections at once
I thought that submasks are there to define a mask and corrections are per mask, not submask, which sounds logical. So, why on Macs you can reset corrections per submask? On Windows resetting is greyed-out for submasks. On Macs, wouldn’t it be equivalent to hiding the submask, using the cross-eyed icon?
Maybe Mac users can comment on this.
2 Likes
I would like the option to work with multiple catalogs.
This would allow me to keep my personal photos separate from projects or other client work.
If these catalogs were also easy to transfer to other computers—or even from PC to Mac (and vice versa)—that would, of course, be fantastic.
I’m thinking, for example, of something like “Sessions” in Capture One. Or at least separate catalogs.
1 Like
Something like “Database open” can be nice for that. Separated database for personal, other for clients, etc.
Some way “restore database” in the Options the “Database location” can be actual workaround, and definitely not elegant 
Agree that if you are serious about panos then you are better of with dedicated software.
I use PTGui but don’t agree about the UI, it is pretty simple as can be seen below. There is obviously advanced functionality available if you need it. Cost is also not so bad as dedicated software such as PTGui doesn’t need updating and so the cost decreases rapidly over the years.

1 Like
Mask related
- WB picker for mask. 1.) On mask. 2.) wherever in the picture
- Auto-select same named mask in click on next photo. Example: i have 100 photo, with mask named: BAG. I want to change only this BAG mask. I correct in one photo (this BAG mask), and when i click to the next photo (what is also has Mask named BAG), AND im in the LC menu, the BAG mask auto selected.
I’d like a “sync changes with similar masks” type function that does (I believe) the same thing. In other words… if you want to change every example of mask “BAG” to Exposure +1 instead of Exposure +0.50, there’s a way to do that without having to go shot-by-shot or pasting all your masks from one image to the next (possibly overwriting other changes).
Not exactly.
Example: in the BAG photo session now i go thru on each bag, where microcontrast, exposure, basic colours are okay now (of course one-by-one without sync ability - so do the “sync” manually).
But I do editing in PL in late night.
As it was late night, i was tired, the backlights/colors in the room was not a friend for more exact color grading → so, i decide to go thru the BAG(s) next day at daytime, when i see the colors better (more exact) to fine tune them.
Photoshoot was outdoor, under trees (so, everything has green tint). And as the clouds come and goes, the WB change a bit sometimes, some color wheel also needed. Like 5 photo is okay, next 3 is a bit changed WB, next 5 is okay, etc.
The global WB (for modell, background, etc) just okay with this small changes on color, i just concentrate to the BAG(s) → practically go one-by-one on the photos, select BAG mask, do fine tune on wb/color wheel.
For this workflow this ‘auto-select by mask name’ can be nice.