Yes, the tools are expensive, not for casual users. But worth it if one is making a living from it , since it saves a lot of time, which one can get return on investment.
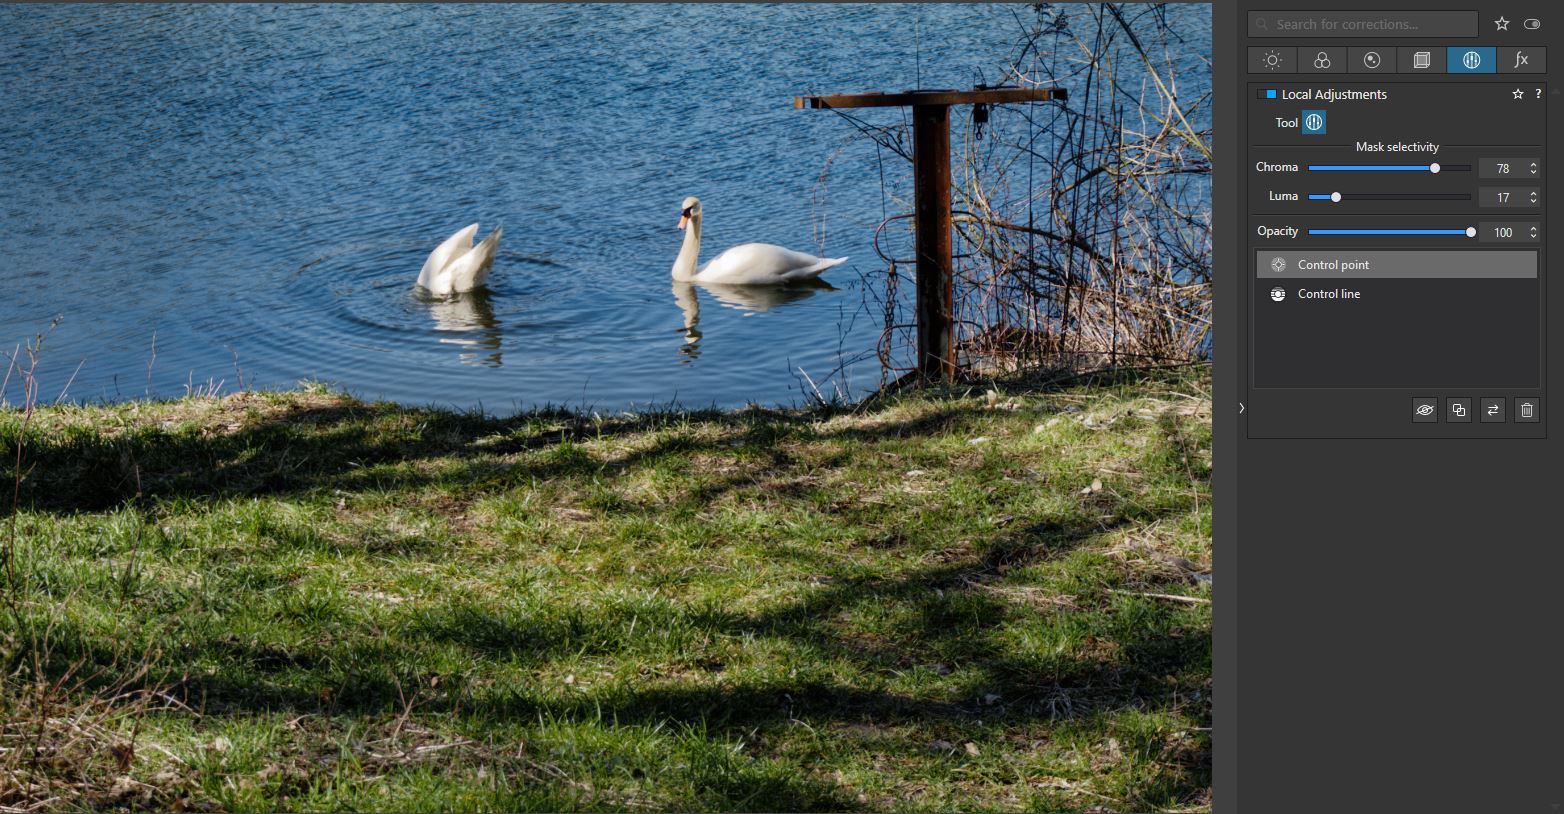
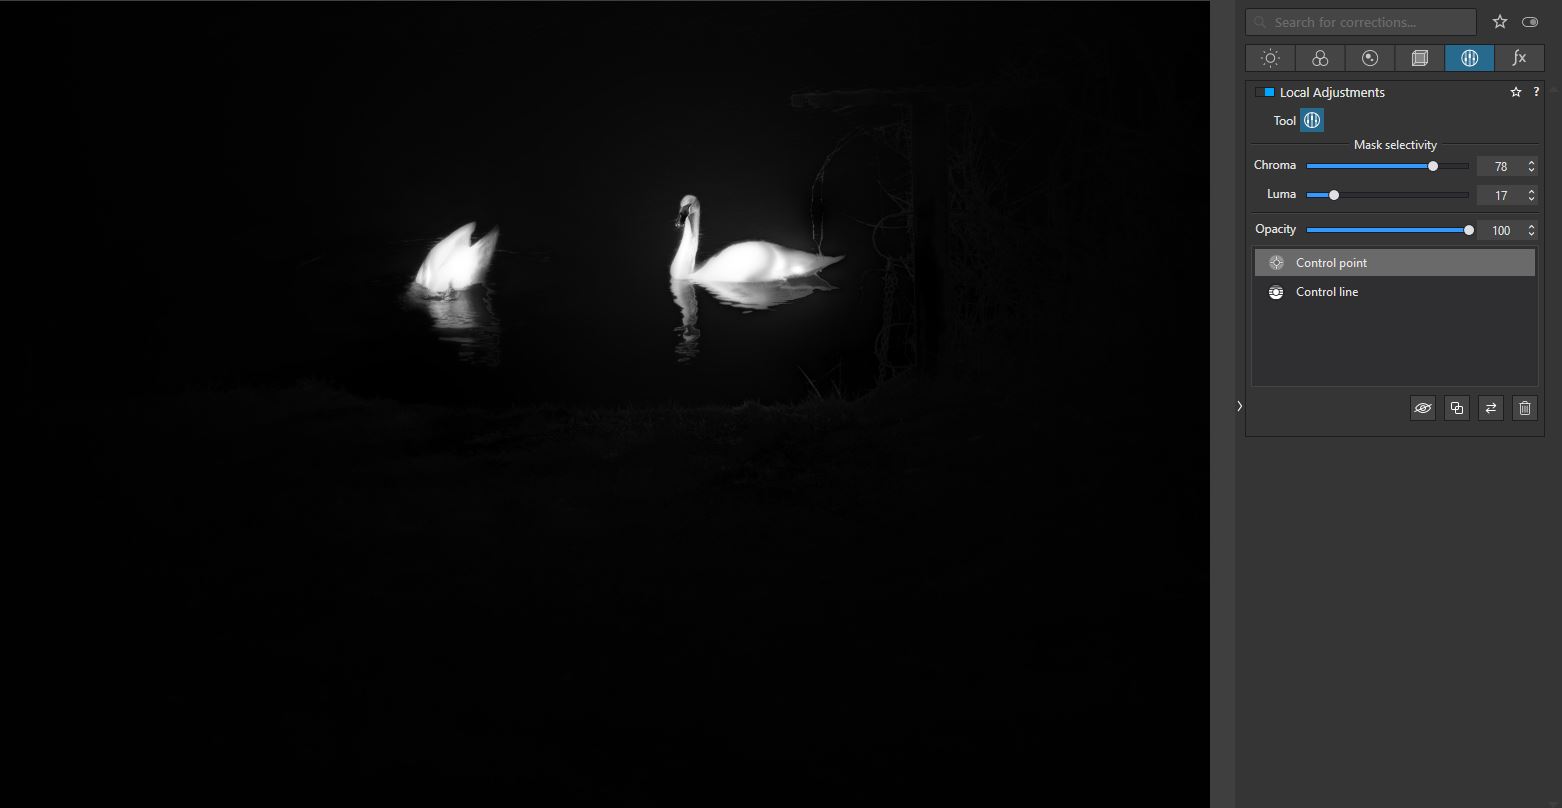
Yes, Control points work with color and tone and we can prioritize each so its quite precise, plus off course we can add negative control points as well, to limit the spillage. This is pretty good method, adding control points to select based on color, tone and position, than using chroma and luma sliders to make sure we get better mask, and finally add negative control points to subtract the unwanted spillage.
That is how I was able to get pretty good and quick selection of these two swans. Probably AI in lightroom would detect them automatically, but it was not hard to do in PhotoLab.
In the original shot the image was well exposed but light feathers of the birds reflected the sun, making it too brights, therefore blown out details, no feather details. So I just wanted to select the birds feathers and bring the exposure down a bit. it worked fine. I imagine AI in lightroom would probably select the beak of the bird as well. In this case I did not want that. Probably one can use brush to subtract the beak in Lightroom or Capture One, but as you can see it works in PhotoLab as well.
Stenis
(Sten-Åke Sändh (Sony, Win 11, PL 6, CO 16, PM Plus 6, XnView))
62
We can absolutely do quite a few interesting things with control points when it comes to masking as long as there isn´t too much “clutter” in the image with the same colors or luma it can be pretty effective. I think I usually prefer the automask and then erase the spill that might occur. The chroma and luma method is kind of elegant but doesn´t really give all that good detail control many times. That´s why I prefer the older and slower automask feature in Photolab most of the times and I also think it might be the case that it more harmonizes with how I use the tools in Capture One.
Still, I prefer the “Style brush” -method in Capture One because it let me work more like I am “painting” a painting or drawing. I think they were introduced a couple of years ago and they totally changed the often cumbersome and ineffective layer administration in CO. The style brushes are absolutely lovely since the layers now are automatically and transparent are created in the background when you start to use one of the brushes. In some ways I find it more natural. When I was younger, I used to do quite a lot of carbon- and black ink drawings, so with CO I feel more “at home”.
Concerning the prices of the brush tools plug in for Lightroom I fully agree. If you really are doing a lot of advanced retouches in Lightroom the price is really not an issue at all for me either despite I´m not living of my images BUT I really do care about how I use my limited time and if these tools can improve my productivity, I will go for them if I was using Lightroom. I have been working during decades with improving software driven workflows so I guess that´s why I´m kind of obsessed by it. Maybe that can excuse some of my writing in this tread and I really appreciate your extensive and skilled input - point taken @MSmithy :-), I have really listened to what you have been trying to say and show me/us with a lot of examples. I think this has been a very interesting discussion.
Of the same reason I´m using Photo Mechanic Plus instead of Photolab Picture Library too, for my pretty intensive use of XMP-metadata on my images. PM Plus is far more competent, flexible and effective than both Lightroom and Photolab and the price of PM Plus is really surprisingly low compared to how much time it has saved me the last two years or so. It´s just around 200 U$ and I would have paid more than the double really because without it I wouldn´t even had considered to undertake that metadata job I do today.
After trying a lot of methods over the years, in the end I got frustrated when companies change and their tagging system or database is not universal to use it with other programs. Like people who were using Lightroom database and tags and keywords for example. than Adobe forced everyone to subscription model, and some users wanted to leave but were held hostage by their own database. It would be too much work to try to rebuild it in another program.
In the end, I decided to use just good old fashion folder structure and manually sort everything. Than no matter what program I use, DXO, C1, Lr, or something else it works the same way. So for me that is the solution.
Speaking of masking, I came across interesting Lr masking video, last night. Interesting challenge to mask a floor of a cathedral interior shot. I don’t have the image to play with it in DXO, but it showed one example where Lr masking was probably faster.
Luminosity masking would be more useful than so-called AI masking, but I agree with other replies here, the current selection tools do more than folk realise and cover almost all use-cases.
I suppose one can make the argument that so called luminosity masks are more intended to enhance the tonal separation of what is already there in the image, hence its using image to select itself using its own tonal information. Its like dodging and burning but in a different way. So we might say its about enhancing what is already there, not so much changing it.
Hard edge masking is more intended to make change something beyond how it was captured. I don’t think that is bad thing to do per se, but what I am saying is that its a different approach to color and tone correction or creative color grading.
It is less about changing the color of a house to a different color, and more about raising or lowering brightness of some areas in the image to lead the viewers attention to where you want them to go and provide better viewing experience.
They are both corrective and creative adjustments, but approach the creative process from different angles. Personally I think luminosity masking approach give better results that feel more organic and natural when used tastefully, while other types of selections are more heavy handed and can easily go in many directions that may or may not benefit the original image.
When image is captured, there is light that is captured and when one is using the luminescence of the captured light to subtly change it, the overall feel after the adjustment tends to feel more natural. When only one specific area is selection with hard edge masking, and changed. Unless the other parts of the image change with it, user can easily create imbalance in the lighting in the image that feels off.
@MSmithy thank you for expanding on the topic of luminosity masks, it’s something I’ve used in the past with Photoshop with the help of Greg Benz’s LM panel extension. LM is also now an integral feature of Capture 1 Pro so the competition is heating up in the RAW processing space.
2 Likes
Stenis
(Sten-Åke Sändh (Sony, Win 11, PL 6, CO 16, PM Plus 6, XnView))
67
I watched the video and it´s very interesting to see how powerful the new smart selection tools are. Not perfect for all conditions but really powerful and they also have functions to correct when a selection done by the AI not gets perfect. Kelby himself calls it “effortless” and the guy to his left said right out that he saw no need for Photoshop anymore when he had all the layers funktions he needed in Lightroom. I would love to get something similar in Photolab.
About metadata and tagging:
“After trying a lot of methods over the years, in the end I got frustrated when companies change and their tagging system or database is not universal to use it with other programs. Like people who were using Lightroom database and tags and keywords for example. than Adobe forced everyone to subscription model, and some users wanted to leave but were held hostage by their own database. It would be too much work to try to rebuild it in another program.”
XMP is really the answer to a tagging system for both documents and images that should be future proof and software system independent. For example, I have myself tried to migrate my XMP-structure from PhotoMechanic to Capture One without any problems. It even crates a list of the keywords used in the image-files or the XMP-files tied to my RAW-files. If I wanted to migrate my metadata structure from PM to a real full-scale DAM-system it would basically just be to point the indexing tool in the DAM to my topfolder or topfolders (one per PM-database).
Unlike Photolab and Lightroom PM and real DAM-systems can have multiple databases and also manages searches that spans over multiple databases. In real DAM-systems a search can handle both images and documents at the same time in the same query. XMP is the opposite to single point of failure since the data is distributed over all the images. If a PM database gets corrupt, it´s just to reindex folders and files again. It´s failsafe and fully scalable.
Photolab though lacks a tool for exporting the keywords and I don´t think it has any for importing a vocabulary from for example Lightroom either as PM Plus has besides that it automatically tries to build a vocabulary from the keywords you already have used on your images. But that is not really enough if you use a standard vocabulary because the you need to import it via a tab-separated file. If you can´t do that you will just have part of the vocabulary accessible and that is a major migration problem. When I had a total crash last summer my own vocabulary in PM Plus vanished. So in order to restore it I had to create a new one by importing all the XMP-metadata from the image-files to Capture One. Unlike Photolab Capture One have a function for exporting the keyword list and that list I then could import to PM Plus.
Even Lightroom is very much of a joke when it comes to how it handles XMP. Lightroom has it all in it´s database (single point of failure) and if you have a disc crash and you backup is corrupt you are smoked. It is possible to export all XMP-metadata from Lightroom but from what I know that is not done by default since it demands an active action of the user and that the database is not corrupt.
Capture One can both be used with a monolithic database as Lightroom but I don´t work like that. Instead, I use the originally used “Session”-mode and the old analog color slide images I repro photographs and then store in a folder with a suitable descriptive session name. Since it´s often from a trip it can be read like “Estepona Spain 2023” or “Israel 2016”. They are all stored in a common topfolder. That is a perfect situation the make a real rapid migration to PhotoMechanic or even Photolab, Because then it is just to point to the topfolder from both PM Plus and Photolab. After an hour or så you are up and running.
Even if I hadn´t added one single keyword I could immediately searching for all my “Estepona” images or the ones from “Israel” and start to add any other metadata. So a proper list of folders in a long row inside a main top folder is a very good beginning. When the database is there and you have imported your keyword list from Photolab if you are migrating from that application you are ready to start after designing two metadata forms in PM. One that is a “Template” used for batch updates and one Info-form for adding of more specific metadata one by one.
True. For now my old school folder structure has not failed me, so I’ll stick to it, but there are times when keywords system or something like that would be helpful to find something quickly.
There was a program that leverages the Google object detection AI system, that they use for Google Photo. Where you can write name of an object, like “chair”, “water” etc and it will detect object with that in the picture and find it. But this program had to use Google API, and I was skeptical of having Google use their cloud service to look up my private database. So I decided to stick to Folders. But system had interesting approach that probably is the future. AI detects what is in the image and you simply search for the term.
I think the program was called: IDimager Photo Supreme 2023
" Photo Supreme 2023 is the popular cross-platform Digital Asset Management software that enables you to find that one image you know exists.Supports Windows 11 and macOS (native Apple Silicon and Intel)"
Artificial Intelligence
Photo Supreme integrates with Google Vision to bring the most advanced technology available today to your desktop. Use Artificial Intelligence to help you jump start your cataloging by automatic labeling, object recognition, landmark recognition and face detection.
Stenis
(Sten-Åke Sändh (Sony, Win 11, PL 6, CO 16, PM Plus 6, XnView))
69
The thing is that you can continue use both your old folder structure and any metadata structure you will settle for.
The only thing you have to do after a migration, is to ensure that you activate all the metadata elements of the IPTC- and/or XMP- elements/fields that you have used in the system you are migrating from. Otherwise, that data will not be visible in PM Plus or whatever other software you are migrating to.
I think a system like IDimager that autodetect and autotagg can work if you start with it from scratch but there is a risk that it creates a lot of garbage automatically. I would never jeopardize the structure I have developed through the years by letting a system like that loose.
Real DAM-implementations in bigger organizations or enterprices are usually not built on a man made structure, they use autofolder creation typically new folders are created for every 1000 nd file in order not to get to may files in the folders which slows down the systems.
It´s an enormous advantage if an auto keyword function can be built that can be reliable enough but I don´t think we are there yet.
I agree adding the object separating process to PL. I have often images that must have changed background. Please, do consider!
I use Anthropics -softwares “Smart Photo Editor”, Potrait Pro" and “Landscape Pro” to separtate the subject from the background to edit the background and to change new background. Then I must export in TIFF to the other application and terminate the workflow with raw in DxO. If all that could be made in DxO, it could be done with native raw and I could continue with PL/raw as the separation is done.
Some times it is necessary to oversaturate, use excessive contrast or light to assist the software to separate the background. Selective adjustments of DxO are good for that but all that has to be reversed when coming back to PL. It would be easier to do this along with the separation work and not guessing what may be needed before exporting.
I also find some issues in Anthropics workflow that may - by a small mistake - make me start all over again. Working within only one software would make that more reliable.
I rely on the skills of DxO to create this kind of an improvement - something that is even better than others can do. I am willing to pay for the upgrade to get it.
2 Likes
Stenis
(Sten-Åke Sändh (Sony, Win 11, PL 6, CO 16, PM Plus 6, XnView))
71
Good point I also thought about the need or possibility to exaggerate the contrast or doing an auto selection wwith a control point and “highlite” an object with a distinct intermediate color in order to be able to use that with the color picker in the Color Wheel since the possibilities in the Control Point are not near as good. Still that will be a clumsy work around.
The problem is still that the chrome -luma approach gives no detaiil control and the color picker in Control wheel generates på much spill to be all that useful. I think it would be great if we could turn a color picked selection into a real layer like in CO because then we could get a better chance to erase that clutter.
I also prefer a more consistent behaviori n the user interface of Photolab and that the use of an extea roundtrip with TIFF as an intermediate format could be avoided. I understand that a lot of old analog photographers in my own age used to legacy TIFF-based workflows continue on thar path but there is also an increasing number of photographers that will prefer to be able to stay in a RAW-based work flow because it really gives some advantages that are abcent in the TIFF flow, like the possibility to yse Deep Prime XD.
Stenis
(Sten-Åke Sändh (Sony, Win 11, PL 6, CO 16, PM Plus 6, XnView))
72
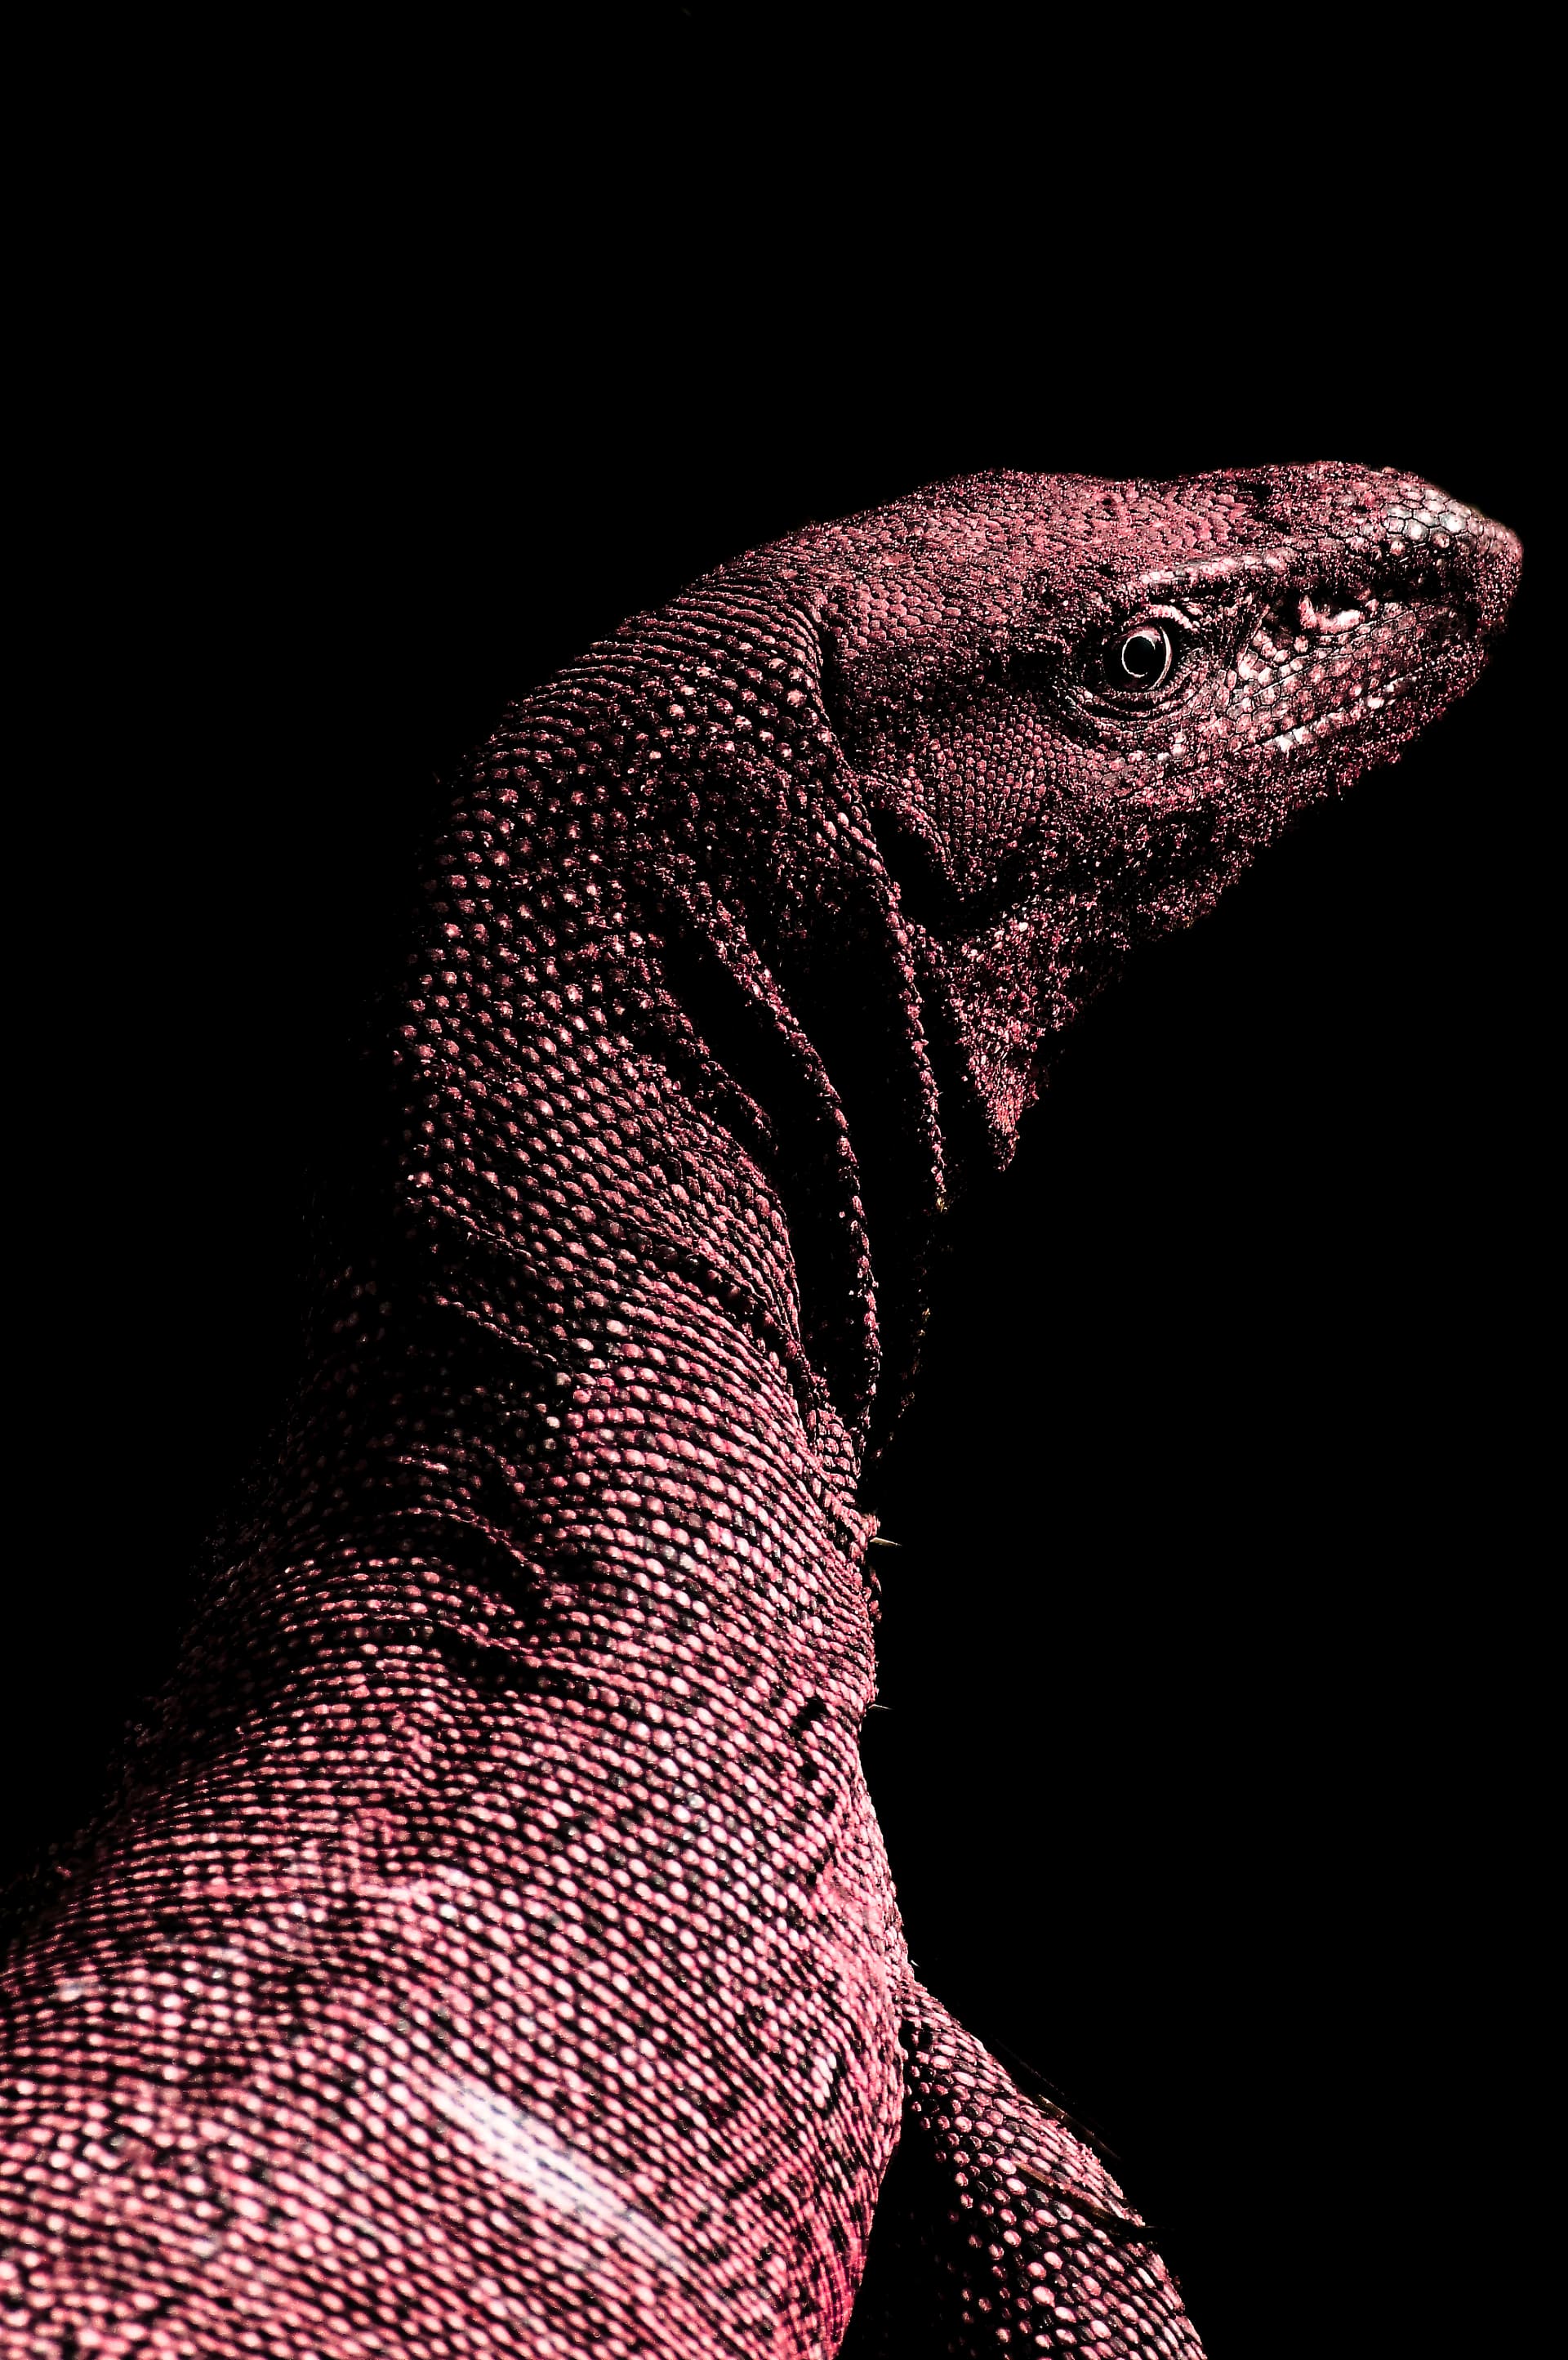
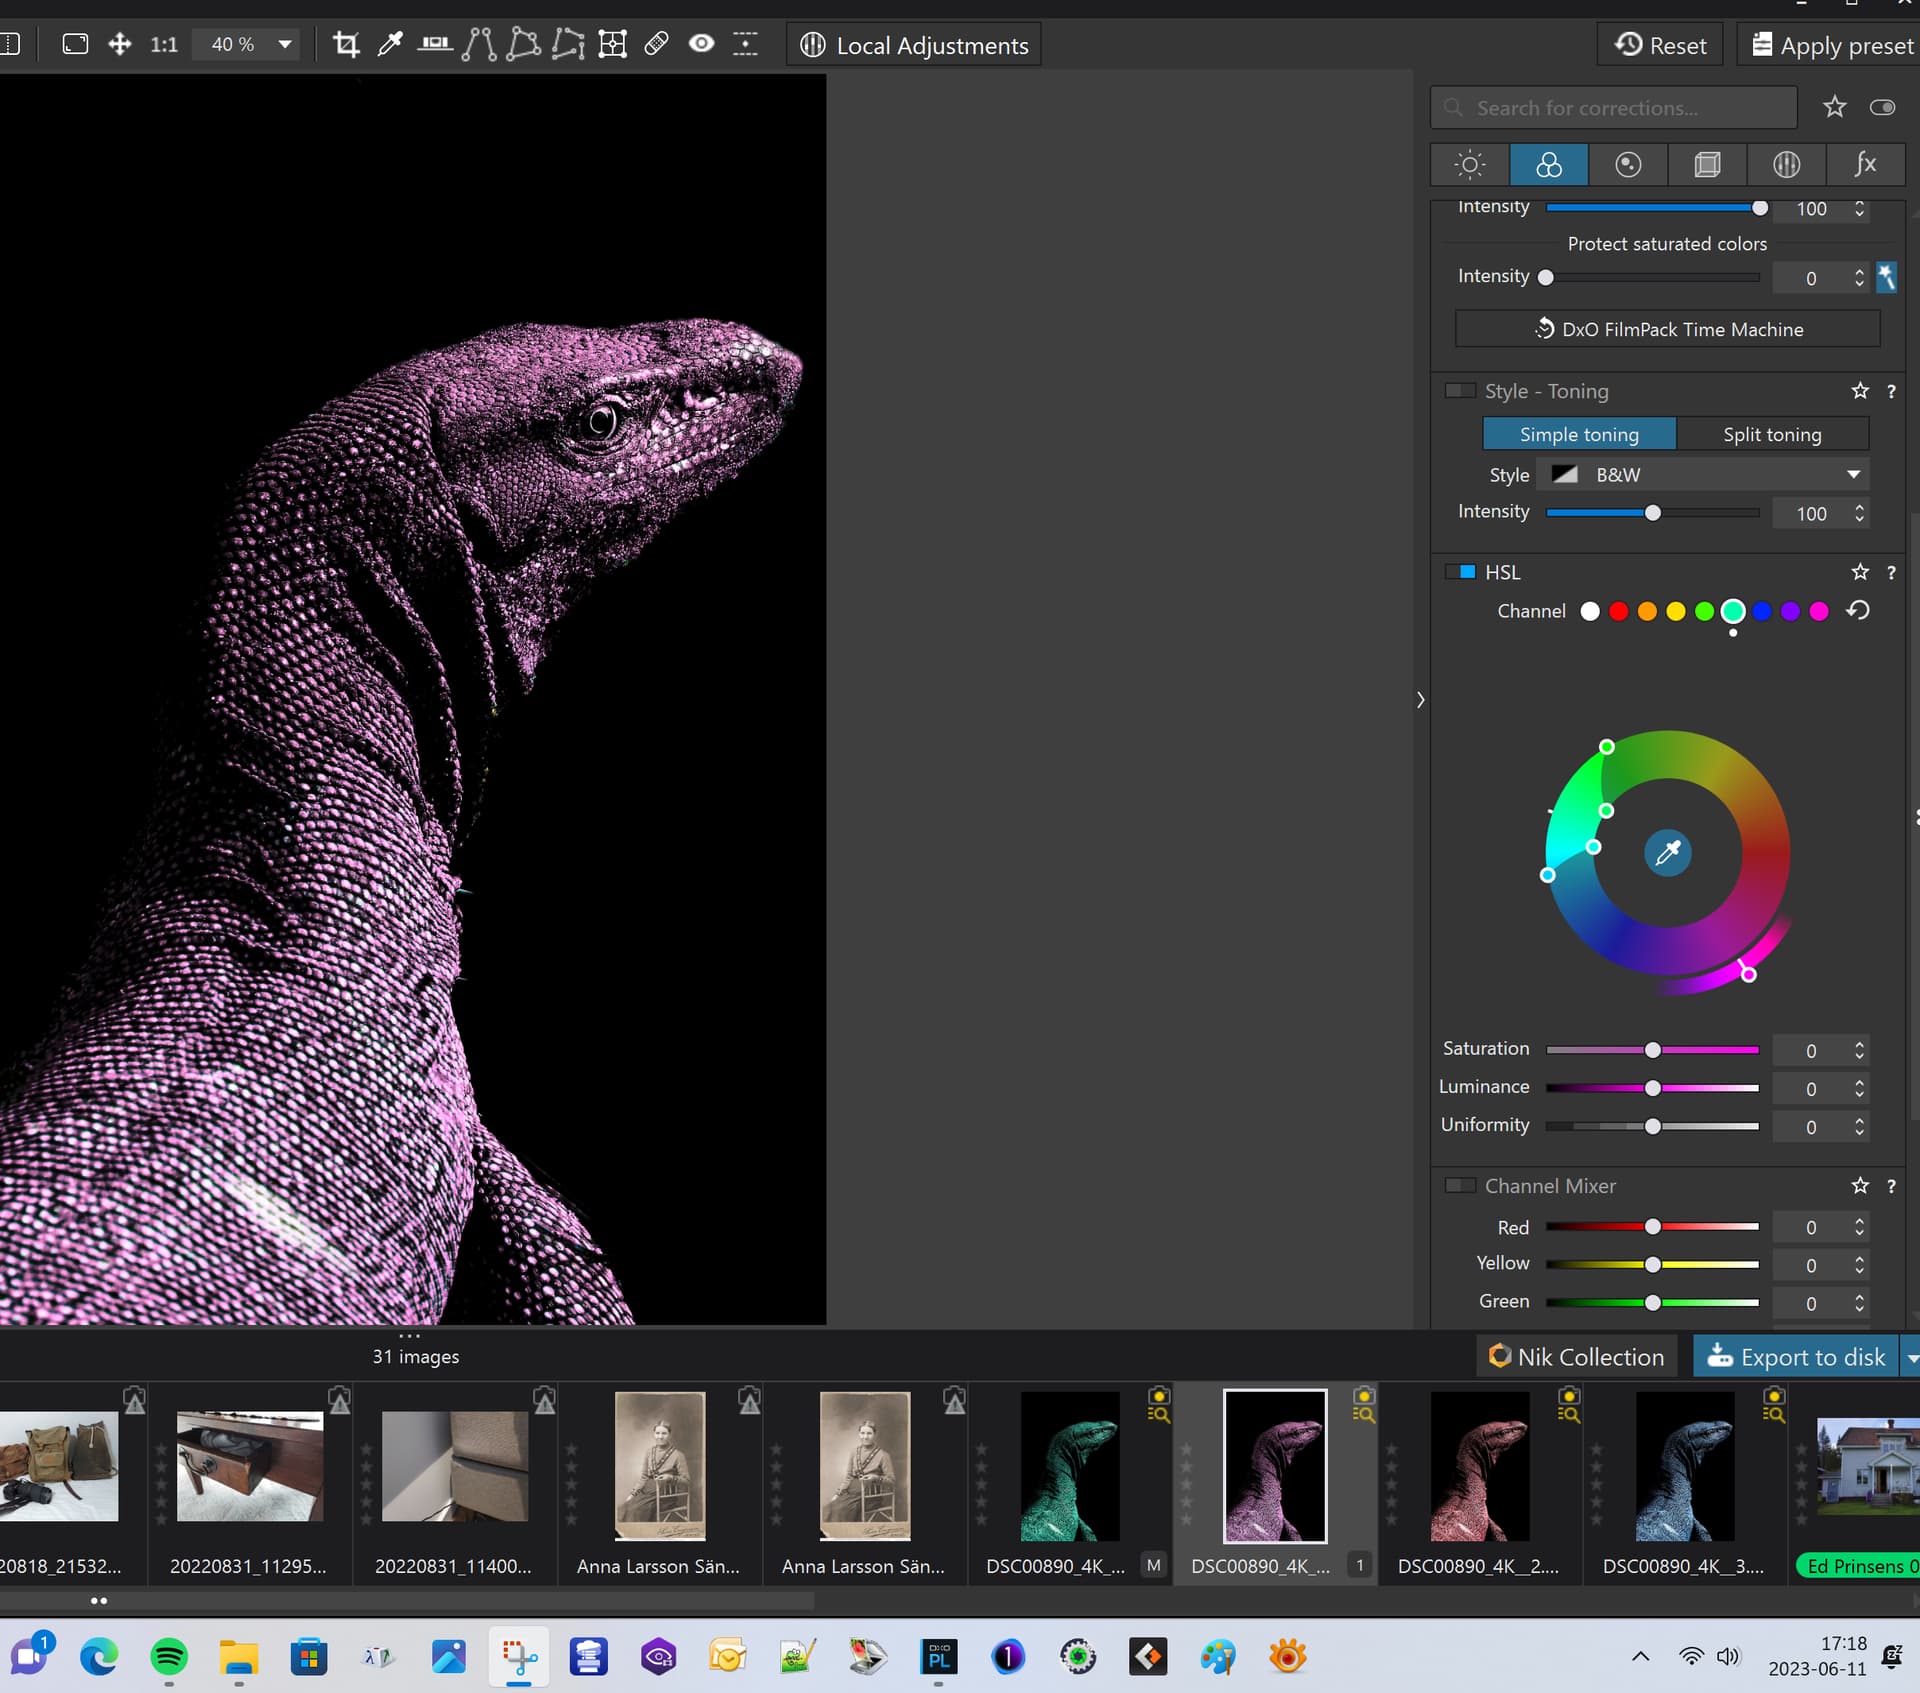
The pretty rare and endemic RGB-Lizzard or Camelion-Lizzard as it also is called on Madagaskar.
(Just a joke)
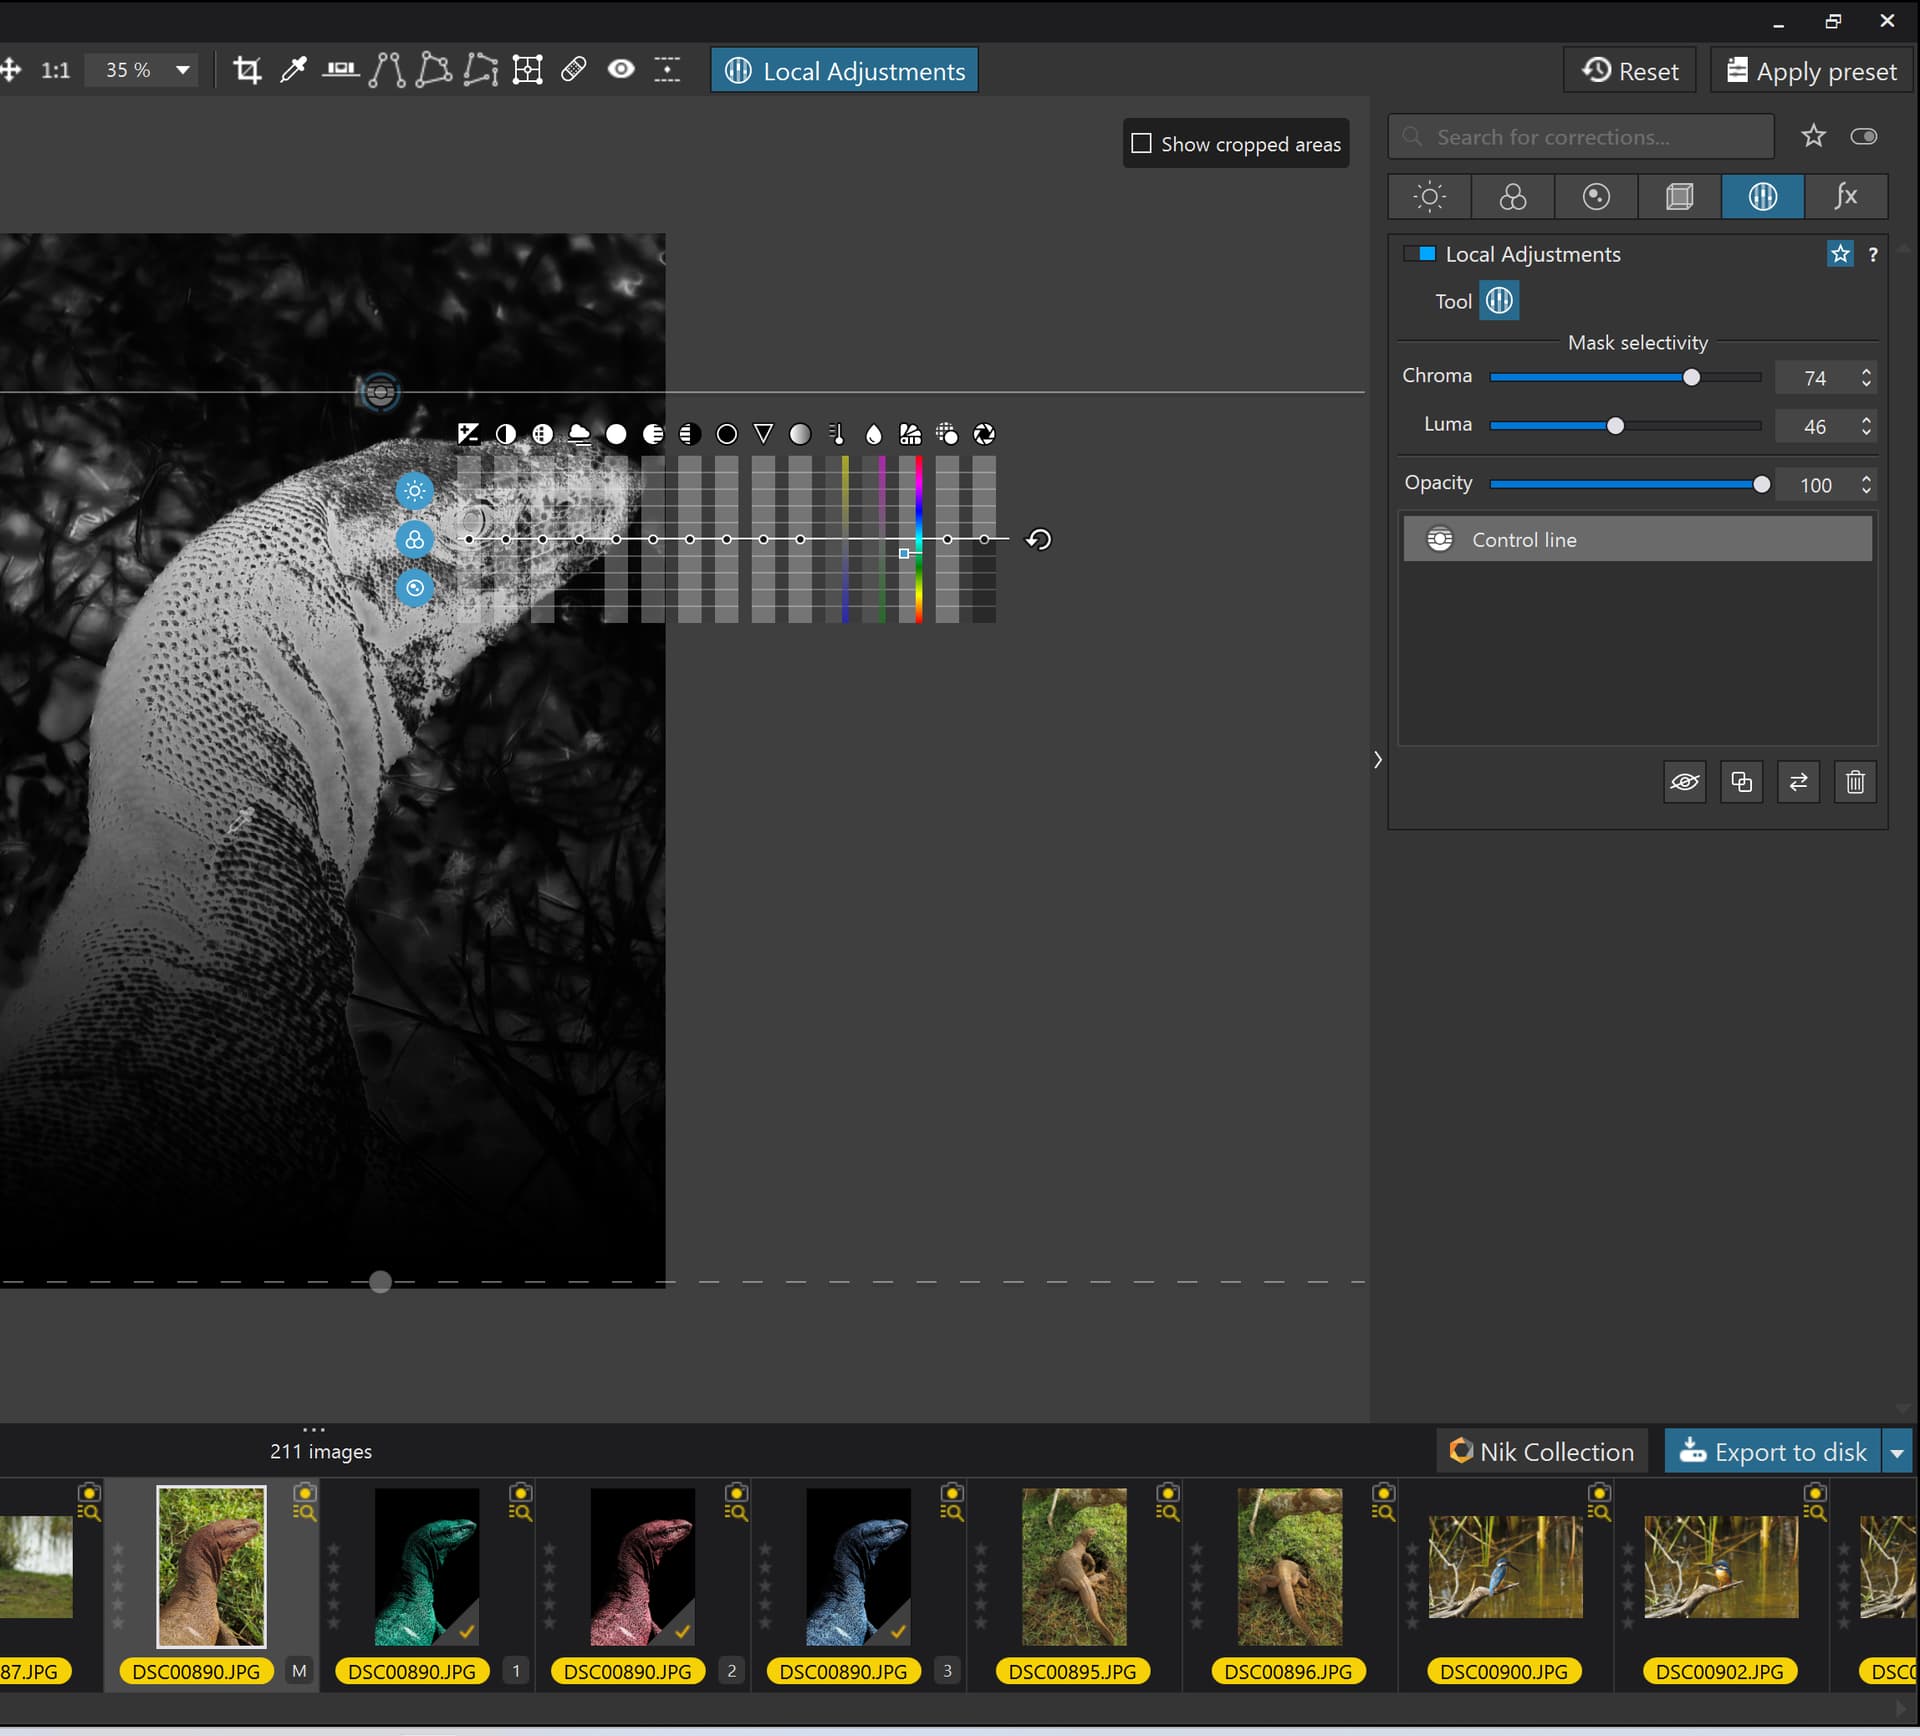
I just played around with Local Adjustments and a strange and confusing thing is that the Color Picker in the Color Wheel (which is a global tool) first seems to work since it is not inactivated. The picker picks the color but is indifferent to what you do with it since the colors are set within the use of Local Adjustment Auto Mask.
I think either the Color Wheel shall work fully and properly or else it should be inactivated. As it is now it just confuses the users.
additionally hold Crtl (= Win) to preview your colour selection
Stenis
(Sten-Åke Sändh (Sony, Win 11, PL 6, CO 16, PM Plus 6, XnView))
74
Yes, I know!
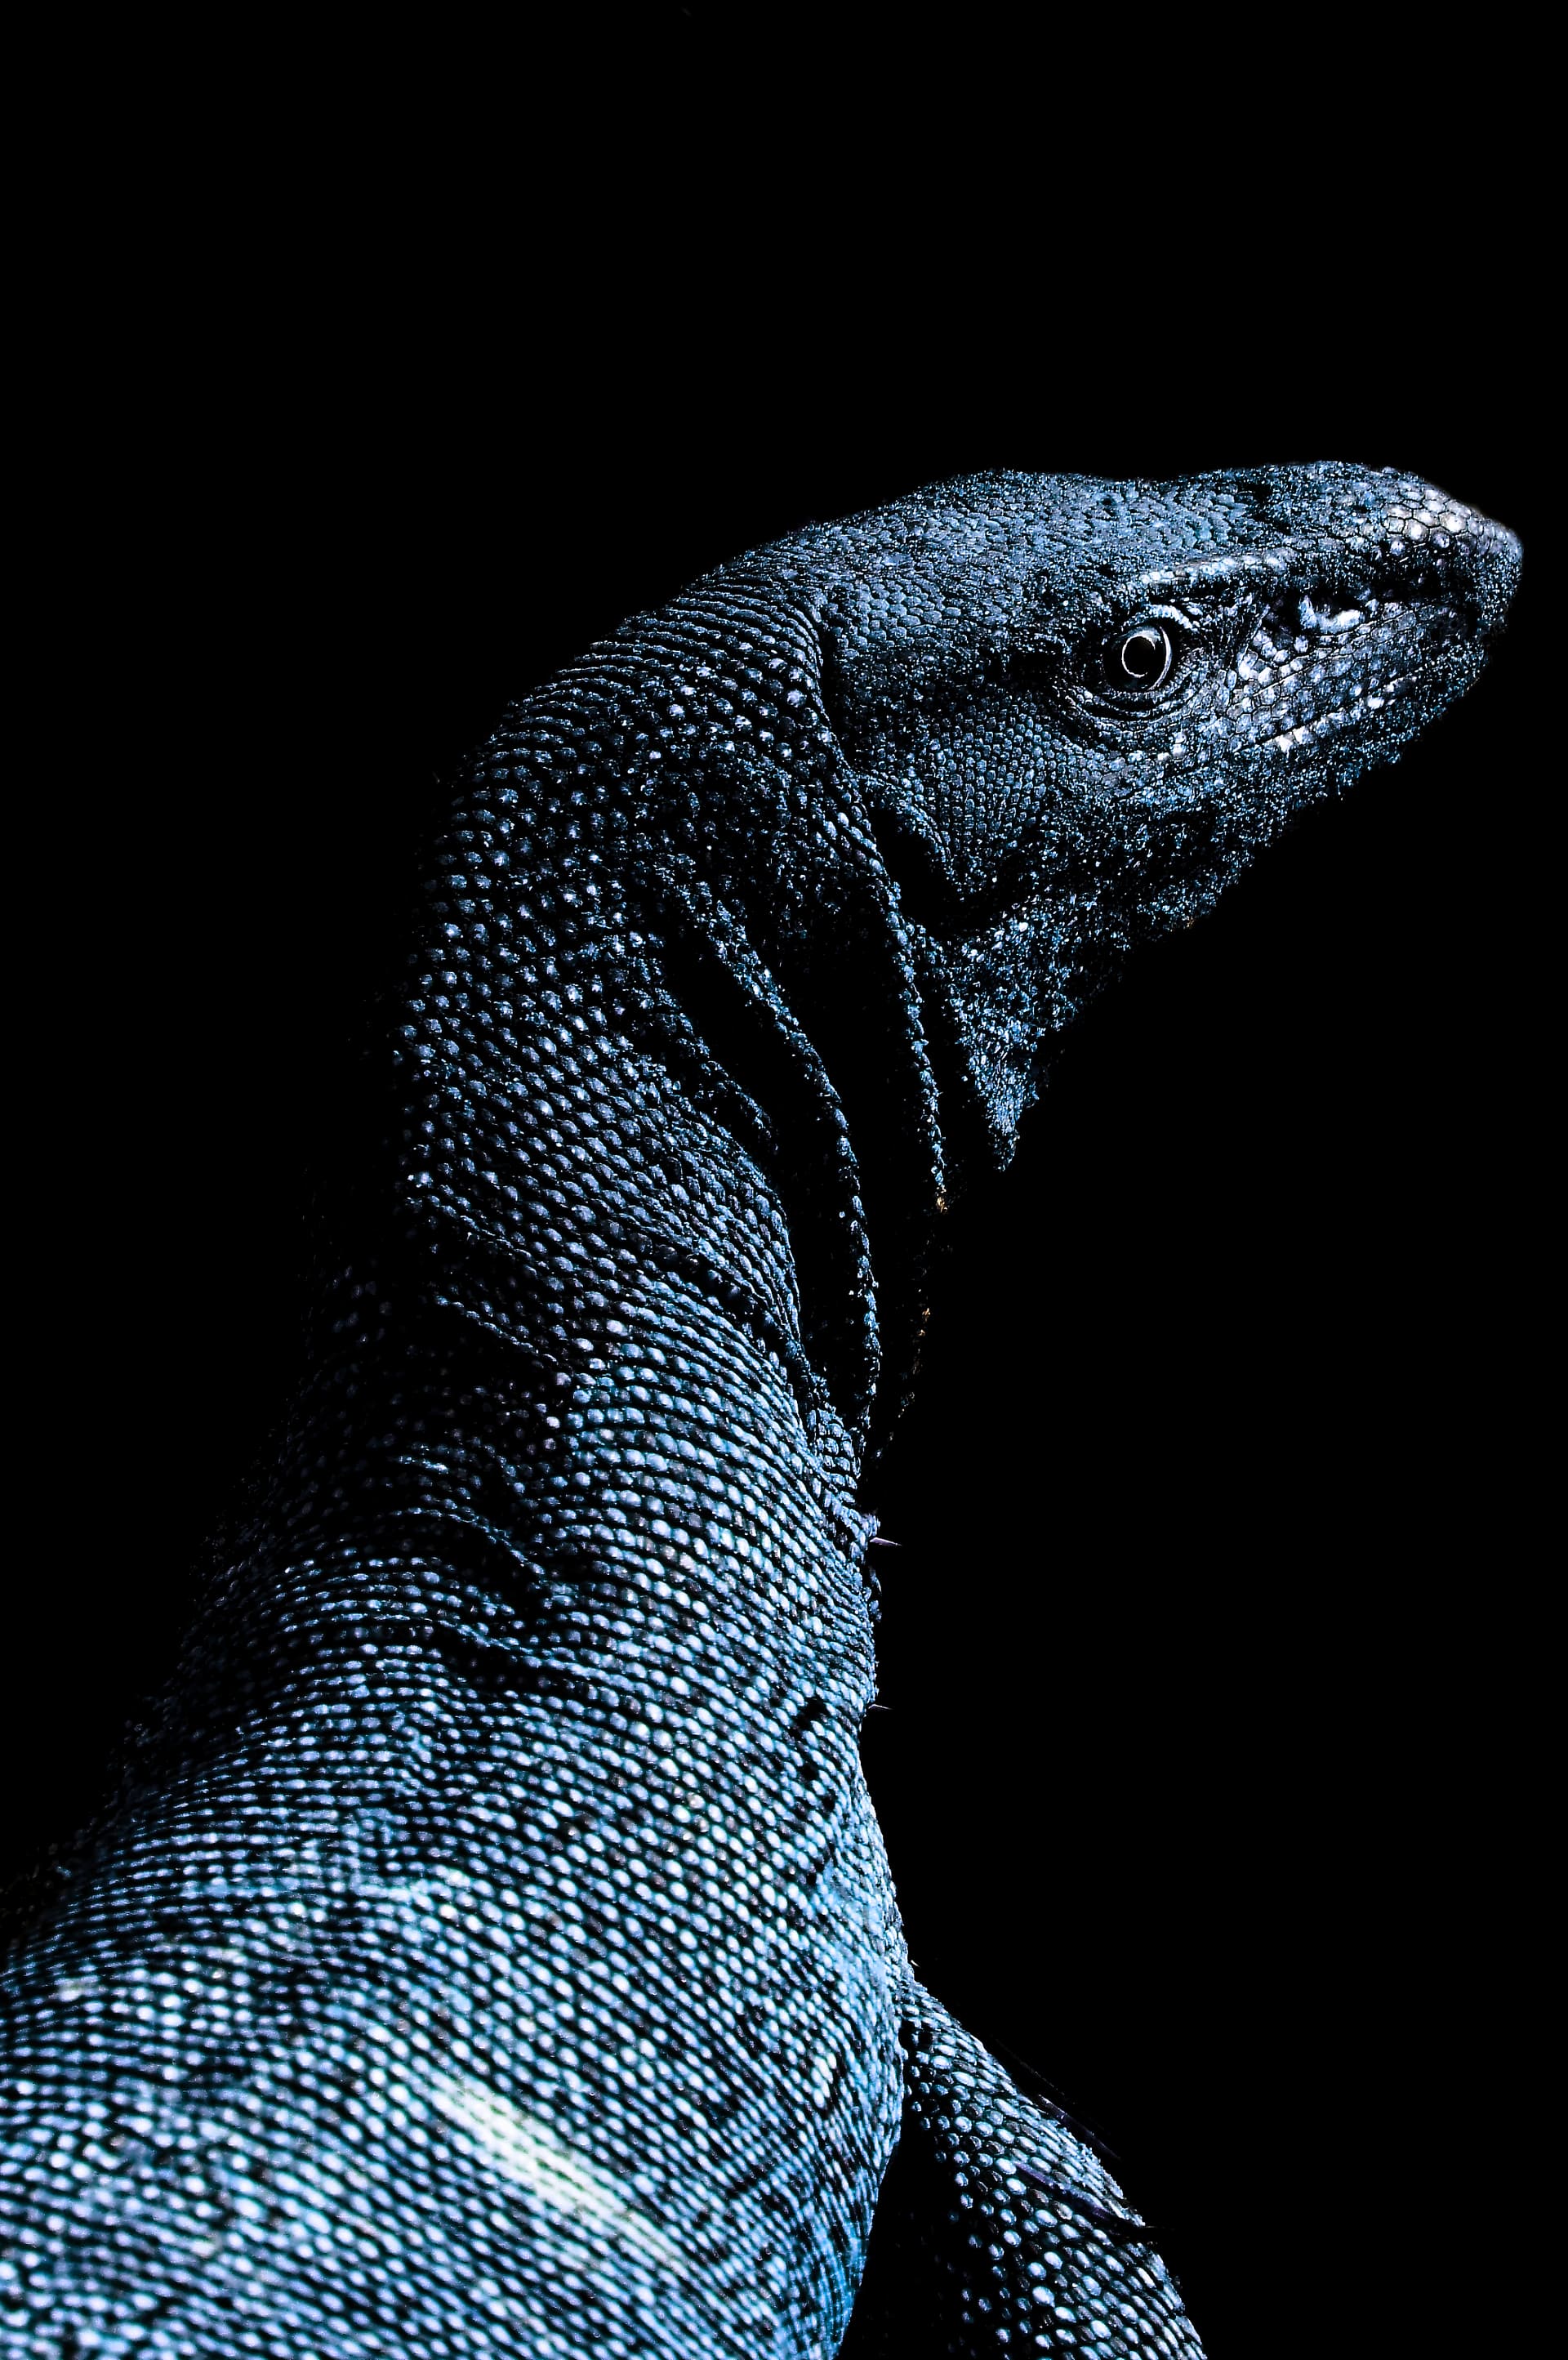
There is no problem using the Color Wheel on a normal JPEG like on the next image below. In this case I have exported this JPEG after using the Color Wheel color picker. I started with a gren variant of my lizard and the I changed it to purple.
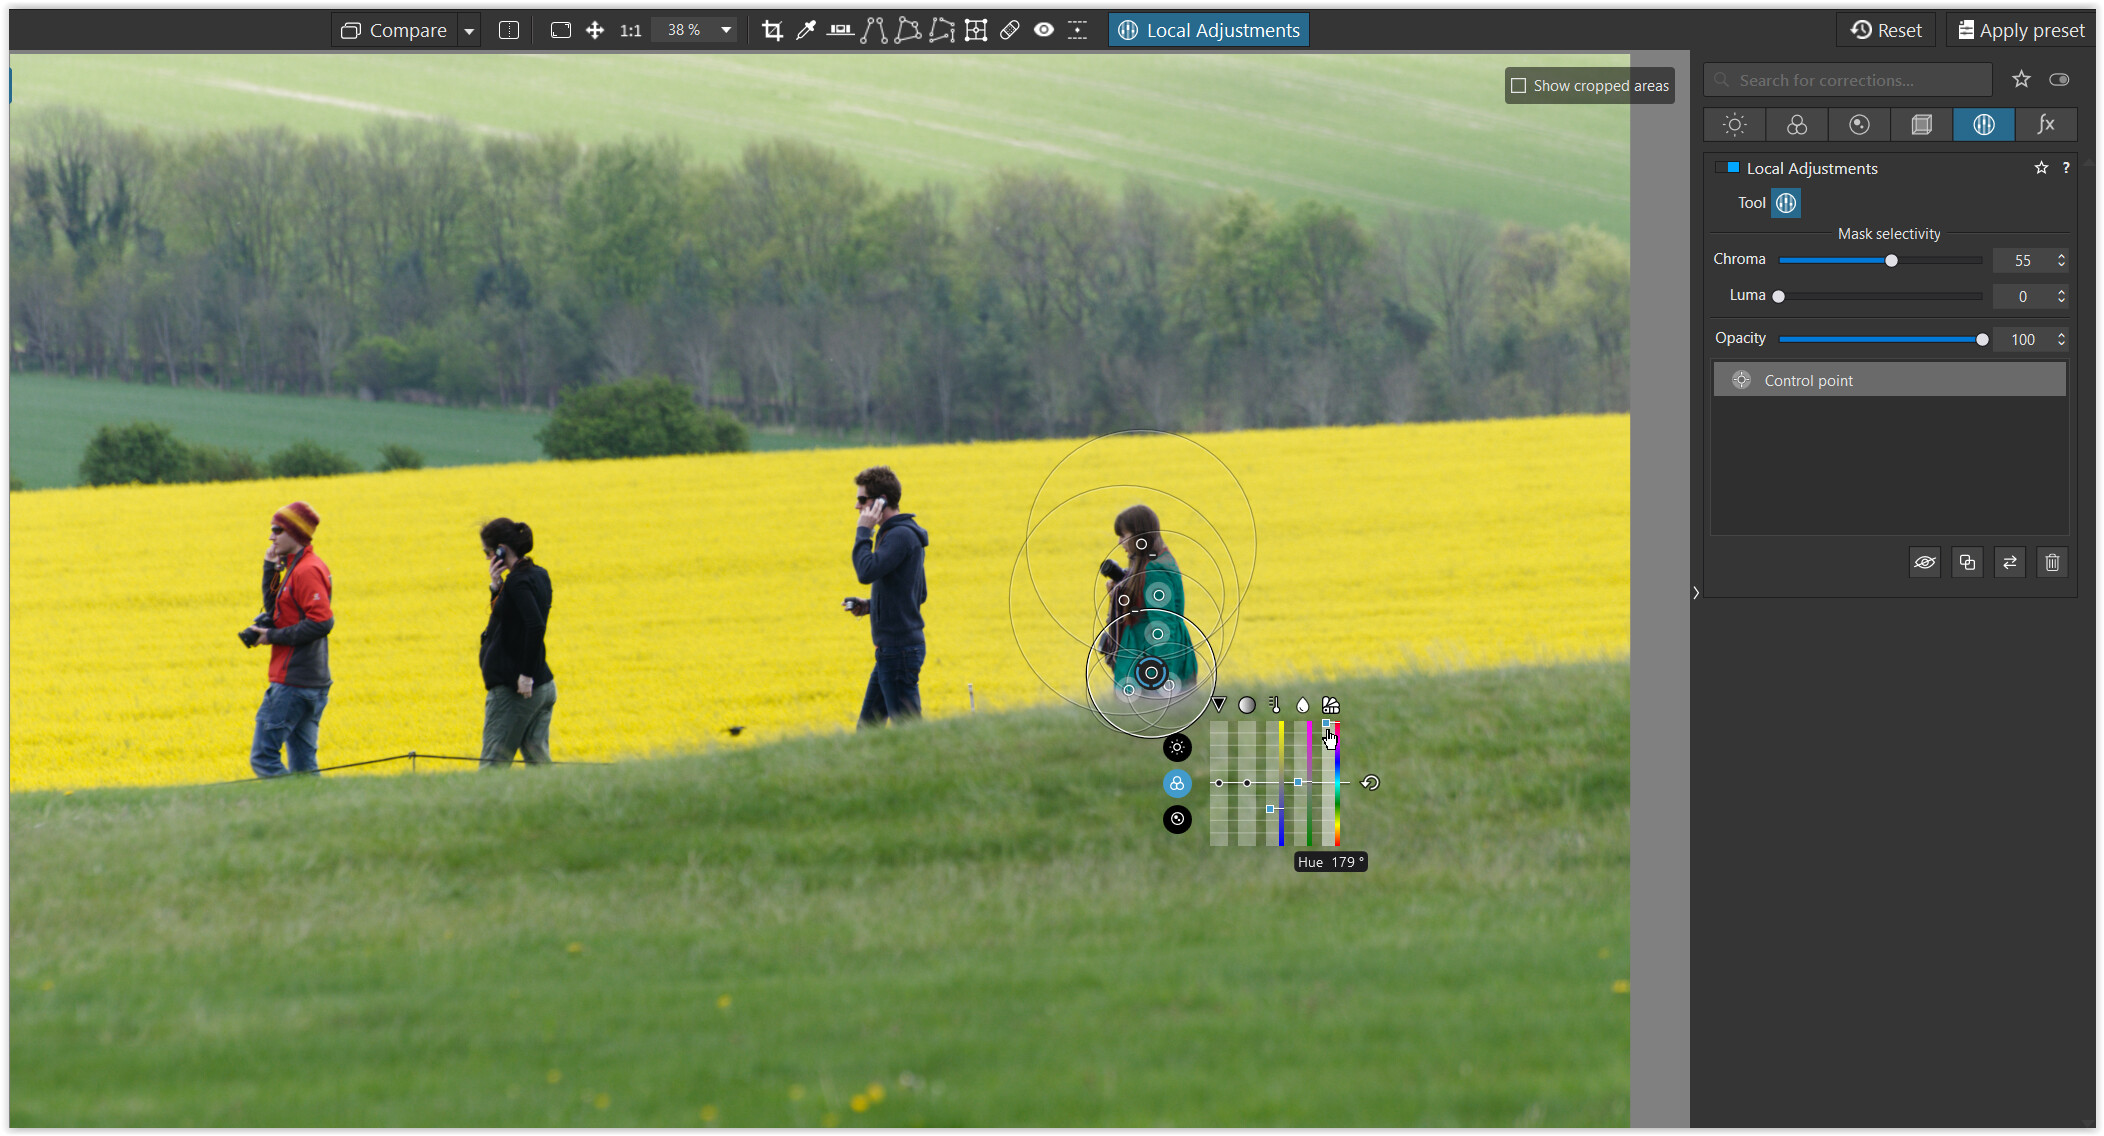
Now when I try to do exactly the same with the same motif in Photolab, from a virtual copy of the “green lizzard” that was used to export image 1 I fail. This virtual copy is NOT just a plain JPEG because it has a couple of layers created with Local Adjustment - Auto Mask - one for the main motif (lizzard) and one for the background.
When I do exactly the same on this image in Local Adjustment - pick the color with the color picker, and then tries to turn it into purple, as you can see to the right (the color wheel) , absolutely nothing is happening
This happens because the color wheel just works outside the Local Adjustment tools. So completely unlike in for example Capture One there are two different systems in DXO working in parallell and completely unaware of each other. I think that is a problem because it´s not just the Color Wheel that lives in its own little world.
Some here are obviously in love with Control Lines and the same goes for them.
If I for example want to use common cloning tool to get rid of a few things via the black and white mask in Control Lines and click on “Retouch” it suddenly jumps out of Local Adjustment. In Capture Ones Black and White masking overview deleting and refining a few things would not have led to a response like that.
For my taste there are far too many lose ends in this user interface to feel really comfortable. It’s not all that straight forward, consistent and self-instructional. Thoughtless and unpedagogical are the words that first comes to my mind. The reason for this “mess” is that NIC Control Points have been “bolted” on Old Optics Pro just before it became Photolab. The Local Adjustments Control Points have never been properly integrated with the code from Optics Pro and that makes me wonder if it´s all that easy to integrate new AI tools before the Control Point System really gets integrated with the rest of Photolab.
Stenis
(Sten-Åke Sändh (Sony, Win 11, PL 6, CO 16, PM Plus 6, XnView))
76
I know but that has nothing with the case I showed you to do.
In fact, there are three scenarios in Photolab:
Local adjustment with Auto Mask (can be adjusted very archaic with the Eraser Control Point)
Control Points and Control Lines can just be adjusted with the sliders (Luma and Chroma) which is a very coarse and unprecise way to do it. Not very much precision there.
The Color Wheel
Live it´s own life completely separated from Local Adjustments. Very limited as it is since we can´t turn a color pick selection into a separat Local Adjustment-like layer like in Capture One.
So what ever we try to do IN Photolab, these two systems can´t communicate at all. The only option you have is to try to change the colors with Local Adjustment in such a fashion that it appears as a unique color in in a new image without any layers etc. in Photolab. Then open the new file and select that unique color.
That´s really a very clumsy work around and maybe you also exports in 16 bit TIFF intermediate file not to lose too much quality.
Wolfgang, if I run into problems like these I have described, I usually leave Photolab for Capture One, because in Capture One everything is layers - even the default “Background” and all tools working on the “Background” will work exactly in the same manner when used in any other layer used for “Local Adjustments” and so it ought to be even in Photolab. That is what I´m trying to tell you. Sometimes it is possible to solve a masking and refining problem with a little “dribbling” between these two separate systems in Photolab but it´s really far from ideal.
I don´t need to send you any files. Just open Local Adjustments and add a mask with “Auto Mask” and then change that area´s color with the Hue-slider in the Control Point “Equalizer”-lik control. Then leave the Local Adjustment-system and open the Color Wheel. Pick your changed distinct color with the color picker and verify it picked that color. As you can see it will mark that color in the Color Wheel- Then try to change that color with the Color Wheel and verify that ABSOLUTELY NOTHING happens.
I don´t discuss that it might be possible in a way or another to work around this limitation. What I´m interested of here is to show that these two systems has no practically useful communication between them going on at all. You just can´t apply the changes you want to do without exporting the image to an intermediate file and then change the color on that file instead. That has to change because the hue slider is not really the answer our prayers. It´s a tool that gives us very little control. At least we can hope that they implement the Control Wheel tech in the Local Adjustment-solution too if they can´t give us something better and far more integrated.
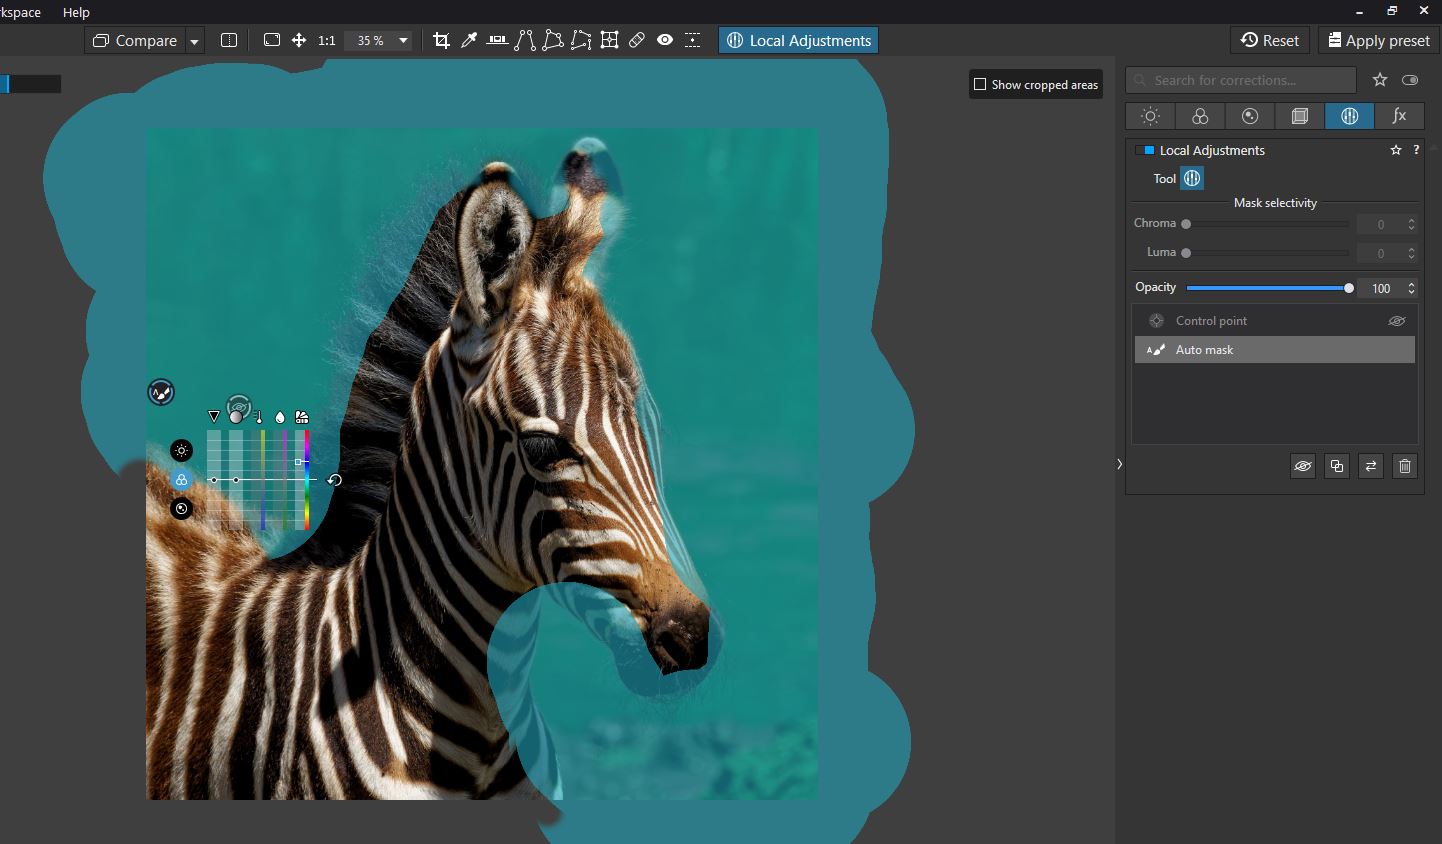
We need smarter tools then the present ones in Photolab, in order to handle an image like the little zebra a few messages above, effectively or we have to put in more manual work with the Auto Mask - Control Point as an alternative but that will often not be all that effective. An image like that is not very suitable for a color picker in a tool like Control Wheel any way. Just compare these Photolab tools with the ones Lightroom now is equipped with that @MSmithy supplied a link to above.
“Effortless” was the word the old Lightroom guru Scott Kelby used. The suggestions for work arounds you have suggested here are really the complete opposite to that.
That sounds to me like you are deliberately trying to complicate your life. I would love to see practical examples where you work on an image, there is a legit reason to make local adjustment, and it cannot be done or is very hard. I would also like to know what is the percentage of images that require that, realistically speaking.
Because, with all do respect it sounds like you have a problem to every solution. Are you sure its the tools that are the real problem here?
What kind of quality are we talking about here? I’ve been working with 8bit JPEG’s professionally with tones of adjustments since I can remember, never had a problem unless I wanted to create one.
16bit TIFF is an overkill for wast majority of workflows, and where it is or would be beneficial there are many alternative workflows. I don’t want to go too deep into it,8bit is just fine, for was majority of situations, and I can demonstrate that if needed. Question is can you really demonstrate your hypothesis about the necessity of 16bit TIFF workflow?
That I think is a matter of personal needs. I would argue that capture one, lightroom and DXO all have many of their strengths and weakness, and while they can all three do a good enough job for almost any professional need, they have a different approach and priorities to features.
As I’ve said before, I won’t argue against improvements that can be added to DXO masking system, anymore than I will argue against Lightroom adding the Noise Reduction AI, finally or some of the features Capture One has that I find useful, like AI lens dust clean up.
But I will argue against current tools we have in DXO being considered bad by user who does not like it for personal reasons. The tools are fine. They can be improved for sure. And they should I agree. But they are not as you like to describe it “useless” and “archaic”. DXO implemented tools that have a different approach to masking and local adjustments, and in some areas are superior in other areas they are not to alternatives found in for example lightroom or capture one. But they are very capable and in instances where I personally found them inadequate I simply used other tools. Same is true for Capture one or Lightroom.
Shouldn’t it be that way. Local adjustment goes on top of the global adjustment. I would expect it to work that way as it is the case in Photoshop for example. Its not a limitation its the way it is supposed to work. If you think it should work differently, that would be a matter of your expectation.
Global adjustments work on whole of image, based on parameters that the specific slider is designed to target. Local Adjustments as the name implies use the same sliders but are applied to an area that is localized based on various methods of selection that local area.
Brush: apply adjustments by painting on the image.
Auto mask: applies adjustments to the brush while automatically detecting contours.
Control Point: applies adjustments to similar pixels, in terms of color and brightness, in the applied area.
Control Line: uses the same principle as control points, but applied to a larger reference area defined by a drawn line and a sampling pipette.
Graduated Filter: Simulates the effect of a graduated filter attached to a lens.
Eraser: refines or erases the local adjustment mask.
New mask: lets you create a new local adjustments mask.
You can use the Mask Selectivity sliders with Control Points or Control Lines, which allow you to adjust the tolerance range of the color that a Control Point or Control Line covers. This will allow you to include variations of hue and brightness level in your correction (such as in order to take into account variations in skin tones; see example below).
Chroma: defines the range of color variation (default setting 50%).
Luma: defines the brightness range for the color (default setting to 50%).
There is also opacity slider. Actually quite a few different options and they can be duplicated, inverted etc.
As you add new local adjustments the one that takes priority is the one that is on the top or last added. As you would expect layers to work.
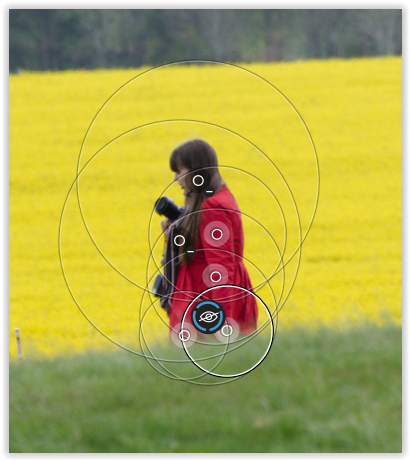
While I agree that for image like zebra you mentioned using auto subject AI selection like in Lightroom would be quick. I must ask myself, why would you need a selection of an entire Zebra vs just something you want to enhance, for which tools in DXO are very good for.
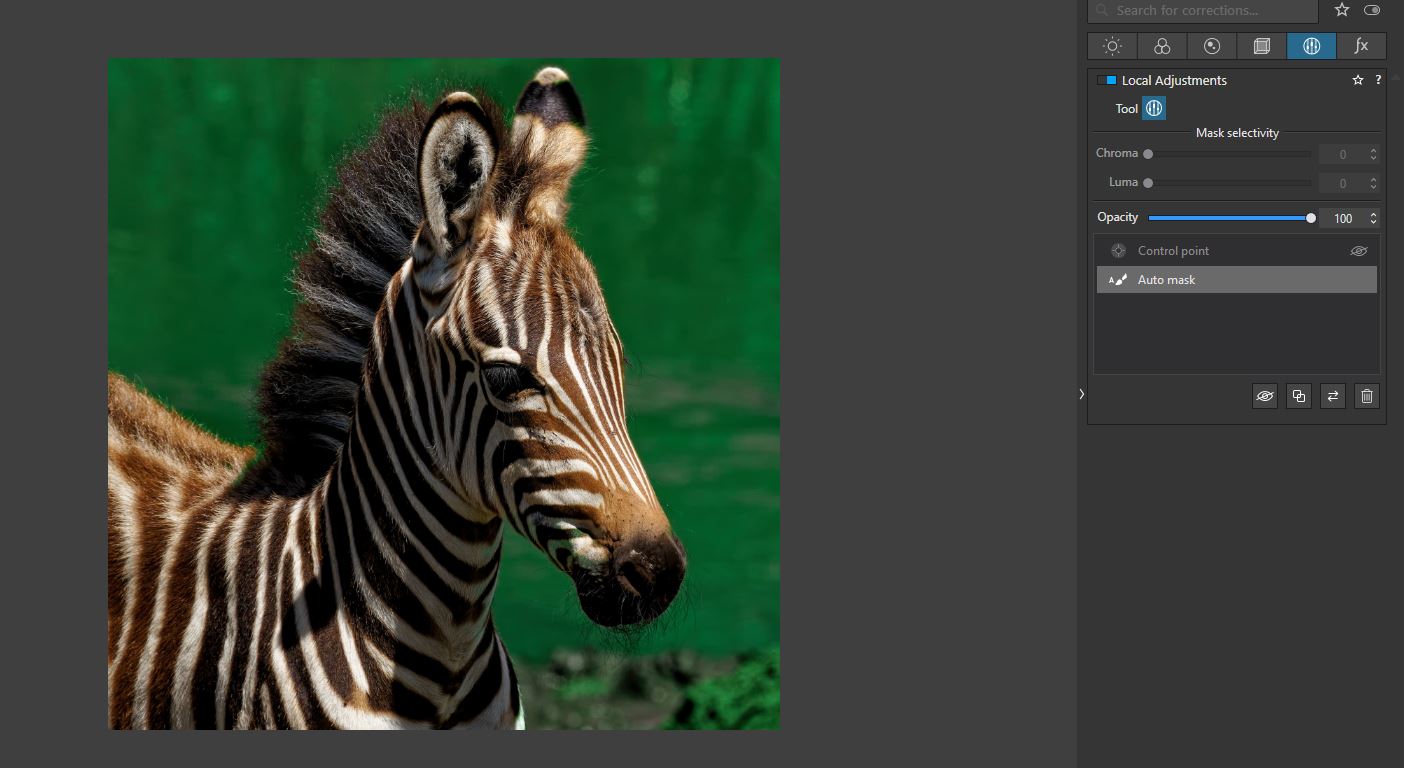
Anyway, if you wanted to, I would use Auto Mask Brush. Few lose strokes and I was able to get a selection.
On the other hand if I wanted to change Zebra, I would select what is easier, and simply invert the mask. This time it was easier to select background. Than I simply inverted the mask. And got me selection of the animal.
While probably selection of zebra would work easier and quicker, although not too much quicker in Lightroom using AI, in my experience, local adjustments of color and tone to enhance what is already there is probably far more common and useful than precise selection of objects, for which I’m still struggling to find as examples in real world workflow.
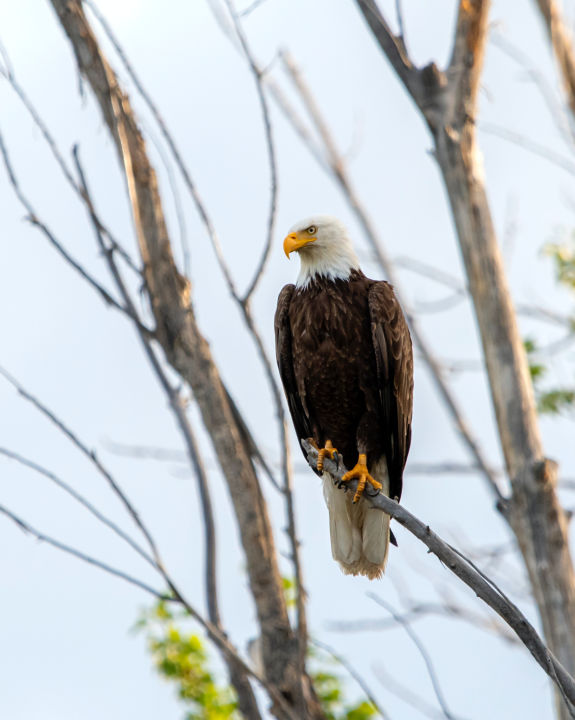
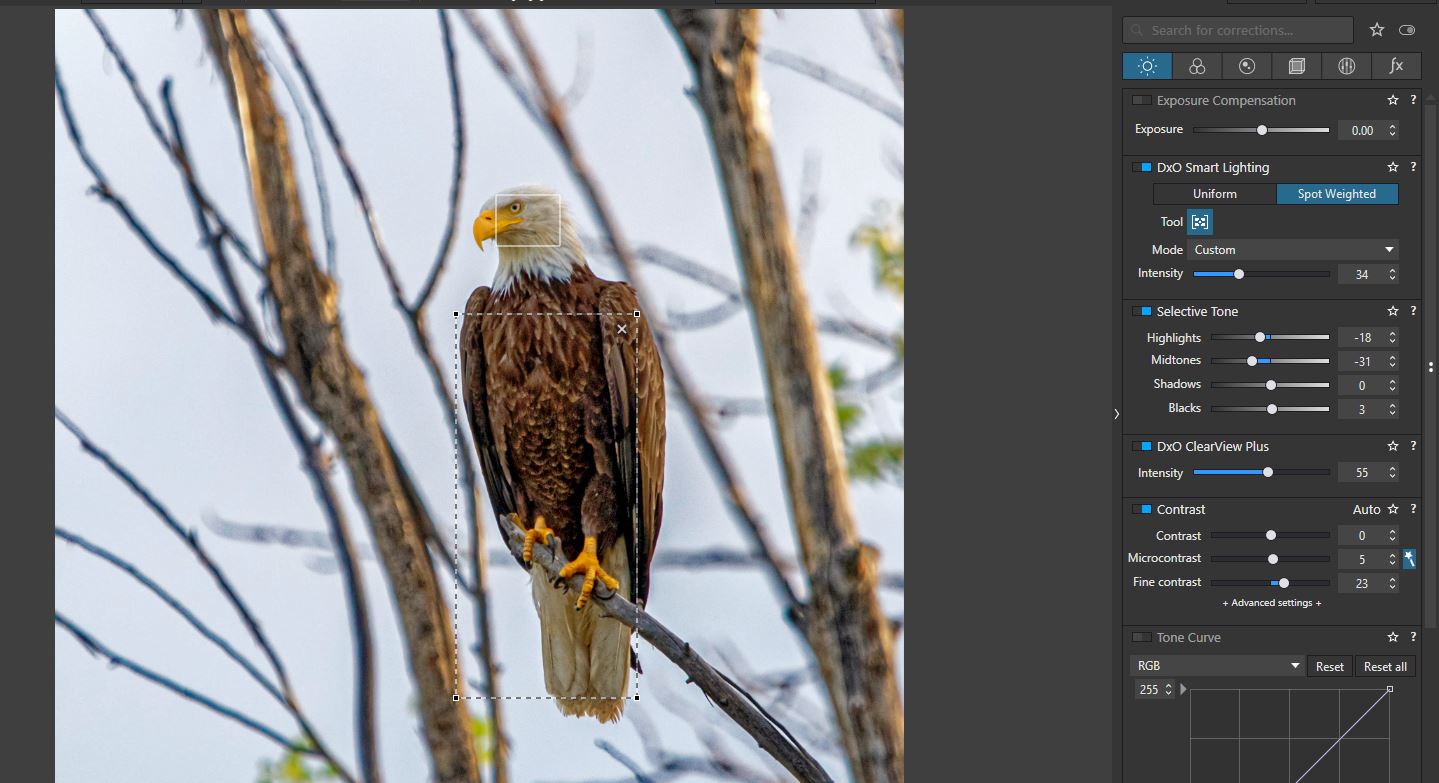
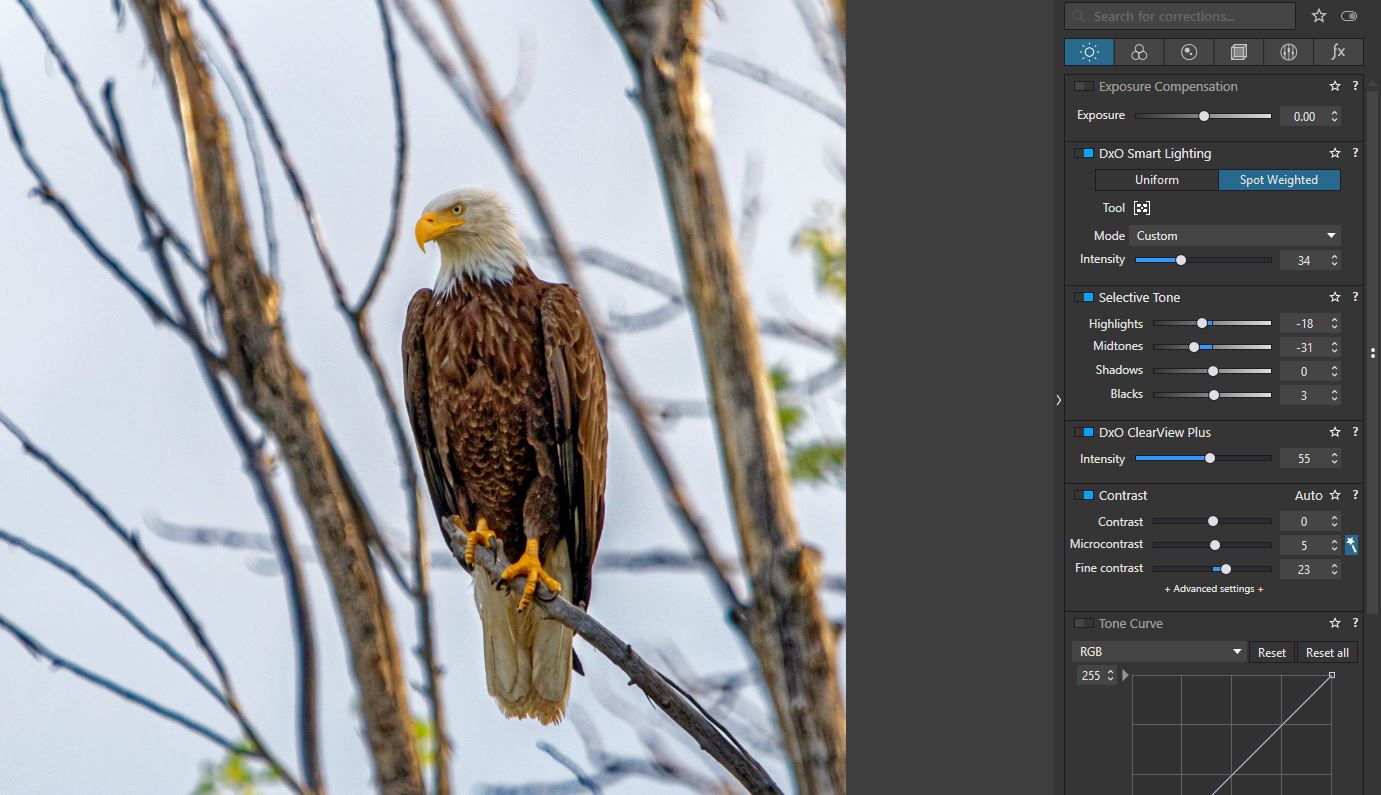
Say you have a photo of an eagle on a branch. The bird is underexposed and background is over exposed. Making a perfect selection in Lightroom or any other program and simply adjusting exposure selectively might seem like the way to go, but I would argue is both quicker and more natural feeling if we use tools that are not so precise.
For example smart lighting and selections in that tool. I could use “selective tone” sliders or use curves as well.
My point is that with existing tools , there is hardly an image I could not balance out in tone and color to a satisfying degree. And if I really need to retouch or do a lot more, I would take it to Photoshop where that kind of job would be better to do anyway.
I can’t think of an example where I had an image that I needed to do something I could not in DXO but it didn’t require Photoshop or something like that. Virtually all normal color and tone adjustments can be fairly easily done in DXO as it is now.
P.S.
The eagle image is just JPEG so I couldn’t manipulate dynamic range as much as in RAW, but I used it to illustrate a point.
Hi Stenis,
to thoroughly understand what you did and then to examine & explain, I’d have liked to see your file …
So – I only can guess you got ‘trapped’ (more on that in a moment).
It is not to convince you about PL, showing a workaround or what ever. While personally I’d also like a couple of things to be improved, use the tool you are familiar with and know how to get the desired result.
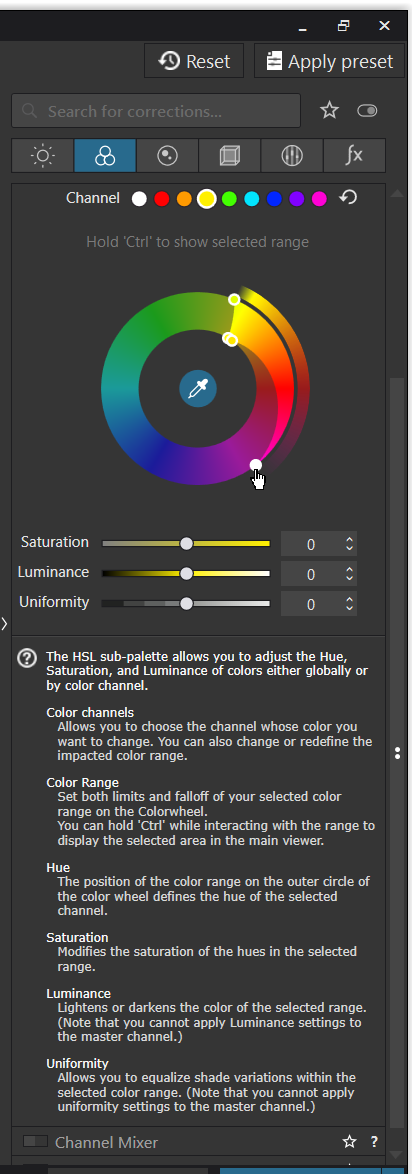
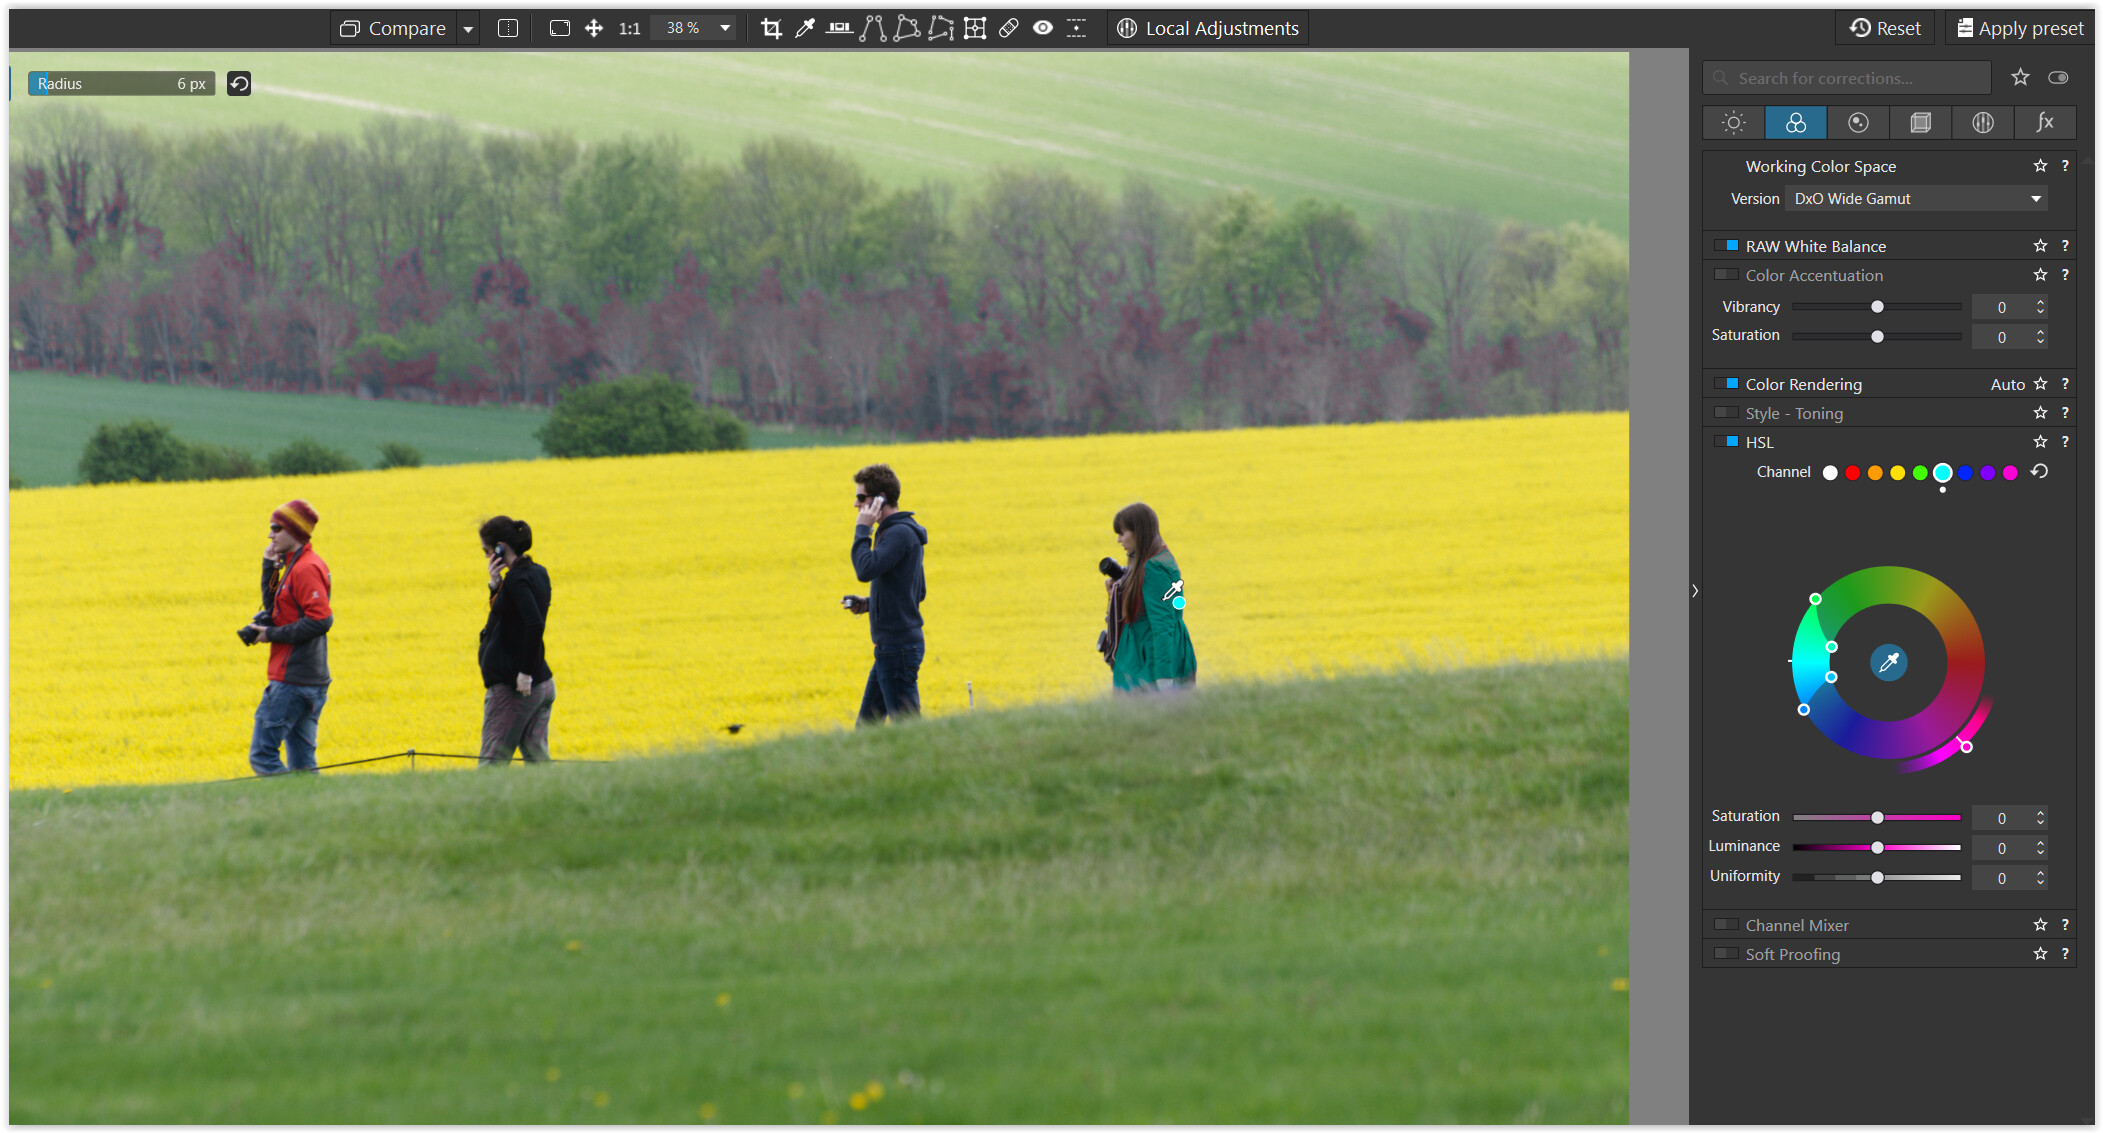
the global HSL tool’s picker seems to select another colour channel
. but trying to change the Hue on her coat has no effect (while otherwise some strange colours in this demonstration)
(VC2) – in reality we are still on the ‘red’ channel
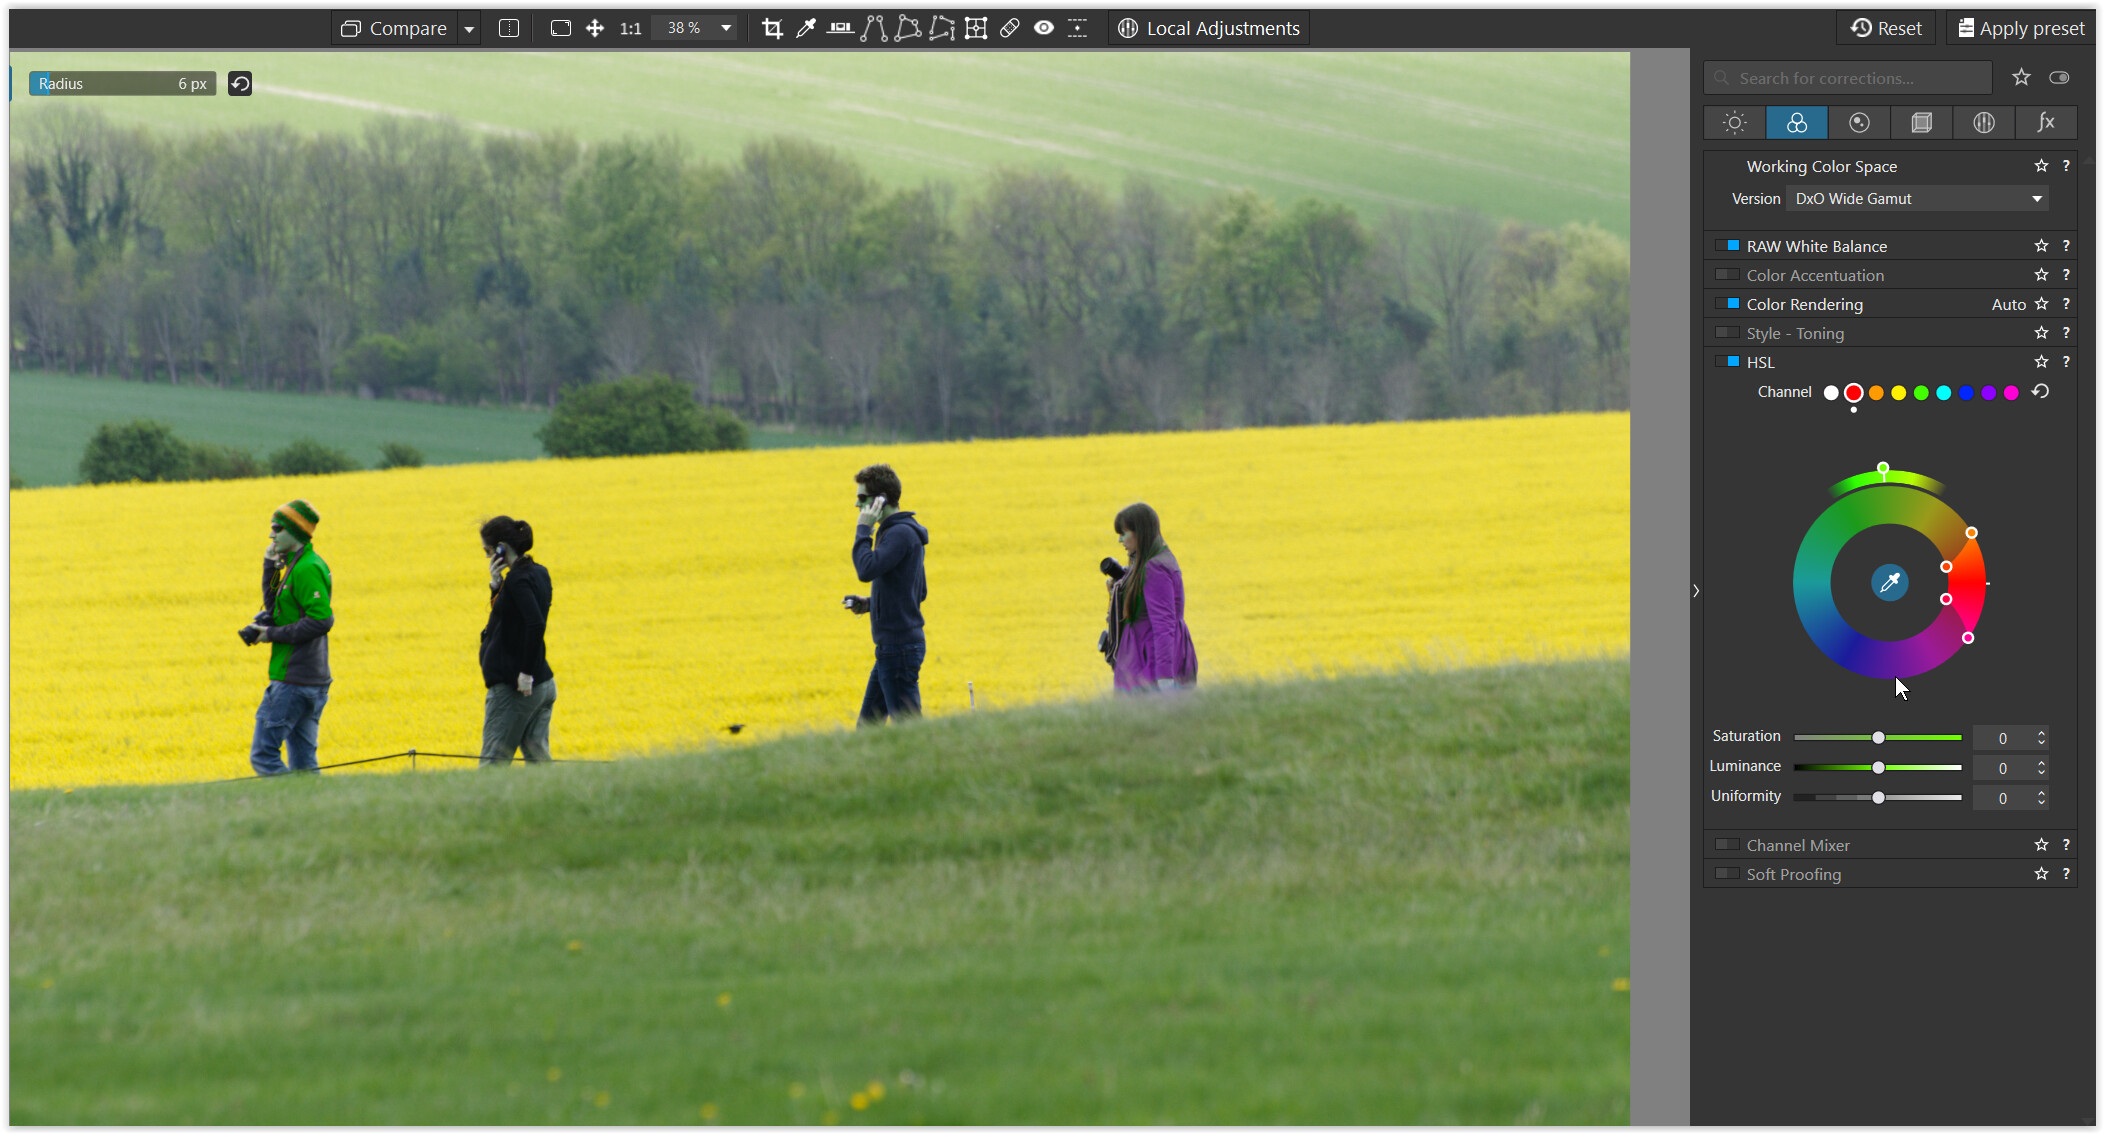
. while we already had mapped her red coat locally to the complementary colour,
now changing the HSL Hue to green turns everything ‘red’ into green
and consequently the already mapped red coat → into the complementary colour purple
How is it possible? The same image, the first with natural color, the second with DxO camera profile Canon 5DS. The same adjustments. Both with local automatic brush on the horizon. The second has a black spot in the middle of the image like a tree, but there is no tree in front.