Initial Camera Settings for PL4, Nikon Df

That’s a pretty good summary of what I’m doing - I can keep my photos in shoeboxes, or hang them out in public for all to see. I’m not trying to earn a profit, and I’m not competing with anyone other than myself. I assume people are viewing these images on a phone, or their home computer. I doubt people are printing copies, but if they want to, that’s fine with me. Every so often, someone buys a print from Smugmug, but that’s not my goal in doing this.

I don’t learn that much from the Smugmug site, but I’m constantly learning things in these forums.

The “Smugazine” with weekly galleries being posted was an idea from my “Clinical Psychologist” who thought this would be good for me. It’s maybe a project, and it’s something taking up a good bit of my time, rather than sitting around in my condo doing nothing. I’m not allowing myself to do most of the things I’d like to be doing, and the “Smugazine” is as much for me as it is for anyone viewing it. I send out an email to lots of people when I update “the next issue”. It feels almost like “work”, and the only person I really need to impress, is me.

The rest of the SmugMug gallery is a collection of photos over the years. I can share them with friends and family. It’s more enjoyable than shoeboxes full of prints…
My take on which colour space to set in the camera is the largest you can choose. Why? because you can always “compress” a range but expanding it means having to invent colours to fill the larger range.

It doesn’t cost anything to choose AdobeRGB and, since PL uses that as it working space, it only makes sense to have as much information as possible for PL to use when editing. Then you can choose to convert to sRGB when you finally output your files for use on screens or the web.

I know it doesn’t seem fashionable to print photos these days but, should you decide you want to print that exceptional image, having the greater colour space will make the print that much better.

1 Like

I’ve been looking where I can set the color profile for export in pl. In the former link Wolf mentions
"If you select AdobeRGB for export, that last step will not take place, and everything will stay in AdobeRGB, as you say.

If you choose “as shot” for export, PhotoLab looks in the EXIF data of the RAW file whether you set AdobeRGB or sRGB in your camera settings and will either keep AdobeRGB or convert to sRGB. "
I can’t find that setting.

George

In your export preference window.

Found it. It’s called different.

George

Correcting. This is not the export profile. It doesn’t say so anyway.

Found it again, in the export dialog. Stupid of me.

Joanna, this is exactly how I work and for the very same reason. :slightly_smiling_face:

After our 5-year-old-sunshine left this afternoon …

I always wanted to maintain the bigger colour space of AdobeRGB, and realized very soon simply to set the camera equally, just to save me from constantly confirming in PS … long time ago.

Like George already cited Wolf’s former post
“If you choose “as shot” for export, PhotoLab looks in the EXIF data of the RAW file whether you set AdobeRGB or sRGB in your camera settings and will either keep AdobeRGB or convert to sRGB”
and strictly pointed out [follow-up post] “… It has no influence on the raw conversion. …” ,
one can set the camera either ways, up to one’s convenience.

BUT, what I wonder about, Joanna, you wrote somewhere, it influences the camera’s screen and the histogram as it reads from the JPEG.
– At some time, I set the in camera Picture Control to neutral (except sharpening +2.0), as to look it similar to flat RAW.
– And then with Active D-Lighting set to ‘Low’, it may influence the camera’s Light Meter.
– And yes, I take RAW + JPEG simultaneously.

have fun, Wolfgang

To be clear again.
It only affects the in camera jpg. It has no influence on the raw conversion. That’s always done in AdobeRGB.

George

3 Likes

My English is not the best English, to say it nicely. But what I kept writing was not different from what Wolf wrote.
As far as I know the main lines are the same for all raw converters.

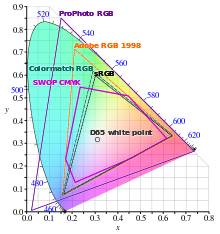
Color spaces are based on what the monitor can show, they are connected to each other. Look at the diagram. The main variable are the wave lengths of the light. Adding a color space to an digital image is taking care that that image has pixel values so that the monitor produces the right colors. I mentioned it before: a digital image doesn’t have colors, it’s the monitor that has colors
.
I also have my own questions about changing color spaces.

As you can see the sRGB colors are covered for 100% by the AdobeRGB colors. So it must be perfectly possible to show those colors in a AdobeRGB color space. On the other hand showing AdobeRGB colors in a sRGB color space will be inpossible when there are colors involved that are out side the sRGB color space. Then some solutions are used that always will alter the colors. Look for rendering intent.
So why using AdobeRGB? First of all there’re monitors,displays that can reproduce those colors.
Second is the practical use of AdobeRGB. When using a larger input gamut,range in wavelength, and divides that in the a/d converter in 255 pieces, then every piece in AdobeRGB will be larger then that of sRGB. The solution is to use a 16 bit division or 65535 pieces. And that’s where the profit in editing is coming from. It’s NOT due to the wider gamut.
Just my thoughts.Maybe I’ve to correct them.

George

1 Like

Hi George,
you explained it very well and why to use 16 bit for editing, preferable in the largest available colour space. If not pressed for time, one really should stick with RAW and not try to edit JEPGs heavily, as they come in 8bit ‘flavor’ only.

In that long post, I tried to illuminate the practical side of what happens, when people don’t know (yet)
how to handle stuff, and kept away from important bits and pieces (like how to fit colours into different
colour space / media, printable colours, softproof …).
It took me quite some time to grapple colour management, but with printing the rubber meets the road.
have fun, Wolfgang

The above answers my own questions - I will leave the camera set to AdobeRGB, as I’m doing almost all my editing now with PL4. Thank you - unless someone tries to change my mind, I’ll leave the camera this way unless/until I have a very specific reason to do otherwise.

I just wrote Joanna that I am setting my cameras to AdobeRGB. I don’t understand the above graph, I need to look this up on the internet and learn it. My photos are viewed on my iMac, in mySmugMug gallery, in emails, and in PL4. Are there any reasons for me NOT to use the AdobeRGB setting?

(I don’t know how to ask it properly, but I always thought I should use sRGB for viewing images, and AdobeRGB for printing images. Since I rarely print anything, and most people just view my images online one way or another, is this an issue?)

Hello Mike,

I would stick to Adobe RGB because of:

  • it is the working color space in DPL
  • it gives you more bandwith while editing in DPL compared to sRGB. There is just more info in the file to put it simple

Based on all the editing you do in DPL you export that “master” file as a 16 bit tiff, still Adobe RGB.

When you want to upload to Flickr, send the file to a friend etc… you

  • take the master files and create a jpg in sRGB out of it

I see the jpgs as “throw-away” files. I personally do not keep them. I only keep the raw and the master.
Based on the master I create jpgs for whatever purpose needed.

This keeps my life simple.

1 Like

This post explains what PhotoLab does depending on what you throw at it (read the whole post).

In combination with the principle “only change color space at the latest possible process step”, the following should be best in the scope of PhotoLab:

  1. Set your camera to AdobeRGB
  2. Customize your image in PhotoLab
  3. Export with profile set to
    a) “as shot” for serious printing
    b) “sRGB” for everything else

Notes

  1. you need a really good monitor in order to see differences between a shot taken with sRGB vs one taken with ARGB - and software with proper color handling.
  2. I do not consider usual household or office printers fit for serious printing.

This is only meaningful for the jpg or tiff made in the camera.
A rgb image isn’t mentioned. But I think it will be opened with the embedded settings of that image. Not sure about that.

Your photo’s will always be viewed in the color space of your display. If you’re lucky, color aware software is being used. When the embedded color profile is different from the displays it will be converted to that color space. If not you will see wrong colors.
What ever you will do with your pictures is up to you. But again: the selected color space does not affect the raw conversion.
George

2 Likes

Yes and not quite:

  • OOC JPEGs have been cooked in the selected color space pan, so, yes.
  • Selected color space also influences
    ** PhotoLab’s working color space for JPEG and TIFF
    ** PhotoLab’s color translation when exporting a customized RAW to JPEG and TIFF

It’s a detail, but it is somewhat important, because PhotoLab does not say, what color space was set in camera. There is no such info in the EXIF Tool (on Mac).

I like “simple”. What I’ve been doing is even easier than what you describe - PL4 can export an image in ‘jpg’ at whatever size I need. Then I email and/or post the images.

In the "righ"t color space? :smiley:

George

If you mean “ICC Profile”, that has “As shot” selected, and since my camera has been set to AdobeRGB I assume that’s how PL4 is exporting my images. That is the default setting, so I left it that way.

Because of all these discussions, I went out today to take outdoor photos with a 40-year-old Nikon E-Series lens, with no auto anything. Manual focus, manual aperture setting, I had to decide everything. The camera was set to AdobeRGB, processed in PL4, and exported using the same export settings as were used when the camera recorded the image - AdobeRGB. Everything seemed to go according to plan, except for White Balance. I set the camera to 5500K, and the images looked more “blue” than I remembered, so I used the white balance tool to adjust them.

I tried to follow the guidelines from everyone here, as best I knew how.

I’m very curious if the image from this morning is “acceptable” to everyone here. I know it could always be tweaked, to look different, but is this image, as-is, an acceptable starting point for an image to be processed in PL4 ?

(With the help of a technician at x-rite, I downloaded and installed my display calibrator, but I have a few more questions to ask them on Monday before I finish the setup. I might also post the question in this forum - it’s pretty generic I think.)

I’ve scrolled through what feels like hundreds of posts. It looks like there is a big misconception about RAW files, particularly with regards to color spaces, but also with a few other things.

User George has given the right answers. None of this matters with a RAW file. Let me describe a simple way of thinking about RAW files that I have found helpful.

RAW means raw.

A RAW file contains the raw sensor data. We know this and yet ignore it. RAW = raw, i.e. no processing.

To turn the sensor data into a color requires processing; therefore, a RAW file cannot have a color space. Or a white balance. Or anything that requires processing.

Here’s what happens when you take a photo:

Photons hit the sensor and are converted to an electrical charge. This charge may be boosted by a gain circuit (driven by the ISO setting) and is then converted to a number using an analog-to-digital converter. Some camera manufacturers may include some other small tweaks, but that’s basically it: the RAW file is a collection of numbers, each representing an electrical charge.

Color space? White balance? This is all done starting from the RAW data. In a RAW file, you can’t lose or gain any amount of color by selecting a color space in the camera. All the information captured by the sensor is in the RAW file. There is no way to get more (or less).

A JPG image is a totally different. It is a processed image that is created from the RAW data—it is never used to create the RAW data.

Converting the RAW numbers into something that looks like an image is always a somewhat arbitrary procedure—there is no absolutely right way to do it. Many software programs will use the metadata to guide the process, at least for the initial presentation (many also apply an automatic minimal amount of sharpening and maybe a few other things). What you’re seeing is not the RAW file—it is an interpretation of the RAW data. You can’t view a RAW file—it’s just numbers.

This default presentation seems to fool people into thinking that their camera settings affect the RAW file. Well, some do, obviously—the things that affect the RAW image are things that affect the number of photons falling on a pixel such as shutter speed, aperture, ISO, etc.

In-camera white balance and color space settings do not affect the number of photons reaching a pixel and are thus not relevant to the RAW file, other than that they are stored as metadata along with the sensor data. Software can use or ignore this metadata.

3 Likes