Sorry if this has already been covered but in the online manual here
Edit pictures with the Customize tab – PhotoLab (dxo.com)
And this of Smart Lighting…does this perhaps address some of your concerns & needs?
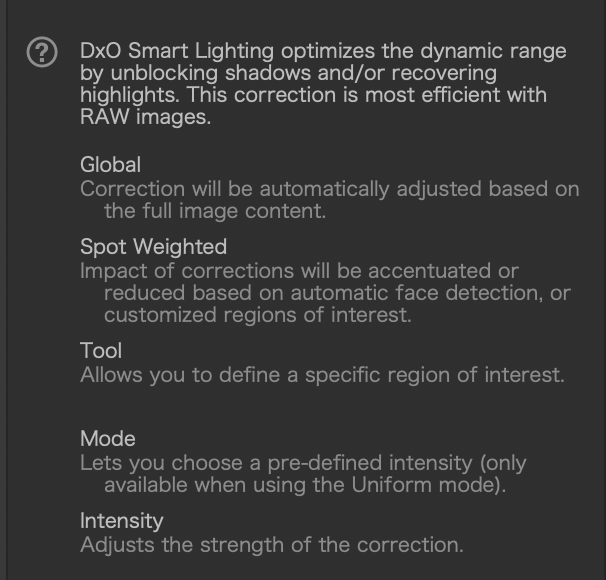
DxO Smart Lighting
About DxO Smart Lighting
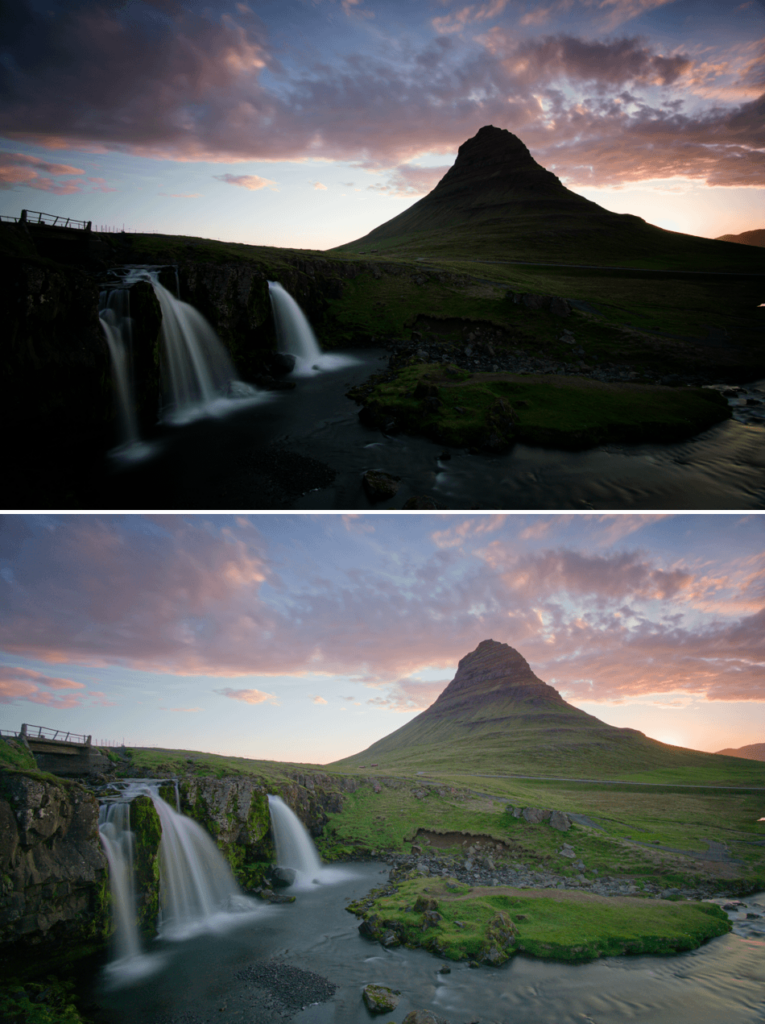
Backlit subjects are a typical case that calls for DxO Smart Lighting correction. Here, because of the very strong contrast, a high level of correction has been applied to open the shadows – as if a fill-in flash had been used.
Ordinarily, image corrections are applied to the whole photograph: when you modify the brightness or the contrast, you make the whole image brighter, darker, and more or less contrasted.
DxO Smart Lighting’s Uniform mode lets you automatically brighten or darken certain areas in your image without affecting other areas. You can also modify the contrast wherever necessary, such as in the following cases:
- Images with areas that are backlit.
- Images with a contrast range markedly higher than a camera can handle, especially images with very dark areas.
- Images that were accidentally underexposed, generally short on contrast, or lacking a flash fill-in.
As for Spot Weighted processing, it uses face detection and works with Smart Lighting to give priority to correctly exposing faces. This is not precisely a local correction, but rather a way to weight the exposure in favor of faces while preserving the correct exposure of the rest of the image, for a balanced and natural result.
DxO Smart Lighting: Uniform mode
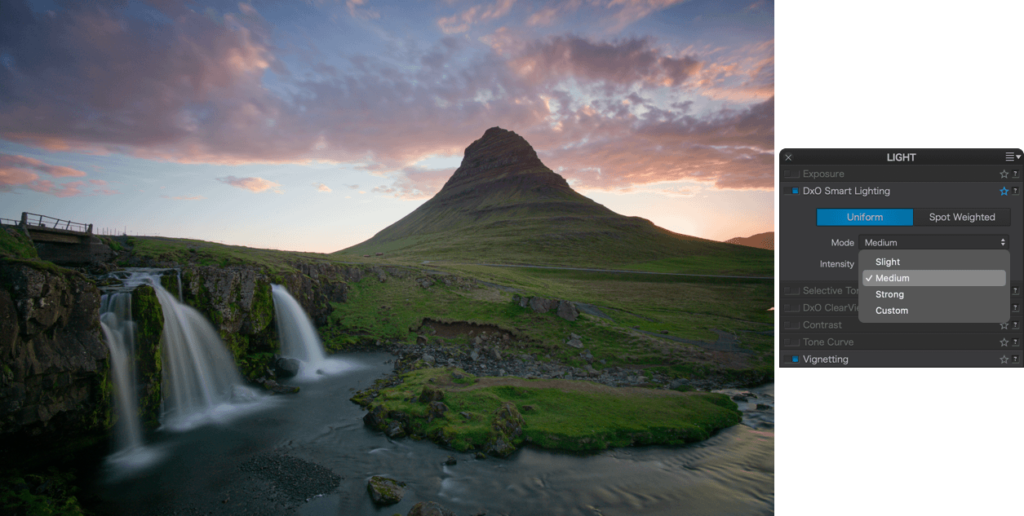
DxO Smart Lighting’s Uniform mode offers three levels of correction which take care of the vast majority of cases.
As with the majority of corrections, DxO Smart Lighting’s Uniform mode functions automatically. In this case, the software analyzes the image content and applies the correction in a homogenous way. You have two tools you can use either together or separately to adjust the correction:
- The first is a drop-down menu that lets you modify the intensity of the correction by choosing among four different levels: Strong, Medium, Slight (default setting), and Custom adjustments.
- The Intensity slider is set at the value assigned to the chosen automatic correction mode: 25 for Slight (default setting), 50 for Medium, and 75 for Strong. You can modify these slider settings, in which case the drop-down menu will display Custom mode.
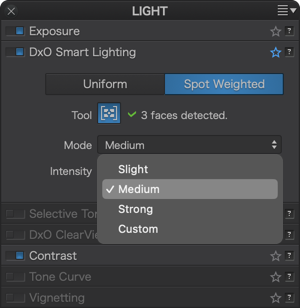
DxO Smart Lighting: Spot Weighted mode
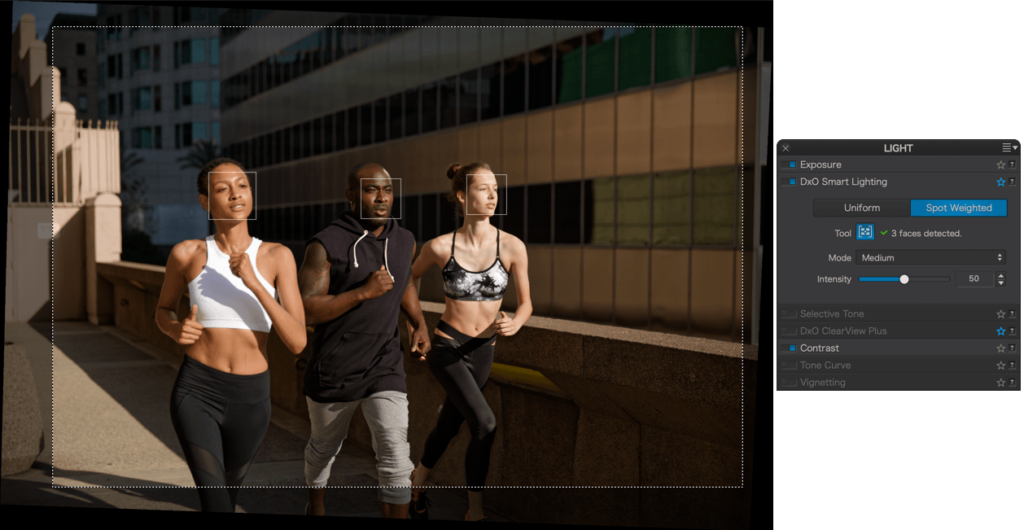
DxO Smart Lighting’s Spot Weighted mode is based on detection of faces in a photo in order to optimize the exposure — without radically modifying the rest of the image. This feature is particularly useful in the following cases:
- Backlit faces.
- Faces that are too bright or too dark against the background, whether dark or bright (e.g., bright on a dark background, bright on a bright background, etc.).
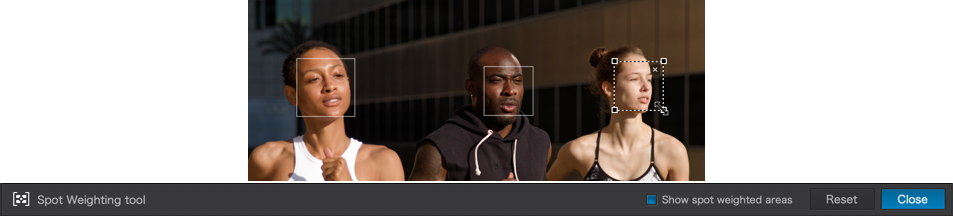
When you click on the Spot Weighted button, DxO Smart Lighting will apply a correction in Slight mode by default, taking into account the faces present in the image. The number of areas detected is indicated in the sub-palette, to the right of the Spot Weighted processing tool icon.
To see the detected areas, click on the tool icon. In the image, each detected face is surrounded by a rectangle. If you move the mouse over one of these rectangles, it will activate (that is, its sides will appear as dotted lines and there will be handles in each corner), thus letting you move it, resize it, or delete it (for this last, click on the cross in the upper right corner of the frame).
You can also use the mouse’s cross pointer to draw a new area. When you do this, the software will perform a new analysis and apply a new correction to the image.
If the system does not detect a face when you turn on Spot Weighted, a No faces detected message will appear in the DxO Smart Lighting subpalette. Generally speaking, non-detection occurs when a face is partially hidden. In these cases, you can manually draw a rectangle, and here, too, the software will perform a new analysis and apply a new correction to the image.
The toolbar located underneath the image lets you activate and deactivate the display of weighted areas (rectangles); to reset the correction; or to close the tool (which you can also do by clicking on the icon in the sub-palette).
You can change the intensity of correction by choosing from among three predefined modes (Slight, Medium, Strong), or by using the Intensity slider to make manual adjustments. In every case, the algorithms take faces into account.
Which settings to use with DxO Smart Lighting
DxO Smart Lighting is probably the most complex of our corrections. It has a global and a local effect on the image – affecting the whole picture and local details – and has a strong influence on contrast and brightness. Such a complex correction can only be mastered with practice. However, you will quickly see for yourself how effective DxO Smart Lighting is even for difficult images.
First, reserve it for photos where the shadows need to be brought back. It has little effect on highlights, unlike Exposure Compensation. Second, you should stick with the three automatic correction modes as much as possible, as they can cope with most situations, and then fine-tune with the Intensity slider afterwards. If you need to do further corrections, use the Selective tone palette or the Tone Curve.