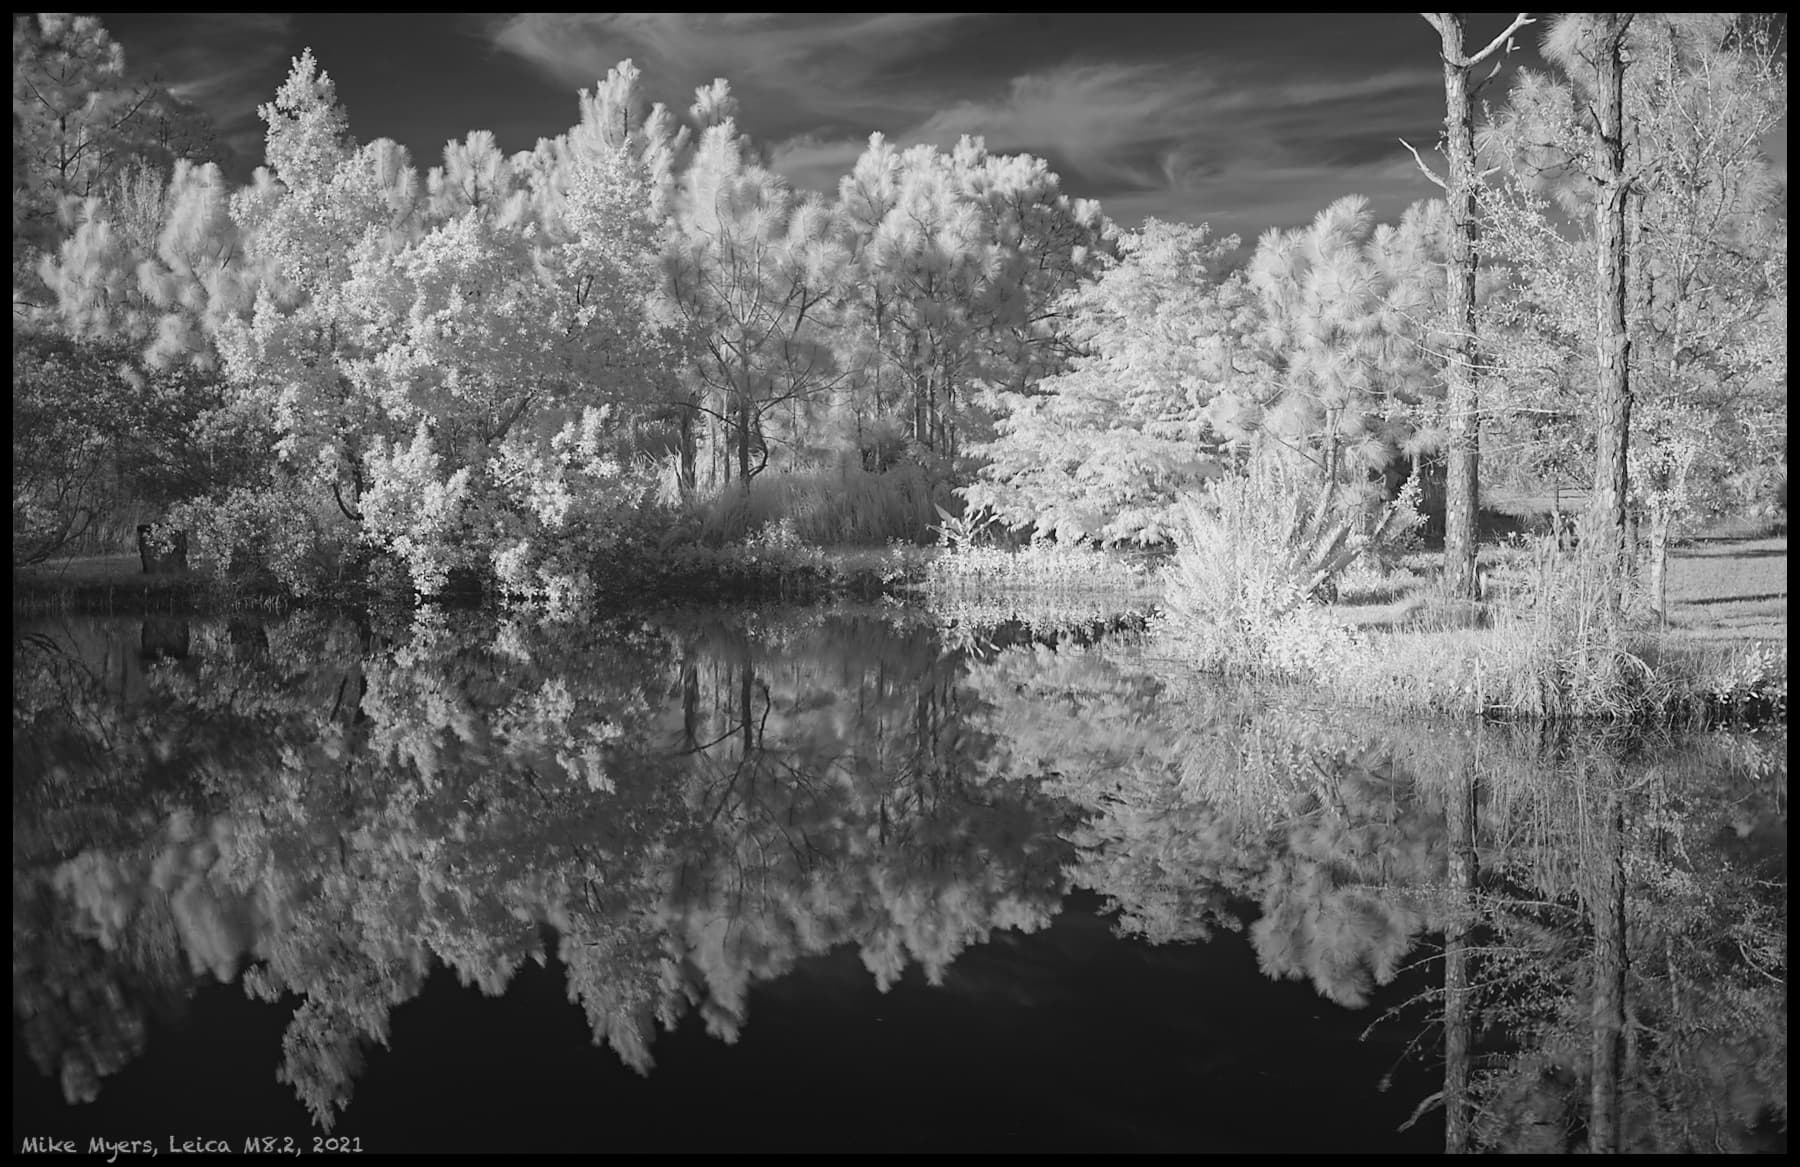
One of my hobbies is taking photos using infrared light. My old Leica M8.2 did not include an anti-IR filter, so it works great for this purpose, even without a tripod. I took a long series of photos in 2021, but I hadn’t edited this one before - what caught my eye this time was the reflection in the water.
Since PhotoLab can’t directly open images from the Leica M8.2 I used DarkTable, but I tried to emulate the tools I most enjoy from PhotoLab. I couldn’t do everything I wanted, but this came pretty close. I’d like to get better at infrared photography, trying out several infrared filters I’ve bought over the past few years.
First of all, well done! It looks sharp where I would expect it to be in a “normal” landscape.
Couple of questions:
Does the absence of the anti-IR mean that focusing works through your EVF? I think I read that unmodified digital cameras need adjustment to autofocus. I certainly found it hard to check manual focus through the viewfinder when I tried to use an IR filter on my Sony bodies.
Does the use of IR change the calculations for Depth of Field?
Could you not have produced some TIFF (or DNG) on which you could then use PhotoLab. Accepted you would lose any optical correction, but that aside …?
Slight correction. Unless you are using an exclusively IR light source, you are using full spectrum light. What you are doing is using an IR filter to block light outside of the IR band from falling on the sensor, but even that depends on which wavelength filter you use as some are narrow pass and others are wide pass.
Long ago, when infrared photography was more popular, many lenses had a mark in red (I think) indicating the infinity setting when shooting with infrared. Some of my Leica lenses have this, and others do not.
I don’t know anything about how the focusing works with an EVF, as all my experience has been with a Leica rangefinder camera.
Sure, or just changed the EXIF data to a Leica M9. But I enjoyed learning a bit more about DarkTable.
Joanna, I’ve now got a collection of IR filters - I can post them here, if you think you can figure out how best to use them. I’ll try to write up a list that I can post here. For the images I’ve already been taking, I have a deep red Leica filter with no information on it, which seems to work. I’ll post another image here, which I spent a lot of time on.
Revisiting that last image, it didn’t “jump off the page” like what I hoped for. I suspect this version goes a little too far, but it’s more of what I wanted to show. I probably should stop second guessing what I want to post for public viewing. I like to let images sit at least overnight before uploading them.
On the other hand, since none of us can “see” what infrared does to an image, maybe I’m free to do whatever I like, as long as I like the result.
One of these days I’ll go back to infrared in color, which involves switching color channels. I used to do that in PhotoShop; I’m not sure if PhotoLab would allow me to do so.
There was a person doing IR photography in New Zealand’s South Island recently posting on Mastodon and they were amazing. It’s such a different perspective.
I think this is the last photo from this series I will be posting here. I like the previous images more than this one, and none of the remaining images has that “spark of life” that I’m looking for. I can’t go back to this location any more, as my brother moved. I liked this image, because it had different kinds of vegetation. These shots were taken on a tripod, and I felt like I was “composing the photo”, but I never was able to imagine all the changes due to infrared. I wanted the foreground sharper than the background, but in retrospect, that didn’t work as intended.
If I don’t mind very long exposures, you are correct.
I just started watching this video:
Most people posting abut IR seem to be using Adobe software. If you have enough patience to watch the above video, there are many choices, several of which I know nothing about. I’d like to find a way to do this properly for color images, even if I have to change the EXIF data from M8.2 to M9 (also as you suggested). I’m not sure if PhotoLab can do channel switching (yet).
If you and Helen watch this last video together, I suspect you will find IR to be a useful tool for creative photography. Maybe others will decide to try it - but yes, all it requires is a filter over the lens of the desired specifications to get the type of color or B&W you want to create.
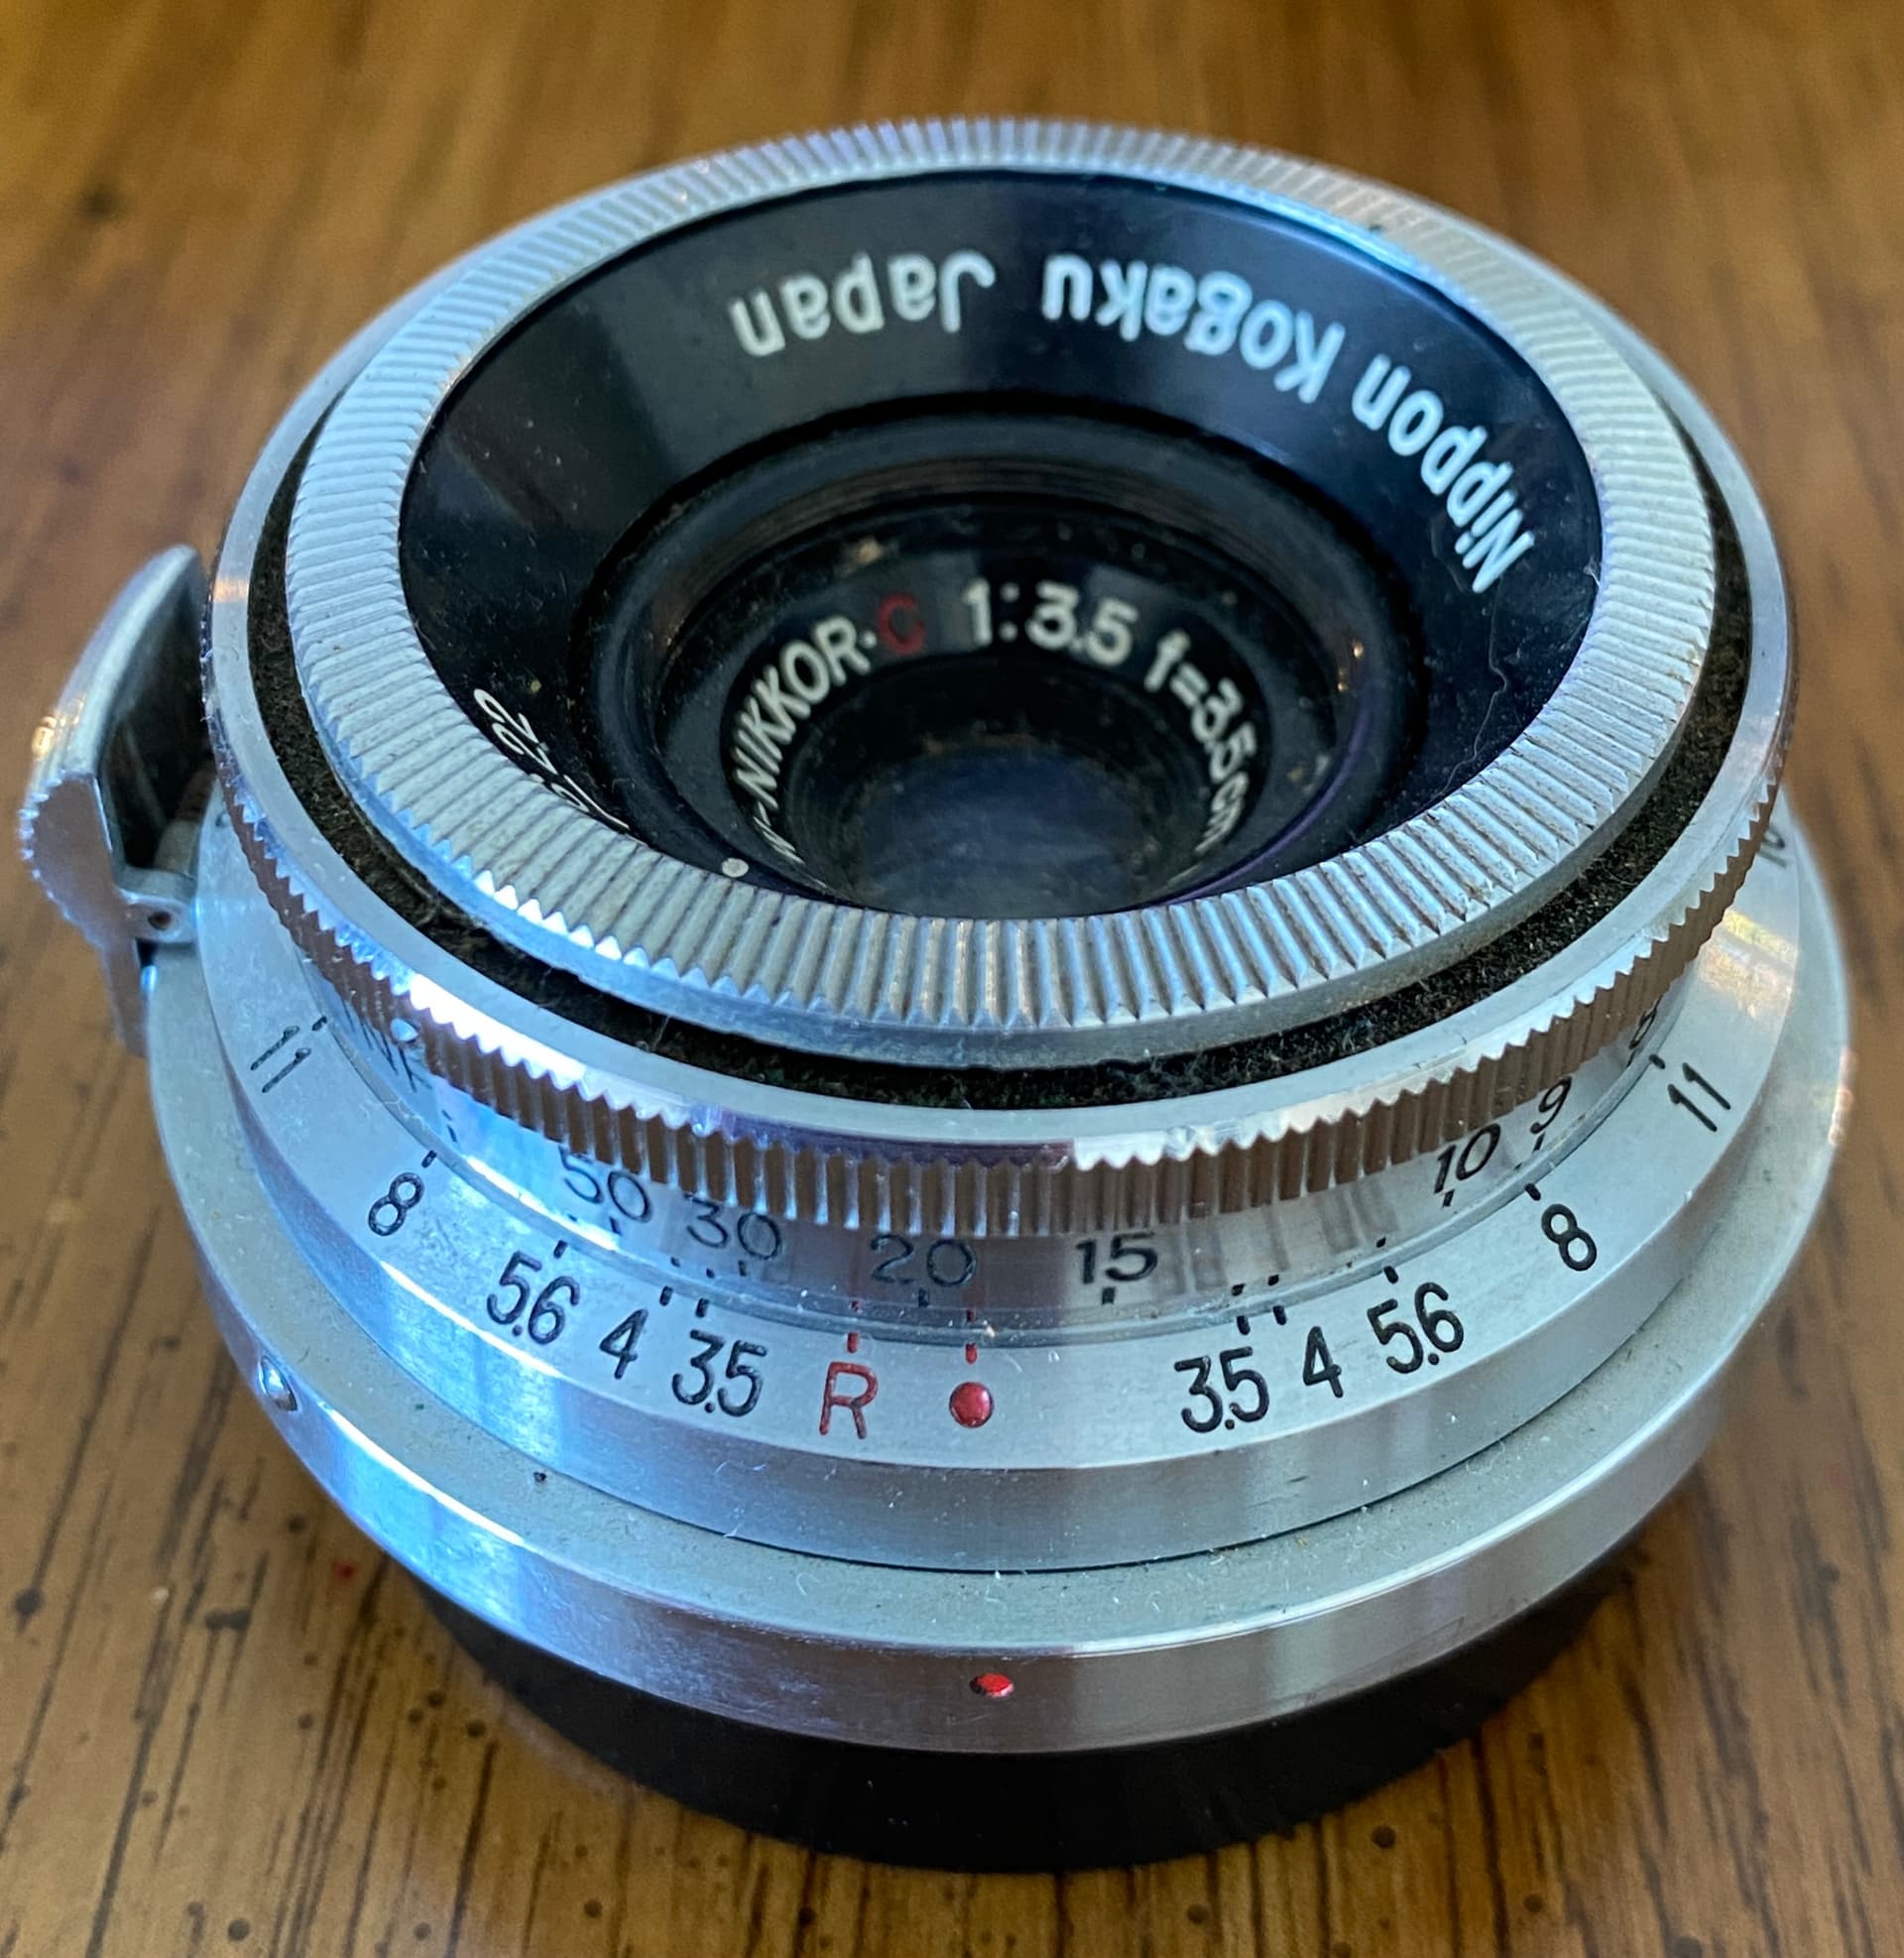
I posted something in this forum recently about infrared photography, intending to post a photo to explain what I meant, but couldn’t find a lens to show what I was talking about. This is a feature on most/many lenses from long ago, but people don’t seem to be as interested in infrared photograph as back when you could just buy infrared 35mm film and an appropriate filter. The point to all this, is that infrared light does not focus on film (or a sensor) the same as visible light.
The lens shown here is a 35mm f/3.5 lens that I used on my Nikon SP (or my Contax) cameras. There is a red dot at the bottom of the image for focusing. As you align the distance marker above the red dot, that is how the lens is focused. If the lens is set to “infinity”, the infinity distance mark would be over the red dot. This applies to most cameras from long ago - and of course, there were ways to help the photographer set the focus, perhaps a “split image rangefinder” which I used, or perhaps a ground-glass screen.
People don’t “see” infrared light - it’s invisible to us. If you look at the lens, you will see a red colored capital “R”. That is where the distance marker needs to be aligned with, for focusing with infrared.
Same thing applies today. The distance markings on our new cameras and lenses are for visible light, and are not appropriate for infrared photography.
With my Leica M8.2 camera and lens I used to focus the normal way until the camera told me the distance was correct, but then I needed to change the focus setting accordingly if I wanted the image to be in focus. I put my own “marking” on the lens, so I knew how to adjust it for infrared - unless I was using a lens like the one shown above - after the focus was set, I would need to move the focus ring a little, to offset it by the distance between the “red dot” and the “red R” on my image.
It all probably sounds horribly complicated, but it was really pretty simple to do in practice - focus normally, than make a small correction.
I’ve only done this on my Leica M8.2 camera. Maybe I will buy a proper size filter to go on one of my Nikon lenses for my D780, and see it can focus properly automatically.
Sorry for yet another bit of “item drift”, but if any of you want to try out infrared photography, even the simple way as described in the video, unless your camera can auto-focus with the IR filter, you’ll need to make the above correction manually.
If my explanation is too confusabobbled, this will be better:
I know you are right, but what would you suggest as a replacement for the M8.2 Leica, trying to keep the cost reasonable? I almost brought the M8.2 with me to India, along with my filters. If they fix my busted D3, I could send that off for an IR conversion, but that’s very expensive. Gosh, too may choices.
That’s easy. A Fuji X100VI in black. I have a friend who is a street photographer, who managed to get one way ahead of the queue. It is a 40Mpx sensor that produces astoundingly good images. But it is an APS-C 35mm equivalent fixed focal length lens ideal for street photography. But with 40Mpx, you can crop more severely without losing definition.
You may not be aware, but I still have my Fuji X100F, in black, with all the rear controls that were deleted from the next iteration.
The Fuji is not a replacement for the Leica M8.2 - the reason I wanted that Leica is that it does not have a built-in anti-IR filter, which allows me to capture infrared images.
To change from the Fuji X100F to either the V, or the VI, would be very expensive, and if you read enough of the Fuji reviews, the “F” model was and is highly regarded - but aside from that, I’ve already got it, and love it.
Because all those “influencers” went wild over the previous model, the V, it was sold out for the rest of the year.
But bottom line, the Leica M8.2 is perfect for me for capturing IR photos. I wish I would have brought it along to India this trip…