Clipped highlights, but only in Photolab?

Looking at (the original? The thread is kinda long) NEF file, I never expected this to be this bad.

But… yes, the raw data in the file is close to clipping, but nothing is really clipped. None of the channels.

As others figured out, the whitelevel used in parsing the RAW data can be crucial.

In this case, DxO PL seems to have that wrong. PLEASE REPORT IT AS IT IS A BUG.
From working with Darktable and other opensource raw processors,
every camera model can have different black- and whitelevels. Data you need for correctly parsing the data in the file. Those black- and whitelevels can even change on the same model, depending on ISO and/or shooting mode! It’s a pain to figure this stuff out.

DxO used the wrong whitelevel here, setting values to 100% that shouldn’t be.

Again, this is a bug, please report it!

Remarks about ‘DxO blabla do not use ETTR blabla’ are horribly wrong or misinformed.
I have never seen misrendering like this on my cameras, so it is brand/model dependant.

You should never blindly to ETTR these days anyway, but that’s a whole other topic.
(ETTR risks clipping raw data if you’re not careful, and since no camera has a working/useful raw-histogram while shooting, it can be hard for people to figure out how much ‘to the right’ they should go. Go too far, you have clipped highlights, which can be a real pain. If you do not go far enough to the right, you risk more noise, which is far easier to handle).

Darktable opens this file with black levels of 1008 and white level of 15892. And the highlights look OK.

1 Like

dude, you apparently have no clue about other bugs in DxO code, so you might want to actually study the problem before barging in with clueless statements

sure sure :wink:

please try to inject just one and share your observations … I merely shared mine that 81 sensels are enough to trigger white level detection for Zf raw in DxO PL code based on the equal DN values in those sensels that was above max DN values in the original image data … somebody can repeat experience with different DN values still above what was the max DN in the original frame … the horse is dead , there is no need to beat it … a proper commercial raw converter developer does test actual raw files as written by a camera’s firmware across the range of nominal ISO values and number of other possible parameters ( that might affect the matter ) and uses the white level found that way to validate or override whatever either exif tags tell and/or 3rd party library provides…

I am, obviously, glad that you heed the advice of the wise

Did a little test with a zone style exposure series and -compensation with Lightroom and PhotoLab version 7.4 on Mac. Have a look:

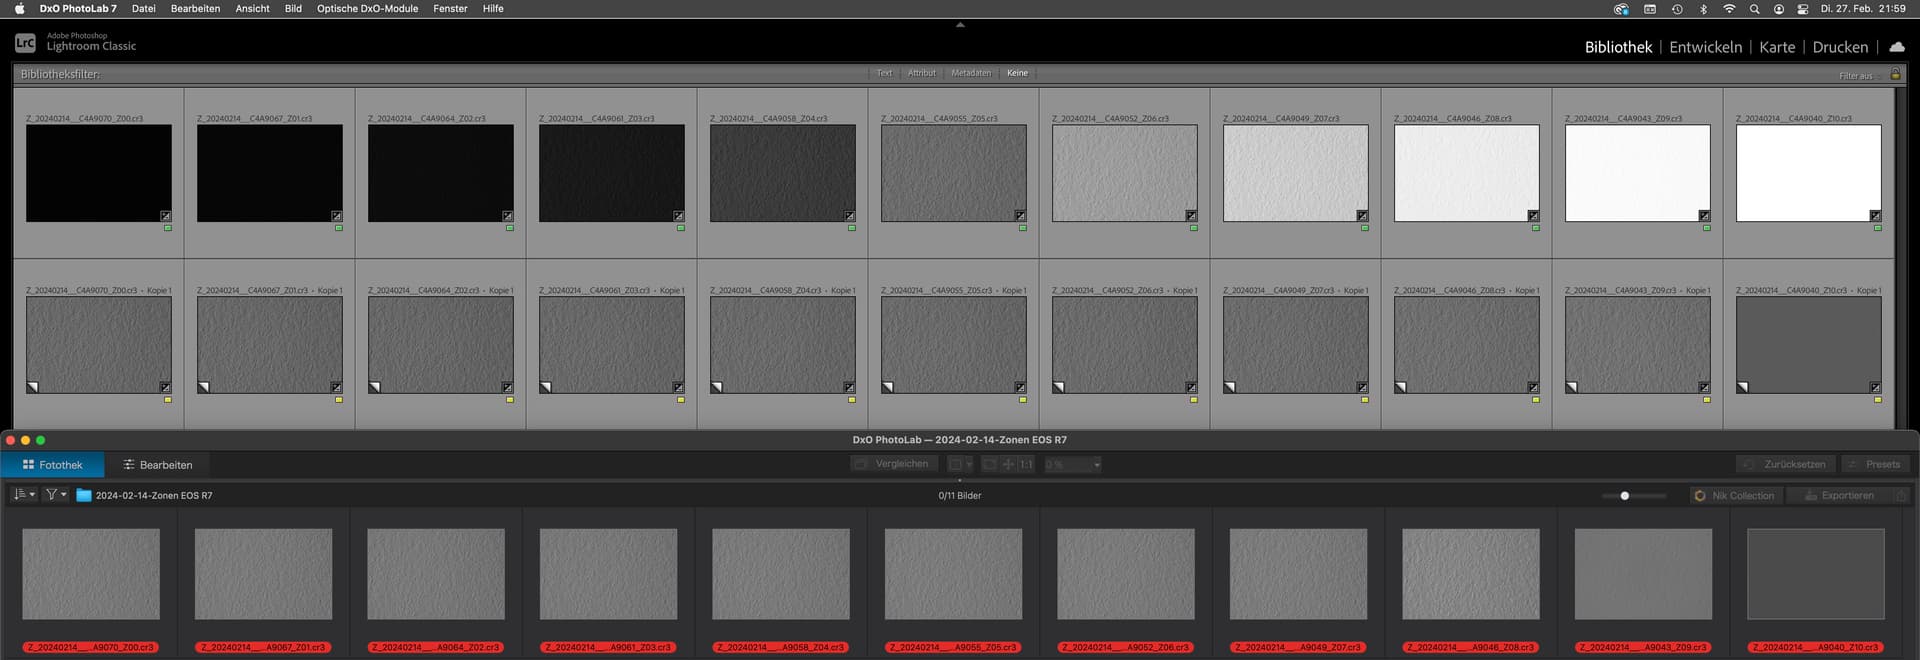
Top row: Bracketed exposures as seen in Lightroom
Middle row: Virtual copies compensated according to exposure offset (Lr)
Bottom row: Compensated copies as seen im PhotoLab 7

While all compensated copies should have close to equal RGB values, we can see some differences between Lr and DPL. Note that the two brightest images have highlights burnt to different degrees, which allows us to see how the apps deal with it.

  • PhotoLab is, in absolute terms, closer to what the RGB values should be (122,122,122)
  • PhotoLab’s third image from right is too bright
  • PhotoLab can compensate ±4EV while Lr goes to ±5EV (corrected the leftmost image in the .dop sidecar file as mentioned here. The rightmost image cannot be lifted with editing the .dop file.
  • The rightmost image is darker because of massively burnt highlights, which leaves only the left (dark) part of the bell-shaped distribution in the histogram when exposure is compensated.
  • Lightroom produces a fairly even set of compensated images, but they are a tad too dark (105 instead of 122)

Imo, Lightroom handles the highlights better in the sense of a more even compensation. DPL has this brighter zone 8 image and its limitations at ±4EV…which can be worked around by setting exposure bias with a text editor in the .dop sidecar(s). Note that both ExposureBias values must be changed (in the Base and Overrides sections)

Images taken with a Canon EOS R7 with a FF 28mm lens. Optical corrections only.

Here’s an image case that appears to show the opposite to the OP’s Nikon photo for the experts to consider… i.e. PL does not show blown out highlights, but FRV does.

https://1drv.ms/f/s!AjxAgDyf1SbdguQiDWRKrr1bUaGsww?e=txGjHS)

FastRawViewer and Sony’s Imaging Edge software show clipping, but to a different extent. Sony’s IE software shows levels of 255 in all 3 channels in more areas, however I thought the magenta shading meant only green clipping. Rather, it appears there is clipping in all 4 channels.

Both Photolab 7.1 (build 151) and Adobe Raw do not show clipping. The highest value I could find in the body of the crane was 252.

While FRV might show some clipping, I “assumed” that since AdobeRaw and PL did not, then these programs better “recovered” these highlights.

Can those more knowledgeable suggest why the differences, and if there really is clipping in this part of the bird?


I use FRV for culling but just downloaded Digger trial for this specific comparison. I do not claim any knowledge RAW photo analysis.

Another possible confounding factor is the “blinkie” settings in camera. Per some advice, I upped the camera’s “blinkie” settings to 108+ from 100 to get more range. (This is the setting that shows overexposure in the camera viewer.) I don’t know if this is used from metadata.

Ultimately, I’d like to learn the true upper exposure limit setting for my camera.
And perhaps this alternate case will help the experts sort out what these programs are doing to set white/black points and dynamic range.

Thanks!

green channels clipped - as you can see with black level off DNs are 16383 = 2^14-1

and somewhere blue channel too and red


the only tool to tell you is the tool that directly displays DN from raw channels - that is rawdigger… the rest are just more or less precise, FRV comes close in rawdigger absence.


here is the spot with all 4 channels clipping actually

and if we want to be very precise - there are only few sensels clipped, manually set clipping indication in rawdigger to max DN value and

those are non-essential practically ( as only literally few of them )

PS: also for A1 camera DxO code clearly has different processing for ARW → DxO → … vs ARW → DNG → DxO → … ( unlike for example for Zf where this is identical processing , as shown = Clipped highlights, but only in Photolab? - #133 by noname ) so regular investigations are not possible… is it a bug OR done for a purpose I have no idea

this “simplified” visual of the difference in linear DNG output (NROC only with No Corrections preset ) =

Thank you @noname!

Thank you for the intro to RAWDigger. I will read the manual and try to learn more.

If I understand the lesson well enough…
Photo 3 shows that only a few sensels on the main bird (photo subject) are truly “saturated” at the 16383 (2^14) value, so not a “bad” result.
Photo 2 shows the saturated areas at the pop can and these also show up as overexposed in both DxO PL and Adobe RAW, so consistent results between programs.
Photo 1 shows an area of “highly-exposed” sensels that will be difficult from which to extract detail.

AdobeRAW and DxO PL appear to set the “white point” at the 16383 value.
And, it appears that DxO processes the raw data as expected given the RAWDigger results.

So: not impacted by the DxO issue with the Nikon files.

it is quite possible that for Sony A1 model DxO code has everything OK when dealing with ARW - but we can’t test properly (so far) as DxO code does work differently with A1 DNGs ( unlike Zf ) … so we can try to find why, but no success is guaranteed… I also tested in DxO 6.9 - same difference…

PS: post some uncompressed Sony A1 raw file just in case - any content is OK

Here’s a link to some quick “test” photos from this morning.
Test Photos

All photos shot at f/6.3, 1/800sec, auto-iso with center-weighted exposure.
-Geranium photos show color and no overexposure at +2
-Truck photos show +0 to +3 with center weight on dark window or on brighter white door panel.

My observations…
-should run the test again with camera on tripod, better target showing dark and light areas, and specific iso step changes, not auto-iso.
-focusing on darker vs. lighter resulted in ~2.5 stop difference
-have about +1 stop latitude when focusing on a light area
-have about +2 stop latitude when focusing on a dark area
-not clear on effect of reflectance from chrome.
-Unexpected result - max green values were higher at 2500 iso vs. 3200 iso. No idea why - perhaps there is a built-in multiplier or sloppy shooting.
The +1 / +2 stop latitude is about what my experience suggests when out shooting, but this may be confirmation bias.

I still need to learn how to best take advantage of this latitude in PL when trying to get the closest to “perfect” / or push “ETTR”.

Thank you!

I suggest you have zebras indicator on your camera. set it to 100 or 100+ and depending on how you shoot, lets say you set it to P mode or Program mode, you just dial in the exposure compensation and let the camera do the rest. I see this is shot on Sony, I use a6300 and I don’t think I’ve had issue with lost highlights once. Super easy to dial in as much as you need. If you shoot too bright scene simply use exposure compensation and watch the zebras. Should not be a problem. If you expose a bit lower, it should not be too much problem cleaning up the shadows with DXO DeepPrime or DeepPrime XD. Like I said, unless I wanted blown highlights, its not a problem to dial in the correct exposure.

Thanks.
The subject of the thread was false clipping in DxO PL when using some Nikon cameras (raw file types). I also saw some differences in my Sony files so submitted a photo for review.

Based on these and previous photos, it appears that DxO handles Sony highlights “properly” in both the uncompressed and lossless compression modes. Your comments seem to support that conclusion. So not relevant to the Nikon issue.
@noname suggested I submit additional photos to further review PL’s handling of Sony files. Hence these photos.

Along the way I learned something about RAWDigger and how to help me dial in highlight limits.

As for camera setting… I prefer manual ss and aperture, using auto-iso or manual override based on the blinkies/zebras. I have my “blinkies” setting at 108+ trying to use some of the built-in headroom to best expose for the highlights (ETTR?). Mostly this works, and I can often get another 1/3 or more stops even with blinkies active at this setting. Sometimes I cannot. An example of this situation was the very bright white Whooping Crane photo submitted in the earlier post. I pushed the exposure to get more out of the balance of the scene but hoped the white bird stayed within the limits. It appeared to work, but I could not get much texture out of this brightly exposed bird. @noname’s comments and RAWDigger analysis of this photo, while not relevant to the Nikon issue, helped me better understand why I got the results I observed.

Sorry, I do not use “P” mode - ever. As amazing as these cameras are, they do not “know” the photographer’s intent so would not know how to adjust the setting for the intended photo. IMHO, that’s my (the photographer) responsibility.

2 Likes

Could you tell me what this means?

George

Are they exposed very close to raw overexposed (very close to full sensor “saturation” in some places) ?
This is where the photolab bug happens.
It seems only rawdigger can check this without any doubt.

more interesting question is why for this camera (Sony A1), DxO does not work identically for ARW and DNG …

I tried Z9 - there DxO code works identically…

R = rawread(‘z:\DSC_0341-NEF.dng’);
D = rawread(‘z:\DSC_0341-DNG.dng’);
isequal(R,D)
ans =
logical
1

Sony cameras show overexposure (OE) with blinking (white/black) areas in the viewfinder (Zebra stripes). I learned the general industry term as “blinkies” as a way to set in-camera exposure based on the highlights. @Joanna has explained this method in other threads.
In the Sony A1 menu, the setting is Exposure>Zebra Display>Zebra Level.
Sony Zebra Display
You can google videos explaining this tool/setting.

In my unscientific testing and recommendations form others I found I can often get away with a bit more exposure hence raising the default to 108.

When reviewing in post, each program I use (or try) sets the OE warnings in the histogram a little differently based on what appears to be a “safety margin” for how the program processes these highlights. This is my “guess”.

While this thread was about a specific Nikon issue, the question as to how PL and other programs process the same RAW highlight data was raised. So I posted a Sony example for comparison. As a result, @noname was kind enough to point me in a direction I hadn’t considered to better understand my confusion on how these programs process the data.

As to how to best set my exposure in the field for extremely white/black objects such as the Whooping Crane, I am still learning. This photo shows a few OE areas on the bird’s body and a few UE areas on the head. This is perhaps a subject for a different thread or forum.
I settled on Sony’s RAW lossless compressed format for my photos trying to get the most info in as small a file as possible.

From @noname feedback, DxO PL appears to handle this RAW format properly. I am satisfied.

Thank you!!

blinkies are blinkies, zebras are zebras - even when they serve the same purpose ( and can be repurposed ) they are different … some cameras have both - blinkies are for stills, zebras are for videos