I am a relative beginner to PhotoLab and had questions about printing some of my photos. Typically, after making the desired edits to the RAW file, I export as a standard jpg with a 300 ppi resolution and have not paid any attention to the actual size of the image.
I would now like to go back and print out some of these images, but now I want to have them exported to a specific size (8x10). I read through some of the previous posts and it seems like all I need to do is to check “Enable Resizing” and select 10" as the longest dimension. Is that correct?
My other question is related to the original RAW file. If I am going back to older photos, i.e. not from a current editing session (Windows PC), does the CR3 file that was the source for the original jpg export (has the green check mark in the corner) still maintain all of the editing steps that were performed before the export?
This is where I get confused. I have heard that Photolab is a lossless editor, so I wasn’t sure if all I had to do was to go back to the CR3 file and just do another export to jpg with the resizing option; or do I have to try and re-do all of the editing steps I made and the re-export?
I tried printing the original jpeg exports at Walmart and their software basically cropped the images to fit 8x10 as opposed to resizing them, so I lost parts of the original photo. I’m not trying for art quality prints, but I would like to at least have them correctly displayed.
Any help/guidance on printing is greatly appreciated.
You don’t need to re-edit your photos when changing Export parameters. The only thing that could be affected is the aspect ratio of your image. If your camera is full-frame then the images are 2:3 ratio ie. 24mm x 36mm.
8x10 is a 4:5 ratio so you will need to crop your image to that ratio. Those options are listed in the crop tool.
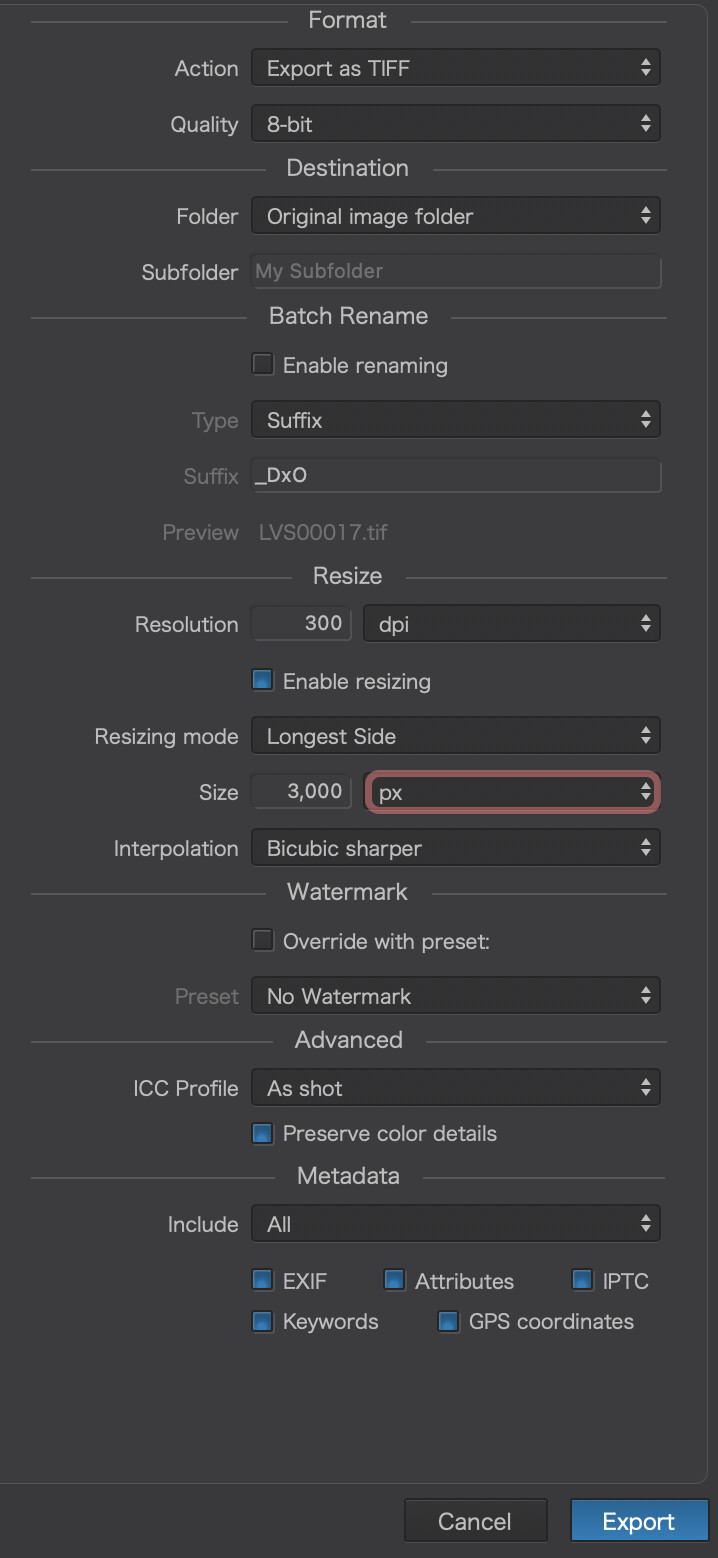
An 8x10 image at 300DPI would need to be 2400px x 3000px to ensure a crisp image.
Also to get the best print quality you should export as a TIFF most printers only require 8-bit color depth, you can find these options in the Export panel.
Thank you for the reply! This is definitely helpful. My camera (R5) is full frame, which probably explains why my crop tool was set at 2:3 ratio. So if my exported photo is at that ratio I would want to choose a print size which maintains that ratio or close to it? So in this case, 8x12 would be the correct size to choose for an enlarged print?
If that’s true, then I assume you set the export to make the longest side 12" and then export in TIFF or 100% quality JPEG?
I know Walgreens has fairly limited options, and really the only reason I did that was to get immediate gratification They don’t offer 8x12 prints, and I don’t think there a lot of local options, so probably will have to resort to an online service and wait for the prints to arrive.
This is probably dating me, but typing this gave me flashbacks of my dad taking photos in the 70’s and sending the film canisters off in pre-addressed envelopes to a lab and then waiting patiently for the prints to show up in the mail to see how they came out
Yes, always set your export to the longest edge required and make sure that 300DPI is set, JPG format will work though you may not get as deep a color reproduction. Best to get one print done and if you’re happy with the results then stick to that, otherwise look around for an online printer.
I’ve used Printique a few times and been very happy.
You don’t have to set the ppi.
If your paper ratio is different from the image ratio you’ll always have a white boarder on one side or you’ll be missing some of the image.
So first crop to the desired ratio, and content, and then export to the desired size. But that last part can better done by the print service too.
Thanks for all the additional details, I feel like I have a better handle on the print process now. As I thought about it, I realized that I didn’t really need to set a dimension (inches) on the export as long as I was printing to the same aspect ratio as the image.
The printing service would basically scale the image size to whatever was selected. The only issue might be in a photograph where there was a significant crop (like a telephoto shot of a small animal) and the native image pixel size was too small that you couldn’t enlarge it to a bigger picture w/o lose of resolution.
I searched, and it seemed like Mpix had decent reviews, so I uploaded a few photos for 8x12 prints from the original 100% jpegs to see how they look. I tried both their E-Surface paper and the Giclee prints. Now I’ll just be waiting at the mailbox for them to arrive, lol
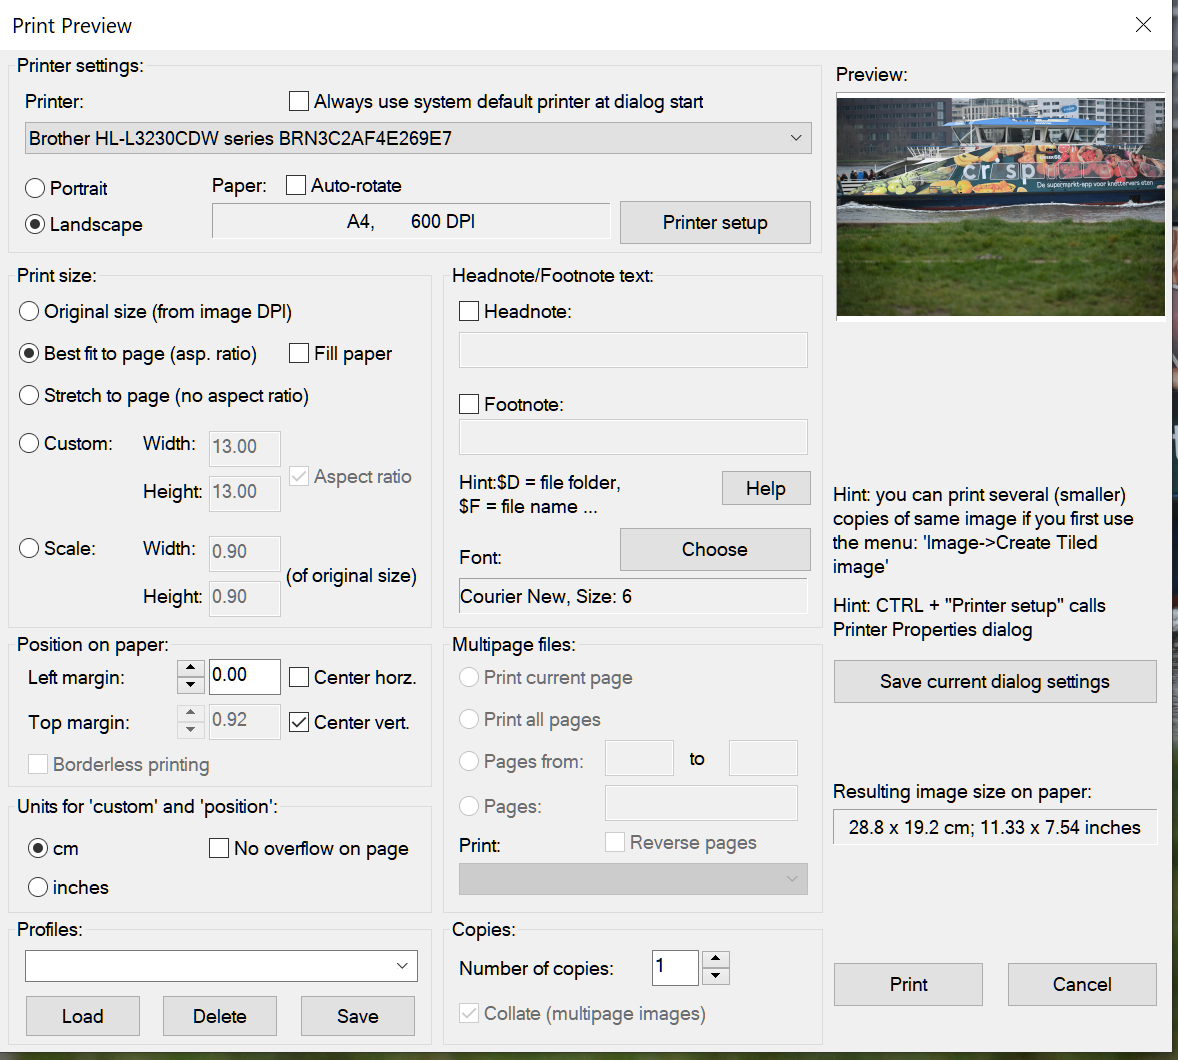
This is the printing tab of IrfanView.
In the print size settings you see some possibilities.
original size (from image DPI). That’s wrong. It should be PPI. DPI is about the quality of the printer. Mostly it has 2 settings: text and graphics. Wit graphics the space between the dots is filled too. So graphics is twice the text. PPI is defining the size of the image. An image on your pc doesn’t have a size, only pixels without dimensions. Only when viewed on screen or being printed it get a size. When using this option, original size, the printer will print using the PPI in the image file. An image of 6000x4000 pixels and a setting of 300PPI will become 20x13.3 inch or 50.8x33.87cm.
But mostly we set the output to a certain paper size. All the calculation is done by the printer. As you can see you can choose a size that’s smaller as the paper used and select a position on that paper. The calculation is done by the printer. I never used this however.
George
PS.
You see also the option ‘best fit to page’. In my case selected. In your example you will get a white space somewhere when the image ratio is different from the paper ratio. When selecting ‘fill paper’ you won’t have white space but will lose some of your image.