I’m not sure if this is a bug, user error, or limitation. Please advise!
I have created a custom preset that I auto-apply to all Fuji RAF files. The preset does lots of things such as adding a bit of lens softness correction, assigning DeepPRIME denoising, et al. There is one thing that I want it to do but the correction is not auto-applied: change the color rendering from “Generic rendering” to “Camera body”.
That is, the custom preset assigns “Camera body” rendering but that change is NOT made when preset is auto-applied. The change is made successfully when I manually apply the preset by selecting it from the “Apply preset” menu.
I would love all changes assigned in the preset to be applied upon opening a file. Am I doing something wrong?
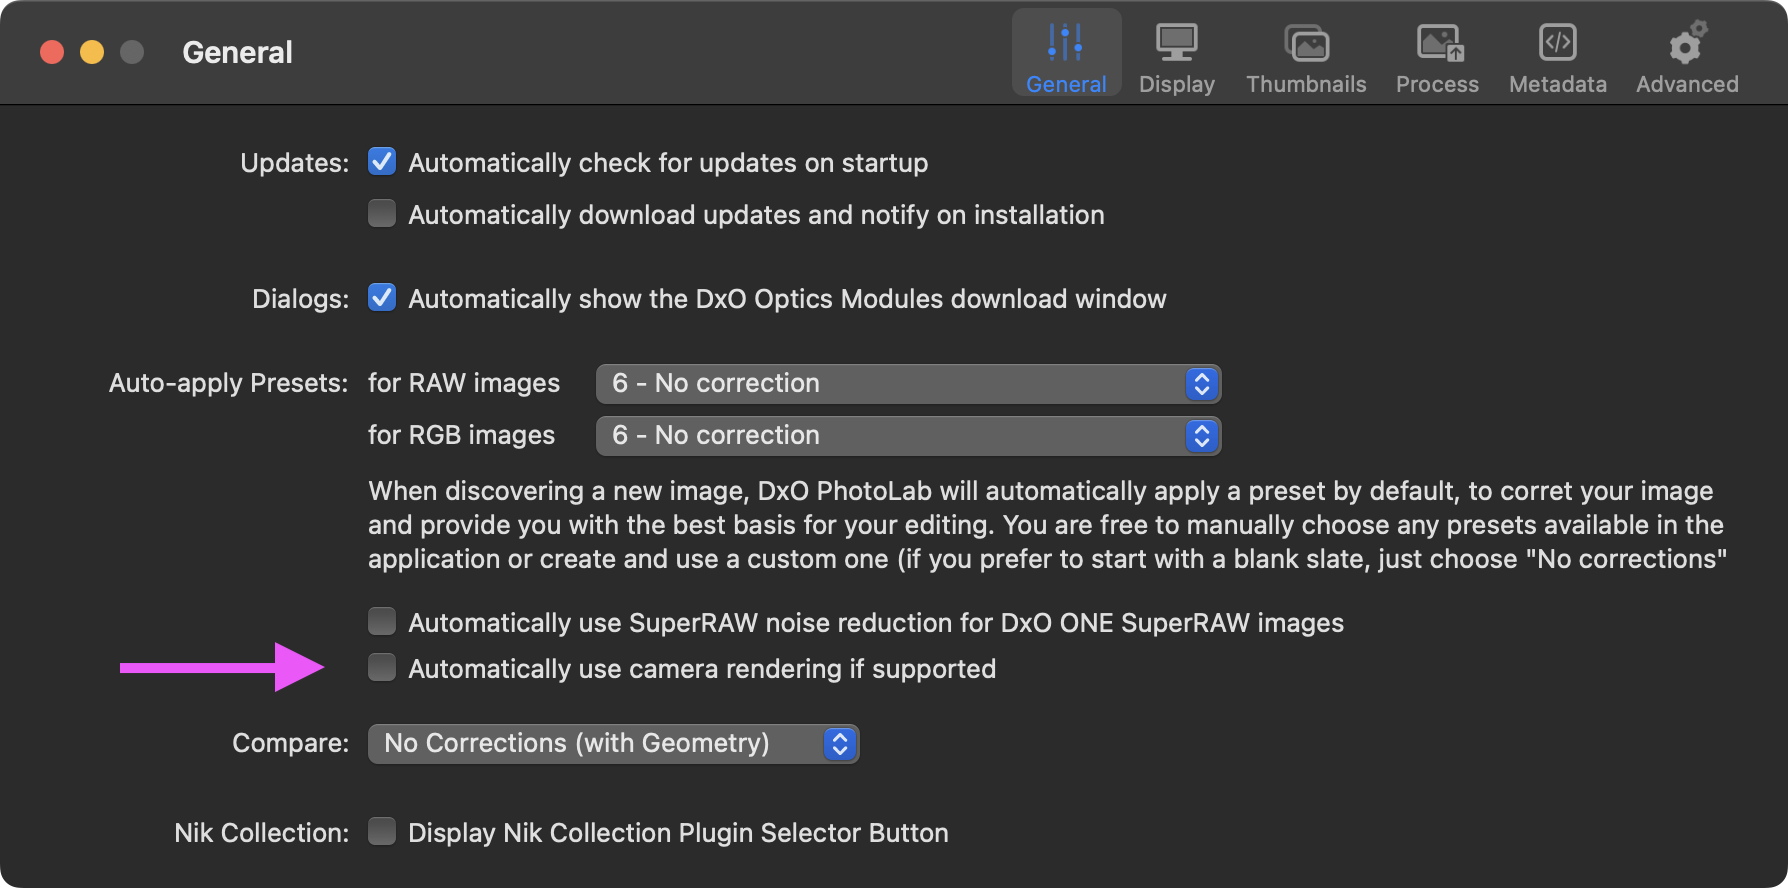
[Resolved! This was a User Error. In my preferences, I had checked the box to “Automatically use camera rendering if supported”. When I de-selected this option, the auto-applied preset began to apply the settings for the rendering I prefer.]
Have you already opened these images with PL?
Has your preset have been changed since then?
PL automatically applies the preset when discovering images.
If you are working in a folder that was already opened by PhotoLab, then changing the default preset isn’t going to cause that preset to be applied to the images in that folder. PhotoLab already pre-processed those. What you would need to do is either select all of the images and apply the preset, rename the folder and open it again in PhotoLab, or (not recommended unless necessary) delete the database. Hope that helps.
he says that everything else (“lots of things such as adding a bit of lens softness correction, assigning DeepPRIME denoising, et al.”) successfully AUTO applies in his situation, except just this item does not … in what you describe nothing will be applying
still you can make a clean experiment by creating a new folder, moving one .RAF raw there (checking that there is no .DOP moved along w/ it - because you never know) and opening it in DxO PL* - to make sure that your default full preset applies and applies everything but a color rendering
You are correct. I haven’t audited that ALL corrections are applied but I think that the rendering type is the only one that I’ve noticed is not being applied. I have lived with this issue for years because PL5 had the same behavior. I work around the problem by selecting all images in the thumbnail strip and manually applying the preset that has already been auto-applied.
and you can share your default preset here - somebody might be able to test to see if by any chance there is something lingering in it ?
and how about recreating this same preset again from scratch ( starting with DxO’s own no corrections preset ) and try to set it as default and then do the clean test
I created an empty folder and copied one RAF file into it. I navigated to that folder with PhotoLibrary, selected the image, and switched to the Customize tab, and found the same issue. The Color/B&W Rendering Type was set to “Generic Rendering” with the Rendering set to “DxO camera profile (X-T5)”. When I double clicked on the preset assigned as the auto-apply preset, the values corrected to “Camera body” with rendering “Fujifilm X70, …”.
Next, I will rebuild the present starting from No Corrections but, in the meantime, I’ve attached the preset that is not working correctly.
I created a new preset after applying the No Corrections preset. Among the changes I made, I set the Color Rendering. Working on a new image in a new folder, I brought the image into the Customize tab and saw the same old problem: all the corrections were applied except for the setting for Color/B&W Rendering. Has anyone reproduced the problem or is it just me???
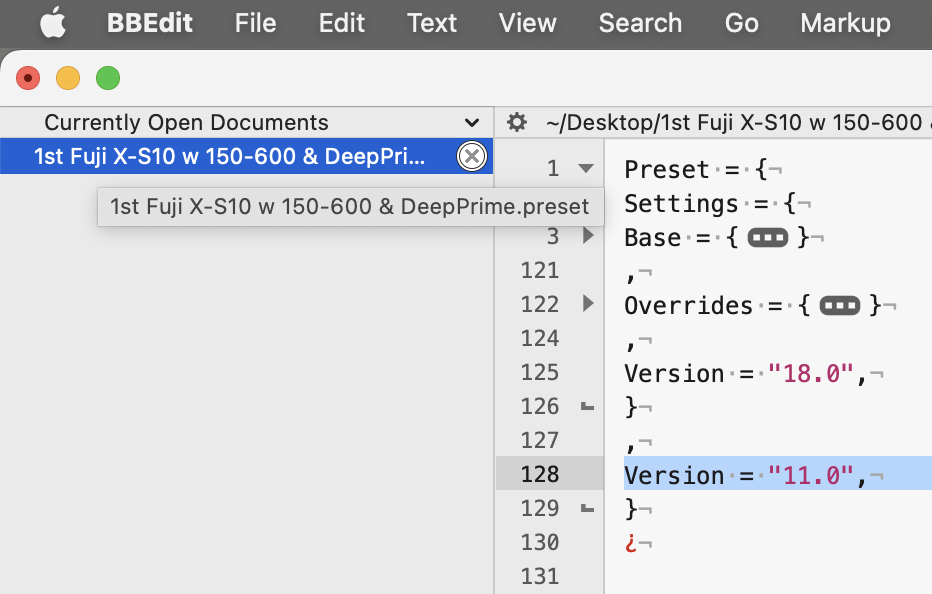
Change the second version entry to 18.0 and it should work.
Also, the Overrides section is unexpected. Don’t remember having seen this with presets on Mac. Overrides exist in .dop files though. In your preset, overrides is empty, so maybe that’s just a difference between Mac and Win versions of PhotoLab.
Dagnabbit! Did not help! I was so hopeful. Thanks for your effort. I really appreciate it. But wait! I was looked at the preset with a text editor, something I had never done before so thanks for that, and found something odd. I searched in the preset for “render” to see if I could spot anything that stood out (without really understanding what I was looking at.) I changed the line:
ColorRenderingType = “FujiXT3”,
to
ColorRenderingType = “FujiXT5”,
because my camera body is an XT5. I’ve never had an XT3 so I have no idea where that value may have come from. The preset seems to be working now. I’m going out to shoot some photos and I’ll confirm again with fresh images when I return.
Wow. Thanks for pointing me in a positive direction.
@markinlcri , good you made it work with the right setting.
Interestingly enough, the .dop sidecar worked with DPL on Mac with the changed version number. DPL on Win seems to do other checks, but the sidecars should be exchangeable between Mac and Win, assuming that we don’t try to use a new dop with an old DPL. Note that I used the import feature of the preset editor to get your .dop file into DPL.
I might add a Mac modified dop sidecar later, then you can check interoperability if you like.
Actually I cannot confirm that I made it work. I’ve now been modifying the settings for rendering, saving the auto-applied preset, and getting very weird results. I can definitely assign the Type to “Camera body” with a Rendering of “Canon 10D, 2D, …”. However when I set the Rendering to any of the Fuji types, the value is not set and the Type defaults back to “Generic rendering”.
Because I saved the preset, I suspect that I changed the ColorRenderingType incorrectly. I think there is a bug when saving presets. Perhaps the well-used big boy values for Nikon/Canon/Sony are vetted and work correctly but the outliers may not be fully tested.
I’ve set mine as shown above. If you’ve checked the box next to the magenta arrow, some interference could be the result as this setting acts on Fuji and Nikon cameras according to what I remember from the user manual.
Last but not least: Here’s my modified copy. It is an absolute preset (changes all settings) and you can see if it a) works as is and b) after you change it back to a partial preset as you seem fit. 1st Fuji X-S10 w 150-600 & DeepPrime MOD.preset (2.9 KB)
If you cannot make it work, try support.dxo.com and ask for assistance, after all, you’re a paying customer, I suppose.
It’s a common misunderstanding to think that you need to make a choice from the list of Renderings (via the “Color/B&W Rendering” tool) to match with your physical camera … That’s NOT the point of the choices offered via this tool.
1) Instead, to have PL render your image according to your camera’s default rendering style, you should select Type = Generic Rendering & Rendering = DxO Camera Profile … and PL will then automatically apply your camera’s default rendering style.
2) The point of Type = Camera Body & Rendering = Some-Specific-Camera - is so you can force PL to render your image as tho it was taken with a different camera.
For example, I have both Sony & Olympus/OM bodies - - but I want all images from these different bodies to have the same “look” … To achieve this, I use Type = Camera Body & Rendering = DxO-One … because I like the look that DxO’s rendering provides (for this now defunct body).
3) The reason you found the token “FujiXT3” in your sidecar/.dop file is that it represents the following family of Camera-Body Rendering-types;
… …
… One of which, you’ll notice, is your XT5
That is, DxO deems all camera bodies in the same list to have the same/similar rendering look
So, when you changed that token to “FujiXT5”, which is NOT one of the tokens recognised by PL, then PL would have ignored it and, instead, used the default rendering for whichever Working Color Space that you had specified (which, for WCS = Wide-Gamut, is Generic/Neutral-Color)
Summary:
If you want PL to render your images in the same way that your camera would, by default, then use; Type = Generic Rendering & Rendering = DxO Camera Profile
If you wish to force PL to render your images in the style of a different camera-body, then use; Type = Camera Body & Rendering = Some-Specific-Camera
That was it. Bingo. I had checked the box to “Automatically use camera rendering if supported”. (Was this the default? I don’t think I would have changed this setting but, if I did, it was years ago.) Now that I have deselected this option, the preset is working properly and assigning the rendering values that I prefer.
Thank you a millionfold! I would have been driven crazy by this if I weren’t already!
Simple? Not for this guy. I really appreciate your comments here. You made matters clearer. I added the change to rendering because I found, while editing my images, that the values I selected gave me consistently better starting points. That is, the initial image on my monitor more closely matched the image in my brain that registered while taking the photo. So, with the help of @platypus I have changed my preferences in Photolab and I am now editing with greater efficiency.