Copy your original RAW file plus the .dop into a new folder and then open the RAW.
I attached a link to video I recorded in one of my previous posts. If you havetime you can download it ans see.
But I just realised that I hijacked jon1 thread (sorry) so I will make a better video and start a new thread.
I just had a quick look at your video. This looks like you are trying to correct a mixture of over-exposure and chromatic aberration.
I think they call it green and purple fringe.
“They” might call it that but the technical term is chromatic aberration. And DxO has a tool for that.
Great news. I’m on my smartphone now but when I get back to my PC I can attach a link to RAW file.
Will you be so kind to show me how to remove this green and purple color in DxO?
Sounds like a plan 
Then I got the same picture output as with your editing.
That’s right. Your RAW file (or copy) plus my .dop file are combined by PL4 to show you how I edited it. So now you can go through the palettes seeing which ones I used, and don’t forget to check the local adjustments.
I don’t understand how you used Local Adjustment 
You don’t double click.
First, select the tool
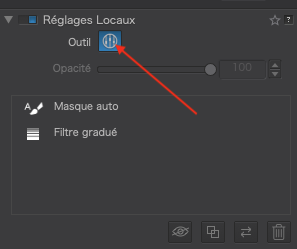
Then you can select one or other of the two adjustments
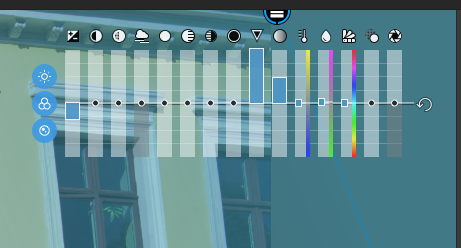
This one is a gradient that goes from the top-right corner to the left window on the second floor of the yellow building
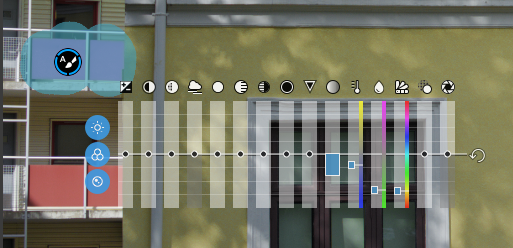
This is the auto-mask for the panels on the balcony
Hi Jon1 and m9k
It is difficult to use different software. Each program has a design philosophy and even though a tool may have the same name it doesn’t mean that it does the same job.
For example in LR there are sliders for setting white and Black points. Capture 1Pro has sliders with these names but they control a narrow range of tones between the white point and white slider and between the black point and black slider. In C1 you set the white and black point using the levels tool which LR doesn’t have.
By asking about specific LR tools the problem is that the solution in DXO is found by a different route. This is why posting a raw file in Dropbox etc. is the best way to receive help.
DXO’s day job is testing/characterising cameras and lenses. The lens corrections in DXO are the best available and therefore you need to start with a raw file in DXO. With some lenses designed for computer correction you can get significant differences at the wide angle setting. Thi sexample for the Olympus 12-100mm Pro lens shows the difference between Adobe and DXO’s optical corrections. LR only uses the jpg correction embedded in the raw file. This is Adobe:
This is DXO:
I hope this illustrates why you need to upload a raw file so that you can see the actual result of DXO. The old adage of a picture is worth a thousand words 
Ian
IanS’s point about DxO’s lens corrections is significant. Much better than anything else out there IMHO. The superior results you’ll get with PhotoLab make spending a little more time learning the program worthwhile.
There are tutorials at the DxO site which will help, too.
Bob
Dear IanS;
I understand everything you say.
Yes; each RAW converter works somehow different and that’s why I use 3 RAW converters at the moment. Each of them has strengths and weaknesses.
At the moment I could not work only with Photolab because some tools are not working as I would like them to work and some other tools I like are missing.
Best regards;
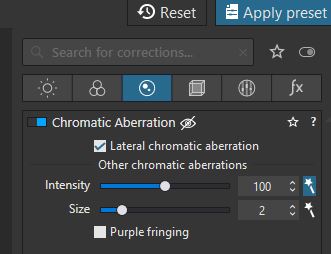
Use the Chromatic aberration tool if the lens correction has left any chromatic aberration:
Ian
Thanks , it helped a lot.
I know about the superior lens correction in DxO.
Check out what Robin Whalley found out in this video. Lens correction …Adobe vs DxO
He’s later mention that the only reason he doesn’t have DxO as his main RAW editor is the lack of Fuji X-Trans support.
In my case , I have to admit that i struggle with local adjustment in DxO. I’m used to the ACR/Lightroom method. Global adjustment is pretty easy.
Local Adjustments in PL
Hello jon1,
please have a look at this thorough and well explained tutorial https://www.youtube.com/watch?v=ueSdlVcU9Y0. While Dan Hughes is on a MAC, in windows the user interface looks a little bit different.
Having activated the Local Adjustments you right click on your picture and get a ‘radial menu’ including a questionmark, that will show you the different options and their specific hotkeys.
To adjust the mask, that is underlying a Control Point, you move the Control Point and/or size it.
To size a mask, that is produced by Auto Mask, Mask or Gradient, you use the Eraser.
Just play around with any of the Local Adjustments to get used to. You will quickly learn, how they interact with Global Adjustments - and speed up your workflow.
have fun, Wolfgang
