Using PhotoLab 4 to process sunset photos

Mike, they are ment for travelling.

I’m not keeping you back to spend money on stuff you ‘enjoy’, but don’t you have an old heavy one for your balcony shots, to put your cam on and when you are finished you just take the whole thing inside … just asking :slight_smile:

1 Like

Or a bag with beans or rice.

George

Or one from TrioPod M - 3 Legs (novoflex.de) or…or…or
Sometimes such discussions remind me of hobby cooks who buy an expensive Damascus knife every 6 months, have 20 other knives in the drawer, but forget to learn how to cut well, cleanly and quickly.
:innocent: :grinning:

1 Like

If the choice is between a technically better street light, or a more pleasing image, for me, the choice is clear - the most pleasing image. But better yet would be go got the most pleasing image, and have the better street lights at the same time.

Sure do - I’m using that again. But my “travel tripod” that I bought was not as steady as I expected on my first test images. I guess I should try again. It cost around $40 or 50 I think, maybe a little more. The way I got it to work well was to hold my camera in my hands, and rest my hands on top of the travel tripod. That worked.

If I expand the tripod legs, raise the camera to the needed height, attach the camera and set the self-timer to take a photo - and the camera is not held steady enough to get a good photo, then what? My “trick” worked.

Actually, I was messing everything up because I’m now working with my MacBook Pro, with a newly installed copy of PL4, and everything is back to like my home computer was before I got it fixed up.

Anyway, I went through the settings and turned everything off, then used the settings I’ve learned are most beneficial. I hope to post one high quality image later today.

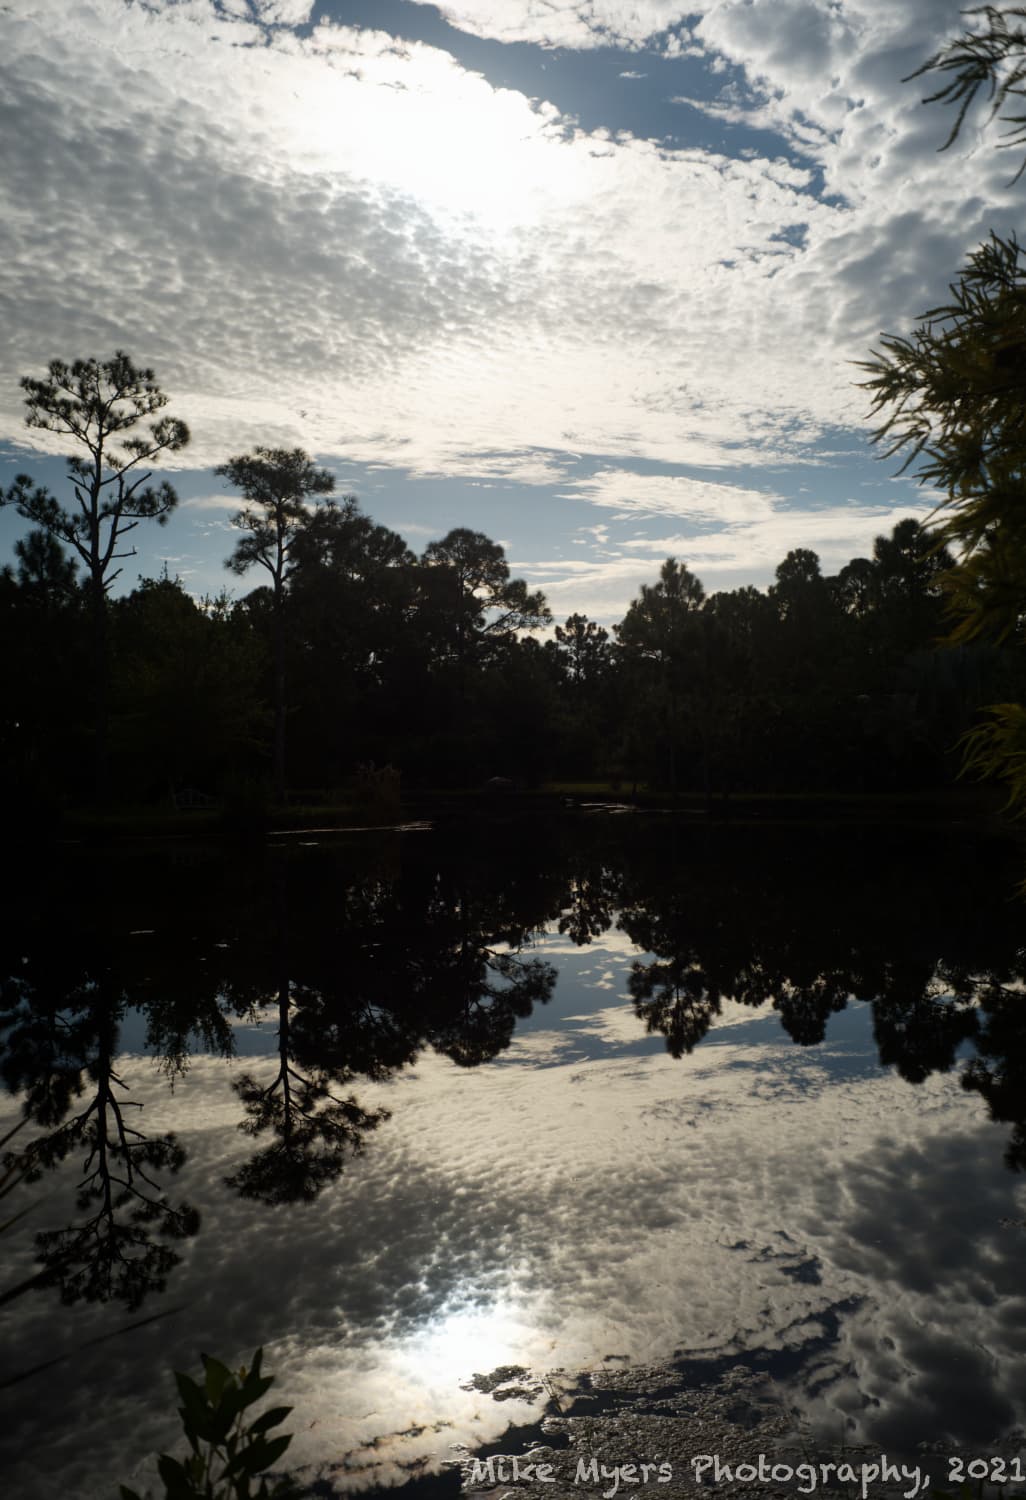
I woke up early yesterday to capture the sunrise, but it was boring. A while later I got to see what I thought was a fantastic sky, with the sky reflected in the pond, and a row of trees across the middle. I got an exposure from the Leica that “felt” right, and spend between two and three hours in PL4 trying to make it look the way I wanted, but the trees are black, and I wanted to make them dark green.
Histogram was adjusted for no clipping.
All non-needed adjustments are turned off.
Everything I tried to do made the trees look “muddy”.
I finally gave up, and left it like this.

I still like the photo, but I think I’d like it more if the trees and shrubbery were a very dark green color…

Maybe I should quit while I’m ahead?

10-06-2021-Tuesday and Wednesday photos_L1003237.dng (29.0 MB)
10-06-2021-Tuesday and Wednesday photos_L1003237.dng.dop (12.3 KB)

We haven’t had a clear night since I got here. Today it’s raining, so tonight is doubtful. If I get a shot, it will be with my Leica (only camera I have here), with 50mm lens, at f/2, so tentatively 10 seconds I guess.

I’ll need my tripod, and some mosquito repellent!

“Sky Guide” is now downloading onto my phone…

Don’t do that Mike. You just need to practice more :kissing_heart:

Talk about take the dynamic range to the limit :open_mouth:

But at least the exposure is as near as I think you are likely to get it, especially with the sun in the shot, even if it was slightly veiled. Well done! :clap:

Here is my effort

10-06-2021-Tuesday and Wednesday photos_L1003237.dng.dop (27,3 Ko)

Or, using Smart Lighting Spot Measure mode

10-06-2021-Tuesday and Wednesday photos_L1003237.dng.dop (42,9 Ko)

You did what I tried to do, with no success. If I can get my Wi-Fi working, I am anxious to see how you did it.

After a night’s sleep, I rethought what I had done and simplified it more.

The most obvious change is the 5:4 crop, to remove the distraction of the over-bright veiled sun in the sky, which effectively blinds the viewer from the adjacent detail in the trees, and to better compose the scene.

But, on the tonality side of things, the most important adjustment is the Smart Lighting Spot Measure mode, where I moved the highlight zone from the sky to the reflection of the sun and increased the intensity to 40.

This then meant I could remove the colour wheel boost to the greens and reduce the tone curve.

What helps with the tree detail is the fine contrast, especially in the shadow slider, although I also added some general fine contrast.

Overall, it actually ended up needing very few adjustments, just the right ones.

Revised DOP file.

10-06-2021-Tuesday and Wednesday photos_L1003237.dng.dop (29,0 Ko)

My problem with this, is while in some ways it is better, it removes the most important reason I took the photo, the sky.

(My internet where I am staying is terrible. )

I much prefer the second photo you posted, where I can see green trees. I didn’t know a way to do that looking as good as what you did.

I only can imagine, that landscape orientation and wideangle lens would have been better for the composition. – As you said the sky got your attention, why don’t you concentrate on the sky? Maybe give the sky more room in comparison to the trees and leave them as pure silhouette.

Anyway, the burned out hole in the sky with otherwise nice ‘cloudy pattern’ just looks ugly and can’t be repaired (could be resolved with HDR/bracketing).


(also have been experimenting with crops similar as @Joanna did and as B&W version, but … difficult composition)

1 Like

Wolfgang, why repair it, as that was part of what I saw?

I would agree that the sky should be good, but it is simply impossible to avoid that terrible burnt out area where the sun is, which effectively gives you two points of brightness which are fighting for attention and fooling the eye into thinking that the trees are darker than they are if the eye didn’t have to battle those bright areas.

Hence the “trick” of using the crop to maintain as much sky as possible without the intense glare. Out of interest, Here’s the bit of sky that I cropped out…

In isolation, do you still think there is enough interest to warrant the intrusion of the bright area?

Don’t get me wrong, I’m not fighting you on this, just suggesting something that I feel helps cope without turning the bright area grey. I see @Wolfgang suggests HDR but, in my experience, if the sun is in the shot, especially behind thin cloud, it is always going to be a “nearly” shot.

At least, with the reflection, there is more detail visible than in the “big blob” in the sky.

Because your eye would graduate the transition to pure white, instead of the inevitable “step” that a sensor has to make between one level and another. It’s not just the brightness, it’s the abrupt transition that leaves the viewer of the image frustrated that they can’t see the detail in the clouds immediately in front of the sun.

Or, at least, that is my opinion :kissing_heart:

Well, you did - it’s the same technique we discussed for the sunset shots in Miami - SmartLighting :nerd_face:

1 Like

Here’s a couple of photos with veiled sun that Helen took. Note the subtle transition from bright…

And here is the un-retouched original of the first one - yes the sun is blown, but Helen reduced the maximum brightness to 244 and, with the rest of the image having that subtle “glow”, it doesn’t appear grey

I am on my phone now. I like the top photo the most. The bottom photo (original) not at all, and while the middle photo solves some issues, just like with my photo, the reason I enjoy the top photo, the reflection, is lost.

Top photo is interesting, middle photo is pretty but boring, bottom needs work.

Just how I see things.

Smart lighting makes sense. I will try again later today.

By itself, the part of the image you removed is ugly, but without it, the reason I took the photo in the first place is gone.

How others will react, I don’t know. To me, the cropped image loses a “bad” part of the image, but to me, bad or not, that was part of what made the whole image.

Maybe I should have used film.

To me, the sun on top along with the clouds, all reflected in the water, is what I was trying to capture.

Wolfgang is right that the sun being burnt out is a technical flaw, but does anyone expect to “see” the sun?

This is like Helen’s photo to me, and both need the sun and the reflected sun.

If I do nothing else today, I will learn how to USA the controlled lighting to get the trees looking as you did.

@mikemyers – to give you a new / different idea


10-06-2021-Tuesday and Wednesday photos_L1003237.dng.dop (67,7 KB)

M = uncorrected, VC1 = B&W

  • copy your dng- and this dop-file into a new folder – I skipped all other versions
  • to see how it looks in colour, deactivate → Color Rendering and → Channel Mixer


Maybe I should have used film.

While film might compress the light a little, I don’t think it would have solved the problem of harsh contrast between the cloudy pattern and the burnt out spot.

To me, the sun on top along with the clouds, all reflected in the water, is what I was trying to capture.

Sure. Now it’s the bright top part, that ‘explains’ the reflections in the water without the necessity to really see the sun in the sky – some surprise (call it ‘magic’), while still logical.

  • to be more believable, I brightened those trees hit by the sun with some → Local adjustments
1 Like

As @Wolfgang says, it really wouldn’t have made that much difference. The sun is just too bright and the transition from “pure” white to the cloud detail is just too marked to my mind.

I would agree, but the difference with Helen’s is the smoothness of the transition and the blown part is roughly circular and looks more like the sun than just a big white patch in the middle of some very beautiful patterns in the clouds.

But it’s your image and what you thought you saw. Unfortunately, on this occasion, although it might work for you as a memory, I would say it doesn’t work as an image, due to the strength and harshness of the blown white patch drawing the eye away from the rest of the scene :wink:

You are trying to photograph one of the hardest subjects. Had you exposed it about a stop or two less, it might just have passed the JC test :crazy_face: :nerd_face:

1 Like

I worked with Smart Lighting several times, learning how it worked, and eventually I got a good “feel” for it. I finally set it to “55”.

I understand what you are both telling me, and standing on their own, your photos are “better”, but this shows what I saw and “felt”.

10-06-2021-Tuesday and Wednesday photos_L1003237.dng.dop (13.2 KB)