How to cleanly recover shadows in this kind of subject in photolab

Hi,

This is something I find difficult to do in photolab.
I hope some of you will have a way to do this cleanly (I mean when looking image at 100% size and not at small screen or web size).
Sure this is far from being a good image, but it illustrate very well my point, so I choosed it.
I don’t want any advice on how to shoot this better (I know I should have exposed it more because I didn’t reach high limit of what my sensor can provide), but when shooting wildlife in real condition with very moving subjects under forest foliage (so very fast varying lighting condition, and more, often fastly going from back lighted to front lighted subjetc), you often get not absolutly perfect exposure. But exposure is right enough to have informations to recover.

So here is the raw file, and thanks for looking at it. It’s a wetranfer link so it should be avalaible 7 days I think (don’t know how to post a D850 RAW on this forum) :

you mean looking @ small window with DPXD NR preview ? unless you specifically do not want advanced NR to help with noise in those deep shadows

I mean getting a clean result after processing the image and looking at the result at 100% size.

This is more a masking problem to isolate main subject for shadow recovering than anything else.
Fur are hard to mask for me with photolab in this kind of scenario.

There is no problem with your exposure. You have no blown highlights to worry about.

I am not sure why you applied exposure compensation of -⅔ in camera but there is still plenty of shadow detail available despite that.

I too use a D850 and can assure you that, as long as you don’t over-expose, DxOMark shows 13.37 stops dynamic range at 400 ISO. So plenty of room for shadow recovery.

Here is a screenshot of all the corrections I deemed necessary…

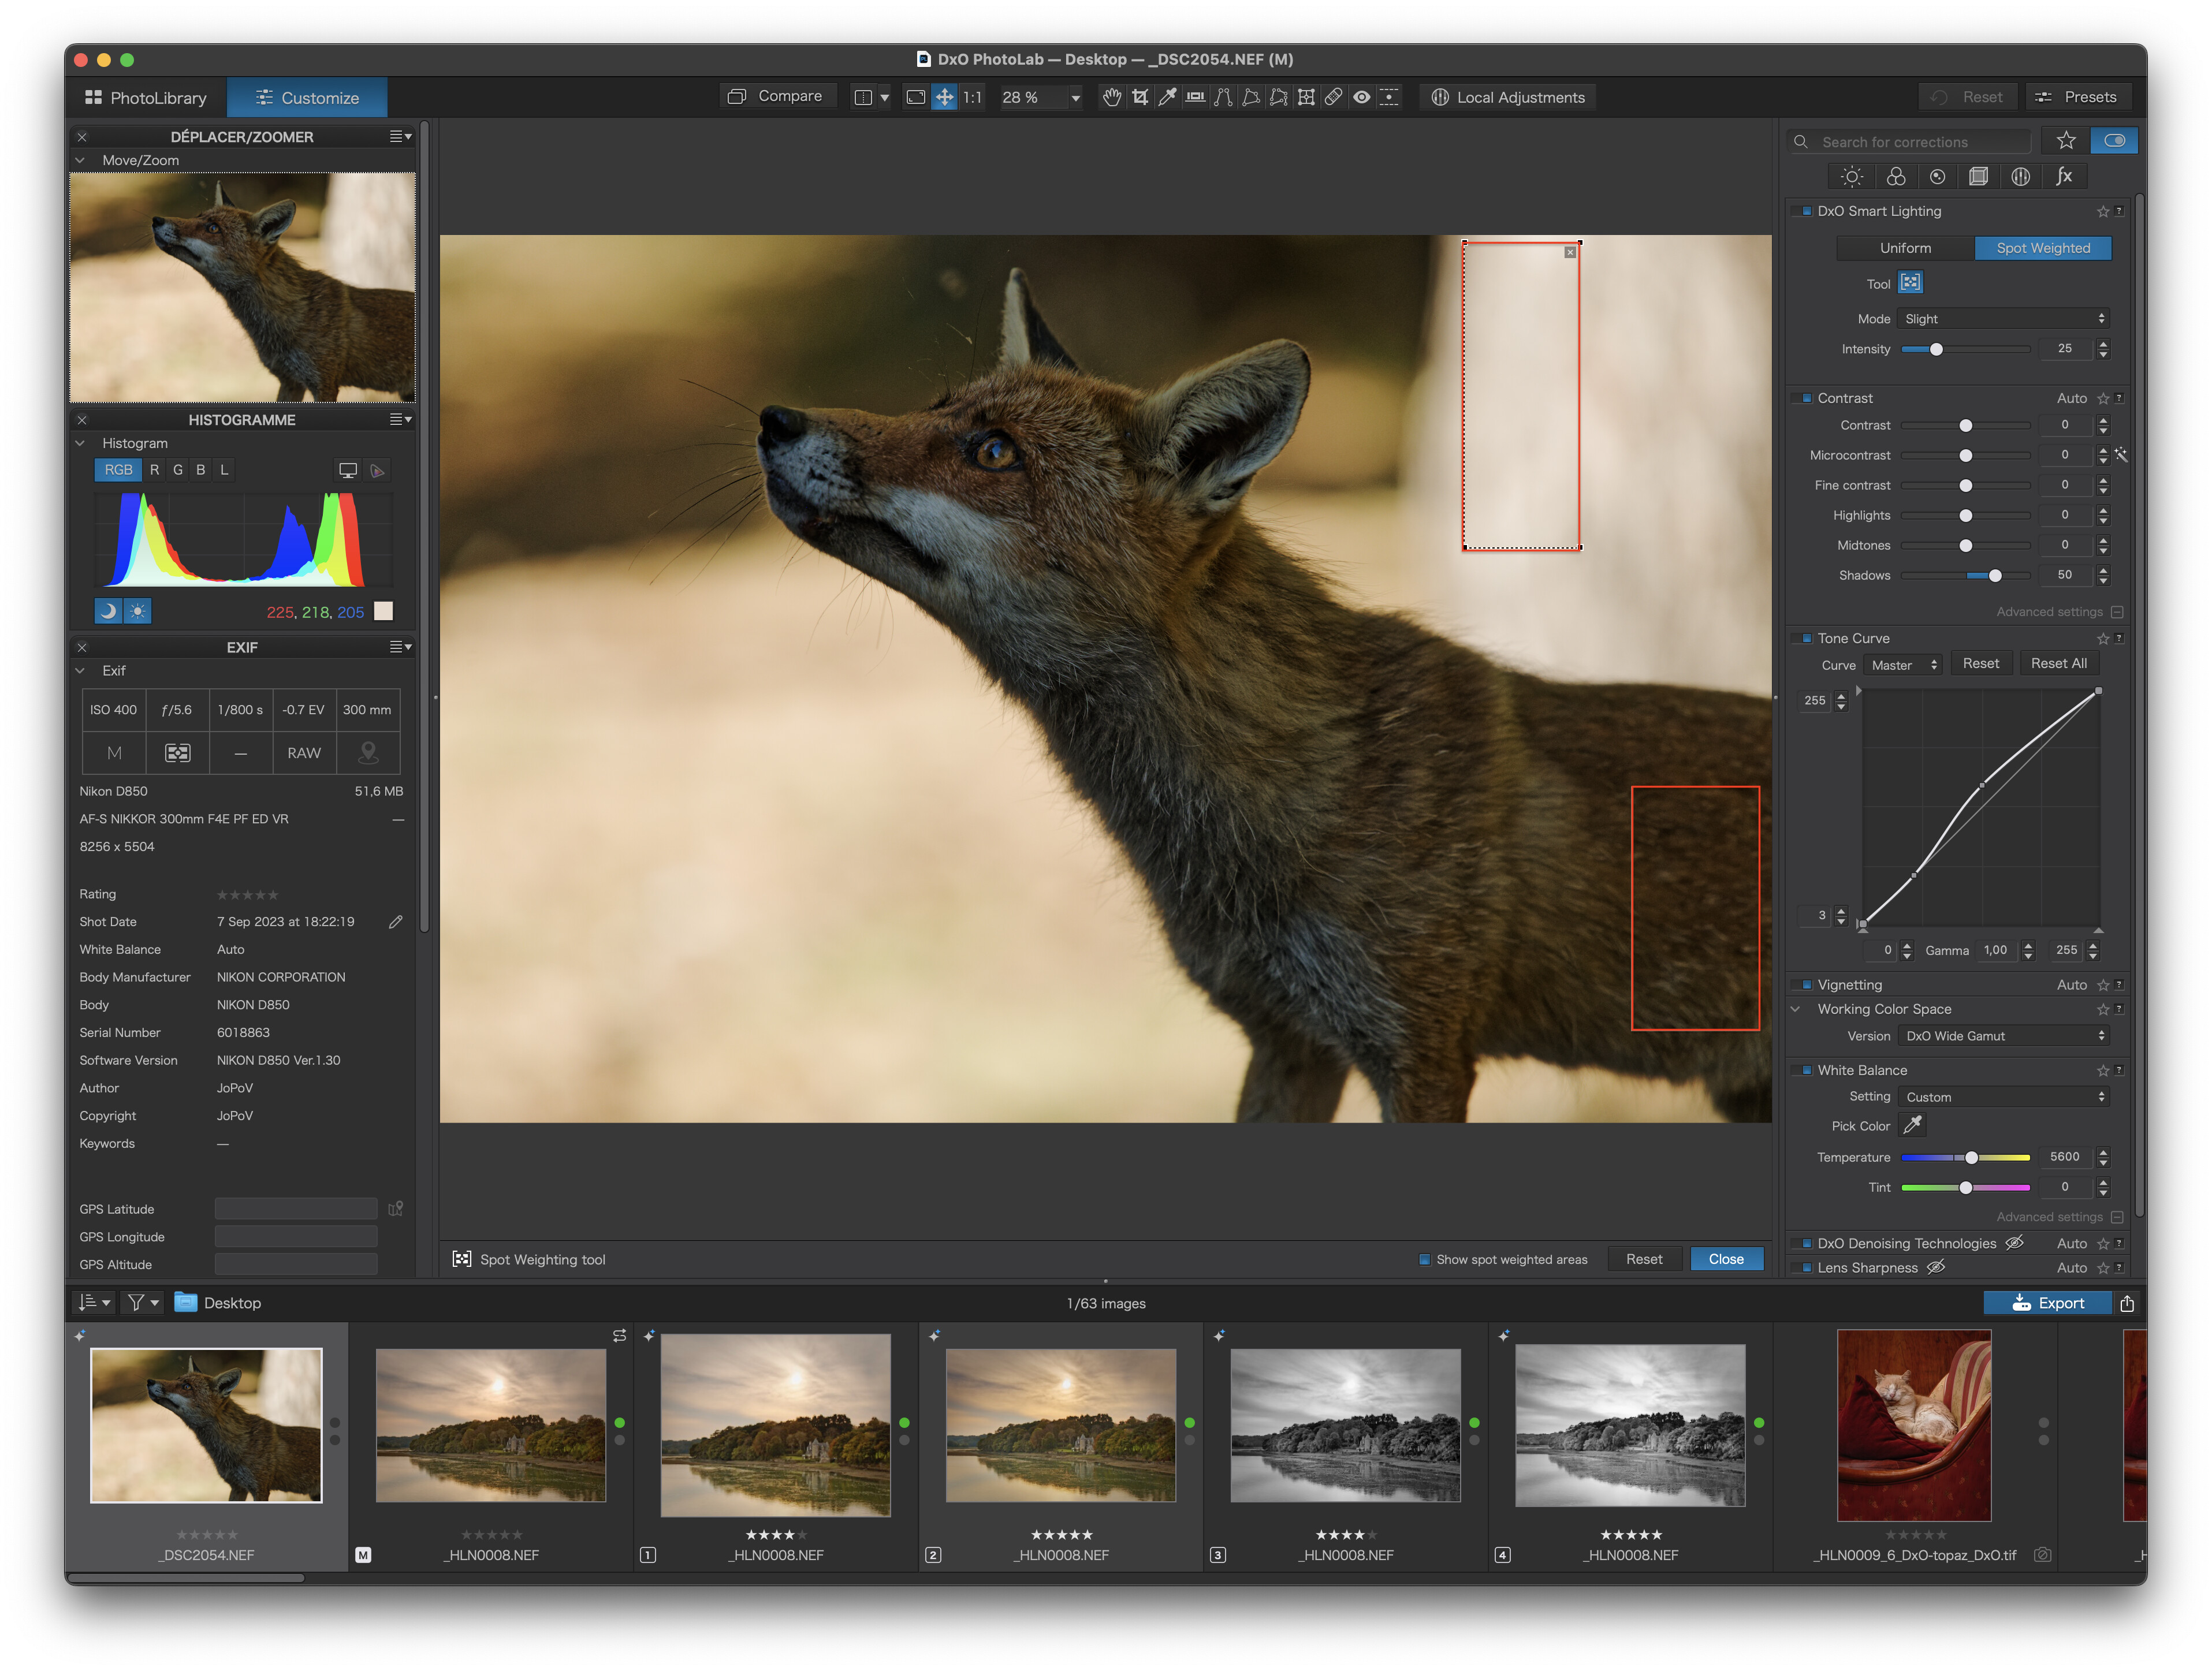
Once the lens module is selected and the four optical settings applied (Vignetting, Lens Sharpness, Chromatic Aberration and Distortion), I applied the default DeepPRIME NR (which is usually perfectly adequate). In fact, at 400 ISO on the D850, it really doesn’t need anything much at all in the way of NR.

Then I used the Smart Lighting tool in Spot weighted mode to select the darkest and lightest areas (see the red rectangles I have overlaid to show their positions more clearly)

I adjusted the White Balance to 6500°K/±0 to give a more natural look.

Next, just the slightest of Tone Curves to gently enhance the contrast and, finally, a touch of Shadow Fine Contrast from the additional FilmPack contrast sliders.

And here is a screenshot of the head at 100% in PL…

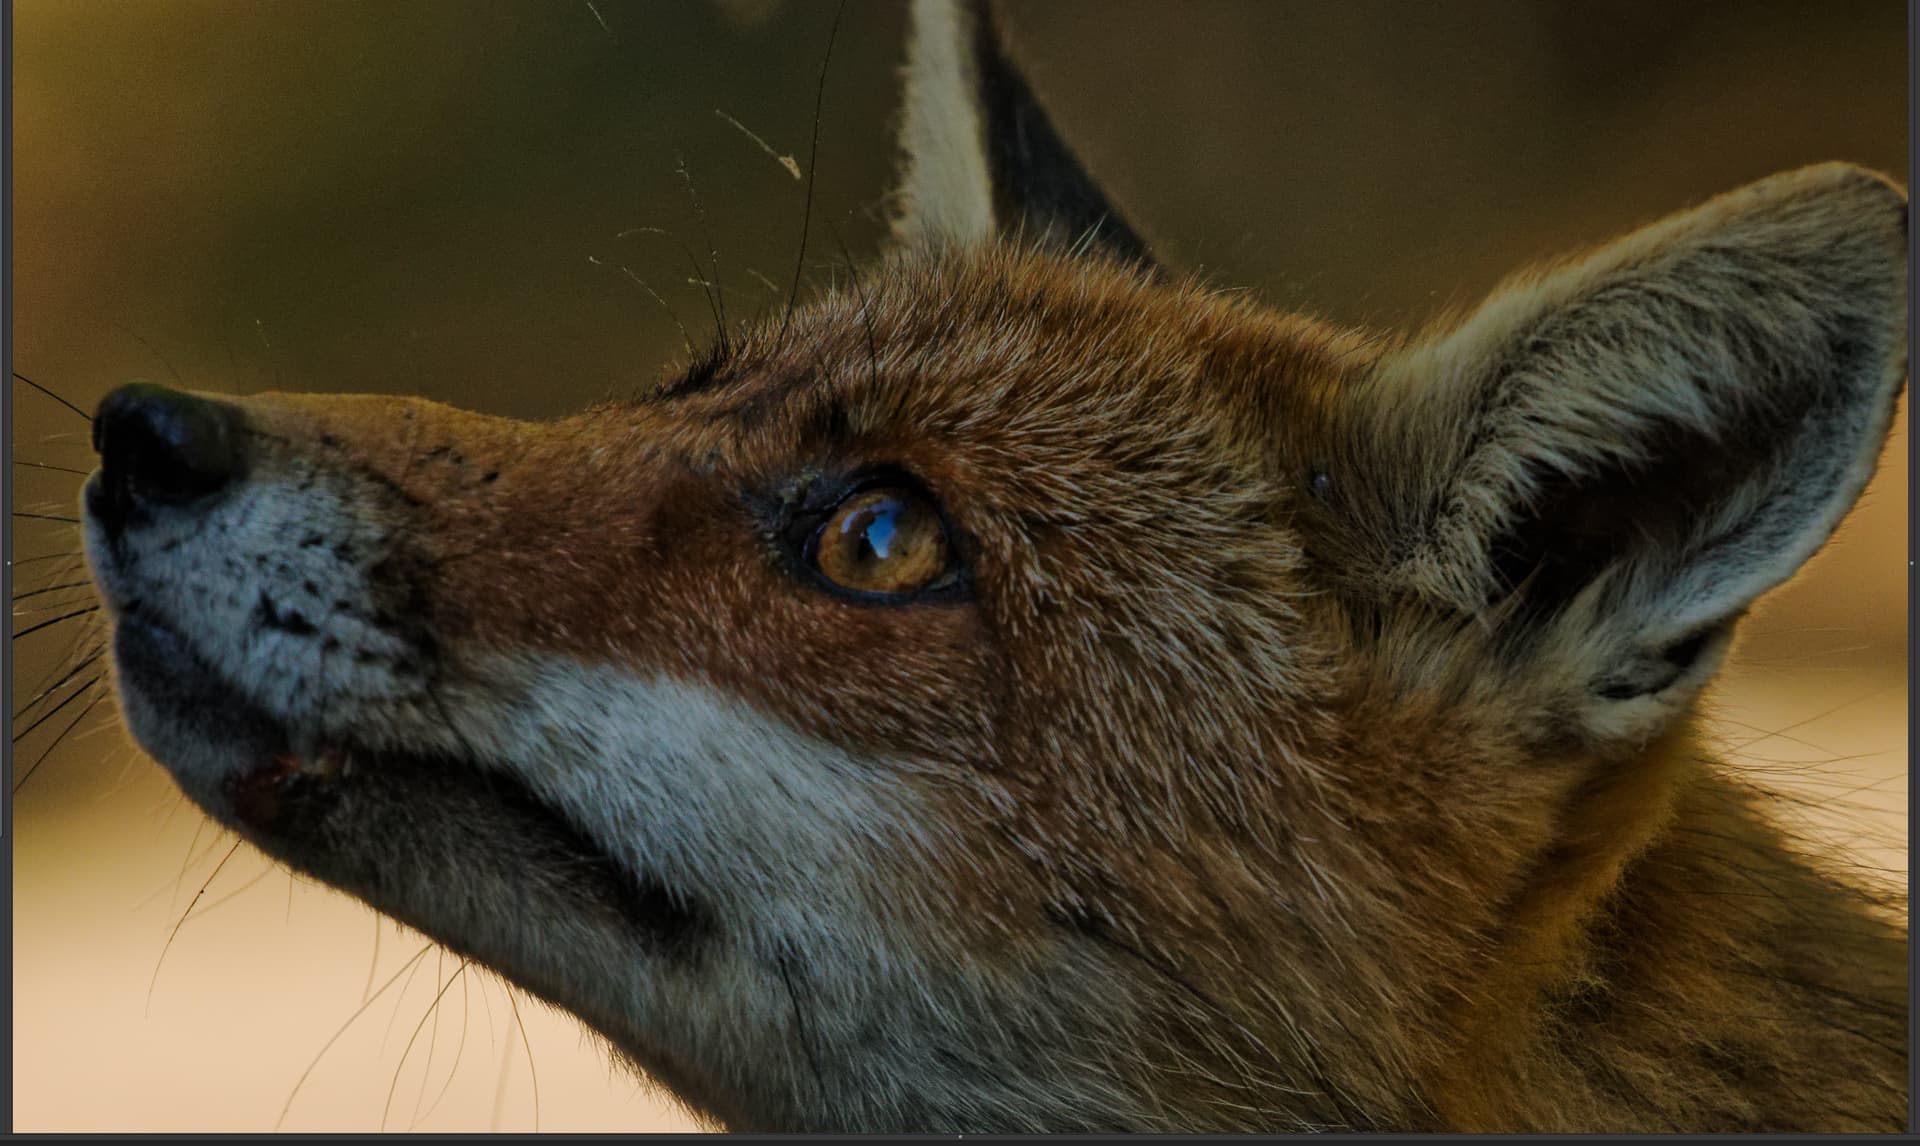
Personally, I would have gone with a smaller aperture (f/10?) to get a bit more of the body fur sharp but that is personal preference as you have obviously followed the golden rule of getting the eye beautifully sharp.


Almost forgot, here’s my DOP file…

_DSC2054.NEF.dop (13,3 Ko)

3 Likes

Yes but I had room left in highlights, so I could have get less noise in shadows when recovering (so better details after denoising shadows recovered).

because I needed it just before this shot in an other direction (with completly burned highlights) and I didn’t had time to tweak anything when this other fox came. (But in fact I could recover even those burned highlights perfectly with about 3 stop underexposure - but in the field, things goes fast and there were lot of different lighting condition from the same place at the same time in different directions where I had to shot).

And they are not perfectly.

Your approch sounds good. But I would like to see trying to recover more, hoping not getting an too unatural result.

But this was a “for trashcan” shot (bad background, light, frame and indeed bad DOF).
here is a good shot from this serie :

2 Likes

a different fox, looks more healthy - no wound, no tick

Yes, but everything goes fast when shooting those shy and always hiding and moving animals (anyway when I tried to shoot them). and distance between them and me is unpredictable, neither their position in light under those trees, or over background.

the same (I think - there were several), but I photolab healed it :wink:
the less shy of the bunch.

was it in a M mode with auto-ISO ( I am not using Nikon , so whatever data in exif tags I might not interpret it correctly for Nikon shooting mode right away ) - just curious why camera did not use a bigger nominal ISO with just -⅔ EC dialed by you ?

Yes manual + auto iso. And matrix metering mode.
About metering I experienced some strange behavior I never had since a little while. Some sudden undexposition along shoots which I think should have got about the same exposure.
Don’t understand that yet. Either a problem, either a rare behavior under some circumstaces of the matrix metering mode.

indeed… with -2/3 EC dialed in, there was almost ~2 stops to clipping anywhere, so one could expect the camera to use something like a nominal ISO 800 at least ( and may be more ! ) not ISO 400 with that EC of -2/3… that does not change exposure of course, but just strange ( might be some Nikon specific matter of course - might need a Thom Hogan level insight :expressionless: )

_DSC2054.NEF.dop (154.8 KB)
_DSC2054_DxO.zip (6.9 MB)

Here is my take on your image. Somewhat subjective edit, but you can if you needed to recover a lot of details from the shadows. Although the focus is on the Fox back not face or eye, so there is that problem that you can’t fix from DXO, but with that resolution in a medium size print, probably not a problem. I’ve done some local adjustments on the image to tweak its fairly flat lighting once you recover shadows, but that is subjective. I would probably do basic exposure and noise reduction in DXO and rest of it in Photoshop, myself, but in a pinch you can do it in DXO.

2 Likes

Here is an export of an image I took at 25,000 ISO, 1s @ f/10 in a Cider cellar…

I have applied DeepPRIME at normal settings and can’t see any perceptible noise.

Honestly, you don’t have to be afraid of high ISO, especially on the D850.

Don’t be fooled. You can never truly retrieve blown highlights.

I usually start a photo session like you are describing by spot metering on the brightest part of the scene - in this case, the lighter wall. Then add 1 stop more exposure. This will “place” the exposure correctly and ensure that the highlights don’t blow.

You’d be surprised how flexible my idea can be - as long as the general brightest light is in range, you don’t have to be that fussy.

I did a series of tests and found that, for highlights with definite detail, you can go to +2EV and, for barely perceptible detail, up to +3EV.

Down to the narrow DoF. A 300mm lens at f/5.6 at a distance of 4m only gives you about 5cm DoF. Even f/10 only gives you 8cm.

ì’m not sure what you mean by “recover more”. More what? If you mean detail, you will benefit from using the four fine contrast slider that come with FilmPack (that is included in the PL Contrast palette)

I certainly can’t find any noise on your image and, as you can see, even at 25K ISO, you can’t see any noise there either.

2 Likes

I 'd not stay 4m from a wild fox w/ a bite on the lips - it might have rabies already !

Well, the problem is the insufficient lighting on the subject, while background is unevenly illuminated.


VC1 with Automask, which does not work (no way to refine the edges)

.


VC2 with a lot of Local Adjustments_DSC2054.NEF.dop (538,6 KB)

2 Likes

Another try. I used a slightly colder white balance in the shadow region compared to the rest, and reduced the saturation of the background.

1 Like

fine details in feathers or furs aren’t the same when better exposed than when more denoised.

I ended with iso range varying from 6400 iso (far under trees, to about 200/300 iso in the most lighted place in this forest. And this from about the same place and the same time) for several shots.

Less dark. more brighter.

Yes wlidlife is wild :sweat_smile:
But I’m wilder : I did bite it !

FRV’s take on the beast

1 Like

One more:
_DSC2054.NEF.dop (18.7 KB)

Zoo fox? Looks like the reflection of a person in the eye…
Add your own NR if you must. I’d probably opt for a square crop (but that was not the question)

Lightroom, two masks and a crop

1 Like