Absolutely correct throughout.
With the modern sensors massive DR and ability to easily do 4-5 steps shadow recovery, the Active D-lighting have seen its best days.
1 Like
All three of those settings are already set to OFF.
I’m pretty sure they were already turned OFF in the menu system when I got the camera.
Thankyou!
I re-saved these settings to U1, as I expect to leave them this way (unless you are aware of something I missed, which I need to change).
I think my other settings are acceptable as-is, but that leaves one thing I’m not yet ready to change as a permanent setting for my camera.
Mode:
- In my mind, the starting point for exposure is (A)perture, which to me means both “depth of field”, and my ability to keep my subject sharp and make everything else less sharp. As of today, that is the first thing I need to select.
- After this is shutter speed, based on the focal length of the lens I’m using, and how much movement there will be in the image. When I used to photograph sports, shutter speed was perhaps the top thing for me to set, if I wanted my photo to appear sharp, but lately I’m mostly shooting “static” shots. My current concerns are to eliminate blur because of using a long focal length, and blur because my hands are not as steady as they used to be. I do some things to try to keep my hands more steady, but I’m always aware of this issue. Or, with a tripod, this becomes a non-issue.
- That leaves one more setting, ISO. My ISO is currently set to 200, and I’ve left Auto-ISO turned on. If my image settings are correct, ISO is nowhere nearly as important as it used to be. (I feel comfortable with this because of PhotoLab and the noise reduction technology.)
(Noise doesn’t bother me as much as it bothers others - I’m too used to shooting film, where every image I took (other than Panatomic X or Kodachrome) had noise. The noise (grain) “was” the image. I know digital is different, but noise doesn’t bother me nearly as much as blurry images do, for example.)
The above leaves one major issue to be addressed, FOCUS. With my Leica, it usually comes down to my accuracy in the rangefinder setting. I practice with this all the time, so it’s easier to do it “for real”, at least most of the time. I know about “zone focusing” and all that, but I hardly ever do it. With long focal length lenses, if I have the Visoflex mounted on top of the Leica, I see an enlarged image, and Leica provides some tools that help me select the best setting, as the tools emphasize the “edge” that I am hopefully focusing on. Giving my preference, the longest lenses I might use on the Leica are 50mm and 90mm. I’ve got a 135mm lens, but I find it takes me longer to be sure I’ve got the focus right. Anything longer than 135mm - forget it. That’s not what the Leica was designed for.
For the D780, @Joanna mentioned several alternative ways to focus, but I have the back-focus button activated - pressing it once instantly focuses the camera. Pressing it and holding it in, gets me continuous focus. For this to work, the small red dot in the viewfinder that represents the spot where I want to focus has to be held over that spot in the image I want sharp. The Nikon D780 provides an endless menu of ways to focus, and by shooting in “Live View” the new mirrorless focusing techniques are available. This includes follow-focus, with the camera searching for, and locking in on, a person’s eyes. I haven’t tried any of this yet. I learned back-button focus a year or two ago, and it changed my life. I’m still learning.
(In India, I found my way of focusing was acceptable, but sometimes the wrong thing was in perfect focus. My friend Rajkumar used the single red dot, putting it over the subject’s eye, meaning his photos (with a perfectly sharp eye) always looked perfect. I tried to copy him, and liked that technique.)
For scenery photos, and most of my non-people photos, I focus on what I think the most important part of the image is, then re-aim the camera, composing for the scene, and shoot. The focus has already been locked in exactly where I want it to be.
I’m guessing that @Joanna is going to prefer my putting the camera in (M) mode, Manual, rather than in (A) mode, Aperture Mode. I do see the advantage of doing it her way, and I intend to start to shoot that way, and see how it goes. Doing things Joanna’s way means if I make an exposure mistake, the image will suffer. Doing things my way, if I make an exposure mistake, the camera will compensate by changing the ISO setting. (…hmm, or does auto-ISO still work in Manual mode???)
(For most of my life, I didn’t have much choice - the ASA film speed was fixed, and if my aperture and shutter weren’t right, the picture wouldn’t be right. If I could trust myself to be as accurate as Joanna, then using (M)anual mode would be simple.)
But it is always better to use as low an ISO as possible because it maintains the dynamic range of the sensor.
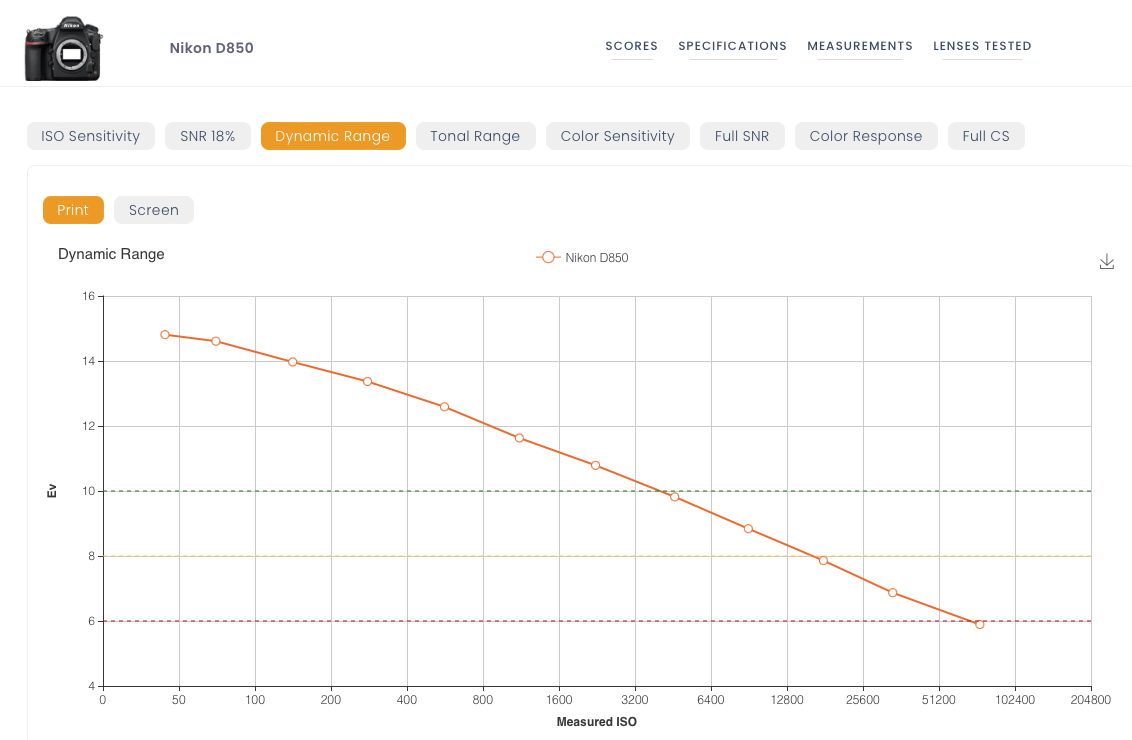
This DxOMark chart shows that, although my D850 has a dynamic range of 14.6 stops, that is only true at around 100 ISO. If we take your Biscayne Bay photo, taken at 20,000 ISO, we can see that there isn’t even 8 stops of DR.
This means you either lose detail in the highlights or the shadows, depending on where you exposure reading was taken from. In this case, the camera decided to protect the highlights, but left the shadows to virtually no detail at all.
If it were me taking that shot, I would have used Manual mode, 100 ISO, measured the brightest part of the image and over-exposed that reading by 2 stops. Who cares what the shutter speed ends up being - the camera should be on a tripod anyway.
Reducing the ISO from 20,000 to 100 is about 8 stops and, maintaining the aperture at f/8 would have given an exposure of around 15 seconds. And a whole lot more recoverable detail in the shadows.
That’s how I get my nighttime shots so detailed.
Other than that, I usually leave my ISO at 400 for average daytime shooting.
But you obviously weren’t bothered by the softness of the Bay shot, due to movement blur from taking it at 1/25 second handheld.
That’s not true all the time. If I am photographing some fast moving event, I use Aperture mode and centre weighted exposure mode. But, if things are relatively static, then it is Manual mode all the way.
Different horses for different courses, as they say. There is no one setting for the perfect picture. As I often end up saying when club members ask what setting to use for a particular shot “ça depend” (it all depends) - on the subject, the light, movement, etc.
And, no Auto-ISO doesn’t work in Manual, otherwise it wouldn’t be a manual mode, would it?
But you don’t have to “trust yourself”. Just follow the rules and use the excellent spot meter that Nikon provides, placing the exposure, just as you would have done with an LF camera and separate spot meter.
Automatic modes are all well and good if you are not fussy and can work in all sorts of situations, like moving subjects, but, if the subject isn’t moving, take the time and effort to get it right in the camera.
Short answers - I wasn’t aware of, or thinking about, that. I just have accepted “the lower the ISO the better”, as long as it didn’t hurt the image in other ways. I think as a default setting, I should change my ISO to 400 as you are using, unless there is a good reason to do otherwise… but why don’t you use a lower ISO value for your default setting?
Biscayne Bay photo - if I had thought about it before shooting, my lens would have been wide open, and the camera would have been on a tripod. I wouldn’t have used a long exposure, as there was a small boat moving away from me, and that would not have looked good - but if I were setting up area of time, I’d love to have tried a long exposure, which might make the water look more like a mirror. To be honest, I didn’t think that photo would turn out at all - I didn’t expect bracing myself against a doorway and holding my breath would be enough. The tripod was only four feet away - I wish I had taken my “grab shot”, then set up the tripod and tried to do better.
That’s what I used to do. That would make more sense for a “default” setting as I’m walking around.
Not in the slightest. I didn’t even take time to look. Had I looked, yes, that would have bothered me, unless I had set up the tripod, which in retrospect is/was my biggest mistake. The tripod is almost always set up, right in front of my sliding door.
I think something you wrote long as is why I prefer center-weighted. I just checked, once I found out where Nikon moved the control, and all this time I have been in Matrix metering. It is now set back to center weighted, where I thought I had left it (but I left it that way on my D750. I didn’t learn until just now how to get to that setting on the D780).
So true!!! I usually go with my best guess.
The very first step is to get things right in my mind (and to verify that’s where how the camera is actually configured). I sometimes us a mental check-list before taking any photo, to verify the camera is ready, but I mostly do that as I’m walking out my door.
(I want to format my memory card before I leave home, and to check that the battery is charged, and that I have a spare battery in my pocket. With the Leica, I need to make sure the lens cap is in my pocket, long before going to take a photo. Lately I’ve been thinking which lens is on the camera, and why. There’s more, but “it depends”.
Maybe it’s a good idea not to make a mental checklist, but a checklist on paper or a card. That’s what my wife does, because she sometimes forgot all the technical stuff.
So is battery full and replacement battery is is in the pocket, how’s the settings for ISO, Aperture value, EV correction to Zero, IS on or off for Tripod use and so on.
There is no shame in taking such a note, as it has happened to all of us that we have forgotten a setting from one session to the next and then ![]()
![]() .
.
Using the camera must be the same as using a weapon for a soldier…not the most beautiful comparison but that definitely sums it up.
I will make my lists for that today, one list for each camera. Leica, Nikon, Fuji.
My memory feels good, until…oops!!!
Thanks!
And don’t forget your mental memory at home, when your body is on hike
![]()
![]()
There’s a lot in this thread about the differences between shooting with a DSLR and shooting with a Rangefinder camera. I can add one more.
I left home around noon to take a photo of a special bicycle, completely covered in flowers. I took similar photos two or three years ago, which looked like (just) a flower covered bicycle. That’s not what I wanted, as I was after some kind of “artsy” photo that would look more like “art” than a boring bicycle. But the bike wasn’t there, the store it sits in front of was closed, so I walked a bit further to buy some grouper for dinner. I was carrying my D780 with the 28-70, and had only one hand free.
As I passed by the building construction site that I see every day, I walked on the opposite side from where I usually walk, stopping every so often to look for an unusual photo angle. The only image that interested me was my looking upwards at the tall crane they use for construction, and a lot of “stuff” that was meaningless, but I thought was nice for framing.
I’ll post the final result below, but what I wanted to make a point of is that my Leica rangefinder camera is almost always used by me to “document” reality. For reasons I find it difficult to explain, the viewfinder on the DSLR was an opening into an imaginary world, where I could compose things in many playful ways, showing a scene that someone walking there would be oblivious to.
Is it “real”? I suppose so, as I didn’t try any camera tricks to distort the image - just positioned myself exactly where I wanted, held the camera in front of me one handed, with “live view” turned on, flipped the viewing screen out, and looked sort of straight ahead, but with the camera aimed upwards. Two reactions, one of which I felt a bit “light-headed” as what I saw on my viewing screen didn’t look “real”, and another that I felt a bit uncomfortable, and lowered the camera quickly. I tried this three times, and the last image was best. Well, best for my purpose. I have no idea if it’s any good as a photograph. As “art”? Maybe. When I view it on my large computer screen, it makes me feel a bit “unsteady”.
I never could have done this with my Leica, for many reasons. …and PhotoLab 6 allowed me to mold the image as if it was modeling clay, until I got the result I wanted. I don’t think I would have gotten this result with a different editing program. PL seems to do what I think, as fast as I can think it.
_MJM0246 | 2022-10-30.nef (26.9 MB)
_MJM0246 | 2022-10-30.nef.dop (13.3 KB)

Why? I use Apple’s Image Capture software that comes with macOS. When I return home, I simply plug in the camera to the computer with a USB cable and download the images into an appropriate folder on disk. Then I simply delete the files from the camera from within Image Capture and the camera is ready to go. One less thing to remember.
Which reminds me, I need to reset the camera from last nights “special” settings for the Jazz concert we went to before I forget and use it as is in broad daylight.
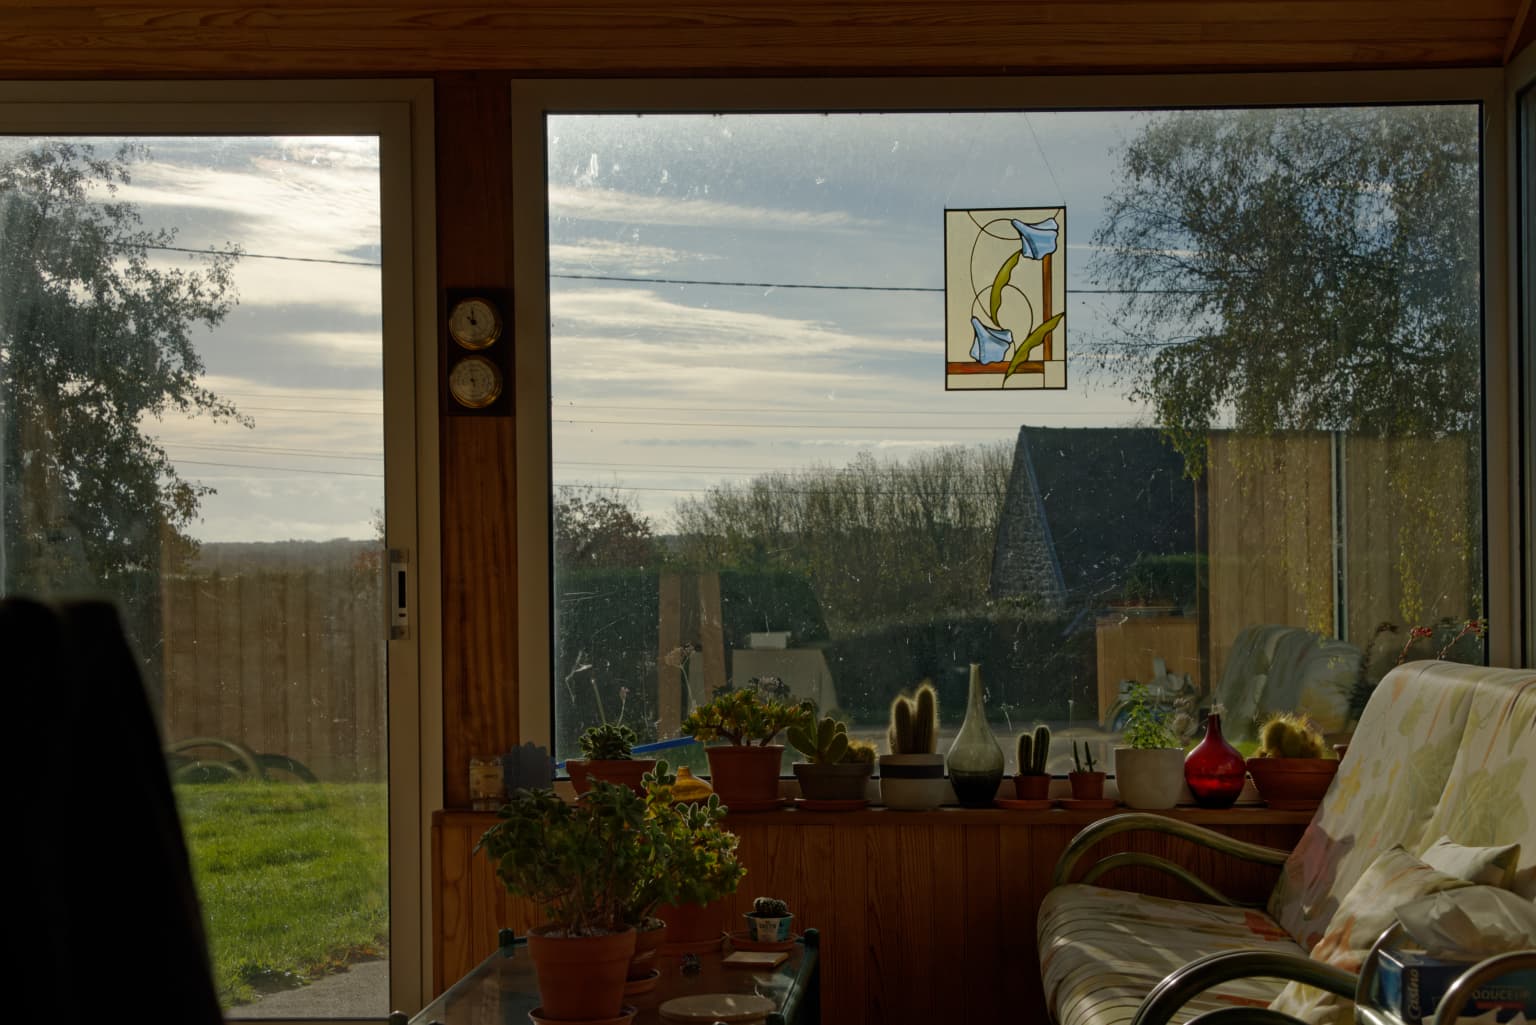
Having just reset my camera to “normal”, I thought I would take a shot from my chair, against the bright light outside, to show what correct spot metering of the brightest part of an image can give you in the way of recovered shadow detail. Nikon D850, 400 ISO, manual mode, spot metering on the brightest part of the sky and set to over-expose by 1⅔ stops.
Note how there is detail in both the clouds and in the plants on the table.
SOOC RAW…

Settings apart from default…
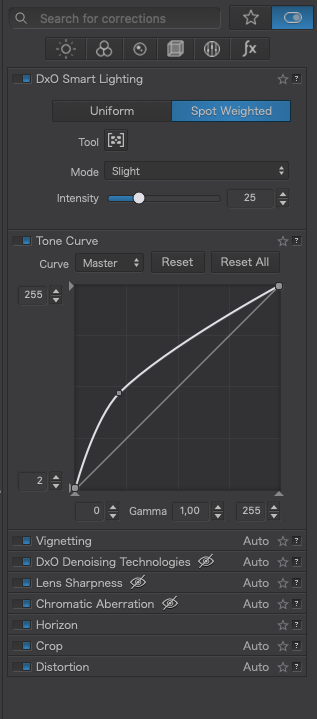
After processing…
Aren’t you using the user setting banks of the D850? I found them difficult to understand as I was used to U1…U3 but lateron I preferred the banks.
The only settings I changed for the Jazz shoot were the ISO (to 10,000), the shooting mode to aperture priority and the metering mode to highlight-weighted. Since both are easy to access from their respective buttons on the top of the camera, I wouldn’t say it is worth a complete user bank.
There are 4 banks for camera and 4 for individual functions. In social dance situations with artificial light I made not very good experiences with hightlight weighted spot metering: couple dance in sometimes dim places where few lamps are pointed “in some directions” to put it mildly. Underexposed faces aren’t nice to look at. I don’t care about blown highlight of a lamp. Usually I use spot metering with +1 stop to get the face right.
But for ballet or concert situations I would also go for highlight weighted metering - Underexposed faces are no better than overblown ones
Also, some LEDs or neon lights can add banding when I use shorter shuttertimes than 1/60, so I have a bank named “tango” which adds quite some changes to my “standard” bank.
I disagree, for several reasons.
The first reason is that the tiny USB connector on a camera can eventually wear out. This happened to my brothers Nikon D200, so I got him a card reader. Repairing the USB connector would have been expensive. To me, those small USB connectors are a convenience, but were never designed to last “forever”.
USB connector durability
The bigger concern is that deleting files doesn’t delete them - it just deletes the data on the card that says which sectors can be used. You can download software to recover “deleted” files, and it will come up with a huge number of files, and partial files. If you format the card instead, everything on the card is “deleted”, and you end up with an “empty” card, and your new data will be saved in a more logical manner, meaning it will be faster.
Delete vs. Format
No matter what you do, the data can still be recovered by experts, such as the FBI.
For photographers though, formatting the card before re-using it is always a good idea, and from what I have read, it is best to format the card in the camera that it will be used in.
(I prefer to use a program like PhotoMechanic to take the photos on a memory card and copy them to a computer in a more organized manner, renaming the images, and making a custom name for the folders. That’s a separate topic though.)
1 Like
I think I need to print this out, as while it’s fresh in my memory again now, I forget things like this. It certainly makes a big difference.
I remember this from sunset photos, but a week from now, my memory won’t be so clear. I will get a little notebook to keep in my pocket, and with the appropriate camera. Does Nikon allow us to over-expose by 1/3 stop increments?
Thanks - again!
No, that’s strictly forbidden by the manual, you could get into super deep troubles and ending up at the gates of hell ![]() sometimes the mikemyers show reminds me on some soap operas
sometimes the mikemyers show reminds me on some soap operas ![]()
1 Like
The 400 ISO is not essential. That is because I wanted to handhold the camera. Normally, I use 100 ISO on a tripod.
The important bits are…
- Manual mode.
- Spot metering on brightest part of scene.
- Placing the exposure at anything up to +2 stops in order to render the bright area as desired. i.e. if you want the brightest area, like a wall, to render as cream or off white, only over-expose by +1 stop - anything from there up to +2 for things like white clouds.
- Let the shadows fall where they will and recover the detail in PL.
Yes, as long as you set the interval in the menus (setting b1)
Or, instead of counting tick marks on the meter scale, you could, instead, set the exposure compensation dial to the required level and adjust the meter to the 0 mark.
Har-di-har har ![]()
![]()
Sorry, could not help it. Should be grateful to read about some easy-to-solve-non-problems which is a rare event in a world going crazier by the minute.