How do I access the “Horizon palette”? When I click on the horizon tool at the top, where would I click to get the palette to open, so I can adjust it? …and again, had you not posted this, how would I know about it?
After recent discussions on this forum I am increasingly getting the idea I should read the whole manual again.
Added later - found it. Went to White Balance and move the slider slightly to the right. Bingo!!
And the "Force Parallel tool worked perfectly.
Learning.
Am stuck on the slider tool for adjusting the horizon…
I’ve been thinking of all the ideas each of you has been suggesting, and they mostly all work together. I’m no expert by a long shot, but I couldn’t do this photo yesterday anything like what I can now do.
2021-09-04-0004.tif.dop (35.0 KB)
2021-09-04-0004.tif (32.4 MB)
Small upload:
Oops, I got interrupted before I finished removing dust and debris… now fixing.
Better, but not perfect.
Maybe I should re-wash my negatives…??
2021-09-04-0004.tif.dop (238.4 KB)
It is documented in the Shortcuts menu which can be found in the Help menu in the Windows version.
I scrolled up so it appears as the first line of the attached image…
Mark

Aha! I never use shortcuts, as I forget them too fast. If I get stuck again, how do I access the shortcuts menu on a Mac… I’ll figure that out tomorrow, too tired right now.
So many programs, all of which use shortcuts, but they’re always different. I much prefer to use the longcuts, looking at a menu.
Thanks for posting.
The shortcuts are probably also in the Help menu in the Mac version. I would check there first.
Mark
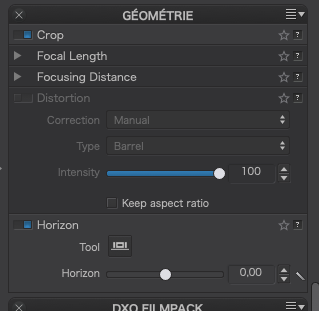
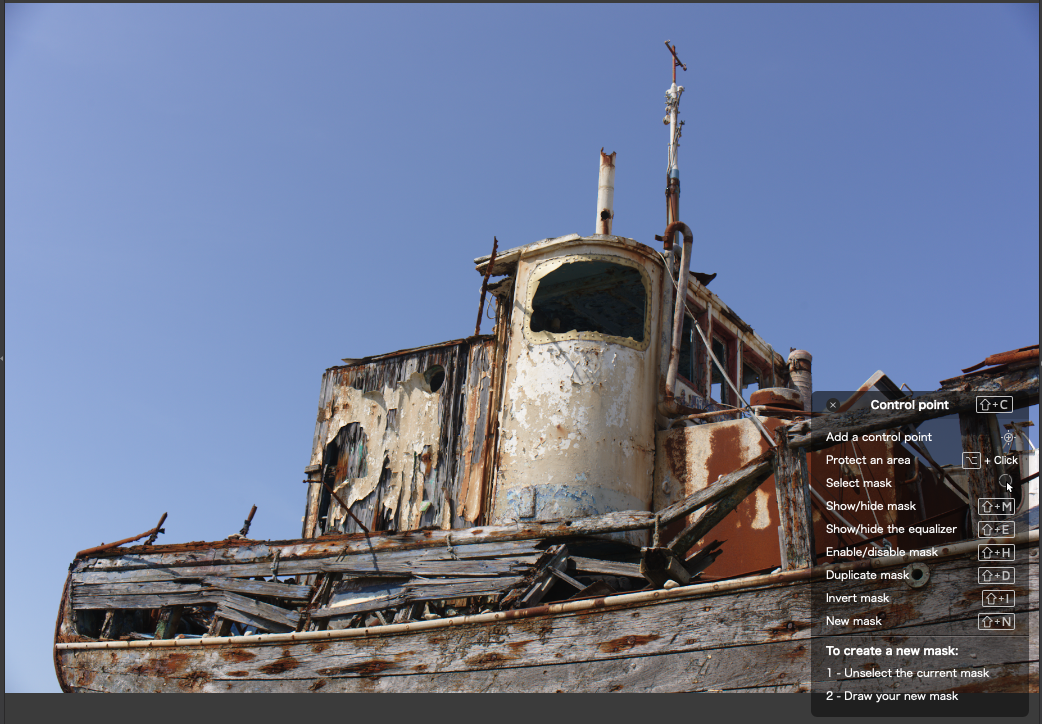
Where is the horizon palette hiding? I know where the tool is, but not the palette. Maybe it is something I turned off long ago, before I knew what it was or did…
It is in the Geometry palette
Mark
Ah yes, so they can pickup even more muck and bullets whilst they are drying for the second time ![]()
I have found the key to clean scans is to wipe the film with something like a non-linting cloth and a drop of alcohol.
BTW, which side of the film do you place towards the scanner sensor? It should be the emulsion, to get clearer definition, which means you will have to use the Mac Preview app to reverse it before bringing it in to PL.
They are…

And here is the Horizon tool
Here are a couple of ideas for the edit
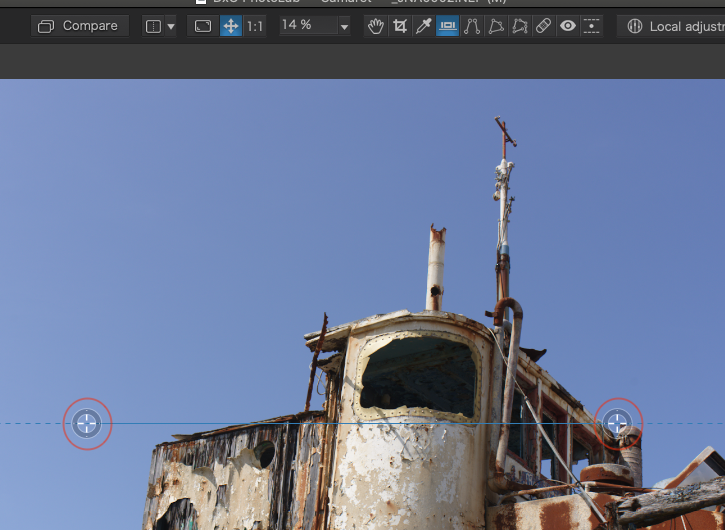
Use the 8 points perspective tool to square up the image…
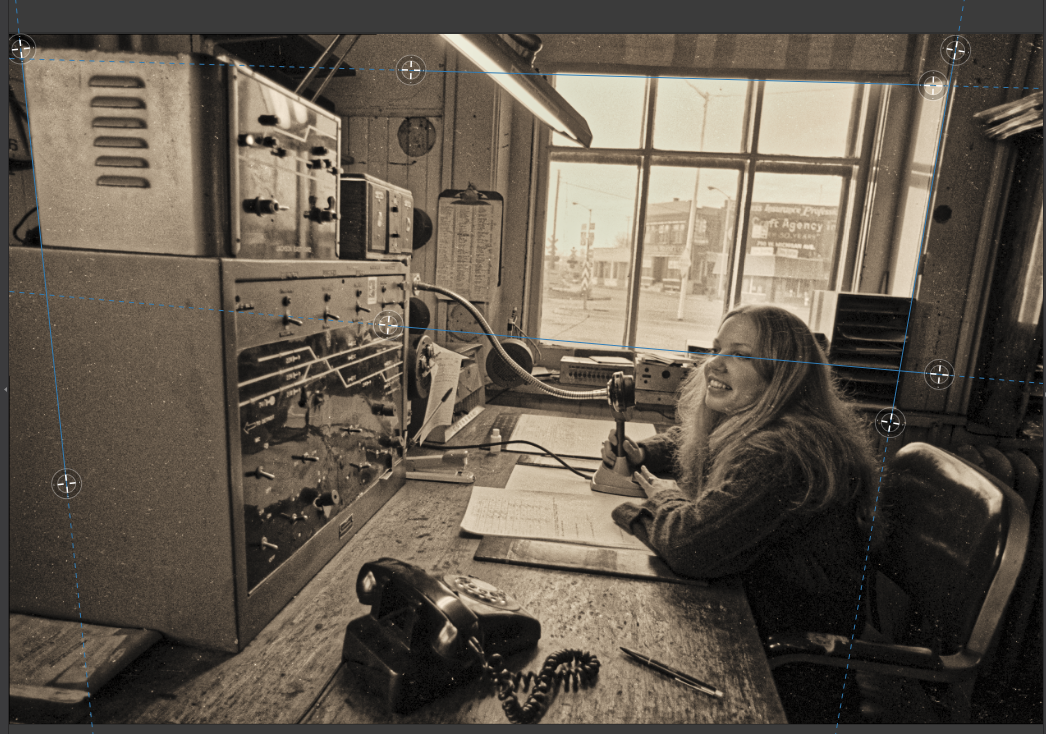
And when you use Control Points, remember that where you place each point determines the tones that are going to be affected. Here I have placed them on different tones through the window, ensuring there are none on the frame. Then I also added a couple of negative points (circled) to prevent the woman’s head from being affected by the darkening. Negative point are easily placed by holding down the Alt/Option key when clicking.

1 Like
Careful with that one.
Search for how to clean negatives before trying something stupid - and you cat tell if it’s stupid until the damage is done… Searching for “how to clean old negatives” (or similar) will get you a few hints. Read them all before diving in.
1 Like
Excellent advice on the whole.
The only bit that worried me was this image on the wikiHow page…
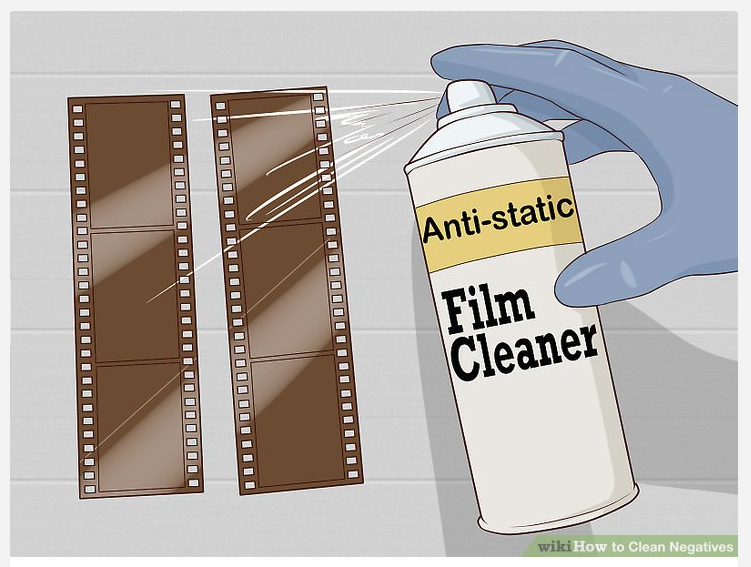
The accompanying words state to spray the cleaner onto a cloth. Never spray anything from an aerosol onto film - you never know if there isn’t some condensed water in the can. I don’t even risk compressed air in an aerosol, preferring a blower bulb instead.
The only time I would ever consider washing old negatives is if there are old water marks already there. Soaking them carefully in tepid water and gently squeegeeing it might even this out but it is very much at your own risk - if you wouldn’t scan the neg with the water marks, you might consider you have nothing to lose and it might work, but be prepared to junk the neg anyway.
This is what I bought from B&H Photo to wipe my negatives:
https://www.bhphotovideo.com/c/product/24592-REG/Ilford_1203547_Antistaticum_Anti_Static_Cloth.html
The instructions with my Plustek were to place the negative into the negative holder with emulsion side down, just as I did with my enlarger. I haven’t had to reverse the images, and the scanner seems to be focused on the grain.
I don’t know if the light in the Plustek is above or below the negative.
Quoting from the instruction manual:
"Place filmstrip in the film holder emulsion (non-glossy) side down, then snap the film holder cover closed.
I would like to think that “shortcuts” are just a quick way to accomplish something, without going through the menu system and clicking on the function you want to do. I have this “problem” with most of my software - I never remember shortcuts, and I usually remember what to click. Holding the space bar down to move the image around for corrections - since I never glanced at the shortcuts, I never knew that. To me, that’s instructions, not shortcuts, and. when one clicks on the correction tool, that message should be be prominently displayed.
Aha! If it was a snake, it would have bitten me. I just click on what I thought was the “horizon tool” above the image. For silly people like me, that adjustment should appear on the screen somewhere as soon as you click on the tool, up at the top. Maybe I never noticed it? Unless I missed it, this does not seem very “user friendly”. Oh well, thanks for pointing it out - will be MOST helpful.
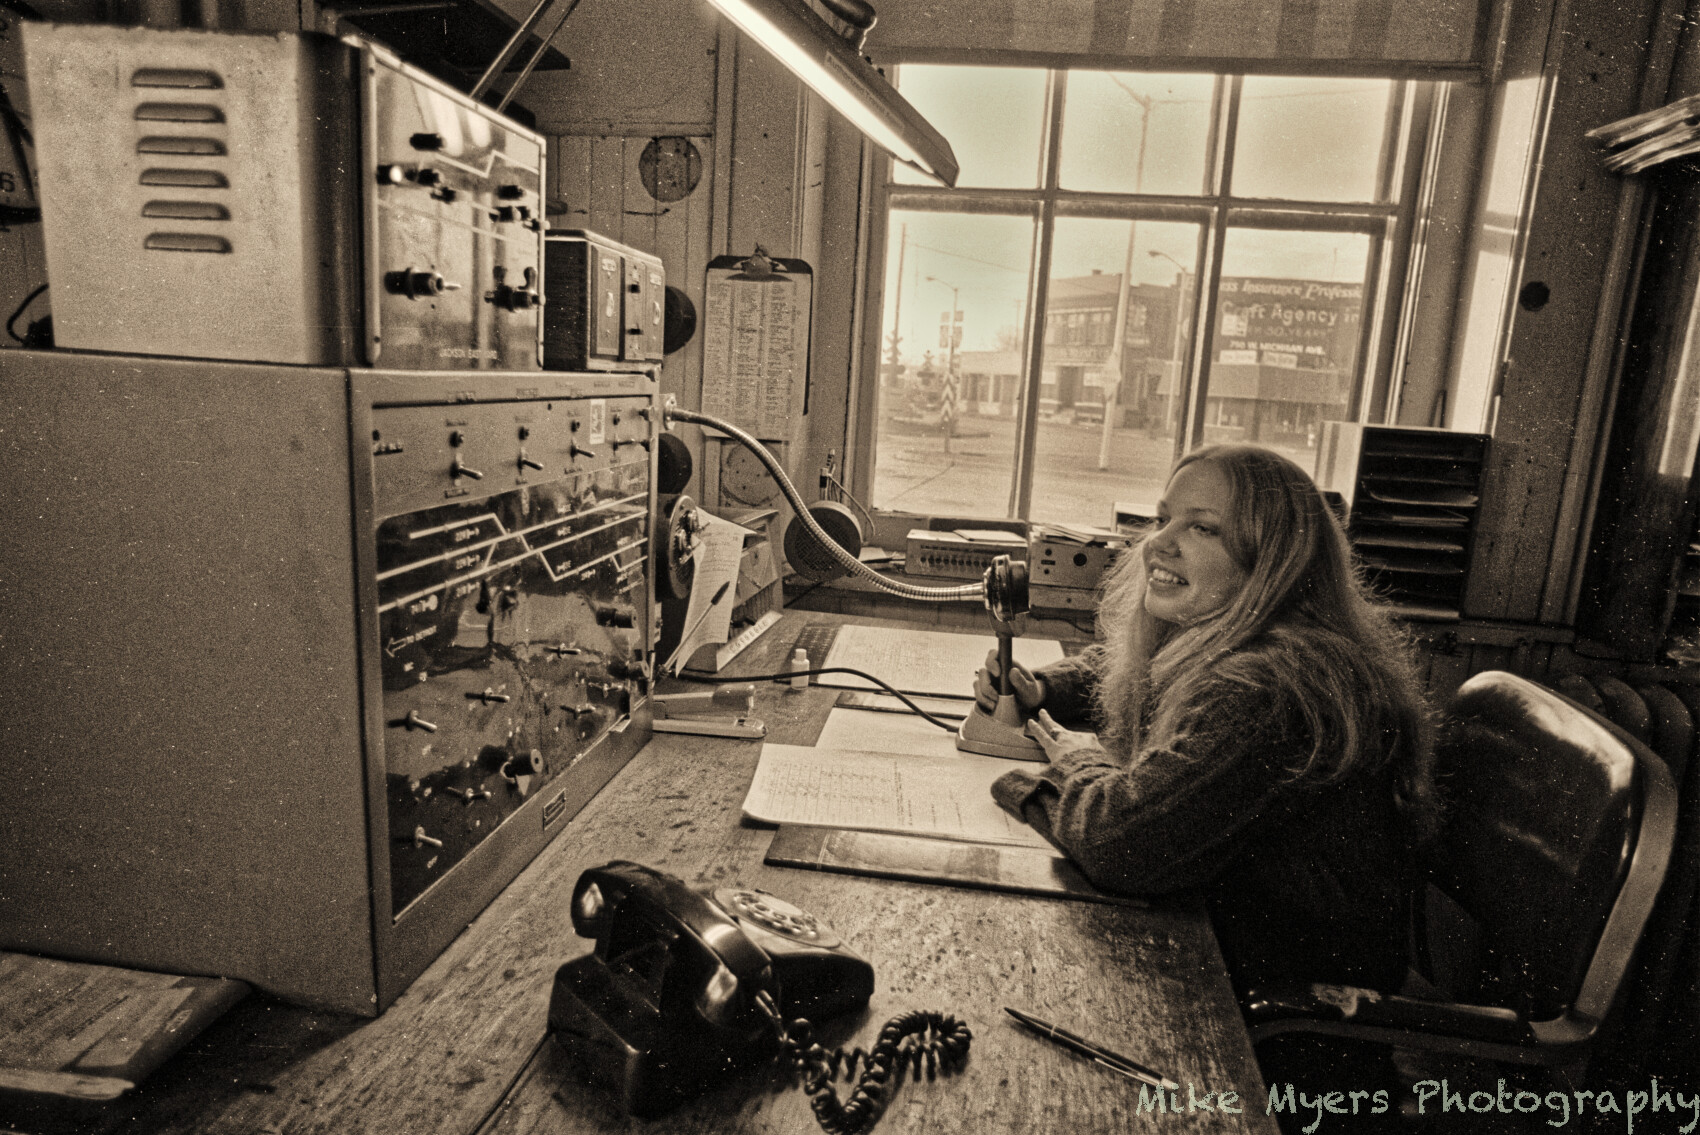
Amazing! I had no idea what this tool was, or how to use it. I took my already corrected image and used this tool on top of it, getting this:

I can see that this tool is based on what I used to do (tilting the easel) but on steroids, stretching the image in a way that would have been almost impossible in a darkroom. I can’t decide if this tool is acceptable for “photojournalism”, but it does accomplish something I think I’d want to do. I can’t decide which photo I prefer, the one I finished before, or my newly corrected image…
2021-09-04-0003.tif.dop (14.2 KB)
In every way but one, using this new (to me) tool creates a more pleasing image. If my Leica M2 had one of Nikon’s "adjustable tilt-shift lenses, where I could hold the camera straight ahead, and lower the lens, this is the effect I would have achieved. The more I think about it, the more I prefer this new version, with the correction.
Thank you once again! I’m sure this tool will be VERY useful to me in the future!
And that’s perfect, but you also need to use a high purity alcohol to bind the dust particles to the cloth. When you’ve had to de-dust a few 5" x 4" negs, you get to appreciate the difference ![]()
I would say that is correct. The software may be automatically flipping the scans for you. There will be a button somewhere to allow you to turn that off if necessary.
If you sneak a peek into the film slot while it is scanning, you should be able to see.
If you take the example of the local adjustments tool, right-clicking on the image shows the “selector” and there is a “?” in the middle.

Clicking on this shows a list of shortcuts in a floating view in the bottom right corner
And most tools have a help button…
In fact, you don’t necessarily need to use the palette. You can simply drag the handles of the tool in the image…
Or you can just ignore the original line and click and drag wherever you want…

Don’t forget, if you were a photojournalist with an LF camera with movements, you wouldn’t think twice of using them. Just because we can’t have the luxury of such comprehensive movements on a small camera doesn’t mean that it is any way less valid. As you mentioned, you could have tilted the easel to some extent in the darkroom or used a tilt-shift lens.
Is this scanning for use in photojournalistic competitions? If not - relax and enjoy making photos you wish you could have made with an LF camera ![]()
Addenda
Don’t forget to do all this geometry stuff before you do any repairs or local adjustments
1 Like
I no longer have a LF camera, and the accessories, but I do have this. It fits my Nikons directly, and with my adapter, it will work on my Leica M cameras…

I agree with you. Something I could have been able to do on my old LF camera should be acceptable on other devices. Technically. I’m not going to worry about this, just use the new technology.
I wonder how many super-useful tools are hiding in PL4 that I haven’t discovered yet?
1 Like
I’m not sure, but helping you has helped me to discover a couple I hadn’t yet learnt ![]()
1 Like