Extracting pop from RAWs - and a quick rough and ready attempt

No problem with that, if you look at a part of an A2, let say an A4 in the A2 (it’s like an A4 crop, moving in the A2 with the sight of the observer), you need to use a CoC of 15 µm because the hypothesis must be taken into account.
But, there is a limit to that, as you wrote previously, the aperture must be larger than the diffraction limit…

and once more, nothing related to the sensor, just how the picture is observed (distance from the print).

Typically you look at the picture as a whole, at an angle of view of about 40 degrees. You would look at 127cm x 102cm picture from 25 cm distance only in special cases, like inspecting military photos, judging photos at contests, just admiring your camera capabilities, or explaining your spouse what the money went for. For this reason, CoC size is often calculated as some fraction of the sensor/film diagonal, e.g. 1/1300, 1/3000, or even less, depending on the target use.

The link you provided does not take into account neither observer’s angle of view, nor human eye/brain resolution and perception. Anyway, as a rule of thumb, to get the same DoF using the same camera angle of view and subject distance, you have to stop the aperture 2-stops more on Full Frame than on Four Thirds sensor, e.g. f/11 on FF corresponds to f/5.6 on 4/3 (or FF image at f/5.6 cropped twice on each side). Then there is the human perception thing, and camera resolution may impact software rendering “quality” with non-linear dependence, to complicate things even further.

I don’t think portrait photographers use DoF calculators, they just “feel” from their experience what aperture to use for a particular scene size/type and camera/lens combination to get the desired result. For wide-angle landscapes, to set aperture and focus distance, you should also take into account atmospheric blur and check the result, because often you see the scene sharper than what the camera records. Macros is still another topic, since thin lens model doesn’t work too well in that case. Obviously, calculators give you a hint, but you should check the result and adapt. But for pixel-peepers, you must use special formulas, say for 160 degrees angle of view :wink:

Note also, that for a perfect lens, the diffraction effect could be fully deconvoluted at the expense of few pixels at the edges (see Fraunhofer equation, Hankel transform, etc.). Since there are no perfect lenses and Airy disks sizes are of order of magnitude of a pixel, it makes the things more difficult and you would have to use specific lens measurement results and some basic linear algebra to do that. NX Studio has the diffraction correction tool. Perhaps PhotoLab takes diffraction into account in the Lens Softness correction tool (but not to a great degree, it seems). But if you have heavy atmospheric blur, the discussion about diffraction is void.

@George @rsp @Wlodek

I want to thank you for taking time to try and explain things from your POV.

Working with different formats makes life interesting when it comes to things like DoF and diffraction. Especially when my ultimate Is, regardless of film or sensor size, to get the largest possible print - sometimes more than 1.5m to 2m on the long side.

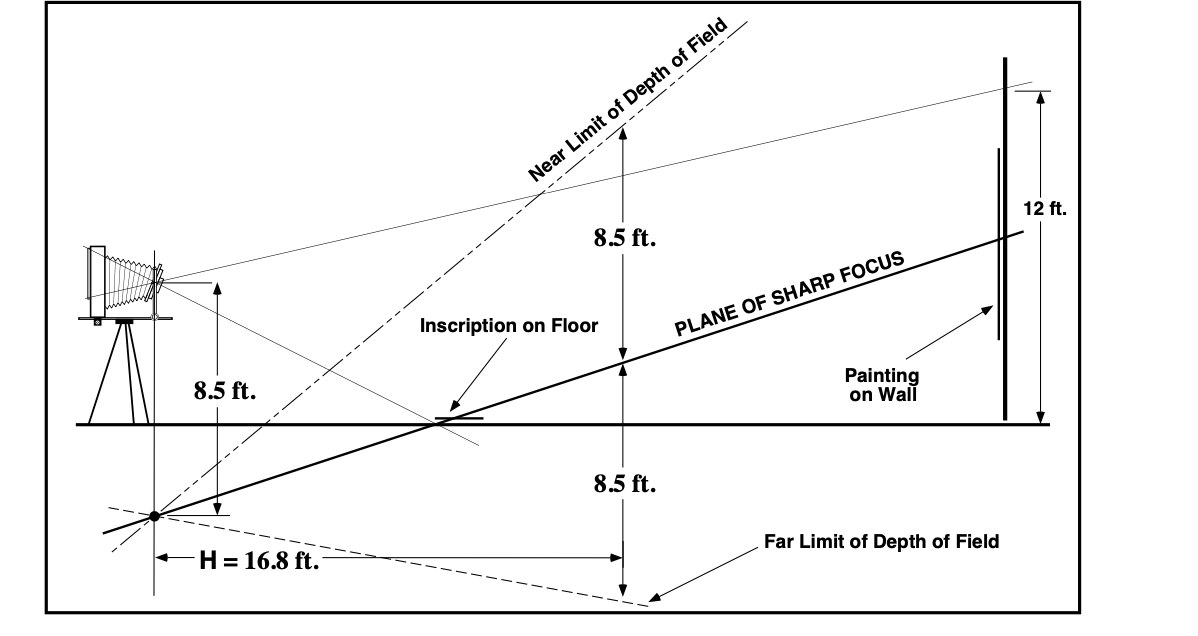
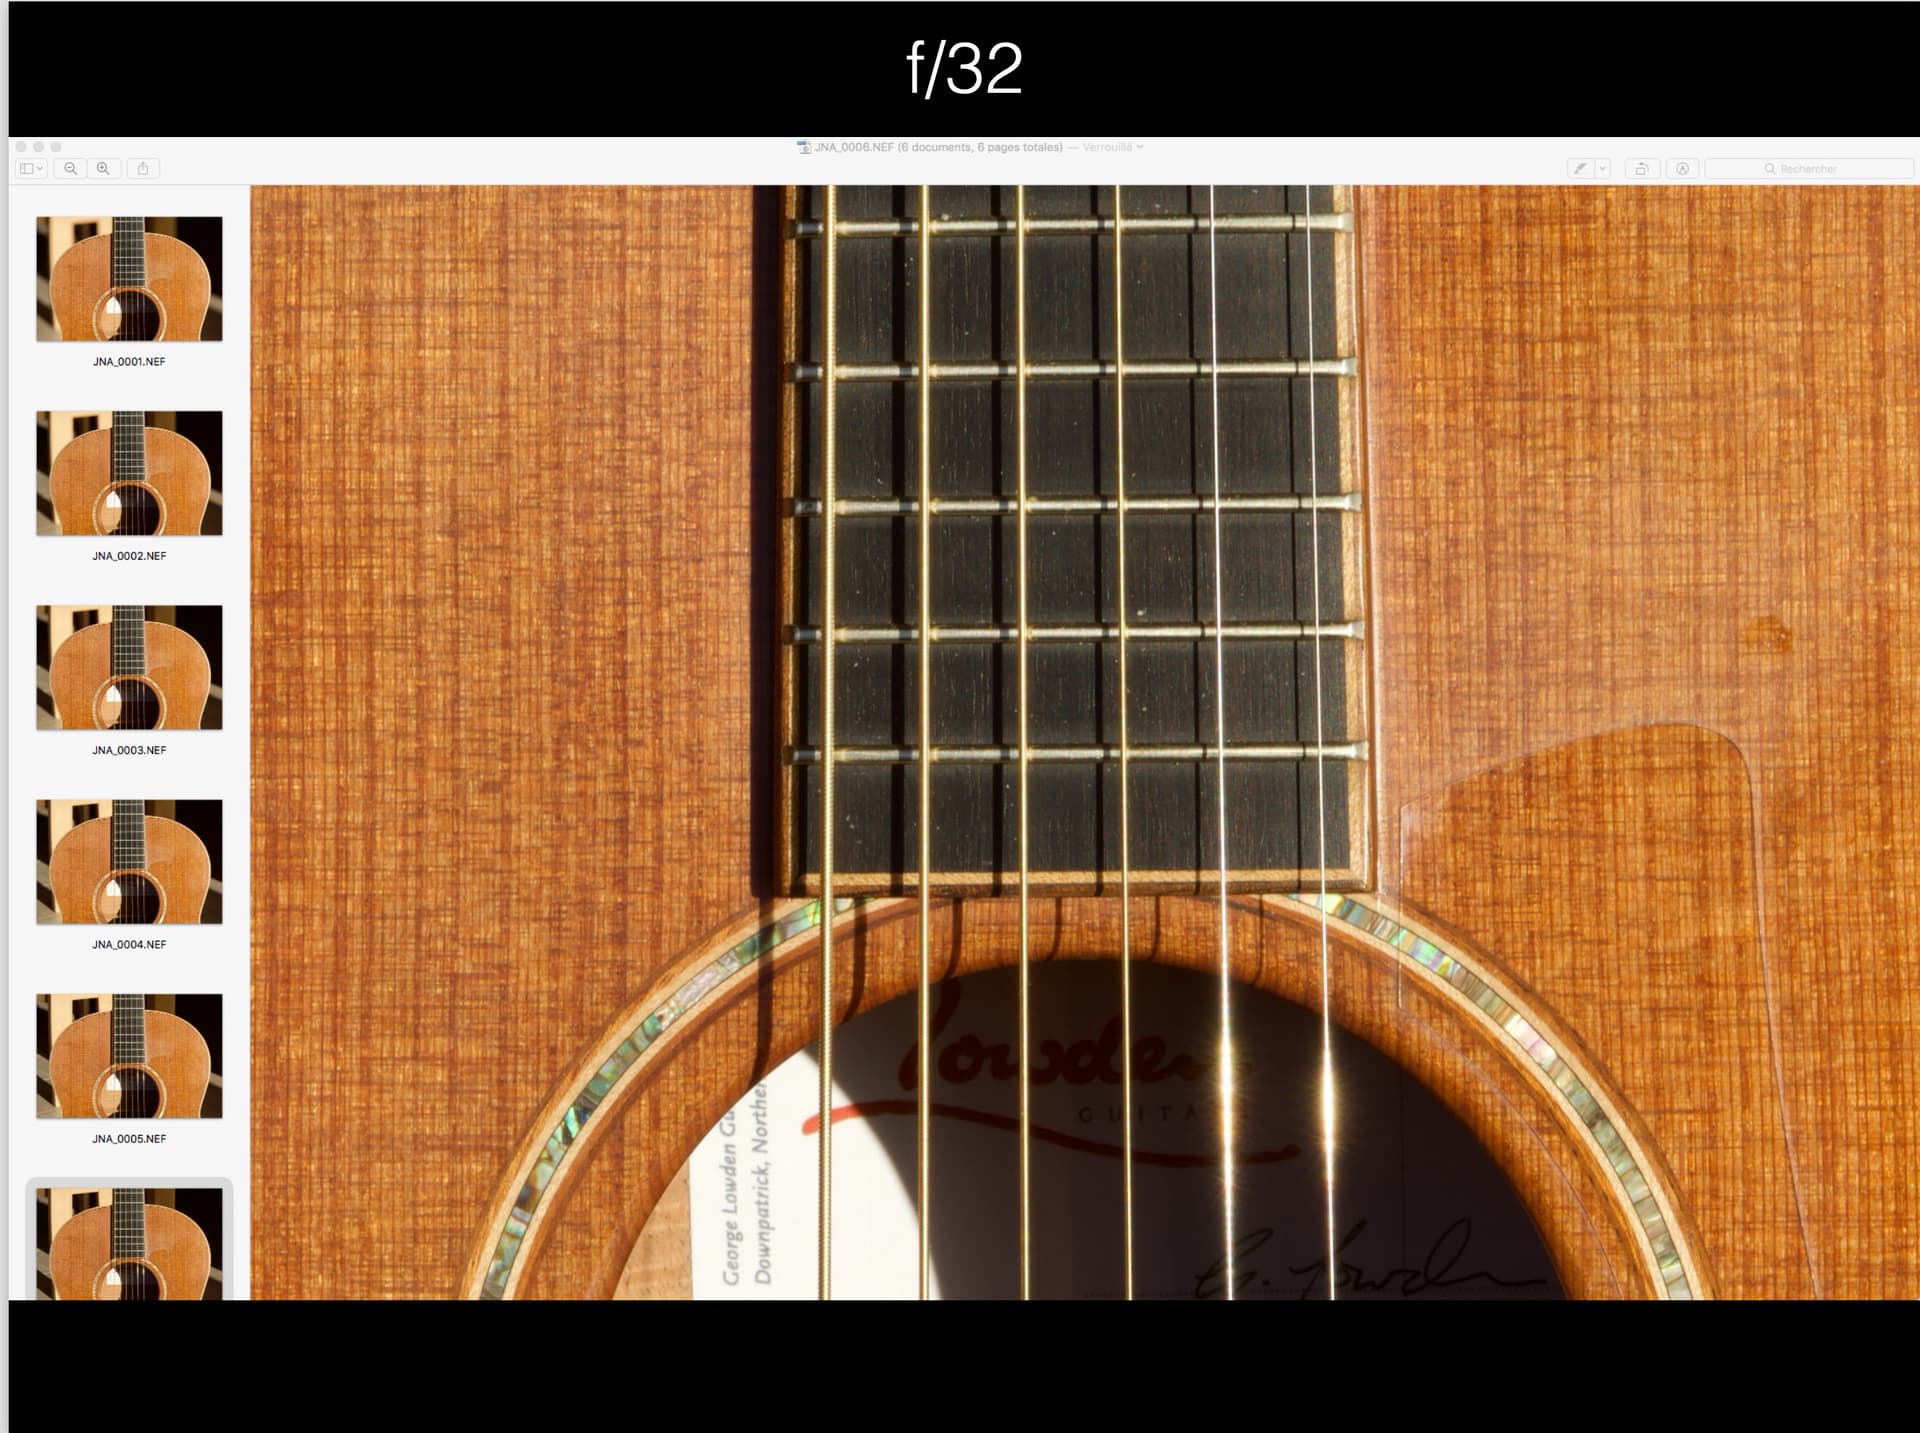
Working with LF is very difficult when you have to scan a 5" x 4" negative at a size that will divide by 240ppi, in order to get a large enough print. But one thing that is easy, is when you can set the aperture to f/32 without any fear of diffraction and get most from here to infinity in focus. Of course, if the DoF isn’t adequate, then just tilt the lens forwards a little bit and everything is in focus, even at larger apertures.

The main reason I bought the Nikon D850 is for its high resolution that makes it possible to create similarly large prints. But unless I spend a small fortune on a T/S lens, I have to rely on hyperfocal distance to get everything in.

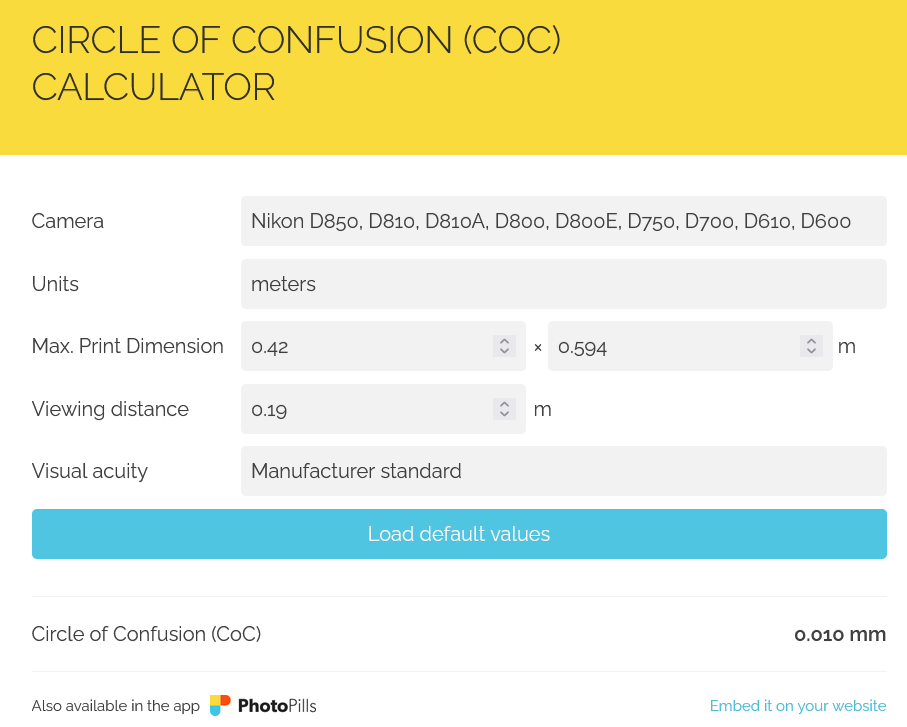
At which point, I had to discover how I could get the maximum sharpness out of a conventionally focused lens, without diffraction affecting it too much. The answer was to use the optimum available aperture and I stumbled across George Douvos’ app, which made life so simple.

Although I have read and digested George’s articles and have a reasonable understanding of what he is talking about, I can simply dial in the maximum blur spot diameter I am willing to tolerate and get all the figures straight away.

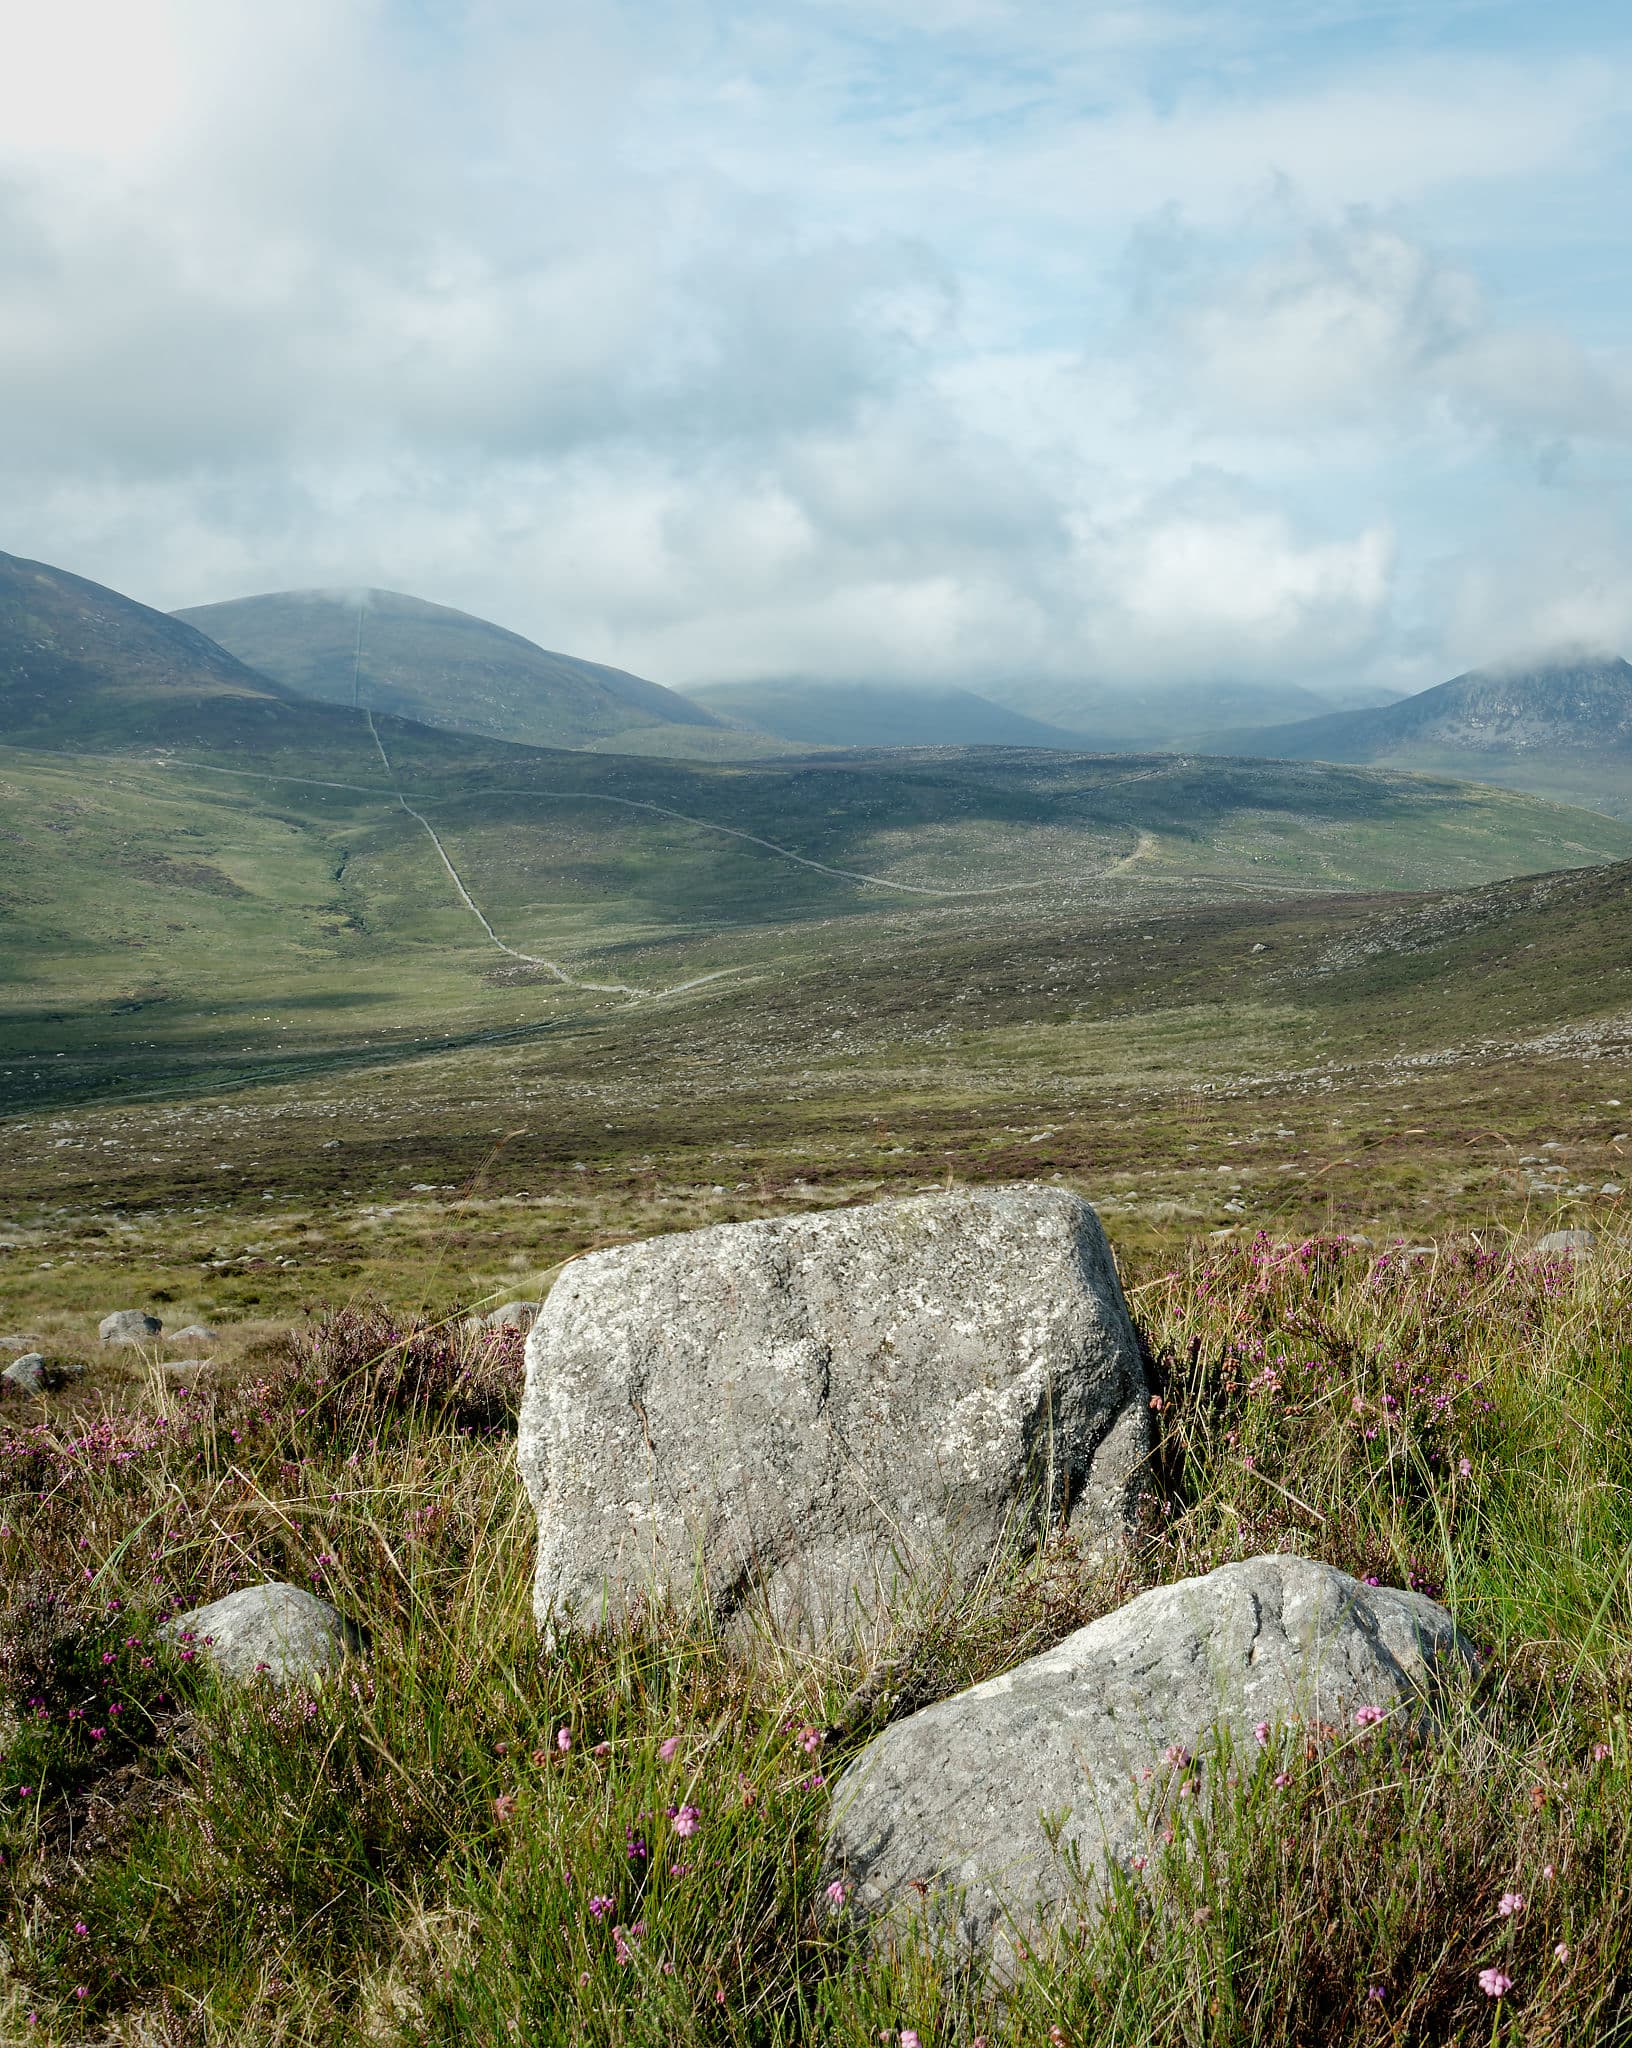
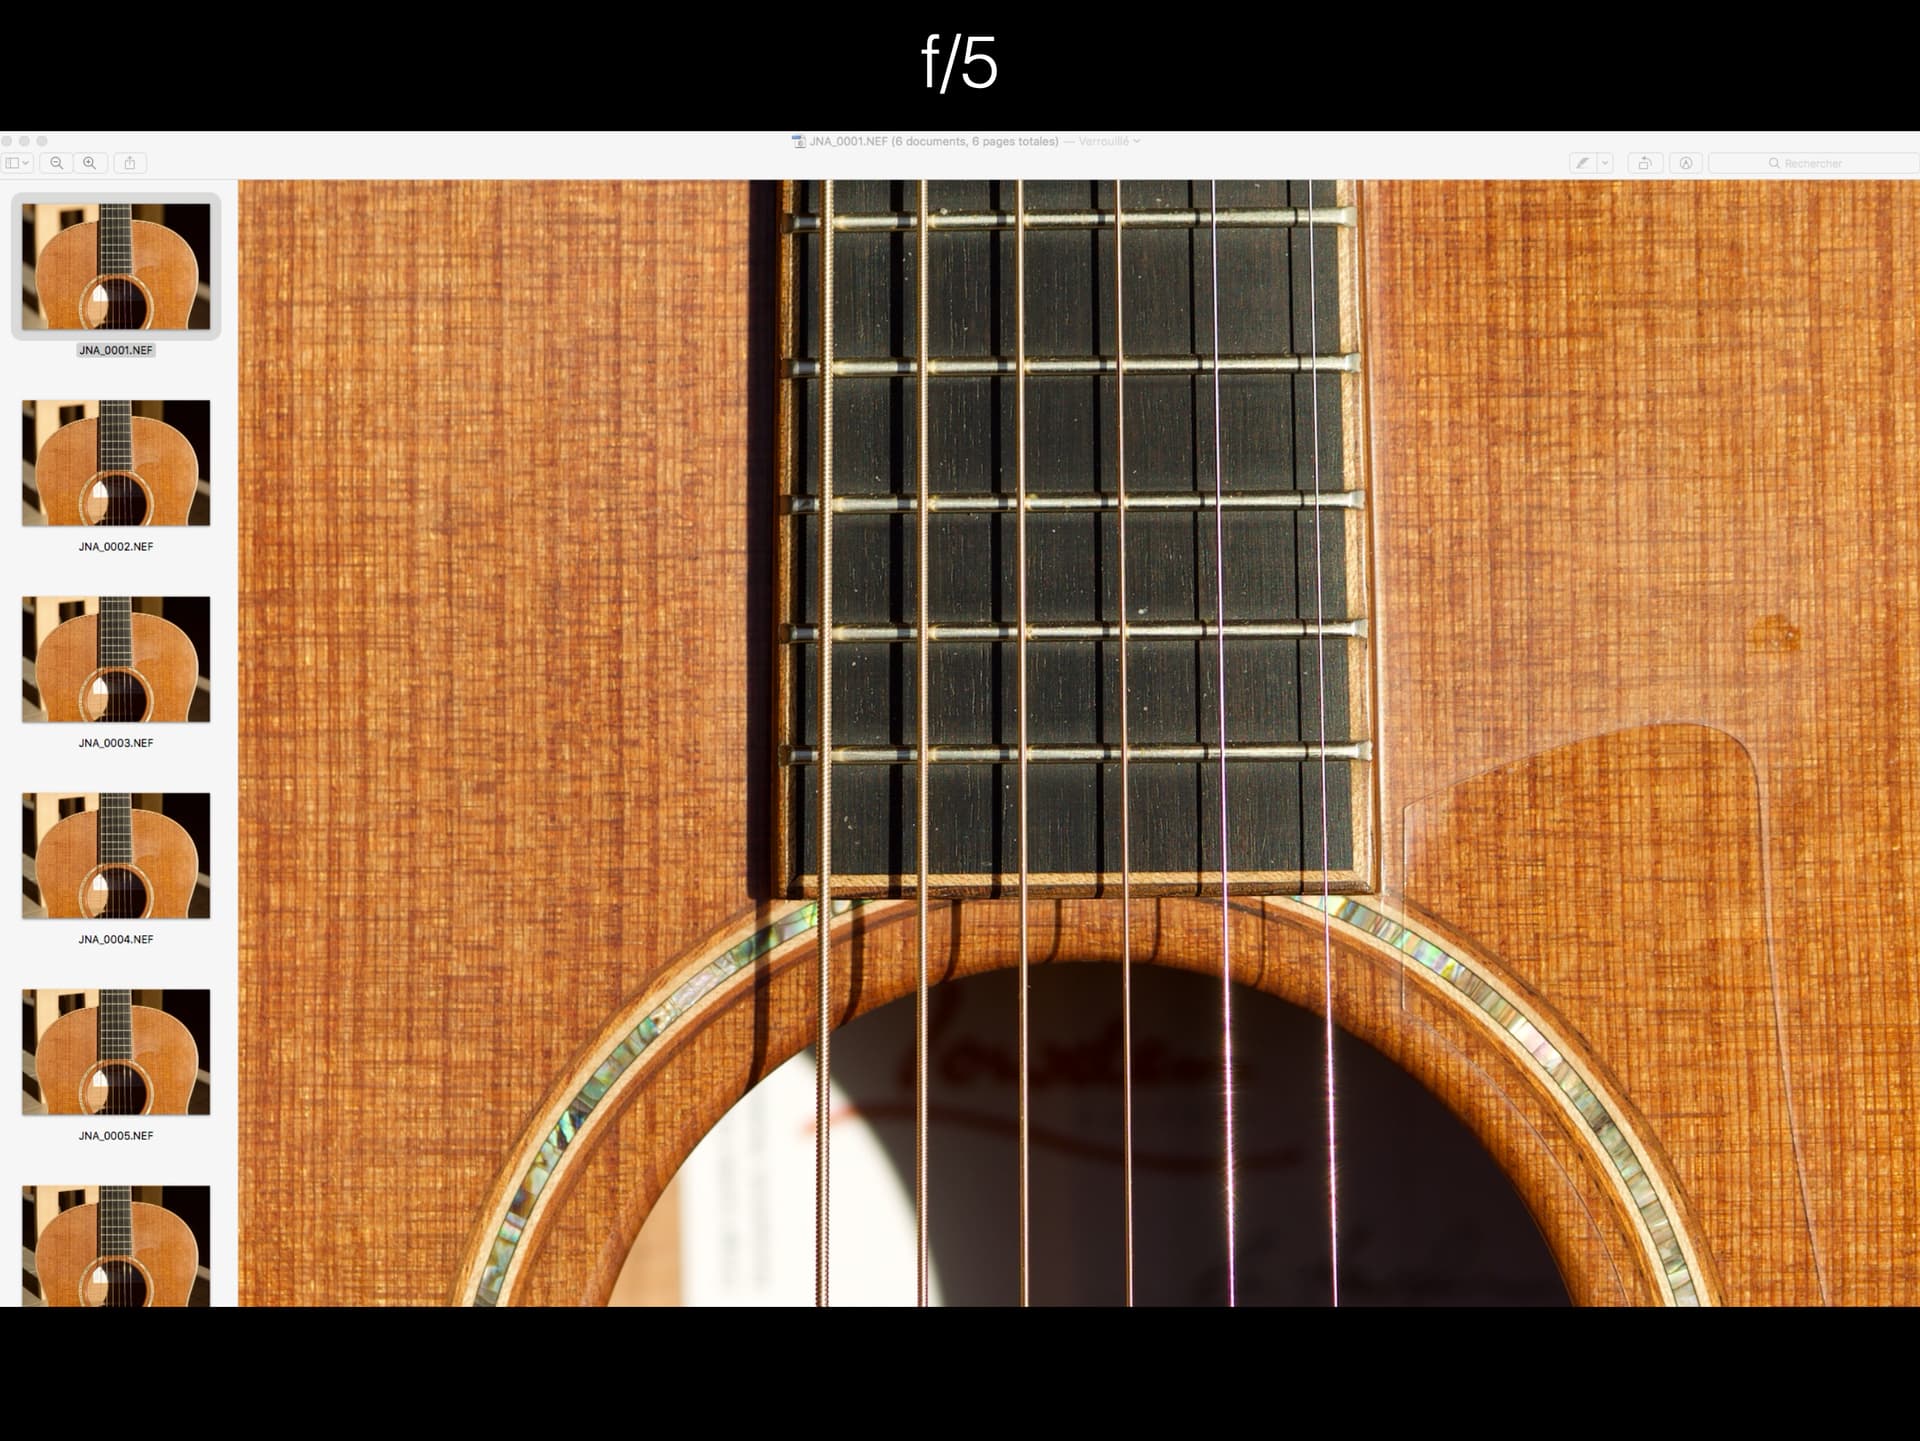
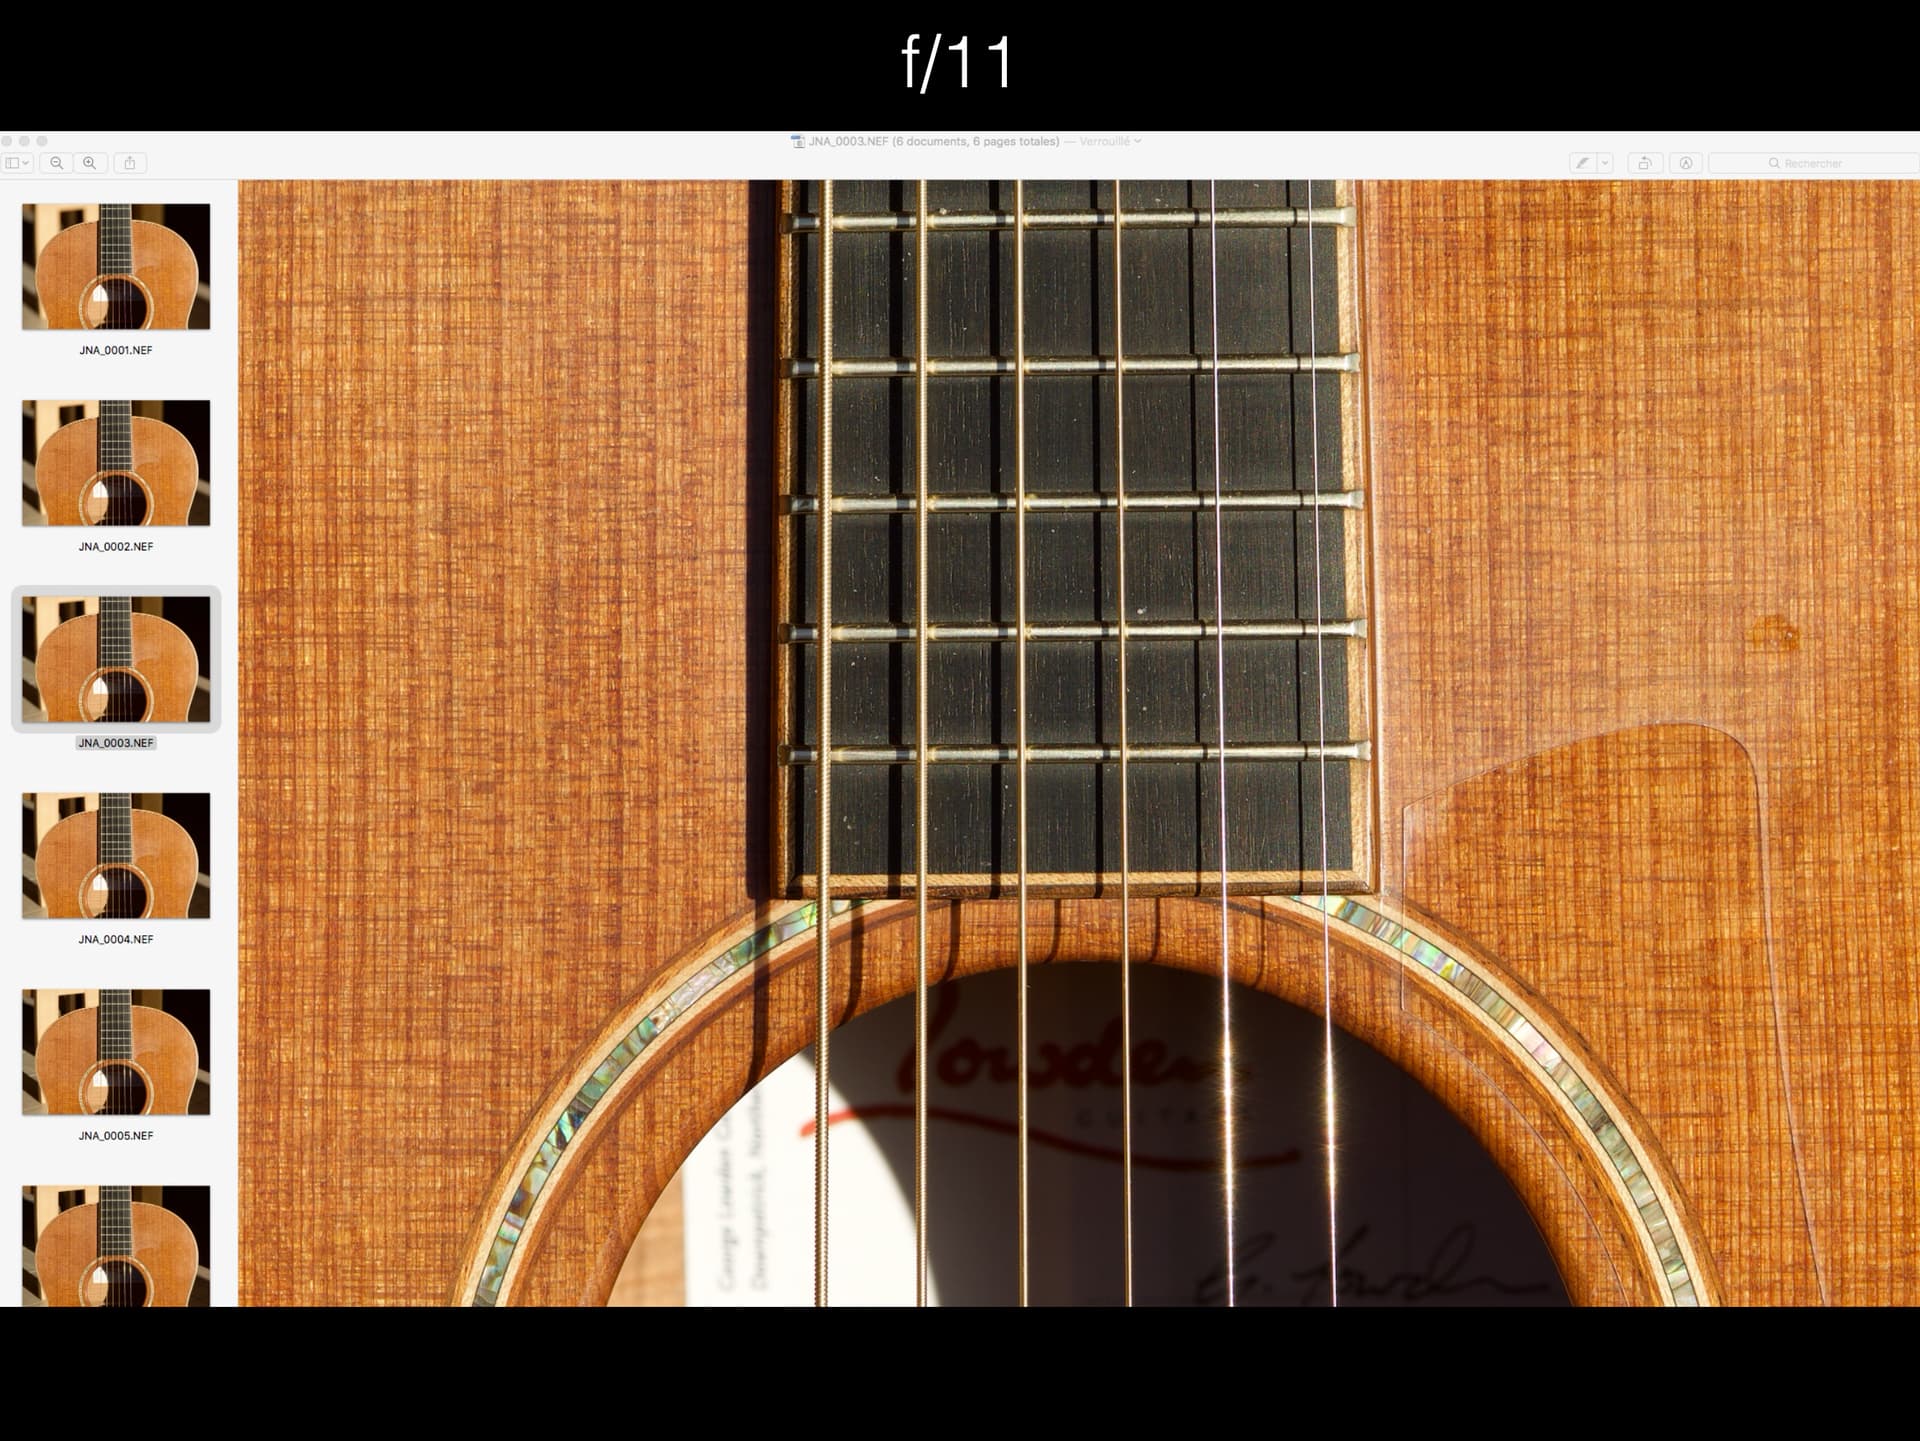
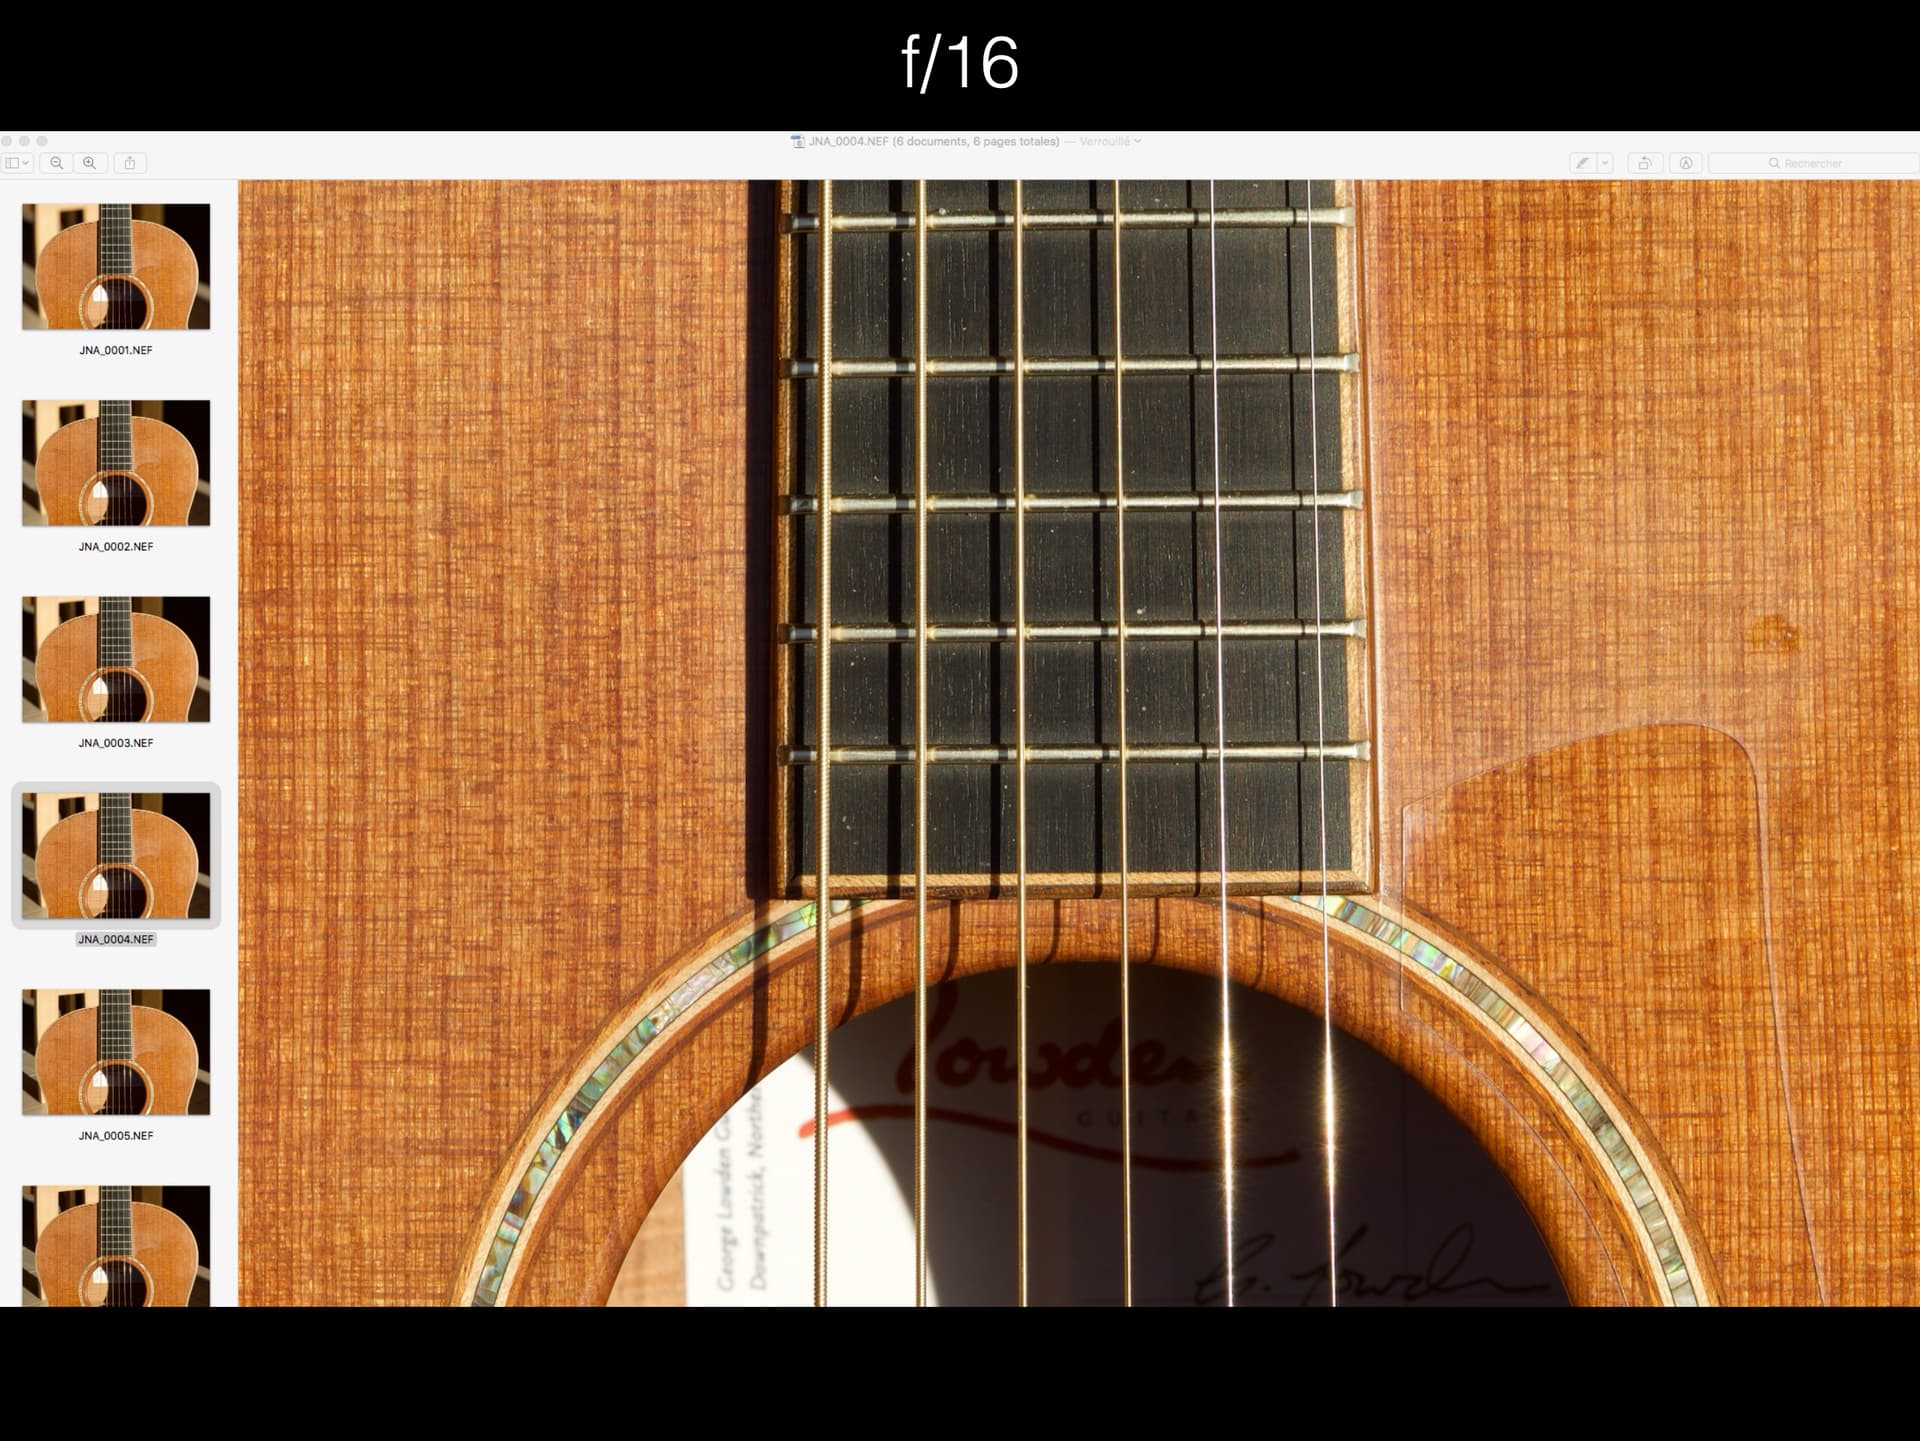
And, as I said before, the proof of the pudding has been in the eating. I have large prints from my LF camera, printed on a Lambda printer, on the wall and I have similarly large inkjet prints from my D850 on a Canon PRO-1000. Until I got a grip on George’s methodology, the results used to be fairly similar in sharpness for fine detail. But, as soon as I started limiting the blur spot diameter, thus causing me to avoid any aperture smaller than f/10, even though the ultimate aperture could be f/5 (which was unworkable), I found my prints were coming out better than I ever thought possible, especially when compared to prints from LF film.

Of course, I am more than likely the OCD one with a screw loose and folks are entitled to settle for whatever blur spot/CoC size they want so, without wanting to be at all rude, and not to dismiss what you have put forwards, that others might find interesting, I find what you are talking about to be to be irrelevant to my work because, based on the results I have been getting, I appear to have “found a better way”. :grinning:


And, yes, the folks who view my prints are only too prone to press their noses up against the image to see just how far the detail goes. I should know, as some of those prints are hanging in my house and I am the one who is constantly looking for perfection. :crazy_face:

1 Like

And here I am just getting to grips with f stop and ISO and thinking the Canon Pro 300 printer is great. A long way still to go to get to your level of knowledge. :roll_eyes: :roll_eyes: :roll_eyes: :roll_eyes:

It is great, for up to A3+ prints. It is certainly better than most similar printers, at least, to my mind. Canon’s B&W mode produces simply stunning results that are hard to distinguish from darkroom prints.

And, if I may suggest exporting correctly sized TIFFs and using Canon’s Print and Layout software, rather than using an app’s print dialog.

I don’t understand what a T/S lens has to do with this. I only know a higher resolution, sensel size, demands a higher quality lens.

I’ve my doubts about his explanations. He’s confusing 2 different concepts. I think PhotoPills is lots better.
https://www.photopills.com/calculators/coc

George

Hi Alan,

Here’s my quick little edit of your photo, nothing too drastic with the adjustments as I’ve tried to keep the look quite authentic. Thanks for the opportunity to play :slight_smile:

When you tilt a lens, it changes the field of acceptable sharpness from a vertical “sandwich” of soft | sharp | soft, to a “wedge” of acceptable sharpness, which emanates from the hinge point, where the film plane and lens plane meet and projects forwards, getting taller as it goes. This obviates the need to think of DoF in the conventional sense as everything from the camera to infinity can be sharp, even at very large apertures.

From what I can see, he is concentrating on calculating for digital sensors and may be using the term “Blur Spot Diameter” to differentiate from using a term that started in the film era.

Whatever the reason, for me, the biggest takeaway is that twice the sensor pixel pitch determines the smallest point that can be recorded as a point rather than a blur. Something that then makes basing perception of sharpness on the rendering on an 8x10 print at arm’s length defunct.

I can only repeat - since restricting my smallest aperture to f/10, my prints are markedly sharper on distant objects when compared with smaller apertures.

Here is a series of slides I made for a lecture…

Note how the “flare” (which can only be caused by diffraction and not DoF) on the strings is almost the same between f/5 and f/8, increases only slightly between f/8 and f/11, but much more strongly for f/16.

It’s a case of finding the balance between blur due to lack of depth of field and that caused by diffraction and, from practical experimentation rather than calculation, I’d rather stick with Mr Douvos’ explanations as, to quote Apple, “they just work” :grinning:

That’s about the sharpness. The dof is a total different concept.


[/quote]

What he calls blur spot diameter is nothing else as the CoC. It looks like Mike Meyers is showing up, using his own thermology.
What you’re doing here by setting that to 10 micron is just using a CoC meant for your phone, under the 4/3" sensor anyway.

I used PhotPills CoC calculator for a A2 print. The viewing distance for your selection is 19cm!

I think the result is just the opposite when using a T/S lens. Your focal plane isn’t parallel to the sensor anymore. But I never tried one.

George

Well, it is. On my series of guitar strings, the DoF totally enclosed the strings. But, despite that, the increasing blur that you see is down to diffraction.

And that is where using the pixel pitch as the basis for avoiding diffraction comes in.

From a DoF point of view, there was no more that could be done to obtain more sharpness - there is no focus blur. But, as the aperture got smaller, diffraction took over and started adding back diffraction blur, thus “re-softening” the small details.

Not the opposite. It’s just that DoF is determined based on the Scheimpflug principle. This article discusses it Scheimpflug principle - Wikipedia

@alan_m after all that complicated “stuff”, can I reassure you that, by using only f/11, you were actually capturing more “pop” in the distance :smiley:

Joanna had probably in mind her 28–300mm f/3.5–5.6G superzoom lens on a full frame camera D850, which is sharpest at f/8–f/11 indeed.

For M.Zuiko ED 12-40mm f/2.8 PRO (4/3" lens), the edge–to–edge sharpness sweet spot is said to be in the f/4–f/5.6 range, depending on the focal length. It’s also said by some, that f/11 is still usable, while others would strongly disagree.

Beware, that most lens sharpness reviews are done only for short focus distances and do not take into account software processing, so it’s reasonable to “learn” your camera/lens/software in real life situations. Some lenses exhibit noticeable rendering differences for various focus distances, like my Nikon macro 105 or 24-70 zoom.

I don’t see how a T/S lens can be of any help to gain a larger dof. Even looking at your link it’s the opposite.

I don’t see how that helps with avoiding diffraction. Diffraction is a physical property of the lens and is dependent of the the size of the top angle of that light beam. If that becomes visible depends on the used diafragma and the sensel size.

One remark on choosing a CoC. That CoC has only a meaning when the sensor size and the print size are known. Your calculator is still standardized for a A4 print viewing at arm length. Your sensor size is FF and the there by belonging CoC is 0.03. Choosing a CoC of 0.01 is choosing a sensor size below the 4/3" and a print size of still A4. If you are happy with it, ok. But the argumentation is wrong.

@Wlodek
I agree. Most zoom lenses have there best quality on the short and about 2 stops above the lowest. This is not a hard rule. I used to use opticallimits.com, the former photozone.de.
For me it is also important the difference between the sharpness in the middle and on the boarders.

George

Then you didn’t understand the principles behind tilt. If you tilt the lens board on an LF camera far enough, the plane of sharp focus can be made to be virtually horizontal and it extend from just under the camera to infinity.

Then the region of acceptable focus (DoF) becomes a wedge, that gets taller, the further away it gets from the camera…

Does that explain it better?

If that is how you choose to explain it, then fine. I will repeat, yet again, whatever terms you use, all I can say is that “it just works” for me and delivers images that are sharper at the extremes of the DoF than by using smaller apertures based on 30µm.

Basing blur spot diameter solely on sensor size is to ignore the added detail that using pixel pitch gives.

And, by the way, from experimentation, on a full frame sensor, 10µm gives an aperture of f/5, which is far to restrictive for landscapes, which is why I use 20µm and settle for an aperture of f/10 as a compromise.

But, don’t just take my word for it, look up the pixel pitch for your sensor and calculate DoF based on a CoC twice that size. And, if that DoF is too restrictive, experiment like I did until you find the minimum real world possible CoC for your circumstances.

You might be surprised :wink:

It doesn’t show the used F-nr. A lot of the foreground is out of focus. Compare this drawing with another having the same focal length and f-nr.

As I wrote. But the only thing you’re doing is to use a wider aperture compared with ‘correct’ selecting.

That’s what my program I showed here was showing.
If you say you’re using a blur of 2 pixels, you don’t have a dof at all. It is the focus point itself. Dof deals with the part before and after it. How far is that Circle of Confusion within the limits to see it as sharp when printed on a specific size and from a specific distance.

George

This is a diagram from a technical document, written by Harold Meklinger, not from a calculator. And, on a 5" x 4" camera, defocus blur is a lot less important, even without tilt.

For example, with a 90mm focal length, using 100µm as a “CoC”, the DoF, at hyperfocal distance and an aperture of f/51, extends from 1.17m to infinity without diffraction.

Getting more of the foreground sharp is achieved by changing the tilt angle. The focal length and aperture are irrelevant.

With tilt, one can happily get away with f/32 to get the entire height of a tall building within the wedge of DoF… Wider apertures could result in horizontal bands of defocus blur at the top and bottom of the image, which would cut across the building.

But this is all based on using an LF camera, which has much more accuracy due to the larger dimensions. If you have never used tilted lenses, then it is going to be hard for you to understand “angular” DoF, because it is so different to “flat” DoF


If you say so, but what I do have, using 8.7µm based on my camera, is a minimum aperture of f/4.5, which is a useful DoF in certain circumstances. For example, at hyperfocal distance of 19.4m, I have a DoF from 9.7m to infinity, with minimal diffraction


Maybe I need to say that small apertures incur diffraction blur in addition to defocus blur.

If we ignore diffraction, then your calculations are plenty good enough but, when I am dealing with very large prints, every tiny bit of sharpness is critical and it is diffraction blur that can make that critical difference.

Take another look at my series of guitar strings. They are completely in focus and within the specified DoF for the selected aperture. But, if you look at the f/32 image…

… which has enough DoF to include the label inside the guitar body, you will see that the strings, which although they are on the line of focus, are blurred. This is diffraction blur, which, at too small an aperture, effectively reduces the sharpness of the image, even though everything is well within the DoF.

Once again Joanna Meyers.
Your dof calculator is just a dof calculator as any other dof calcuator using the same formulas, only another thermology for the CoC.
The CoC is based on the sensor size, the print size and a viewing distance. The dof is based on that CoC and the used f-nr, focal length and focus distance.

Back to the calculator. You first have to select what sensor you use. And here you’re going wrong. You think you choose a blur circle, that’s not true. You choose a sensor size with the according CoC for an A4 print.
Further you’ve to select a f-nr. Choosing a f-nr gives you the dof limits for that chosen sensor size.
Your dof calculator is showing the CoC suggesting that that is the value you chosed. That’s wrong. It should show you the chosen sensor size.
Now you use your FF or LF camera. By selecting another sensor size you get wrong dof values. So if you choose 0.1 for your D850 the shown dof is wrong.
Unless there’s another screen where you can choose the sensor size and overrule the normal CoC. I didn’t find it. For me it’s impossible to select a CoC without a sensor size.

George

Joanna Meyers? Was that just a mistake or was it sarcasm?

Mark

Sarcasm.

George

A statement which makes it obvious you haven’t either read or understood George Douvos’ articles.

In case you can’t bothered to read all of them, here is an excerpt from one of them…

Now, I know, the traditional way of doing things is to see depth of field as one thing, and diffraction as another. In traditional depth of field talk, it is assumed that there is no diffraction and that stopping down will always result in greater depth of field, no matter how large the f-number. Diffraction is seen as something separate — something that adds its own effects to every part of the image and become increasingly troublesome at large f-numbers. There is, of course, absolutely nothing that is technically incorrect with that approach. The problem with it is that it is difficult to use: You treat depth of field as a geometrical construct that ignores diffraction, but have to tell yourself that you can’t trust that construct when the f-number gets too large because, really, you shouldn’t be ignoring diffraction. But at what f-number do you suspend trust? And by how much do you compensate for that lack of trust? How sharp will your image actually be? No, it’s not easy. Is it not better to do the calculations properly in the first place?

What I have presented here and in my apps is, in essence, a redefinition of depth of field. By this definition, the region of acceptable sharpness is determined by the combined effects of defocus and diffraction. This is not only more realistic, but also much easier to use. What’s not to like?

It’s particularly important to do the calculations properly now that sensors with high resolving power are increasingly coming on the market. When using a high quality sensor, and when intending to view your images at large sizes, you’d be crazy to stick to a sharpness criterion as large as 30 microns. Remember the curve for the shot at f/11? Here it is again, and again we show the depth of field if we are happy to accept blurs in our image as large as 30 microns. Immediately below that graph is another one showing what depth of field we would have at f/11 if we want no blurs larger than 25 microns.

This article is concise and will remain as my final reply on the matter. Basically, standard CoC is not sufficient for my needs. I need to know the exact point at which diffraction starts to affect image sharpness. With standard calculators, working with CoC based on sensor size, I have to make a best guess at the aperture size that suits my image. With a calculator that is based on pixel pitch, I no longer have to guess because it takes diffraction into account.

Please don’t bother to “correct” what you think to be faulty thinking. I have too much experience of the added quality George Douvos’ methods bring to my prints and that is all that matters.


Since Joanna Meyers doesn’t exist in this forum and Mike’s name is Myers, I couldn’t dare to guess :grinning: :crazy_face: :rofl: